Steps in pipelines
Types of steps in Codefresh pipelines
Codefresh pipelines are composed of a series of steps.
You can create your own pipelines by writing a codefresh.yml file that describes your pipeline. This file can then be version controlled on its own (pipeline as code).
Built-in step types
Codefresh offers the following step types:
-
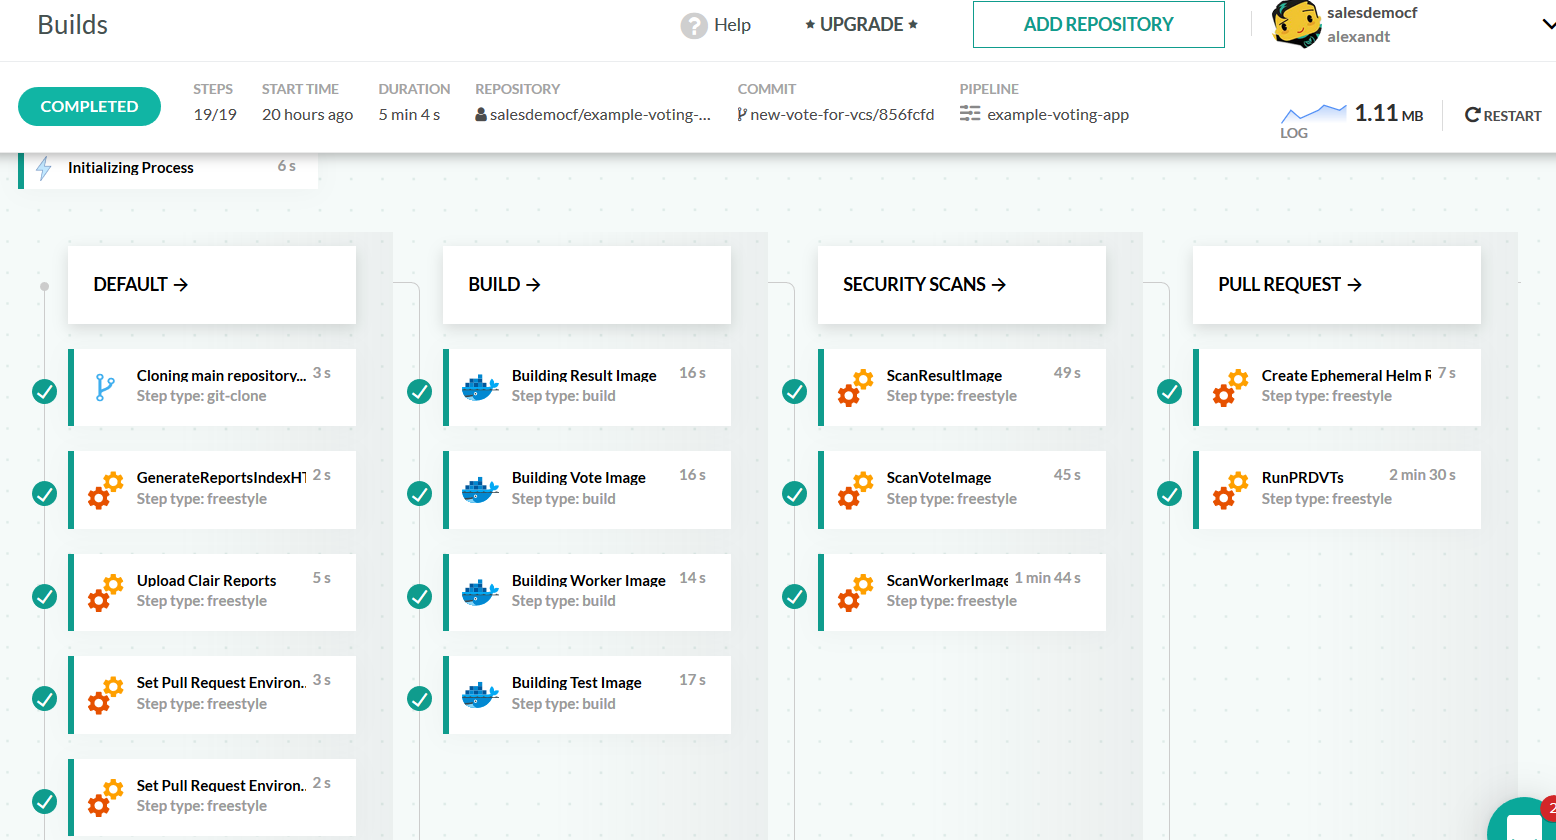
Git clone
Git clone steps allow you to checkout code in your pipeline from any internal or external repository. Existing accounts that still use repositories instead of projects have an implicit clone step in the pipelines. -
Freestyle
Freestyle steps are the cornerstone of Codefresh pipelines. They allow you to run any command within the context of a Docker container. A lot of Codefresh optimizations such as the shared docker volume are designed specifically for freestyle steps. Freestyle steps are a secure replacement fordocker runcommands. -
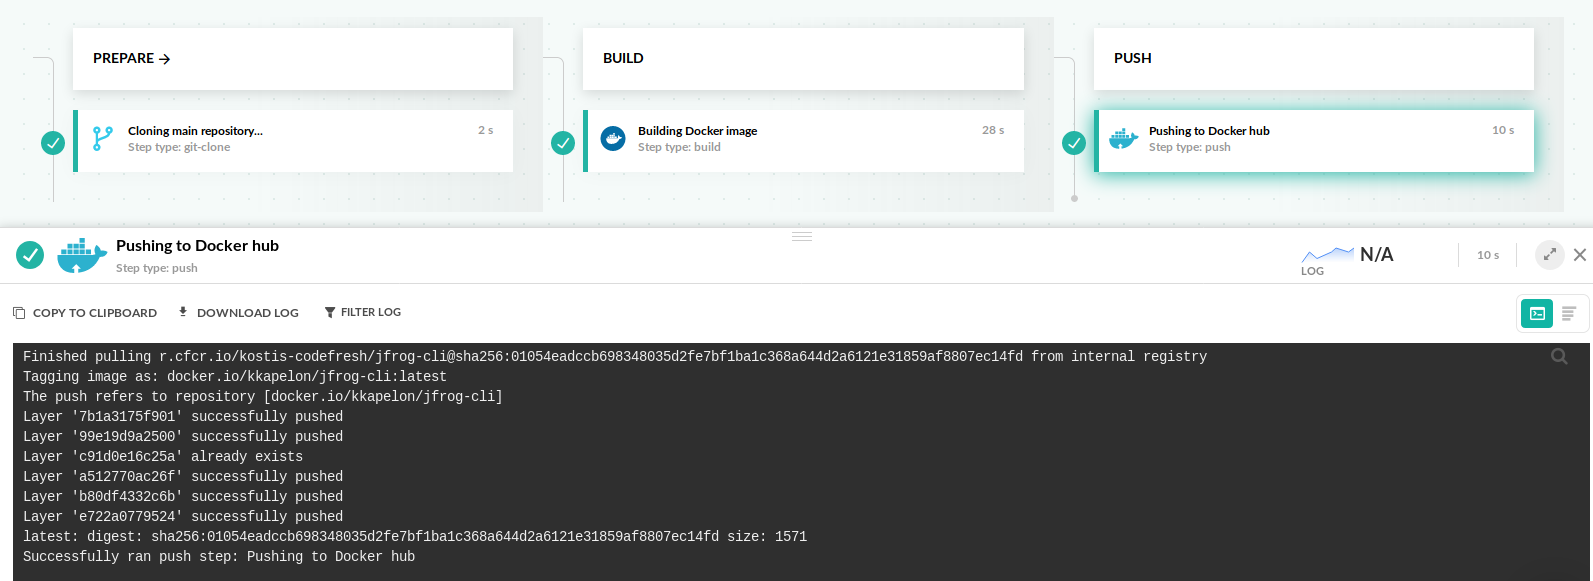
Build
Build steps are the main way where you get access to the Docker daemon (Docker as a service) in Codefresh pipelines. Build steps take as input any Dockerfile and run it on the cloud in a similar manner to what you do on your workstation. Build steps automatically push the result to the default Docker registry of your account (no need for docker login commands). Codefresh also comes with a global Docker cache that automatically gets attached to all build nodes. Build steps are a secure replacement fordocker buildcommands. -
Push
Push steps allow you to push and tag your docker images (created by the build step) in any external Docker registry. Push steps are not needed at all if you work with only the internal Codefresh registry. Push steps are a secure replacement for thedocker taganddocker pushcommands. -
Composition
Composition steps allow you to run multiple services together in the Codefresh infrastructure and execute unit tests or other commands against them. They are discarded once a pipeline finishes. Composition steps are a secure replacement fordocker-composedefinitions. -
Launch test environment
Launch test environment steps behave similar to compositions, but they persist after the pipeline ends. This is a great way to create preview environment from your pull requests and send to colleagues. -
Deploy
Deploy steps allow you to perform Kubernetes deployments in a declarative manner. They embody the Continuous Deployment aspect of Codefresh. -
Approval
Approval steps allow you to pause pipelines and wait for human intervention before resuming. They allow you to embrace the concepts of Continuous Delivery.
NOTE
Codefresh also supports parallel workflows, as well as running pipelines locally on your workstation.
Step directory
For freestyle steps, we also offer a plugin Marketplace with several existing plugins for popular integrations.
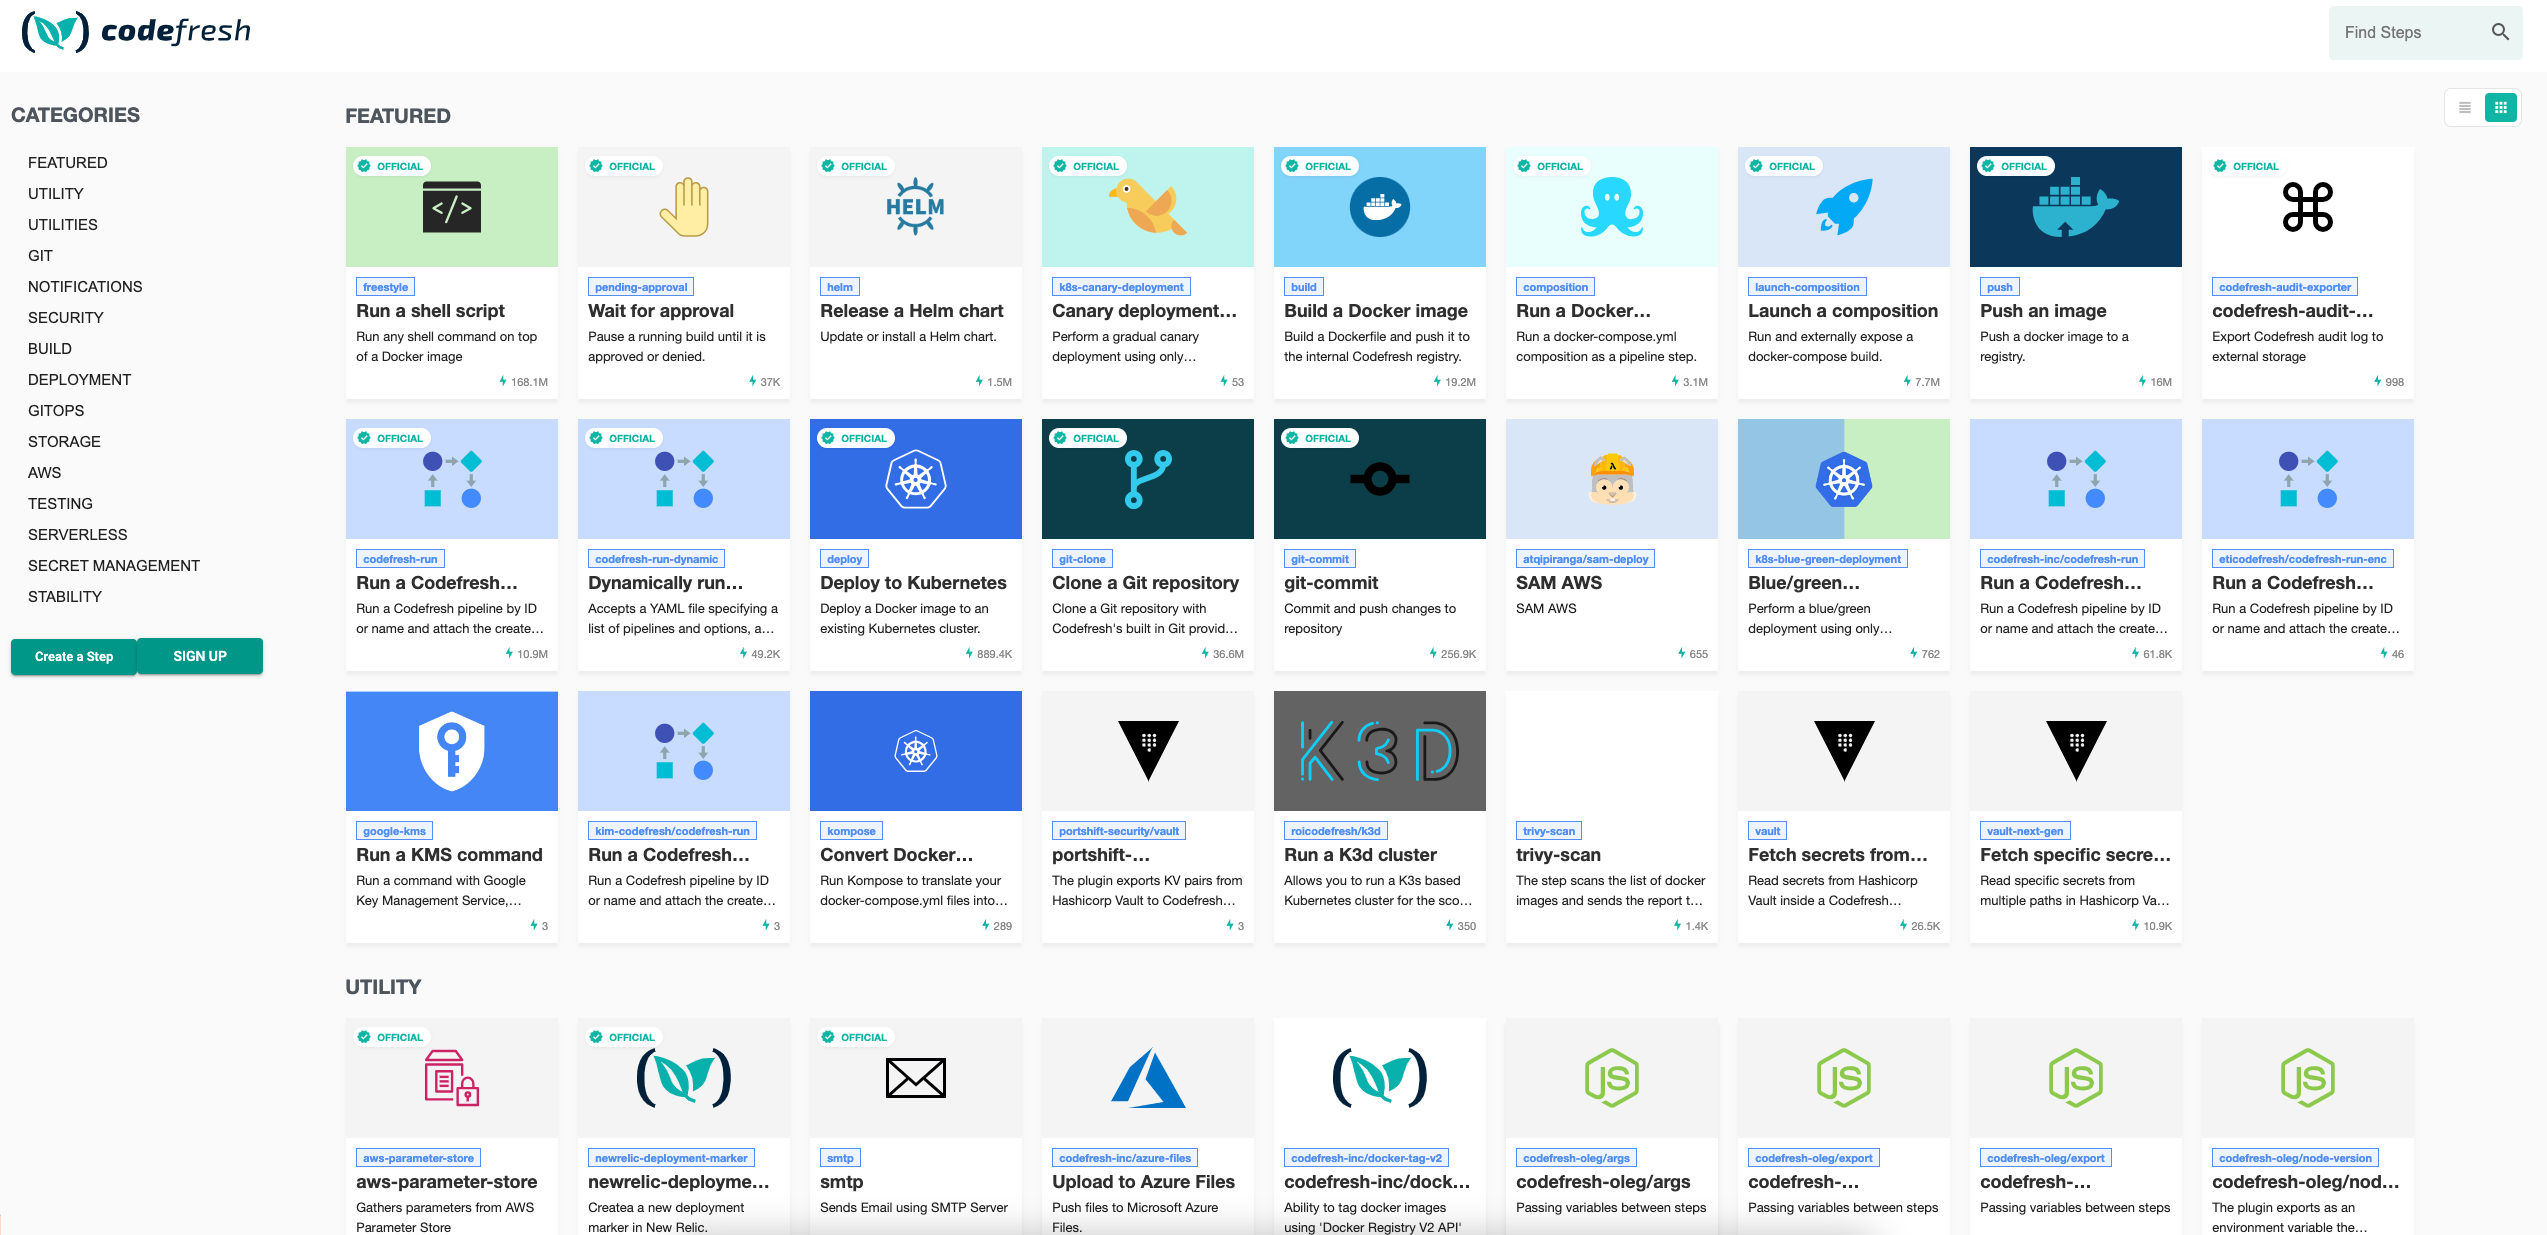
Codefresh steps can be:
- Private (visible only to you and your team) or public (visible to everybody via the Marketplace)
- Official (supported by the Codefresh team) or community based
- Ready for production or still in incubation
In your pipelines, you can use any of the public steps already in the Marketplace, any steps created by your team, and any steps that you create for yourself.
Using custom pipeline steps
When you create a pipeline, you will have access to two categories of steps:
- Public steps that exist in the marketplace
- Steps that you or your team have created (visible only to you)
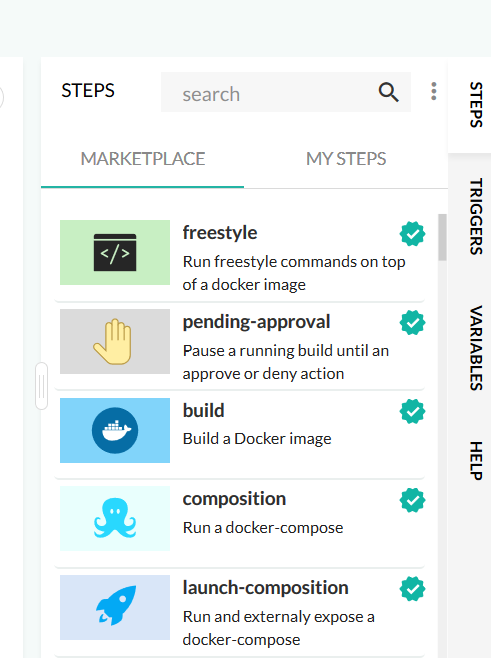
To use a step, first click in the section of the pipeline where you want to insert the step. You will get a new dialog with all the details of the step along with a live preview of the exact YAML that will be inserted in your pipeline.
For all steps you can define:
- The title of the text (which will also be visible in the pipeline UI)
- A freetext description
- The stage that will contain the step
The rest of the fields are specific to each step. See the documentation of each step in order to understand what each field should contain. There are fields for each step that are marked as required and are essential for the step to work. These are marked with an asterisk.
Once a step is added to the pipeline, you are fee to change the resulting yaml even further by just typing in the pipeline editor.
Creating your own step
There are two ways to create custom steps in Codefresh. The simplest way is to package an existing CLI tool into a Docker image and use it as a freestyle step. The more advanced way is creating a typed step with explicit input and output parameters.
Here is a summary on the two ways:
| Custom freestyle step | Codefresh typed plugin | |
|---|---|---|
| Assets needed | A Docker image | A Docker image and a plugin manifest |
| Knowledge required | Docker building/pushing | Docker and Codefresh CLI |
| Step can be used | In any Docker based CI/CD platform | In Codefresh |
| Effort required | Minimal | Medium |
| Distribution via | Dockerhub | Codefresh marketplace |
| Input variables | Yes | Yes |
| Output variables | No | Yes |
| Versioning via | Docker tags | Manifest entry |
| Grouping of multiple steps | No | Yes |
| Marketplace entry | Not possible | Possible/optional |
| Best for sharing steps | with your team/company | with the world |
We suggest that you start with custom freestyle steps first, and only create typed plugins once you are familiar with Codefresh pipelines or want your plugin to appear in the marketplace.
Creating a custom freestyle step
As an example let’s say that you need to use the JFrog CLI in a pipeline in order to interact with Artifactory or Bintray. JFrog does not offer any Docker image that contains the CLI and you already know that all Codefresh steps are actually Docker images.
Therefore you can easily package the CLI into a Docker image and then make it available to any Codefresh pipeline that wishes to use it. First you create a Dockerfile that packages the CLI:
Dockerfile
FROM debian:stable-slim

WORKDIR /jfrog-cli

ENV DEBIAN_FRONTEND noninteractive

RUN apt-get update && apt-get install -y curl && rm -rf /var/lib/apt/lists/*

RUN curl -fL https://getcli.jfrog.io | sh

ENV JFROG_CLI_OFFER_CONFIG false
ENV BINTRAY_LICENCES MIT

RUN /jfrog-cli/jfrog bt config --licenses $BINTRAY_LICENCES

RUN ln -s /jfrog-cli/jfrog /usr/local/bin/jfrog

CMD ["/jfrog-cli/jfrog"]
This is a standard Dockerfile. There is nothing specific to Codefresh in the image that gets created.
You can test this Dockerfile locally with:
docker build . -t jfrog-cli
docker run jfrog-cli
In a similar manner you can package any other executable and its dependencies. You could even just package curl with an external URL that hosts the service that you want to interact in a Codefresh pipeline.
Once the Dockerfile is ready, you need to push it to Dockerhub. You can either do it manually from your workstation, but it is best if you actually create a Codefresh pipeline that does it for you.
Now that the image is ready and public you can notify your team that the new plugin is ready. Everybody who wants to interact with JFrog Bintray and/or Artifactory can place the following snippet in a pipeline:
codefresh.yml
version: '1.0'
steps:
  run_frog_cli:
    title: Running jfrog CLI inside Docker
    image: kkapelon/jfrog-cli
    commands:
      - jfrog bt --help
      - jfrog rt --help
You can then customize the exact command(s) that you want to run with the tool. All capabilities of freestyle steps are possible, such as passing environment variables as input parameters.
codefresh.yml
version: '1.0'
steps:
  run_frog_cli:
    title: Running jfrog CLI inside Docker
    image: kkapelon/jfrog-cli
    commands:
      - jfrog bt package-show google/tensorflow/tensorflow
    environment:
      - BINTRAY_USER=my-user
      - BINTRAY_KEY=my-secret-key
If you want to use multiple versions of the step in the same pipeline, you can just create different docker tags. Notice that you can also use a private registry instead of Docker Hub if you wish your step to be used only within your organization.
Creating a typed Codefresh plugin
You can use the step-type resource in the Codefresh CLI to create your own typed step.
Every Codefresh step is composed of two parts:
- The step description in the special YAML syntax for describing Codefresh steps
- A Docker image that implements the step (optional)
The easiest way to create your own step is to start by using the definition of an existing step.
codefresh get step-type vault -o yaml > vault-step.ymlHere is the resulting yaml:
vault-step.yml
version: '1.0'
kind: step-type
metadata:
  name: <codefresh_account_name>/<step_name>
  isPublic: false
  description: >-
    The plugin exports KV pairs from Hashicorp Vault to Codefresh pipeline ENV
    variables
  sources:
    - 'https://github.com/codefresh-io/steps/tree/master/incubating/vault'
  stage: incubating
  maintainers:
    - name: Alexander Aladov
  categories:
    - featured
  official: false
  tags: []
  icon:
    type: svg
    url: 'https://cdn.jsdelivr.net/gh/codefresh-io/steps/incubating/vault/icon.svg'
    background: '#f4f4f4'
  examples:
    - description: example-1
      workflow:
        version: '1.0'
        steps:
          Vault_to_Env:
            title: Importing vault values
            type: vault:0.0.7
            arguments:
              VAULT_ADDR: '${{VAULT_ADDR}}'
              VAULT_PATH: '${{VAULT_PATH}}'
              VAULT_AUTH_TOKEN: '${{VAULT_AUTH_TOKEN}}'
              VAULT_CLIENT_CERT_BASE64: '${{VAULT_CLIENT_CERT_BASE64}}'
              VAULT_CLIENT_KEY_BASE64: '${{VAULT_CLIENT_KEY_BASE64}}'
  created_at: '2019-07-03T14:57:02.057Z'
  updated_at: '2019-09-18T08:15:28.476Z'
  latest: true
  version: 0.0.1
  id: 5d1cc23ea7e22e40227ea75d
spec:
  arguments: |-
    {
        "definitions": {},
        "$schema": "http://json-schema.org/draft-07/schema#",
        "type": "object",
        "additionalProperties": false,
        "patterns": [],
        "required": [
          "VAULT_ADDR",
          "VAULT_PATH",
          "VAULT_AUTH_TOKEN"
        ],
        "properties": {
            "VAULT_ADDR": {
                "type": "string",
                "description": "Vault server URI. Example: https://vault.testdomain.io:8200 (required)"
            },
            "VAULT_PATH": {
                "type": "string",
                "description": "Path to secrets in vault. Example: secret/codefreshsecret (required)"
            },
            "VAULT_AUTH_TOKEN": {
                "type": "string",
                "description": "Vault authentication token (required)"
            },
            "VAULT_CLIENT_CERT_BASE64": {
                "type": "string",
                "description": "Base64 encoded client cerificate"
            },
            "VAULT_CLIENT_KEY_BASE64": {
                "type": "string",
                "description": "Base64 encoded client key"
            }
        }
    }
  steps:
    main:
      name: vault
      image: codefreshplugins/vault
      environment:
        - 'VAULT_ADDR=${{VAULT_ADDR}}'
        - 'VAULT_PATH=${{VAULT_PATH}}'
        - 'VAULT_AUTH_TOKEN=${{VAULT_AUTH_TOKEN}}'
        - 'VAULT_CLIENT_CERT_BASE64=${{VAULT_CLIENT_CERT_BASE64}}'
        - 'VAULT_CLIENT_KEY_BASE64=${{VAULT_CLIENT_KEY_BASE64}}'
For each step, you define the following sections:
- Metadata to describe the characteristics of the step
- The description of its arguments
- The implementation (i.e. which yaml gets inserted in the pipeline)
Metadata section in step
Note the following:
isPublicdecides if this step is visible only to your and your team, or visible to all (in the Marketplace)- The
nameof the step must be prefixed with your Codefresh account name. Steps created by the Codefresh team are at the root level of the hierarchy, without a prefix. This is the same pattern that Dockerhub uses for images. stageshown if this step is ready for production or still in incubation. This is just an indication to users. It doesn’t affect the implementation of the step in any way.icon. Ideally you provide a transparent .SVG so that the icon is scalable. The icon for a step is used both in the Marketplace as well as in the pipeline view. You can also select a default background to be used. Alternatively, you can define jpg/png icons for large/medium/small sizes. We suggest the SVG approach.- The
versionproperty allows you to update your plugin and keep multiple variants of it in the Marketplace. - The
examplessection will be shown in the Marketplace as documentation for your step.
Argument section in step
We follow the JSON Schema. You can use the Schema generator to easily create a schema. JSON schema is used for arguments, that is, input parameters, as well as output parameters as we will see later on.
The property additionalProperties defines how strict the plugin will be with its arguments.
You can set it to either false or true:
false, which is usually what you want, fails the pipeline will fail if the plugin is given more arguments that it is expecting.true, the plugin will only use the arguments it understands and will ignore the rest.
Implementation section of step
The final part is the step implementation. Here you can define exactly the YAML that this step will insert in the pipeline. You can use any of the built-in steps in Codefresh, and even add multiple steps.
NOTE
Currently you cannot nest custom pipeline steps. We are aware of this limitation, but at the time of writing you cannot use a typed step within another typed step.
Once you are done with your step, use the Codefresh CLI to upload it to the marketplace. If you want the step to be available only to you and your team make sure that the property isPublic is false (and then it will not be shown in the marketplace).
codefresh create step-type -f my-custom-step.ymlIf you make further changes to your step you can update it:
codefresh replace step-type -f my-custom-step.ymlIf you want to remove your step from the marketplace, you can delete it completely:
codefresh delete step-type kostis-codefresh/sampleVersioning for typed steps
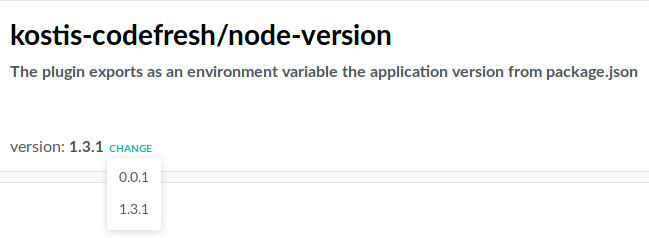
The version property under metadata in the plugin manifest allows you to publish multiple releases of the same plugin in the marketplace. Codefresh retains all previous plugins and users are free to choose which version they want.
To create a new version of your plugin:
- Update the
versionproperty undermetadatain your custom YAML. - Run:
codefresh create step-type -f custom-plugin.yamlYou will now be able to see the new versions of your plugin in the step Marketplace drop-down:
You can also use the Codefresh CLI to list all versions:
codefresh get step-types kostis-codefresh/sample --versionsTo delete a specific version, use:
codefresh delete step-type 'account/plugin:<version>'Note that Codefresh step versions function like Docker tags in the sense that they are mutable. You can overwrite an existing plugin version with a new plugin manifest by using the codefresh replace step-type command.
Latest plugin version for typed steps
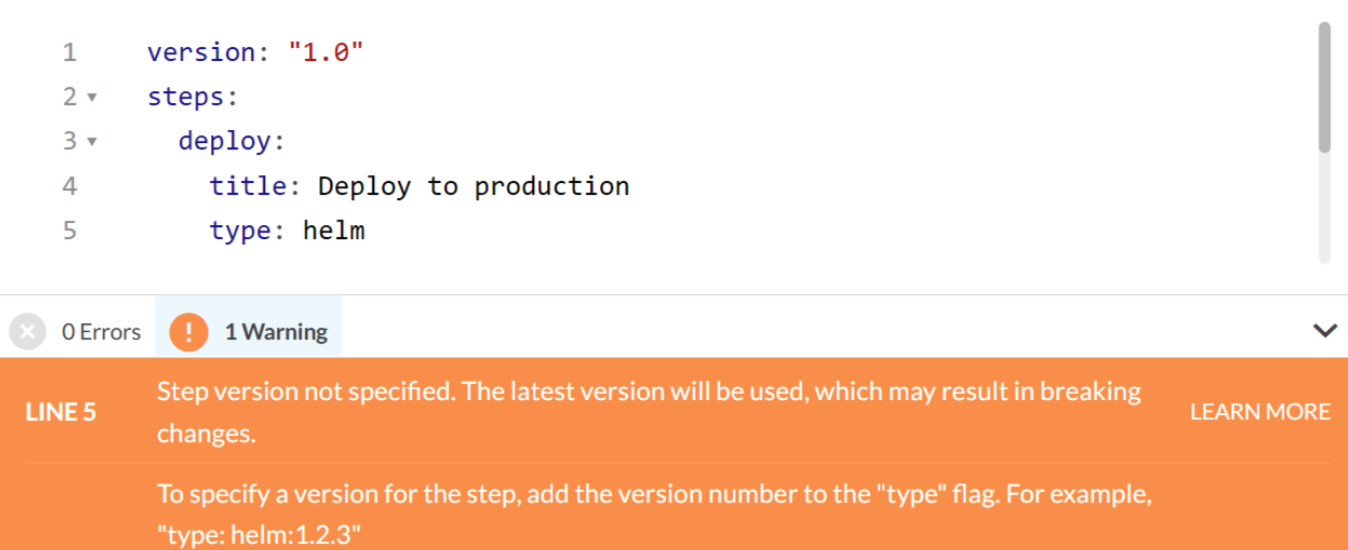
If you do not define an explicit version for the plugin, the latest version (according to semantic versioning) will be used. You can also use different versions of the same plugin within the same pipeline.
These typed steps do not require a version number: pending-approval, github-action, parallel, and services.
codefresh.yml
version: '1.0'
steps:
  my_step_1:
    title: Running old custom step
    type: kostis-codefresh/sample:1.2.1
  my_step_2:
    title: Running new custom step
    type: kostis-codefresh/sample:1.3.5
TIP
If your pipeline includes typed steps without corresponding version numbers, Codefresh issues a warning as assigning the latest version can introduce breaking changes and fail the pipeline.
Example with input parameters
Let’s create a very simple step called node-version. This step will read the application version from a NodeJS project and expose it as an environment variable. This way we can use the application version later in the pipeline, for example to tag a docker image.
Here is the respective step YAML.
plugin.yml
version: '1.0'
kind: step-type
metadata:
name: kostis-codefresh/node-version
isPublic: false
description: >-
The plugin exports as an environment variable the application version from package.json
sources:
- 'https://github.com/kostis-codefresh/step-examples'
stage: incubating
maintainers:
- name: Kostis Kapelonis
categories:
- utility
official: false
tags: []
icon:
type: svg
url: https://cdn.worldvectorlogo.com/logos/nodejs-icon.svg
background: '#f4f4f4'
examples:
- description: example-1
workflow:
version: '1.0'
steps:
main_clone:
title: Cloning main repository...
type: git-clone
repo: 'my-github-user/my-github-repo'
revision: 'master'
git: github
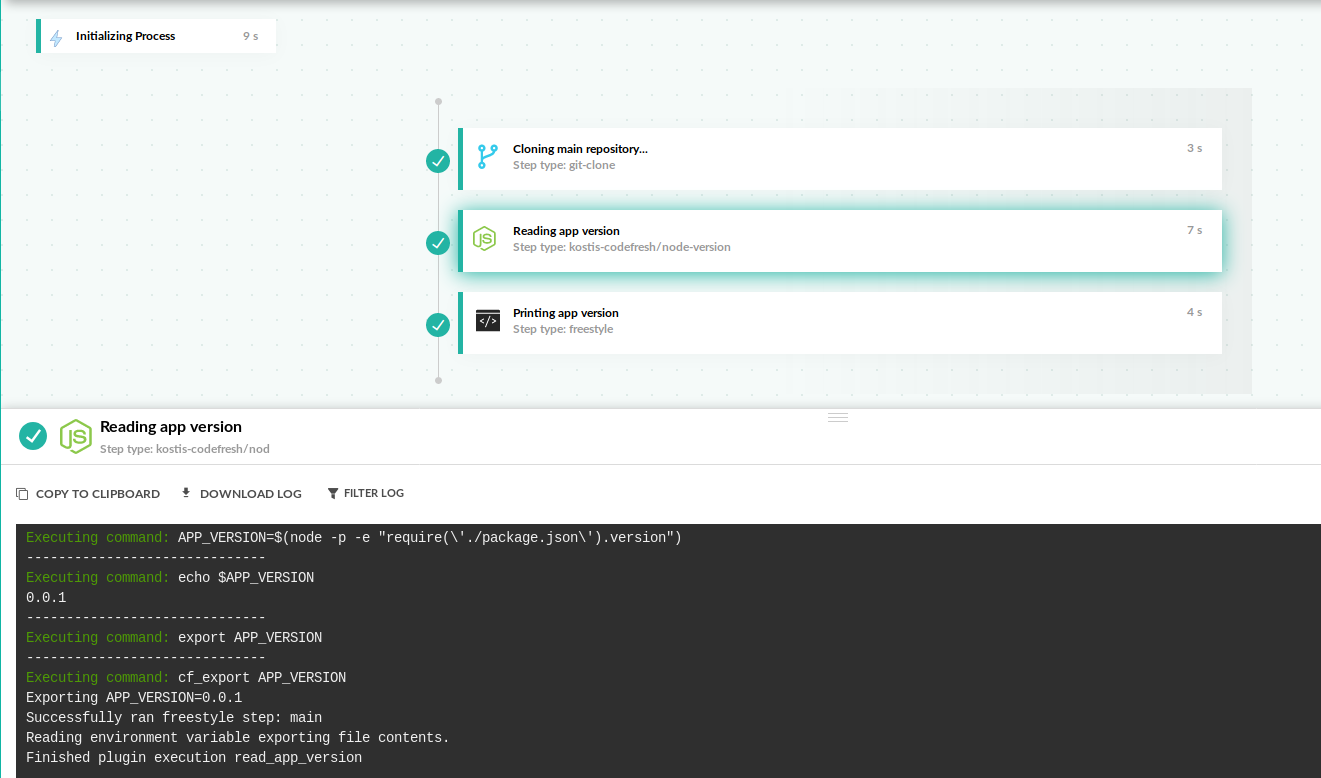
read_app_version:
title: Reading app version
type: kostis-codefresh/node-version
arguments:
PACKAGE_JSON_FOLDER: './my-github-repo'
print_app_version:
title: Printing app version
image: alpine
commands:
- echo $APP_VERSION
latest: true
version: 1.0.0
spec:
arguments: |-
{
"definitions": {},
"$schema": "http://json-schema.org/draft-07/schema#",
"type": "object",
"additionalProperties": false,
"patterns": [],
"required": [
"PACKAGE_JSON_FOLDER"
],
"properties": {
"PACKAGE_JSON_FOLDER": {
"type": "string",
"description": "folder where package.json is located"
}
}
}
steps:
main:
name: kostis-codefresh/node-version
image: node
commands:
- cd $WORK_DIR
- pwd
- APP_VERSION=$(node -p -e "require('./package.json').version")
- echo $APP_VERSION
- export APP_VERSION
- cf_export APP_VERSION
environment:
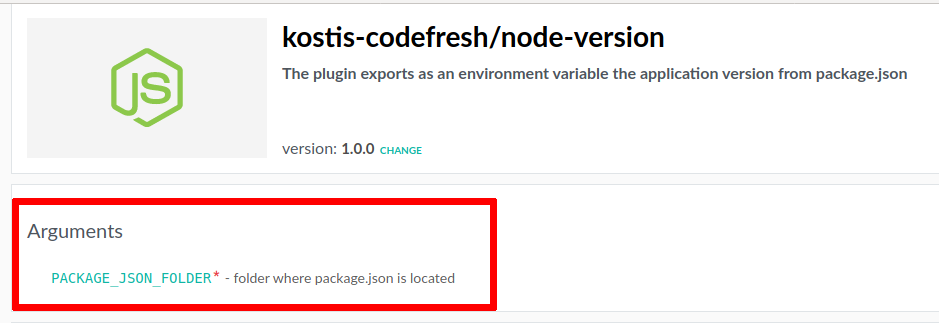
- 'WORK_DIR=${{PACKAGE_JSON_FOLDER}}'If you look at the spec section you will see that the plugin expects a single parameter called PACKAGE_JSON_FOLDER. This will
be passed by the plugin user to specify the folder that contains the package.json file. This way this plugin can be used for multiple applications. For example, the plugin user might check out 3 different Node.js projects and use the plugin to read the versions of all of them.
The plugin implementation is specified in the steps sections. We use the standard Node Docker image to read the version from the package.json file. Notice how we convert the plugin argument to an environment variable called WORK_DIR
By default all plugins start with the Codefresh volume at /codefresh/volume as a working folder. So with the cd command we enter the project folder (which we assume was checked out in a previous pipeline step). Once the version is read it is made available to all the other pipeline steps with the cf_export command.
We now insert our plugin in the marketplace with the following command:
codefresh create step-type -f read-app-version.ymlThe step is now ready to be used by anybody.
An example user pipeline is shown at codefresh.yml.
codefresh.yml
version: '1.0'
steps:
  main_clone:
    title: Cloning main repository...
    type: git-clone
    repo: 'codefreshdemo/example_nodejs_postgres'
    revision: 'master'
    git: github
  read_app_version:
    title: Reading app version
    type: kostis-codefresh/node-version
    arguments:
      PACKAGE_JSON_FOLDER: './example_nodejs_postgres'
  print_app_version:
    title: Printing app version
    image: alpine
    commands:
      - echo $APP_VERSION
This is a very simple pipeline that checks out a NodeJS project and uses our plugin. Notice how we pass as argument the required parameter example_nodejs_postgres to tell the plugin where our package.json file is located. Once the plugin runs the application version is available as an environment variable that we can use in other steps as APP_VERSION.
The input parameter is also shown as required in the Marketplace.
This is a trivial example, but is still shows how Codefresh pipeline can be declarative while actually doing a lot of imperative actions behind the scenes.
Example with output parameters
In the previous example our plugin had an output parameter (APP_VERSION) that is created by the custom step and given back to the user. Even though creating an output parameter using only cf_export will work just fine in the technical level, it is best to formally define output parameters in the step definition.
If you define output parameters in the step definition their names will appear on the marketplace and users will have an easier time understand what your step produces. You will be able to define complete JSON objects in addition to output strings. Formal output parameters are also available under a special notation (step.outputs) that we will explain in this example.
We suggest you always formalize your output parameters in your step definition, especially when your step has a large number of output parameters.
The same JSON Schema is also used for output parameters as with input ones. Here is a very simple example {:target=”_blank”} that shows the different types of output parameters you can have.
plugin.yml
version: '1.0'
kind: step-type
metadata:
name: kostis-codefresh/output-parameters-example
isPublic: false
description: >-
The plugin shows how you can export output parameters
sources:
- 'https://github.com/kostis-codefresh/step-examples'
stage: incubating
maintainers:
- name: Kostis Kapelonis
categories:
- utility
official: false
tags: []
icon:
type: svg
url: https://cdn.worldvectorlogo.com/logos/bash-1.svg
background: '#f4f4f4'
examples:
- description: example-1
workflow:
version: '1.0'
steps:
dummy_parameters:
title: Creating output parameters
type: kostis-codefresh/output-parameters-example
print_my_variables:
title: Printing dummy content
image: alpine
commands:
- echo $MY_NUMBER
- echo $MY_CITY
- echo $MY_FAVORITE_FOOD
- echo ${{steps.dummy_parameters.output.MY_NUMBER}}
- echo ${{steps.dummy_parameters.output.MY_CITY}}
- echo ${{steps.dummy_parameters.output.MY_FAVORITE_FOOD}}
latest: true
version: 1.0.0
spec:
returns: |-
{
"definitions": {},
"$schema": "http://json-schema.org/draft-07/schema#",
"type": "object",
"additionalProperties": true,
"patterns": [],
"required": [
"MY_NUMBER",
"MY_CITY",
"MY_FAVORITE_FOOD"
]
,
"properties": {
"MY_NUMBER": {
"type": "number",
"description": "an example variable that holds a number"
},
"MY_CITY": {
"type": "object",
"description": "an example variable that holds a JSON object",
"required": ["city_name", "country", "population"],
"properties": {
"city_name": {"type": "string"},
"country": {"type": "string"},
"population": {"type": "integer"}
}
},
"MY_FAVORITE_FOOD": {
"description": "an example variable that holds a number",
"type": "array",
"maxItems": 3,
"items": {
"type": "string"
}
}
}
}
steps:
main:
name: kostis-codefresh/output-parameters-example
image: alpine
commands:
- cf_export MY_NUMBER=42
- cf_export MY_CITY='{"city_name":"San Francisco", "country":"usa","population":884363}'
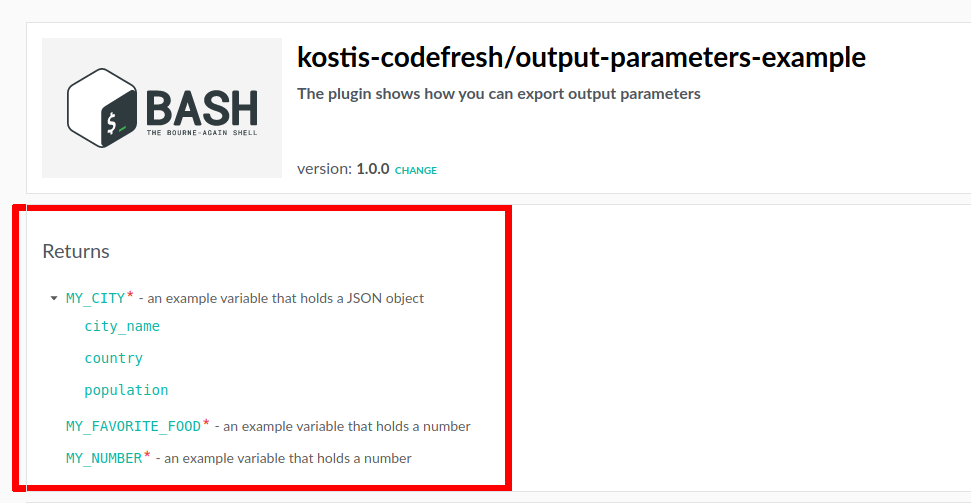
- cf_export MY_FAVORITE_FOOD='["pizza", "ramen", "hot dogs"]'This plugin exports 3 output parameters
MY_NUMBER- a single numberMY_CITY- an object with fieldscity_name,country,populationMY_FAVORITE_FOOD- an array.
Output parameters are defined in the returns block.
The output parameters of the step are now shown in the marketplace so consumers of this plugin know what to expect when they use it.
As can be seen from the examples block, when you have formal output parameters you can also access them by mentioning the specific steps in your pipeline that creates it. The following are two equal ways to use an output parameter in your pipeline:
echo $MY_NUMBER
echo ${{steps.dummy_parameters.output.MY_NUMBER}}
In the case of output parameters that are objects you can also use jq to get specific properties like this:
echo ${{steps.dummy_parameters.output.MY_CITY}} | jq '.city_name'
This will print “San Francisco”.
Example with input/output parameters
Let’s take everything we learned from the previous examples and create a custom step that has
- A custom Docker image
- Formal input parameters
- Format output parameters
In this simple example we will create a custom step that reads the Maven coordinates from a pom.xml file. Unlike package.json, a Maven file has 3 characteristics (group, artifact name and version). First we create a very simple executable that reads a Maven file and gives us these coordinates in JSON format.
mvncoords -f pom.xml
{"groupId":"com.example.codefresh","artifactId":"my-java-app","version":"3.0.2"}
Next, we package this executable in a Dockerfile.
Dockerfile
FROM golang:1.12-alpine AS build_base

WORKDIR /tmp/

COPY . .

# Unit tests
RUN go test -v

# Build the Go app
RUN go build -o ./out/mvncoords .

# Start fresh from a smaller image
FROM alpine:3.9

COPY --from=build_base /tmp/out/mvncoords /usr/local/bin/mvncoords

CMD ["mvncoords"]
We now have a custom Docker image that contains our executable. If we want other people to use it, we need to push it to Dockerhub. You can do this manually from your workstation using docker login and docker push commands, but it is much better to automate this with a Codefresh pipeline.
This pipeline checks out the Dockerfile plus source code, builds the docker image and then pushes it to Dockerhub (so that the image is public).
Finally we are ready to create our Codefresh plugin. Here is the specification:
plugin.yml
version: '1.0'
kind: step-type
metadata:
  name: kostis-codefresh/mvn-version
  isPublic: false
  description: >-
    The plugin exports as an environment variable the mvn coordinates from pom.xml
  sources:
    - 'https://github.com/kostis-codefresh/step-examples'
  stage: incubating
  maintainers:
    - name: Kostis Kapelonis
  categories:
    - utility
  official: false
  tags: []
  icon:
    type: svg
    url: https://cdn.worldvectorlogo.com/logos/java-4.svg
    background: '#f4f4f4'
  examples:
    - description: example-1
      workflow:
        version: '1.0'
        steps:
          main_clone:
            title: Cloning main repository...
            type: git-clone
            repo: 'my-github-user/my-github-repo'
            revision: 'master'
            git: github
          read_app_version:
            title: Reading app version
            type: kostis-codefresh/mvn-version
            arguments:
              POM_XML_FOLDER: './my-github-repo'
          print_app_version:
            title: Printing app coordinates
            image: alpine
            commands:
              - echo $MVN_COORDS
              - echo ${{steps.read_app_version.output.MVN_COORDS}}
  latest: true
  version: 1.0.0
spec:
  arguments: |-
    {
        "definitions": {},
        "$schema": "http://json-schema.org/draft-07/schema#",
        "type": "object",
        "additionalProperties": false,
        "patterns": [],
        "required": [
          "POM_XML_FOLDER"
        ],
        "properties": {
            "POM_XML_FOLDER": {
                "type": "string",
                "description": "folder where pom.xml is located"
            }
        }
    }
  returns: |-
    {
        "definitions": {},
        "$schema": "http://json-schema.org/draft-07/schema#",
        "type": "object",
        "additionalProperties": true,
        "patterns": [],
        "required": [
          "MVN_COORDS"
        ],
        "properties": {
            "MVN_COORDS": {
                "type": "object",
                "required": ["groupId", "artifactId", "version"],
                "properties": {
                    "groupId": {"type": "string"},
                    "artifactId": {"type": "string"},
                    "version": {"type": "string"}
                }
            }
        }
    }
  steps:
    main:
      name: kostis-codefresh/mvn-version
      image: kkapelon/maven-version-extract
      commands:
        - cd $WORK_DIR
        - MVN_COORDS=$(mvncoords -json)
        - export MVN_COORDS
        - cf_export MVN_COORDS
      environment:
        - 'WORK_DIR=${{POM_XML_FOLDER}}'
We place this plugin into the Marketplace with:
codefresh create step-type -f read-maven-version.yml
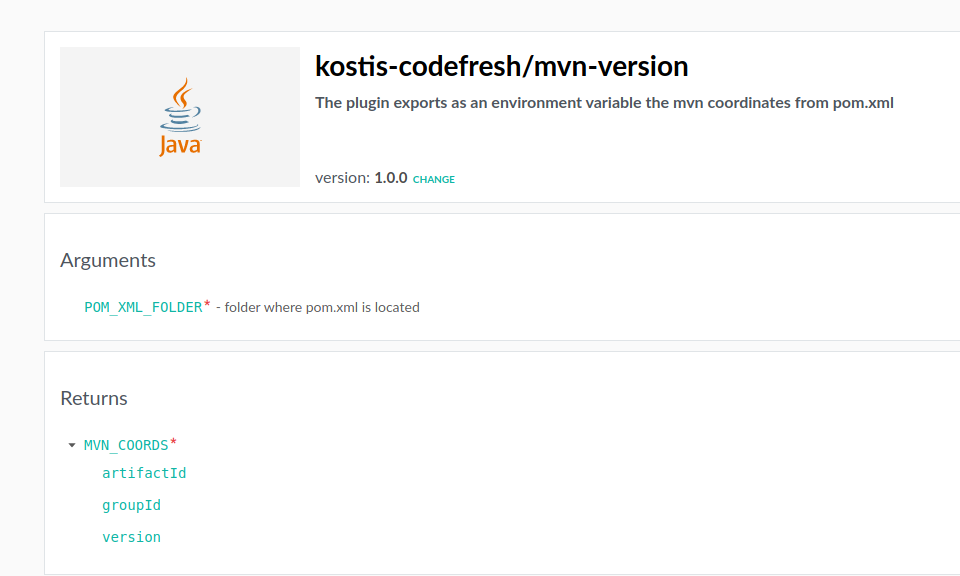
If you look at the plugin entry in the Marketplace you will see both input (the folder of the pom.xml) and output parameters (mvn coordinates) defined:
The plugin is now ready to be used in a pipeline:
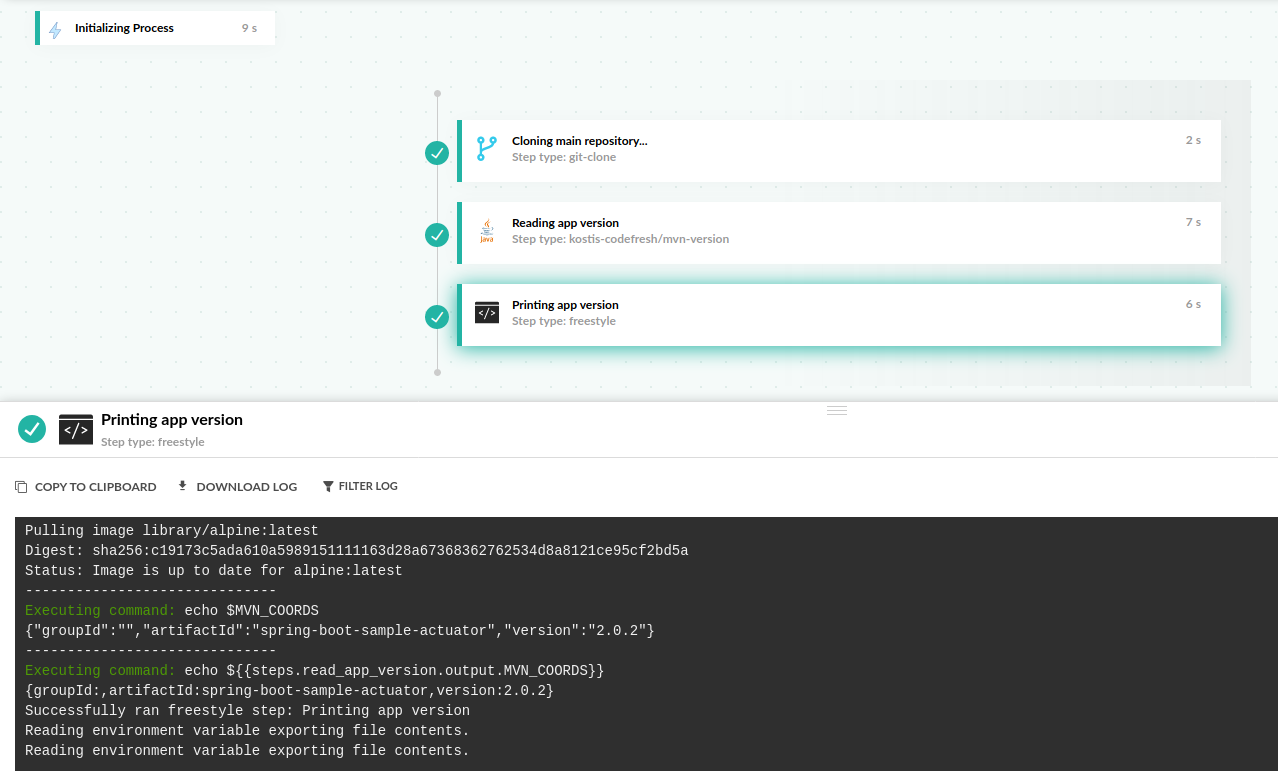
If you look at the pipeline definition you will see how we pass arguments in the plugin and get its output with the steps.output syntax.
codefresh.yml
version: '1.0'
steps:
  main_clone:
    title: Cloning main repository...
    type: git-clone
    repo: 'codefresh-contrib/spring-boot-2-sample-app'
    revision: 'master'
    git: github
  read_app_version:
    title: Reading app version
    type: kostis-codefresh/mvn-version
    arguments:
      POM_XML_FOLDER: './spring-boot-2-sample-app'
  print_app_version:
    title: Printing app version
    image: alpine
    commands:
      - echo $MVN_COORDS
      - echo ${{steps.read_app_version.output.MVN_COORDS}}
This was a trivial example, but it clearly demonstrates how a custom step communicates with the rest of the pipeline by getting input from the previous steps and preparing output for the steps that follow it.
Exporting parameters manually inside a plugin
Normally, in a pipeline you can either use the cf_export command or write directly to the /codefresh/volume/env_vars_to_export file.
However, inside a plugin you can also use the /meta/env_vars_to_export file that has the same semantics, but is used for exporting variables in the same scope as the plugin only.
The rules for using /meta/env_vars_to_export are:
- When the step-type (plugin) does not define the
returnschema, all the output variables from substeps will be projected and exported as the root step (they may override each other). - When
returnschema is defined, only the variables that matched the definition will be exported as root step.
plugin.yaml
version: '1.0'
kind: step-type
metadata:
  name: <account_name>/my-step
  ...
spec:
  arguments: |-
    {
      ...
    }
  returns: |-
    {
      "definitions": {},
      "$schema": "http://json-schema.org/draft-07/schema#",
      "type": "object",
      "additionalProperties": true,
      "patterns": [],
      "required": [
        "ROOT_VAR"
      ]
      ,
      "properties": {
          "ROOT_VAR": {
              "type": "string",
              "description": "an example variable"
          }
      }
    }
  steps:
    export_my_variable:
       title: "Exporting custom variable"
       image: alpine
       commands:
         - echo PLUGIN_VAR=Alice >> /meta/env_vars_to_export
         - echo ROOT_VAR=Bob >> /meta/env_vars_to_export
    read_my_variable:
       title: "Reading custom variable"
       image: alpine
       commands:
         - source /meta/env_vars_to_export
         - echo $PLUGIN_VAR #Alice
         - echo $ROOT_VAR #Bob
codefresh.yaml
version: '1.0'
steps:
  plugin:
    type: <account_name>/my-step
  echo:
    image: alpine
    commands:
      - echo $PLUGIN_VAR #empty
      - echo $ROOT_VAR #Bob
You can still use cf_export command inside the plugin as well (as shown in the previous examples).
Example with step templating
As an advanced technique, Codefresh allows you to define a custom step using templating instead of fixed YAML. We support templates inside the spec: block of a plugin definition by taking advantage of the Gomplate library that offers additional templating functions on top of vanilla Go templates.
NOTE
Gomplate Data functions will not work since Codefresh does not pass the Data object to gomplate functions.
As a simple example lets say we want to create a single step that checks out any number of git repositories. Of course you could just copy-paste the git clone step multiple times in a single pipeline. To make things easier we will create a single step that takes an array of git repositories and checks them out on its own:
checkout_many_projects:
  title: Checking out my Git projects
  type: kostis-codefresh/multi-git-clone
  arguments:
    GIT_PROJECTS:
    - 'codefresh-contrib/ruby-on-rails-sample-app'
    - 'kubernetes/sample-apiserver'
    - 'kostis-codefresh/nestjs-example'
    - 'spring-projects/spring-petclinic'
The GitHub projects are passed as an array, so if we want to check out an additional project, we simply add items to that array.
Here is the step specification:
plugin.yml
version: '1.0'
kind: step-type
metadata:
  name: kostis-codefresh/multi-git-clone
  isPublic: false
  description: >-
    This pipeline plugin shows templating of custom steps
  sources:
    - 'https://github.com/kostis-codefresh/step-examples'
  stage: incubating
  maintainers:
    - name: Kostis Kapelonis
  categories:
    - git
  official: false
  tags: []
  icon:
    type: svg
    url: https://cdn.worldvectorlogo.com/logos/git.svg
    background: '#f4f4f4'
  examples:
    - description: example-1
      workflow:
        version: '1.0'
        steps:
          checkout_many_projects:
            title: Checking out my Git projects
            type: kostis-codefresh/multi-git-clone
            arguments:
              GIT_REVISION: 'master'
              GIT_PROVIDER: 'github'
              GIT_PROJECTS:
                - 'codefresh-contrib/ruby-on-rails-sample-app'
                - 'kubernetes/sample-apiserver'
                - 'kostis-codefresh/nestjs-example'
                - 'spring-projects/spring-petclinic'
  latest: true
  version: 1.0.0
spec:
  arguments: |-
    {
        "definitions": {},
        "$schema": "http://json-schema.org/draft-07/schema#",
        "type": "object",
        "additionalProperties": false,
        "patterns": [],
        "required": [
          "GIT_PROJECTS",
          "GIT_REVISION",
          "GIT_PROVIDER"
        ],
        "properties": {
            "GIT_REVISION": {
                "type": "string",
                "description": "branch or tag or revision to checkout (same for all projects)"
            },
            "GIT_PROVIDER": {
                "type": "string",
                "description": "Name of git provider to use from Codefresh integrations screen"
            },
            "GIT_PROJECTS": {
              "description": "A list/array of git projects to checkout",
              "type": "array",
              "maxItems": 10,
              "items": {
                        "type": "string"
                        }
            }
        }
    }
  delimiters:
    left: '[['
    right: ']]'
  stepsTemplate: |-
    print_info_message:
      name: kostis-codefresh/multi-git-clone
      title: Info message
      image: alpine
      commands:
        - echo "Checking out [[ len  .Arguments.GIT_PROJECTS ]] git projects"
    [[ range $index, $git_project :=.Arguments.GIT_PROJECTS ]]
    clone_project_[[$index]]:
      title: Cloning [[$git_project]] ...
      type: git-clone
      repo: '[[$git_project]]'
      revision: [[$.Arguments.GIT_REVISION]]
      git: [[$.Arguments.GIT_PROVIDER]]
    [[end]]
There are two important points here:
- Instead of using a
steps:block, we instead define a block calledstepsTemplate:. This block name instructs Codefresh that we will use templates - Because the Codefresh runtime is already using the double curly braces for variables mentioned as
${{MY_VARIABLE_EXAMPLE}}, we instead define templates with the characters[[]]. You can see the definitions for these characters inside thedelimiters:block. You are free to use any other replacement characters of your choosing.
In the stepsTemplate block we use Golang template keywoards such as range, len and template variables (such as git_project). You can use all the capabilities of Go templates (e.g. if, range, with) as well as the extra methods of gomplate such as math and net functions.
Creating the marketplace entry for a step with templates is exactly the same as any other step:
codefresh create step-type -f multi-clone-step.yml
You can then use the step in any pipeline and pass the arguments that will fill the template:
codefresh.yml
version: '1.0'
steps:
    checkout_many_projects:
      title: Checking out my Git projects
      type: kostis-codefresh/multi-git-clone
      arguments:
        GIT_REVISION: 'master'
        GIT_PROVIDER: 'github'
        GIT_PROJECTS:
          - 'codefresh-contrib/ruby-on-rails-sample-app'
          - 'kubernetes/sample-apiserver'
          - 'kostis-codefresh/nestjs-example'
          - 'spring-projects/spring-petclinic'
    print_my_workspace:
      title: Show projects
      image: alpine
      commands:
        - ls -l
        - pwd
We have also added two extra parameters, one for the git revision and one for the Git provider that will be used during checkout.
The end result is that with a single step you can checkout many projects. Checking out an additional project is as simple as adding a new entry in the GIT_PROJECTS array.
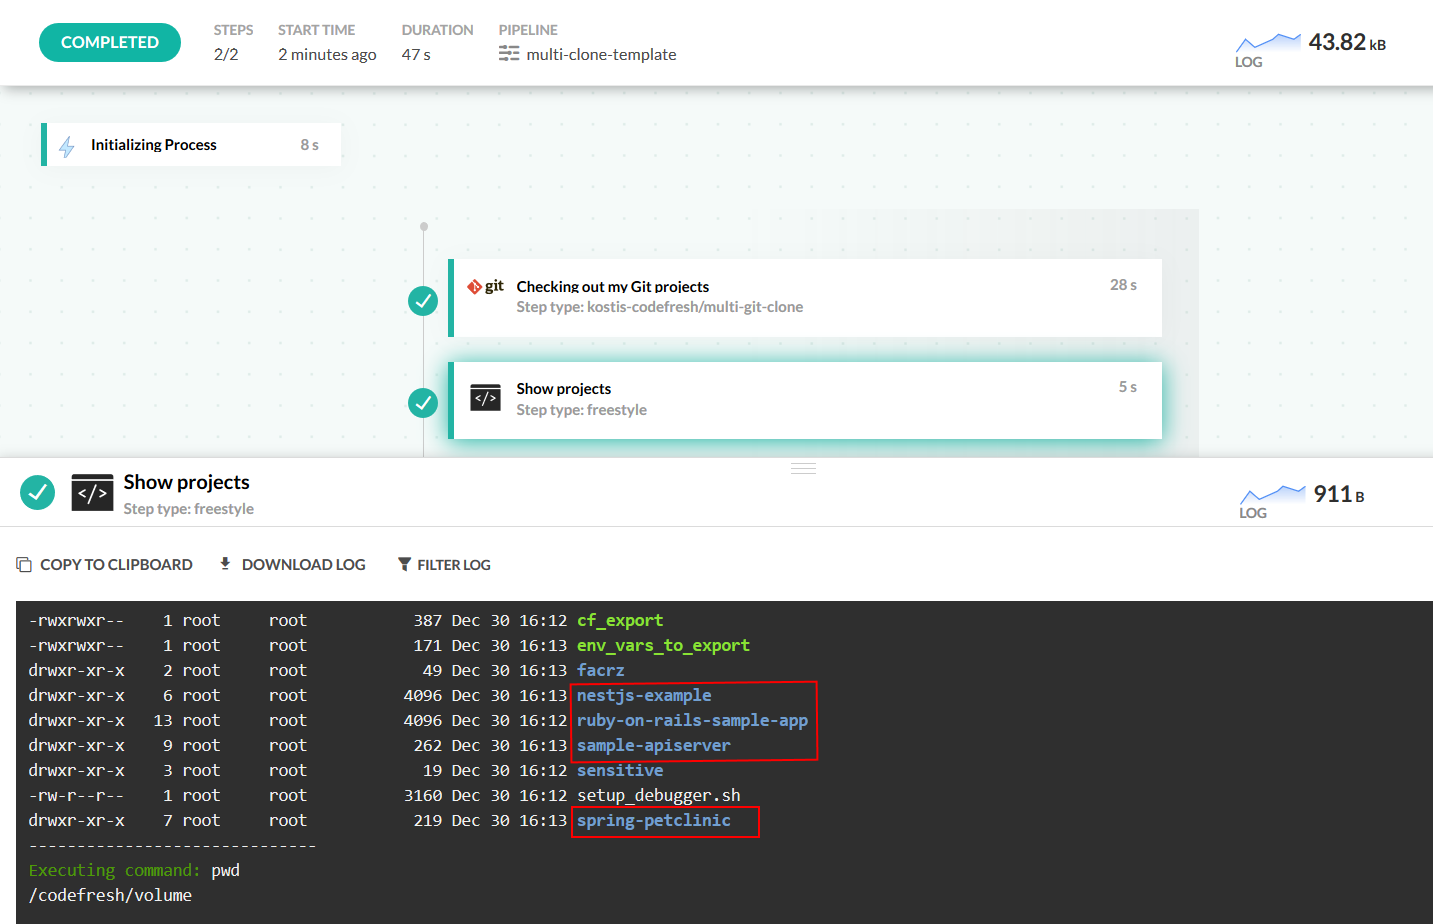
This was a contrived example to demonstrate how you can use templates in the Codefresh plugin specification. Note that using templates in Codefresh steps is an advanced technique and should be used sparingly.
Limitations of custom plugins
Parallel steps are not supported inside custom steps.
Within a custom step, the fail_fast field does not work. Use the failFast field instead.
Custom steps are not compatible with service containers. More specifically:
- If you have a service container in the pipeline-level, steps inside the custom plugin will not be able to access it
- If you try to attach a service container to a custom plugin, the plugin will fail when executed
- If you try to define a custom plugin where a step inside it has a service container attached, the custom plugin will fail when executed
Related articles
Introduction to Pipelines
Grouping steps into stages
Post-step operations