Unit testing
Run unit tests in Codefresh pipelines
Easily run unit tests for every commit or pull request.
TIP
For the purposes of this article, “unit tests” are the tests that use only the source code of the application and nothing else. If you are interested in running tests with external services (such as databases), then see integration tests.
Different companies have different types of unit tests, and in several cases, the type of programming language also affects when/what tests are run. Codefresh supports all testing frameworks (including mocking frameworks) for all popular programming languages.
Here we will see four ways of running unit tests in Codefresh:
- Running unit tests in a Dockerfile (recommended only for smoke tests)
- Running unit tests with an external image (best for traditional/simple applications)
- Running unit tests in the application image (not recommended, but very popular)
- Running unit tests using a special testing image (the recommended solution for complex applications)
For an example application for 2 and 3, see unit test examples.
Running unit tests as part of a Docker build
A handy way to quickly test a Docker image is by placing one or more smoke tests in the Dockerfile itself. The unit tests are executed when the image is built, and if they fail, the image is not created.
Here is an example:
Dockerfile
FROM python:3.6.4-alpine3.6

ENV FLASK_APP=minitwit
COPY . /app
WORKDIR /app

RUN pip install --editable .
RUN flask initdb

# Unit tests
RUN python setup.py test

EXPOSE 5000
CMD [ "flask", "run", "--host=0.0.0.0" ]
This kind of unit test is transparent to Codefresh. The unit tests just execute in a build step in the same manner as you would build the image on your workstation.
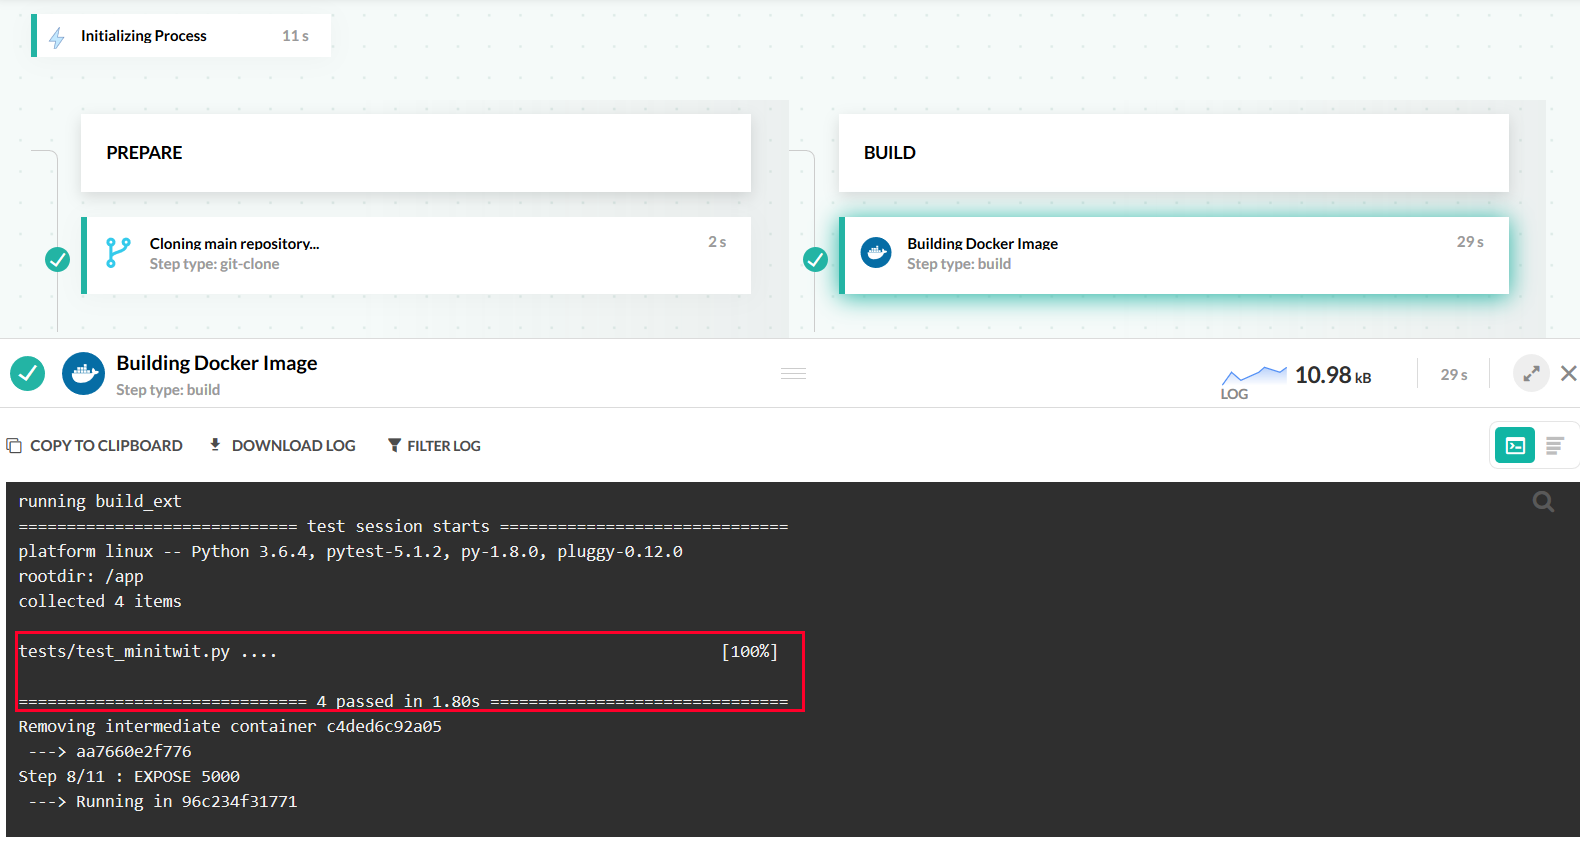
A big disadvantage of this unit testing method is that getting reports from the Docker image is not a straightforward process. On the other hand, such unit tests are very easy to integrate in any workflow. The Codefresh pipeline simply checks out the code and builds a Dockerfile.
codefresh.yml
version: '1.0'
stages:
  - prepare
  - build
steps:
  main_clone:
    title: Cloning main repository...
    type: git-clone
    repo: 'codefresh-contrib/python-flask-sample-app'
    revision: 'with-tests-in-dockerfile'
    stage: prepare
    git: github
  MyAppDockerImage:
    title: Building Docker Image
    type: build
    stage: build
    image_name: my-app-image
    working_directory: ./
    tag: with-tests-in-dockerfile
    dockerfile: Dockerfile
This technique is best used for a very small subset of unit tests that check the overall well-being of a Docker image. The bulk of the tests should be executed outside the Docker build process as we will see in the sections that follow.
Running unit tests using an external Docker image
The recommended way to run unit tests in Codefresh pipelines is to select a Docker image that has all the test tools that you need, and define an explicit testing step in your pipeline, usually a freestyle step.
Here is an example where unit tests are run using a JDK/Maven image:
codefresh.yml
version: '1.0'
stages:
- prepare
- test
- package
steps:
main_clone:
title: Cloning main repository...
stage: prepare
type: git-clone
repo: 'codefresh-contrib/spring-boot-2-sample-app'
revision: master
git: github
MyUnitTests:
title: JUnit tests
stage: test
image: 'maven:3.5.2-jdk-8-alpine'
commands:
- mvn -Dmaven.repo.local=/codefresh/volume/m2_repository test
MyAppDockerImage:
title: Building Docker Image
type: build
stage: package
image_name: spring-boot-2-sample-app
working_directory: ./
tag: 'non-multi-stage'
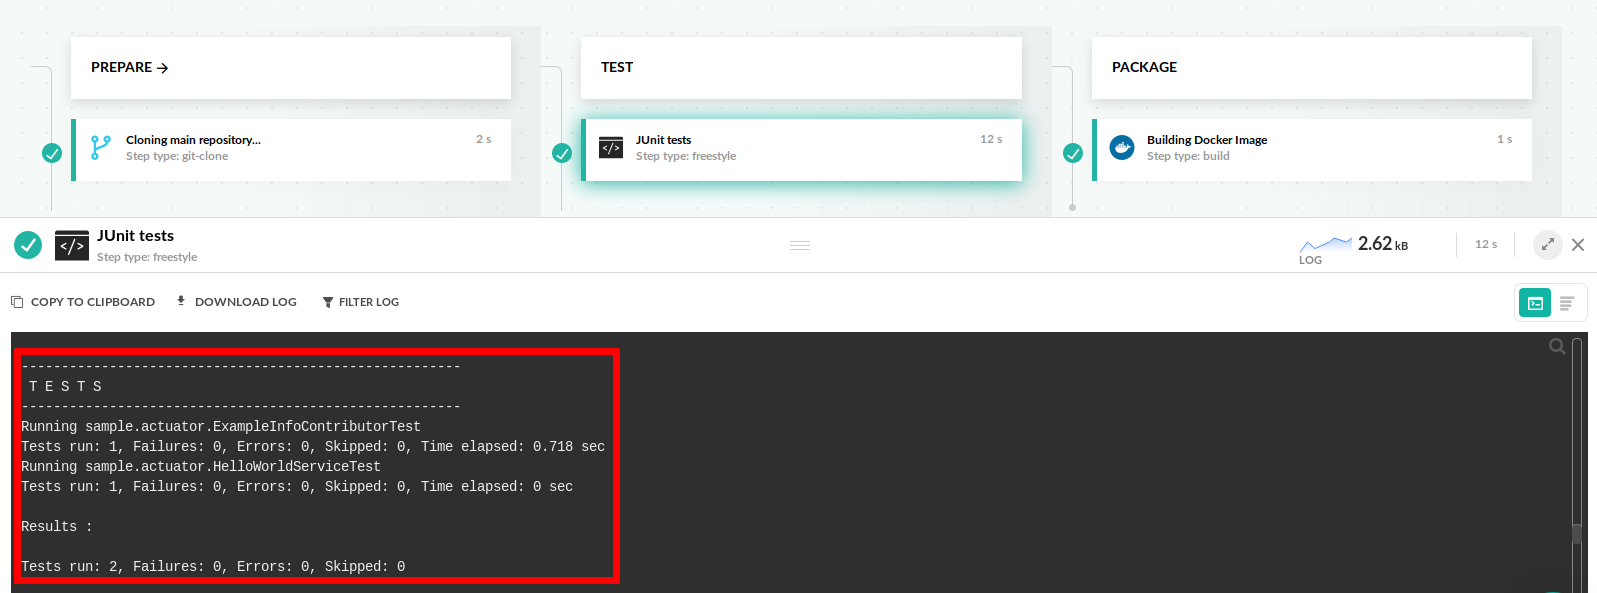
dockerfile: Dockerfile The main advantage of this approach is that you can easily replicate your test environment in the Codefresh pipeline by selecting the appropriate image for your tests. You also get a clear overview on the test results. If they fail, the pipeline automatically stops execution. You can change this behavior with the fail_fast property.
Notice that even if the example above eventually creates a Docker image, you can still use this way of running unit tests for traditional applications that are not dockerized yet, such as VM-based applications.
Running unit tests with the application Docker image
In several cases, especially with dynamic languages, you can reuse the Docker image that holds the application also for unit tests. This is a very common technique for Node, Python, and Ruby applications.
In this case, you can use context variables in Codefresh to run a unit test step in the image that was created in a previous step:
codefresh.yml
version: '1.0'
stages:
- prepare
- build
- test
steps:
main_clone:
title: Cloning main repository...
type: git-clone
repo: 'codefresh-contrib/python-flask-sample-app'
revision: 'master'
git: github
stage: prepare
MyAppDockerImage:
title: Building Docker Image
type: build
stage: build
image_name: my-app-image
working_directory: ./
tag: 'master'
dockerfile: Dockerfile
MyUnitTests:
title: Running Unit tests
stage: test
image: '${{MyAppDockerImage}}'
commands:
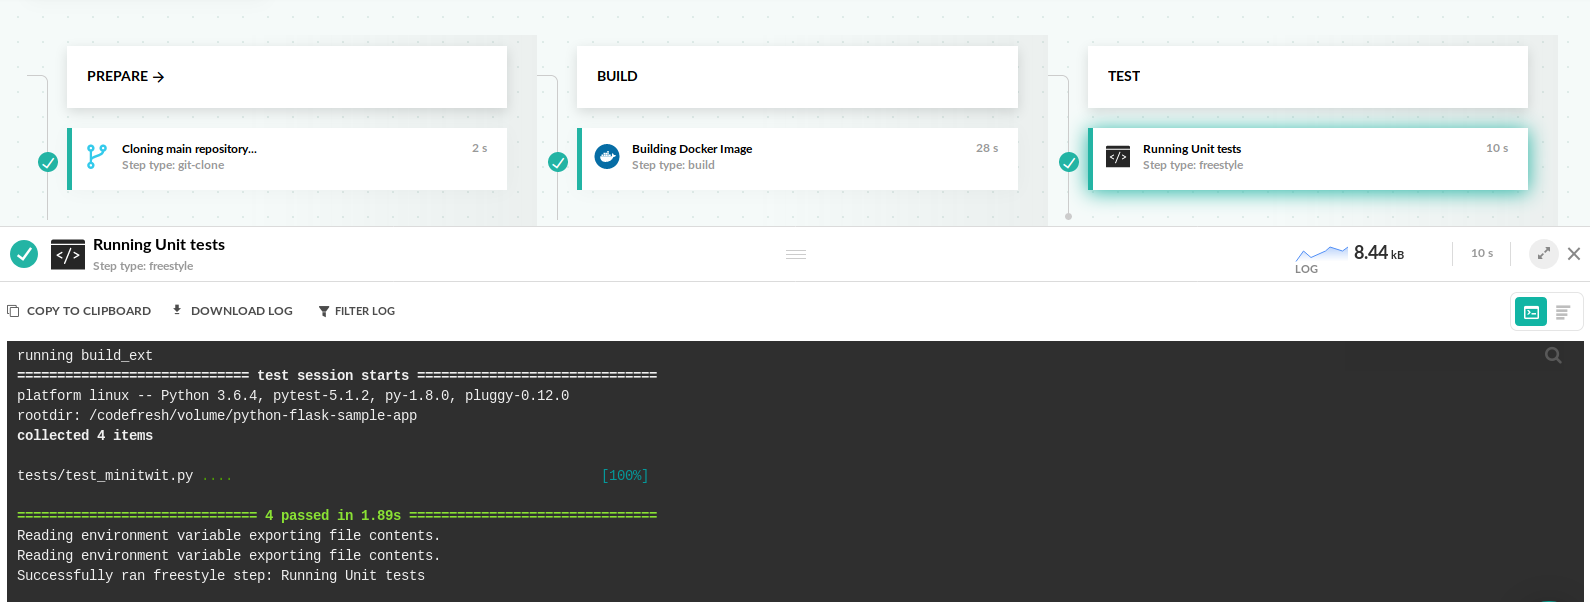
- python setup.py test We use a Codefresh variable as the value of the image property in the last step. This will make the unit test execute in the same Docker container that was created in the second step of the pipeline.
This technique is certainly useful, but can be easily abused if you end up shipping testing tools in your production image (which is not recommended). If you find your production images filled with test tools and libraries, it is better to use the technique in the next section which uses a different image for tests.
Running unit tests with a dynamic Docker image
The ultimate method of running unit tests in Codefresh is by creating a specific image, dedicated to unit tests. If Docker Hub doesn’t already contain an image that suits you, you should create your own.
This means that your application has two Dockerfiles. The main one that holds the application as a deployment artifact, and another one that holds all the unit test libraries and tools that you need.
Here is an example:
codefresh.yml
version: '1.0'
stages:
  - prepare
  - 'Test tools'
  - test
  - build
steps:
  main_clone:
    title: Cloning main repository...
    type: git-clone
    repo: 'codefreshdemo/demochat'
    revision: 'master'
    git: github
    stage: prepare
  MyUnitTestDockerImage:
    title: Building Test image
    type: build
    stage: 'Test tools'
    image_name: my-test-image
    working_directory: ./
    tag: 'master'
    dockerfile: Dockerfile.dev
  MyUnitTests:
    title: Running Unit tests
    stage: test
    image: '${{MyUnitTestDockerImage}}'
    commands:
      - npm run test
  MyAppDockerImage:
    title: Building Docker Image
    type: build
    stage: build
    image_name: my-app-image
    working_directory: ./
    tag: 'master'
    dockerfile: Dockerfile
Here we create two Docker images:
- The first docker image is created from
Dockerfile.dev.
Unit tests run in the context of that image (MyUnitTestDockerImage). - The production application uses another Dockerfile.
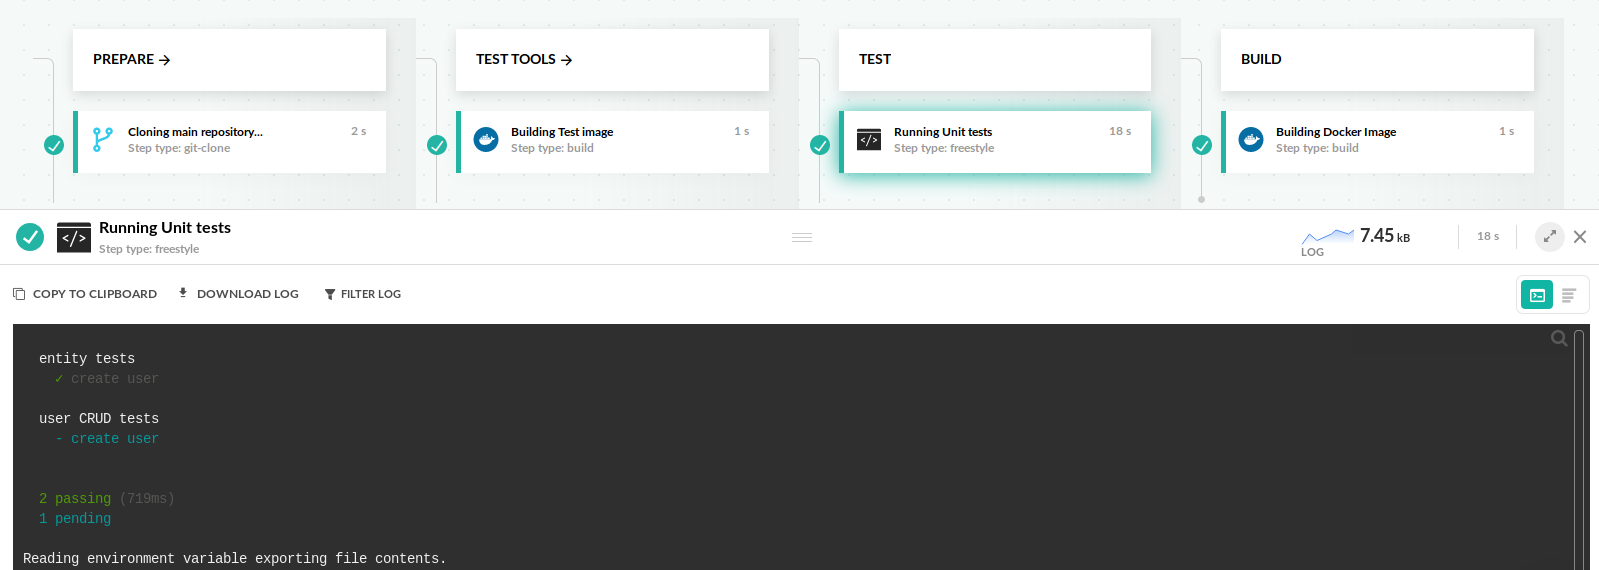
This is one of the best ways to run unit tests (as well as integration tests), as it allows you to fine-tune the test environment while still shipping only what is needed to production.
In the example above, we used two different Dockerfiles, but you could also use a single Dockerfile with multi-stage builds. Use the target directive to stop the image build process at a previous layer that has all the testing tools.
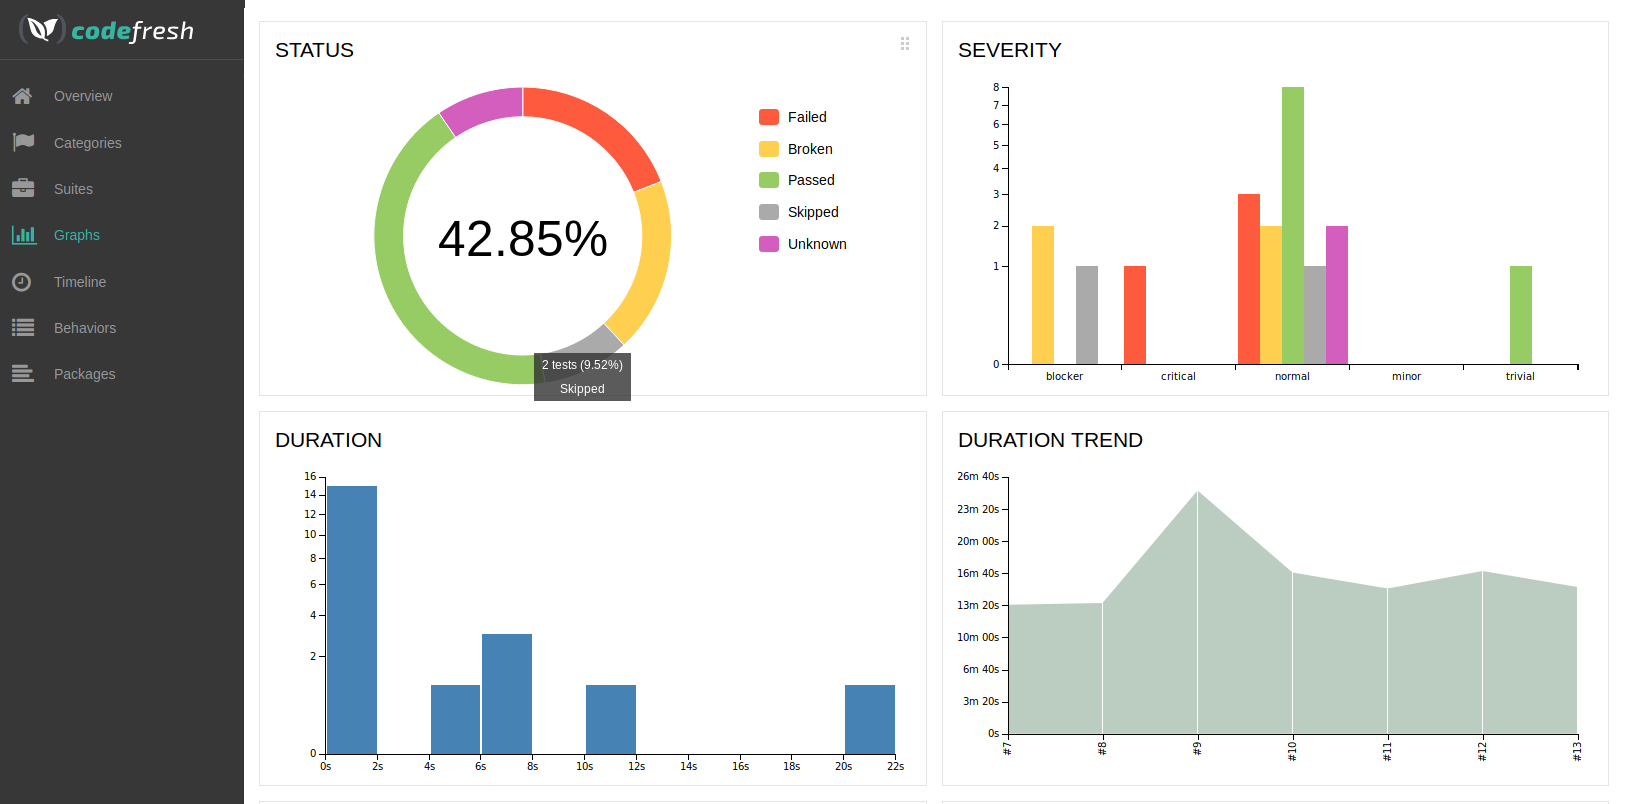
Creating test reports
All the methods mentioned above for running unit tests, apart from the first method, can also be used for reporting. Read all about test results and graphs in test reports.
Related articles
Unit test example
Introduction to pipelines
Codefresh YAML for pipeline definitions
On-demand environments
Integration tests