Caching in pipelines
Faster builds with Codefresh caching
One of the unique features of Codefresh is the multitude of caching systems that take part in a pipeline, and in particular the caching mechanisms targeted specifically at Docker builds. Most types of caching are completely automatic and require zero configuration in order to activate. Caching is a built-in feature in all Codefresh accounts regardless of pricing tier (even free accounts have all types of caching enabled).
Types of caching
Here is a quick overview of all types of caching used in a Codefresh pipeline:
| Caching mechanism | Activation | Used in | Comments |
|---|---|---|---|
| Distributed Docker step/image caching | Automatic | All pipeline steps | |
| Distributed Docker layer caching | Automatic | Pipeline build steps | Mimics local Docker layer cache |
| Caching from previous built image | Automatic | Pipeline build steps | Distributed version of --cache-from |
| Docker registry caching | Automatic | Pipeline build steps | Works for all connected Docker registries |
| Traditional build caching | Automatic/manual | Pipeline freestyle steps | See notes for parallel builds |
All these caching mechanisms are enabled by default and you can freely disable them if you encounter any issues with caching.
Let’s see these caches in order and how to use them effectively.
Distributed Docker image caching
This is the simplest mode of caching available. All Codefresh steps are in fact Docker images. After a pipeline runs for the first time, Codefresh will pull all required images from their registries (either public or private) and will cache them for the next build:
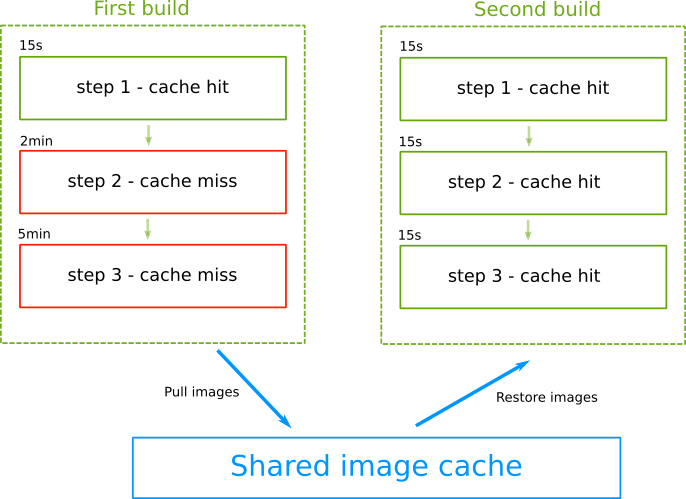
The next time the pipeline runs all images will be fetched from cache. This includes built-in steps (e.g the clone step), custom steps from the marketplace or your own dynamic pipeline steps.
This cache mechanism is completely automatic and is not user configurable. Some ways that you can affect it are:
- If you use well known images in your pipeline (such as
alpine,node,mavenetc) they have more probabilities to be already cached by the Codefresh platform - Use specific tags for your images (e.g.
alpine:3.9.2andmaven:3-jdk-11-openj9) instead of generic ones (e.galpine:latestandnode:buster) that change all the time - Using small images in the pipeline will make caching/restoring of pipeline steps much faster.
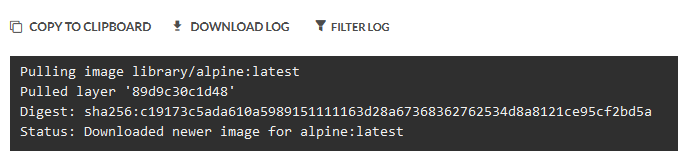
You can see in the pipeline build logs if the images of your steps are found in cache or not. Here is an example of a cache hit:

and a cache miss:
This cache mechanism is applicable to all Codefresh pipelines and steps.
Distributed Docker layer caching
This type of caching is only applicable to build steps and mimics the ways docker layer caching behaves locally on your workstation.
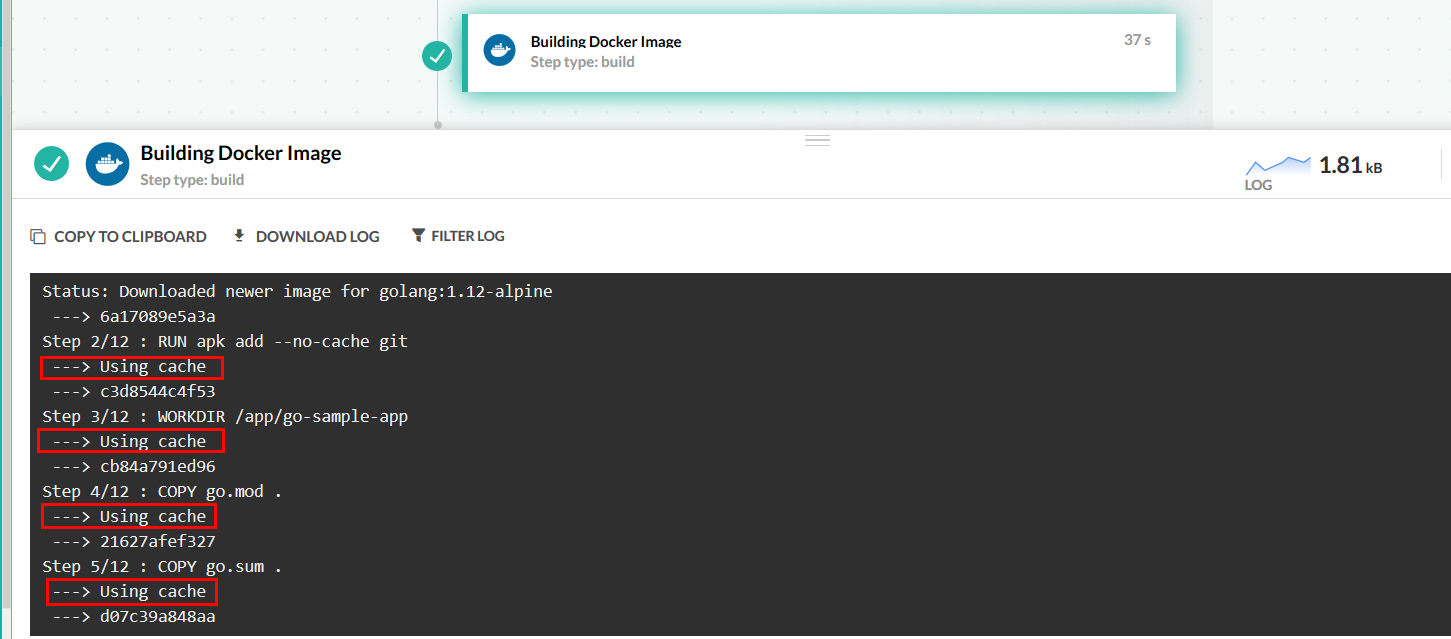
When you build images locally, Docker will cache intermediate layers making future builds much faster. You can see when caches are used in your build logs.
> docker build . -t my-app
Sending build context to Docker daemon  81.92kB
Step 1/10 : FROM golang:1.12-alpine
 ---> 6a17089e5a3a
Step 2/10 : RUN apk add --no-cache git
 ---> Using cache
 ---> 7b65bc6a6690
Step 3/10 : WORKDIR /app/go-sample-app
 ---> Using cache
 ---> 8755d1490fe2
Step 4/10 : COPY go.mod .
 ---> Using cache
 ---> 476d868ceddd
Step 5/10 : COPY go.sum .
 ---> Using cache
 ---> 3239097e9bde
[...]
In a distributed build environment however, things work much differently as each build node has its own cache. If you run a pipeline on one node and then run a second build on another node everything will be recreated again because (normally) build nodes don’t share any cache.
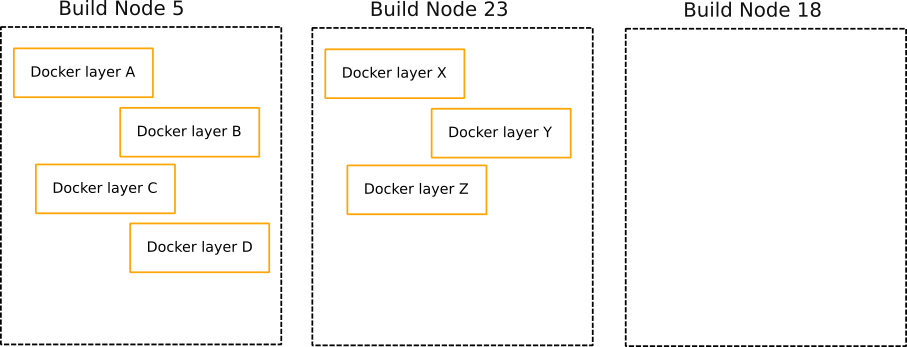
In the example above if you run another build that is picked up by build node 18 all Docker filesystem layers will be recreated again even though they are already present in other nodes.
Codefresh is one of the few CI/CD solutions that has a distributed Docker layer cache. This makes layer caching available to all build nodes. It doesn’t matter any more which build node runs which pipeline as all of them are equal regarding their caching capabilities.
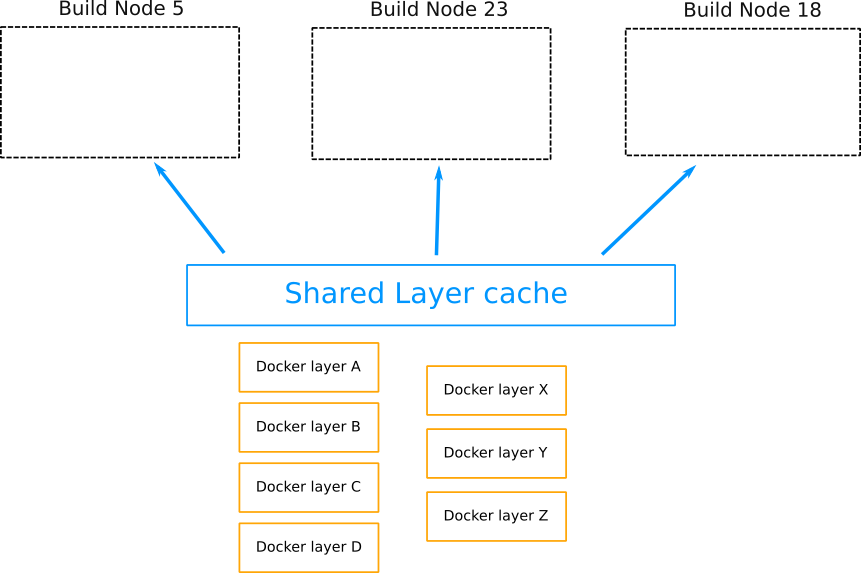
With the distributed docker layer cache all build nodes are now equal. Any of the available nodes can pick your next pipeline build as all of them have access to all the previous docker filesystem layers.
You can see if this cache is used in your pipeline logs:
Codefresh will also automatically pass the --cache-from directive to docker builds with the previous successful build artifacts:
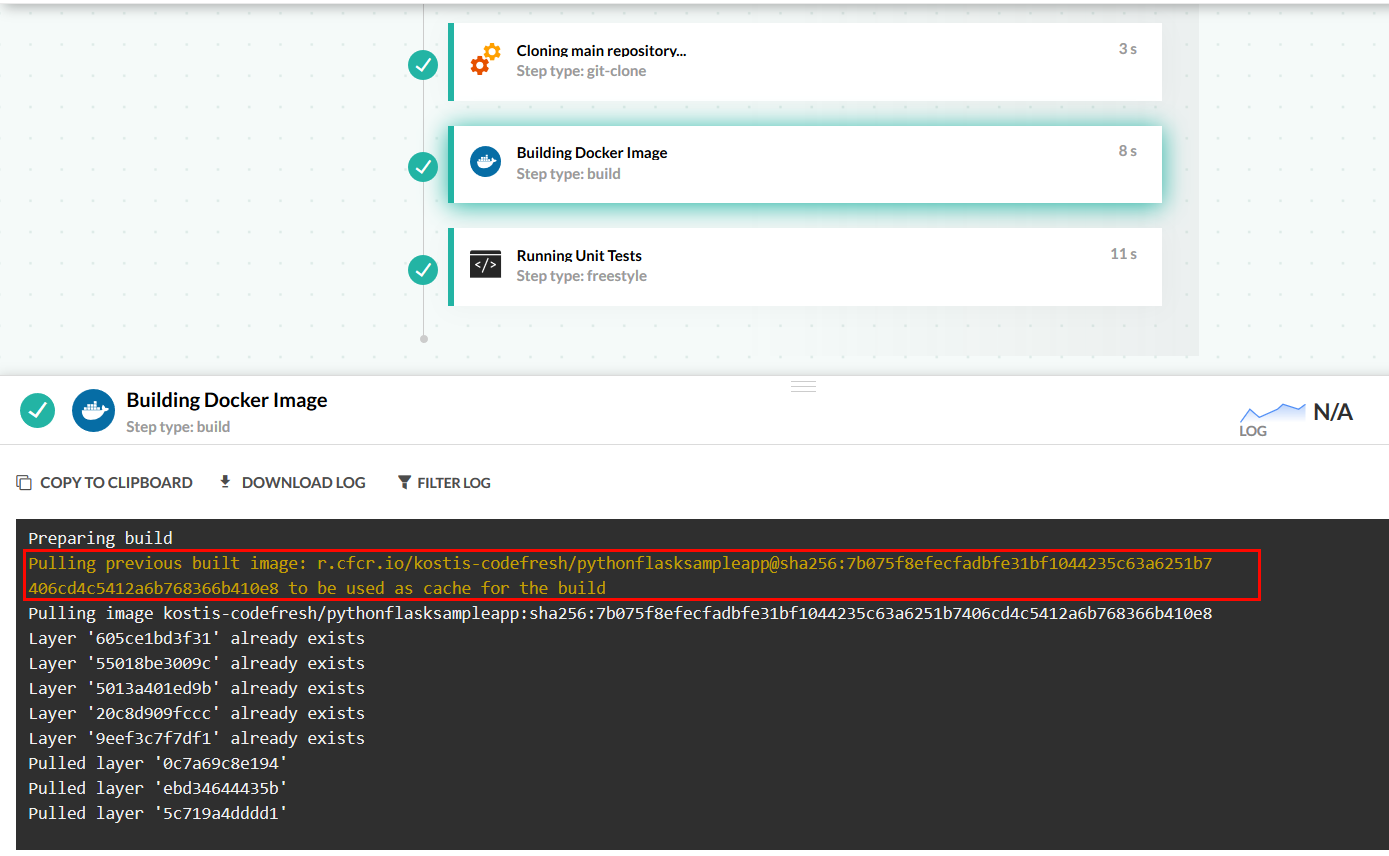
To take advantage of this build cache just follow the official Docker guidelines and best practices such as
- Download dependencies in a separate docker layer
- Put layers that will not change frequently at the top of dockerfile (e.g. OS libs)
- Put things that will change frequently at the bottom of the dockerfile (e.g. source code)
- Don’t use side effects in Dockerfiles
Basically, if your Dockerfile is already optimized on your local workstation, it should also be optimized for Codefresh. More information can be found in the official documentation:
- https://www.docker.com/blog/intro-guide-to-dockerfile-best-practices/
- https://docs.docker.com/develop/develop-images/dockerfile_best-practices/
Docker registry caching
This is a caching mechanism unique to Codefresh, and applicable only to build steps when any of connected Docker registries are used.
Codefresh will check the internal Docker registry before a build step and if the exact same image is found (using the image hash), it will skip the build step completely:
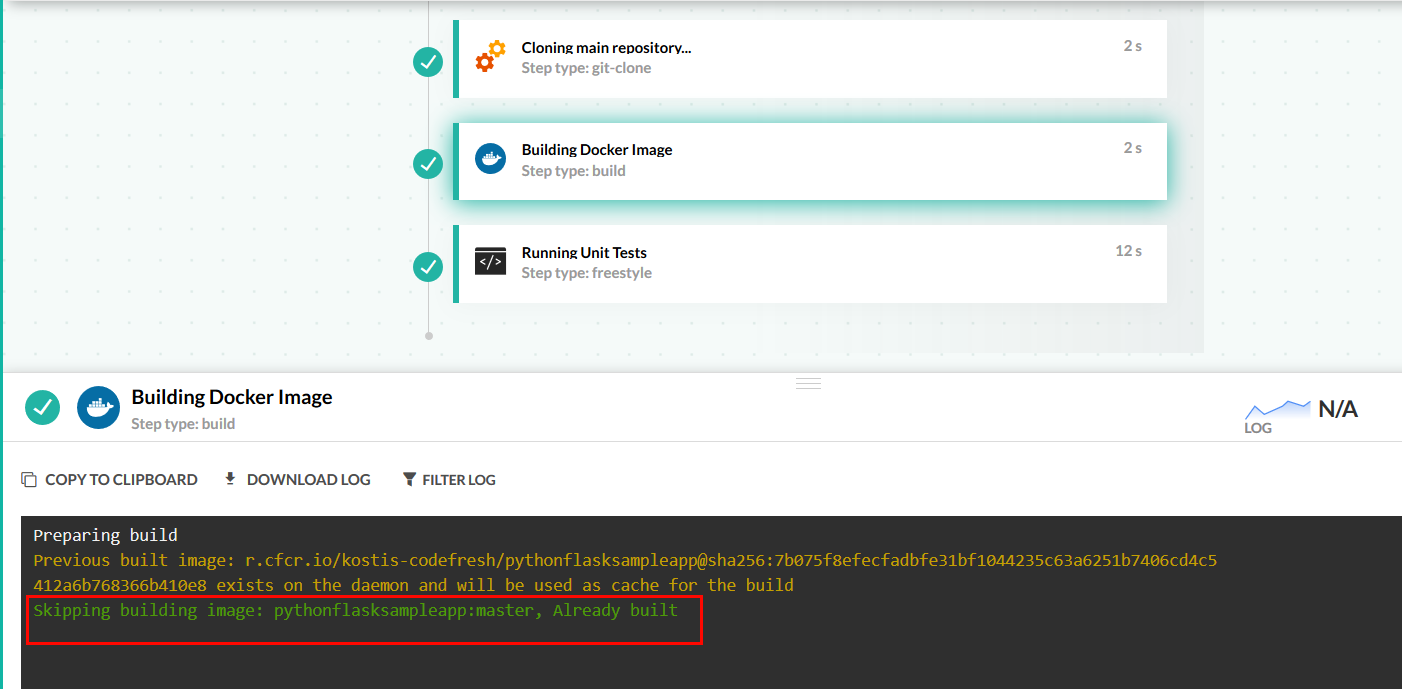
This is a very effective way to cut down the amount of time needed by pipelines but it obviously works only for Docker images that don’t change often (helper images, plugins, build tools etc.) as the deployment docker images will always be different when a new git commit happens in the source code.
You can take advantage of this mechanism by not mixing deployment docker images with development docker images. The former will change all the time, while the latter should be recreated less often.
Traditional build caching
If you have read the introduction to pipelines page you will already be familiar with the shared volume that is automatically mounted on all pipeline steps. This volume is not only used for data exchange between steps of the same pipeline, but is also stored/fetched for each subsequent build as well.
This means that unlike other CI solutions where you have to manually describe what folder you wish to cache, in Codefresh everything that exists in /codefresh/volume and its subfolders is automatically cached between different builds of the same pipeline. The volume mounting and caching/restoring process is completely automatic. You don’t need any configuration about it.
The main choice that you have is which files to place on the volume. For example, Node.js uses the folder node_modules for its dependencies which are placed under the project folder which is automatically placed under the volume. So all contents of node_modules will be cached by default without any further action on your part.
NOTE
If you are using Codefresh on-premises, this kind of caching is not available for the built-in runtime.
You need to use the Codefresh Runner with your own runtime to activate volume caching.
The simplest way to see this caching mechanism in action is this pipeline:
codefresh.yml
version: '1.0'
steps:
  write_sample_file:
    title: Writing to shared volume
    image: alpine:3.10.3
    commands:
     - date >> /codefresh/volume/sample.txt
  read_sample_file:
    title: Reading from shared volume
    image: alpine:3.10.3
    commands:
     - cat /codefresh/volume/sample.txt
If you run this pipeline multiple times you will see multiple entries in the file sample.txt.
NOTE
If you run concurrent builds too quickly after one another, the Codefresh Volume will refresh from scratch instead of being cached between builds.
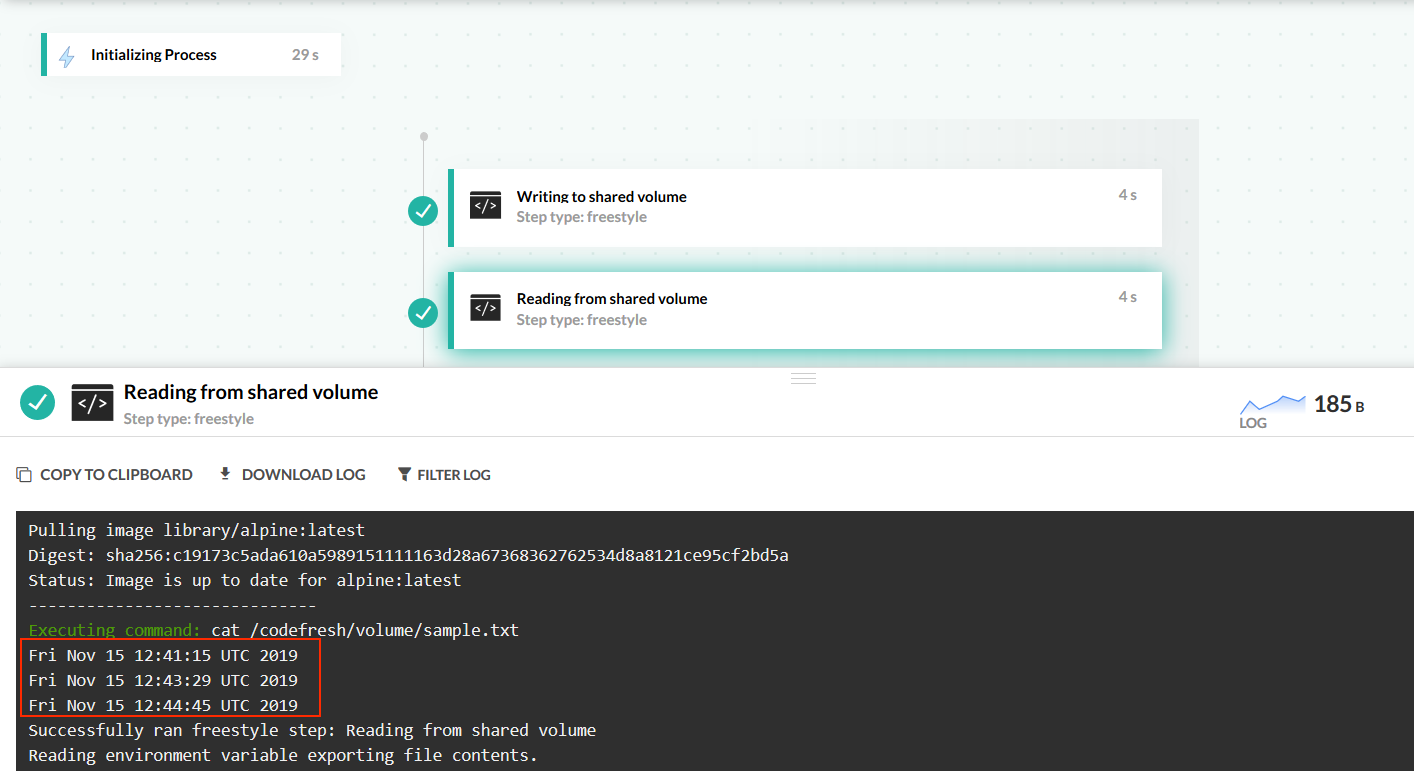
Notice also the complete lack of volume directives in the codefresh.yml file. The pipeline volume is mounted and cached/restored by Codefresh with no configuration on your part.
Some important points on this caching mechanism:
- The volume is handled and managed by Codefresh in a completely transparent manner. You DO NOT need any
volumedirectives in your pipelines to take advantage of it. The volume is even present in service containers for integration tests. - On each build, the clone step will purge/delete everything that is not placed in
.gitignore. So make sure that your.gitignorefiles contain all the things that you want to see cached (e.g.node_modules) - If you use the SAAS version of Codefresh, volumes will be reused across all your account pipelines. If you use the On-prem or Hybrid version of Codefresh, pipeline volumes can be scoped to different pipelines or triggers as well
- You need at least one build of your pipeline in order for the cache mechanism to take any effect.
- The volume is NOT available in build steps. This is not a Codefresh limitation. Docker itself does not allow volumes during builds. There is no folder
/codefresh/volumeinside a Dockerfile for you to access. - This is the only caching mechanism that is not related to Docker images. So if you compile/package a traditional application with Codefresh that is not packaged as a Docker image this is the only way to get faster builds.
See also a full example that uses the volume at https://github.com/codefreshdemo/cf-example-shared-volumes-between-builds.
Caching folders which are outside your project folder
By default if you checkout a Git project named foo, the source code is placed under /codefresh/volume/foo. This means that with zero configuration the following things are cached:
- your source code of
fooproject - all dependencies under the project folder (e.g.
foo/node_modules) - all project logs, test results that are inside the project module.
Everything else found in external folders is NOT cached by default. So if you have things in folders such as /root, /tmp/, /home/, /var/ that you need to cache you need to manually copy them to the volume.
In practice, this means that you need to look at the documentation of your build system and test framework and make sure that all folders you want cached are placed under the Codefresh volume. This is a typical pattern with Java applications.
- For Maven use
mvn -Dmaven.repo.local=/codefresh/volume/m2_repository packageas shown in the example. - For Gradle use
gradle -g /codefresh/volume/.gradle -Dmaven.repo.local=/codefresh/volume/m2as explained in the example. - For SBT use
-Dsbt.ivy.home=/codefresh/volume/ivy_cache. - For Pip use
pip install -r requirements.txt --cache-dir=/codefresh/volume/pip-cacheas shown in the example - For Golang pass an environment variable
GOPATH=/codefresh/volume/goto the freestyle step that is running go commands - For Rust pass an environment variable
CARGO_HOME=/codefresh/volume/cargoto the freestyle step that is running rust/cargo commands
This is only needed for traditional applications that are not dockerized. If you already use Docker containers the previous caching mechanisms are already enough.
Issues with parallel builds and parallel pipelines
Codefresh supports two forms of parallelism, parallel steps within the same pipeline and parallel pipelines (as well as concurrent builds).
All parallel steps inside the same pipeline use the same volume. Codefresh does not perform any conflict detection in that case.
For concurrent builds of the same pipeline, notice that if you make too many commits very fast (triggering a second build while the previous one is still running), Codefresh will allocate a brand new volume for the subsequent builds. This will force all builds to start with a clean shared volume, resulting in longer build times. Be sure to set your build termination settings correctly.
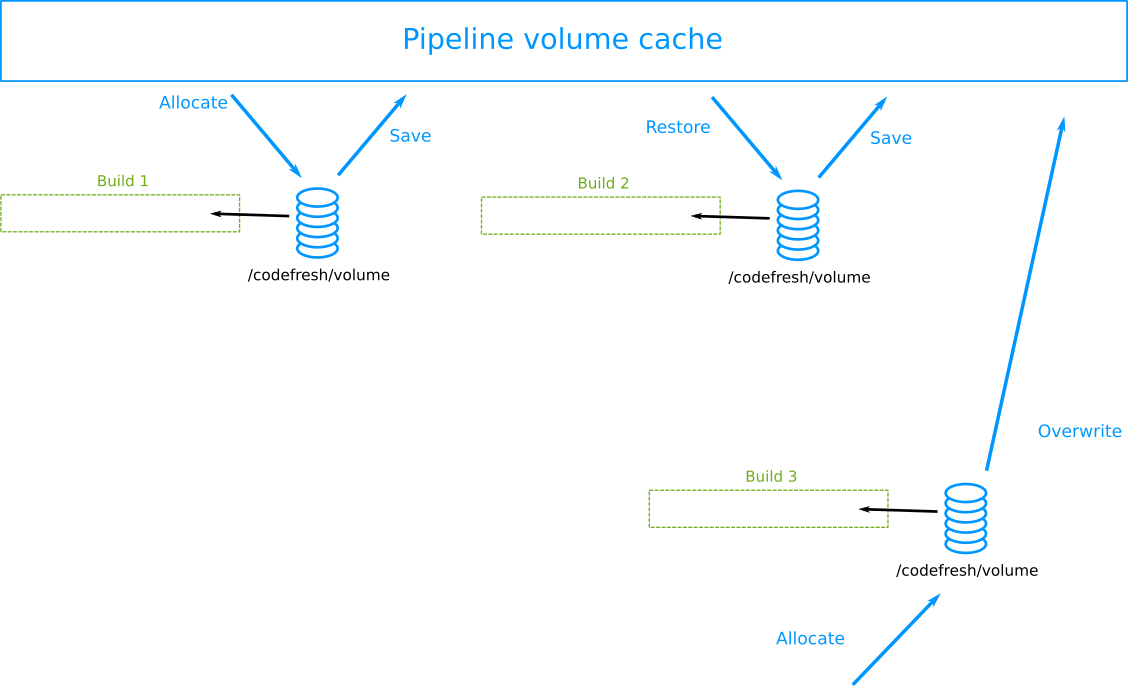
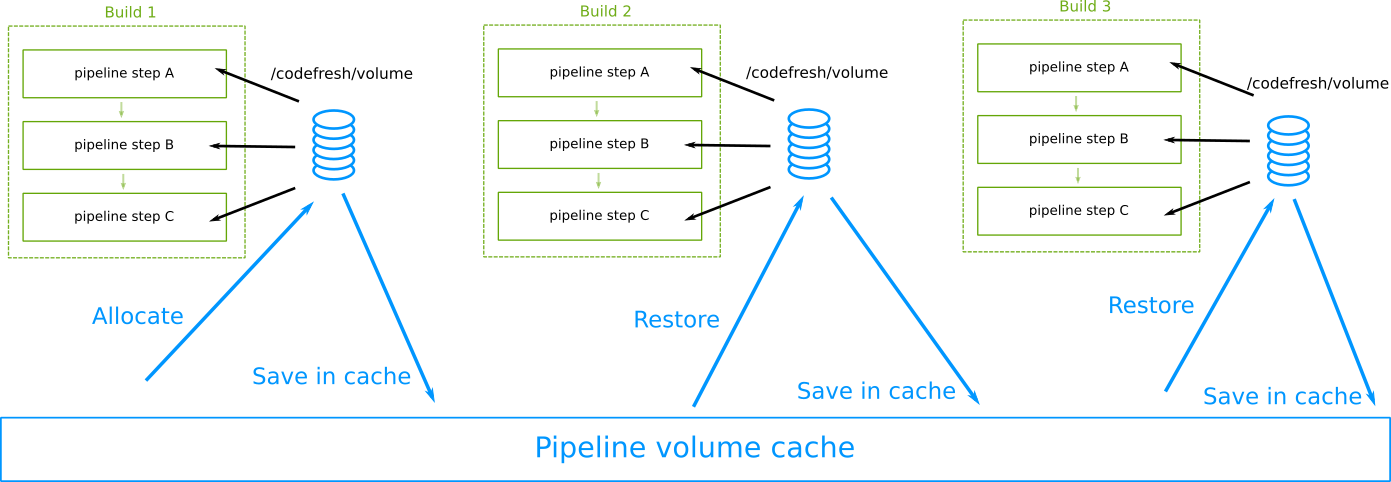
The diagram above shows the following sequence of events:
- The first build of a pipeline is triggered. Codefresh allocates a brand new volume and automatically mounts is as a workspace at
/codefresh/volume. - The first build runs and stores artifacts on the volume
- The first build finishes. Codefresh stores the volume in the cache
- A second build is triggered for the same pipeline and same git branch. Codefresh sees that there is already a volume in the cache and passes it to the second build. The second build correctly finds all artifacts in the cache
- Before the second build finishes, a third build is triggered.
- The pipeline volume is still locked by the second build and Codefresh cannot use it in the third build. Codefresh allocates a brand new volume that has no artifacts at all and passes it to the third build
- The second build finishes and its volume is saved into cache
- The third build finishes and its volume is saved into cache overwriting the volume of the second build.
- If a fourth build starts it will use the volume from the third build since this was the last saved volume.
Codefresh cache size and eviction policy
If you use the SAAS version of Codefresh, then you don’t have any control of cache policies. The SAAS version is fully controlled by Codefresh personnel and the cache policies in place might clear caches sooner than you think.
If you run a pipeline very infrequently it is possible to suffer many cache misses. If you also use obscure Docker images you might see them downloaded again and again.
If you run the Hybrid Runner or on-premises versions of Codefresh, then your system administrator is responsible for fine-tuning the cache settings.
Related articles
Introduction to Codefresh pipelines
Codefresh YAML for pipeline definitions
Steps in pipelines
Parallel pipelines