Docker image metadata
How to use custom metadata in your Docker images
Images built by Codefresh can be annotated with customized metadata. This article explains how to create advanced view of your images and enrich them with custom metadata which perfectly fits your flow and image management process.
NOTE
We have since expanded this feature, and now you can add custom annotations to pipelines and builds as well. Notice also that the syntax shown in this page is deprecated but still supported. For the new syntax, see Hooks in pipelines.
Metadata types
Images built by Codefresh can be annotated with an array of key-value metadata. Metadata values may be of the following types:
| Annotation type | Guidelines | Example |
|---|---|---|
| String | Use string | ‘Example note’ |
| Number | use numeric value to set this kind of annotation | 9999 |
| Boolean | Use true / false value | true |
| Percentage bar | use 0-100 value ending with % | 85% |
| Link | use url | ${{CF_COMMIT_URL}} |
You can also use conditional expressions to set metadata.
Annotate your images using Codefresh YAML
You can annotate an image as part of its build process and also on post build steps.
Build step Image Metadata Annotation
You can annotate an image as part of its build process by declaring the metadata value on the build step:
- The
metadataattribute - The
setoperation - An array of key-value metadata
build-metadata-annotation
build_step:
  type: build
  ...
  metadata: # Declare the metadata attribute
    set: # Specify the set operation
      - qa: pending
      - commit_message: ${{CF_COMMIT_MESSAGE}}
      - exit_code: 0
      - is_main:
          evaluate: "'${{CF_BRANCH}}' == 'main'"
Adding annotations to Built images on post-build steps
Any step in the YAML workflow can annotate built images by using post-step operations. To annotate a built image, configure any step with:
- The post-step operation
- The
metadataattribute - The
setoperation - A list of target images with the variable syntax of
${{build_step_name.imageId}} - An array of key-value metadata
annotating-step
build_step:
  type: build
  ...

any_step:
  ...
  on_success: # Execute only once the step succeeded
    metadata: # Declare the metadata attribute
      set: # Specify the set operation
        - ${{build_step.imageId}}: # Select any number of target images
          - qa: pending

  on_fail: # Execute only once the step failed
    metadata: # Declare the metadata attribute
      set: # Specify the set operation
        - ${{build_step.imageId}}: # Select any number of target images
          - exit_code: 1

  on_finish: # Execute in any case
    metadata: # Declare the metadata attribute
      set: # Specify the set operation
        - ${{build_step.imageId}}: # Select any number of target images
          - is_main:
              evaluate: "'${{CF_BRANCH}}' == 'main'"
Example - Quality Image Metadata Annotation
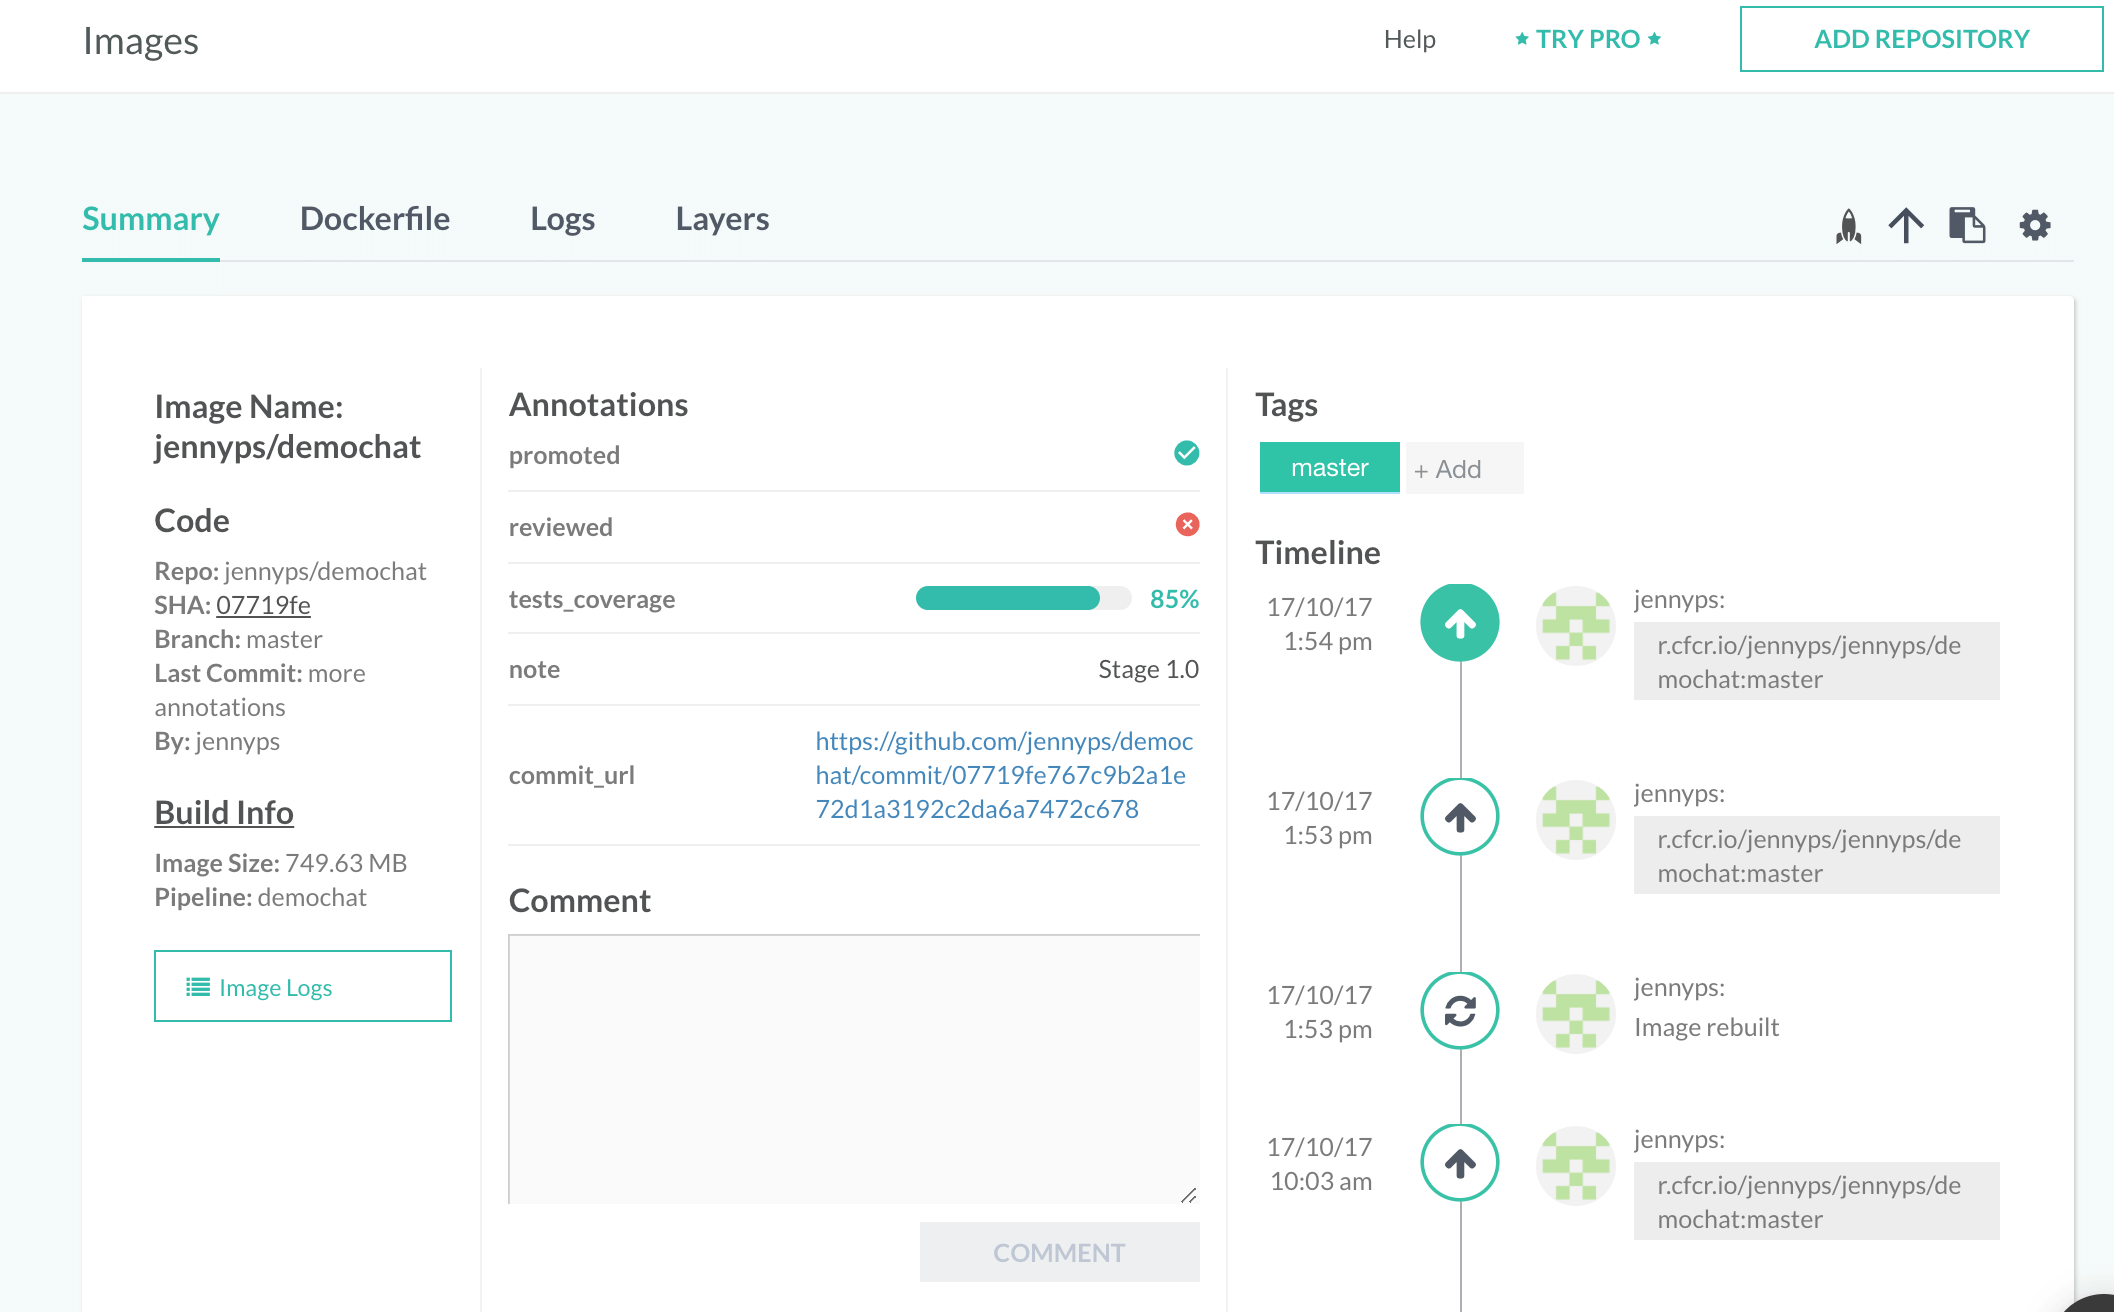
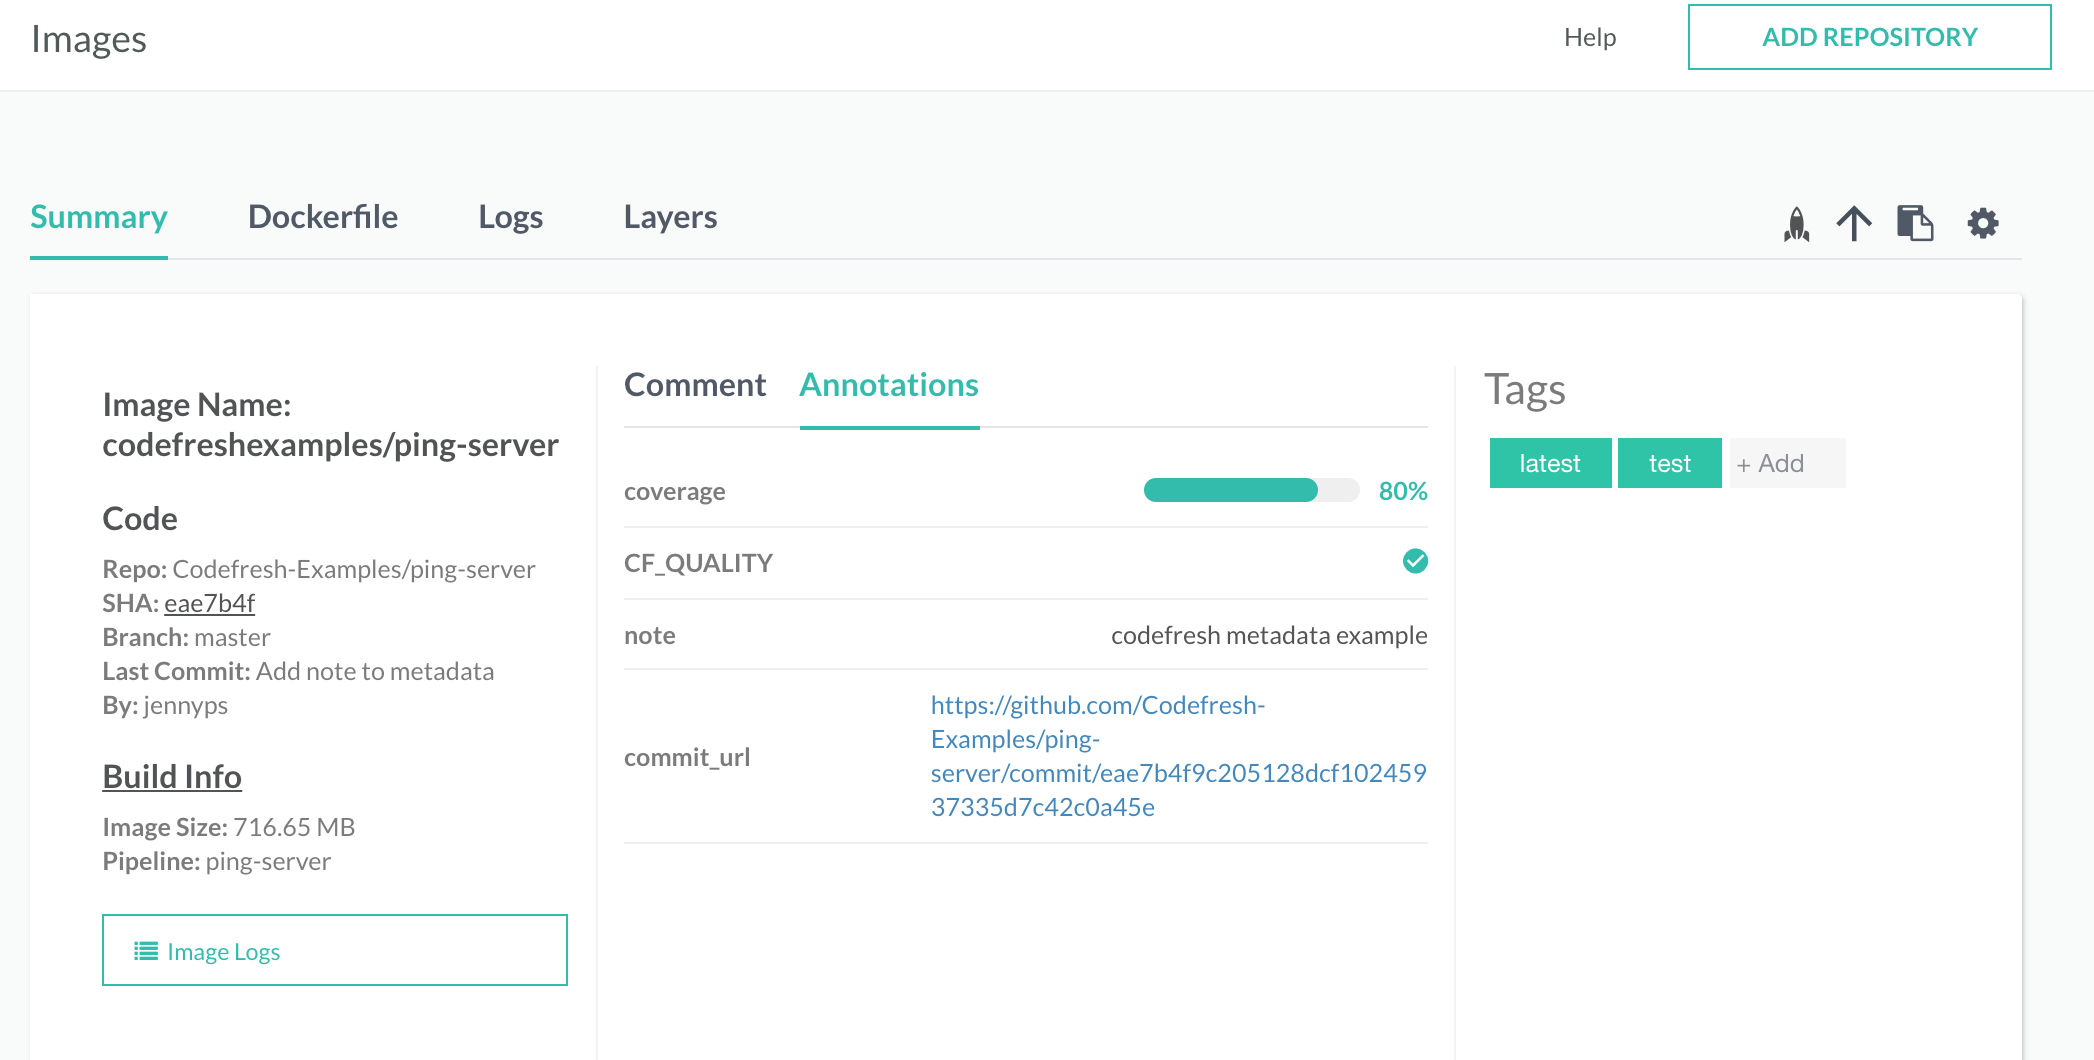
You can set a quality indicator to images to show if they passed or failed tests. An image with the boolean annotation CF_QUALITY set to true will have a quality indicator in the ‘Images’ view.
YAML
version: '1.0'
steps:
  build_step:
    type: build
    image_name: myrepo/imagename
    working_directory: ./
    dockerfile: Dockerfile

  unit_test:
    image: '${{build_step}}'
    working_directory: IMAGE_WORK_DIR
    commands:
      - echo test
    on_success:
      metadata:
        set:
          - '${{build_step.imageId}}':
              - CF_QUALITY: true
    on_fail:
      metadata:
        set:
          - '${{build_step.imageId}}':
              - CF_QUALITY: false
Image quality has 3 indicators:
- True - this image is considered a quality image (ex. passed tests),
- False - this image is not considered a quality image (ex. when tests failed but the image was already built).
- No value (nobody set the annotation) - this image has no quality indicator.
Viewing Image Metadata Annotations
You can view an image’s metadata annotation by:
- Navigating to the
Imagesview - Selecting the target image
- Selecting the
Annotationstab
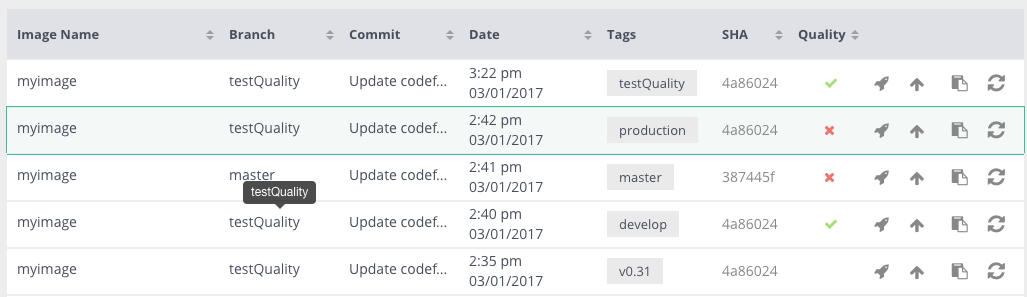
In addition, you can add selected annotations to the images table on images page. To display an annotation in the image table, click on the gear icon at the top right corner of image page and then select all annotations you want to display.

Annotating images programmatically
It is also possible to annotate images with the Codefresh CLI.
First find the id of an image that you wish to annotate with the command
codefresh get images
You can also search for a specific image by name:
$ codefresh get images --image-name custom
ID           NAME                   TAG CREATED          SIZE     PULL
b5f103a87856 my-custom-docker-image bla Fri Feb 01 2019  91.01 MB r.cfcr.io/kostis-codefresh/my-custom-docker-image:bla
Then once you have the ID of the image you can use the annotate command to add extra metadata:
codefresh annotate image b5f103a87856 -l coverage=75
Using custom metadata in Codefresh pipelines
You can also use the Codefresh CLI to fetch existing metadata from images. It is then very easy to extract and process specific fields with yq.
Here is an example:
$ codefresh get image b5f103a87856 --output=yaml | yq -r .annotations.coverage
75
You can then easily process the metadata (e.g. with scripts) and take decisions according to them. Here is an example step that will fail the build if test coverage on an image is less than 80%
YAML
version: '1.0'
steps:
  findLabel:
    title: Get image label for coverage
    image: codefresh/cli
    commands:
      - export MY_COVERAGE=$(codefresh get image b5f103a87856 --output=yaml | yq -r .annotations.coverage)
      - echo "Coverage is $MY_COVERAGE"
      - if [[ $MY_COVERAGE -lt "80" ]]; then exit 1 ; fi
The possibilities are endless as you can take any combination of image metadata and use any complex conditional in order to process them in a Codefresh pipeline.
Related articles
Docker registries for pipeline integrations
Accessing a Docker registry from your Kubernetes cluster