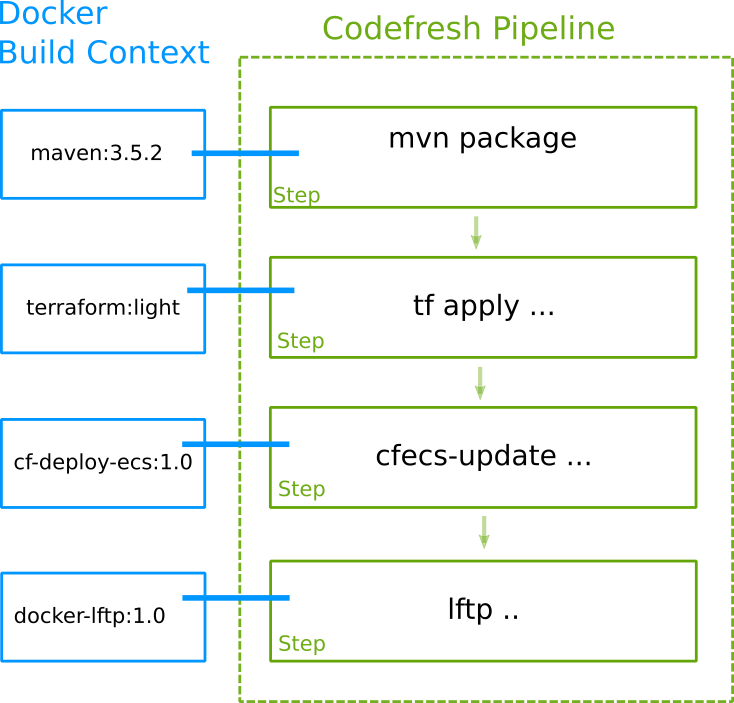
Introduction to Codefresh pipelines
Understand how Codefresh pipelines work
The central component of the Codefresh platform for continuous integration (CI) are pipelines. Pipelines are workflows that contain individual steps, with each step responsible for a specific action in the CI process.
Use CI pipelines to:
- Compile and package code
- Build Docker images
- Push Docker images to any Docker Registry
- Deploy applications/artifacts to VMs, Kubernetes clusters, FTP sites, S3 buckets etc.
- Run unit tests, integration tests, acceptance tests etc.
- Any custom action that you define
Why are Codefresh CI pipelines different?
Codefresh offers unique characteristics in CI pipelines that serve as the cornerstone of the build/deploy process:
- All steps in Codefresh pipelines are executed inside a Docker container of your choosing.
- All steps in Codefresh share the same “workspace” in the form of a shared Docker volume.
- The shared Docker volume is automatically cached between pipeline executions.
- Every successful pipeline automatically pushes its Docker image to the default Docker registry defined in your account.
- Codefresh has a distributed Docker cache for all build nodes and caches layers similar to the docker daemon on your workstation. This is fully automated, and does not need to be configured to activate it.
Using Docker containers as build tooling
Unlike traditional solutions, Codefresh was built from the ground up to have full Docker support. All Codefresh pipelines deal with Docker images, either using them as runtime tools or creating them as deployment artifacts. Everything that happens in Codefresh uses a Docker image behind the scenes.
It is important that you understand how to take advantage of Docker-based pipelines as they are much more powerful than traditional VM solutions. The capability to define your own tooling cannot be understated. It is the fastest way to take full control of your build tools and to upgrade them easily.
With traditional VM-based build solutions, you are constrained on the build and deployment tools provided by the vendor. If for example you need a new version of Node/Java/Python other than the one that is provided on the build slave, you have to wait for your vendor to add it. If you need to use a special tool (e.g terraform, gcloud) and the vendor does not support it you are out of luck.
With Codefresh you don’t have to care about what is installed in the Runners that execute your builds. They can run any Docker image of your choosing. You are free to update the version of the image used at any given time.
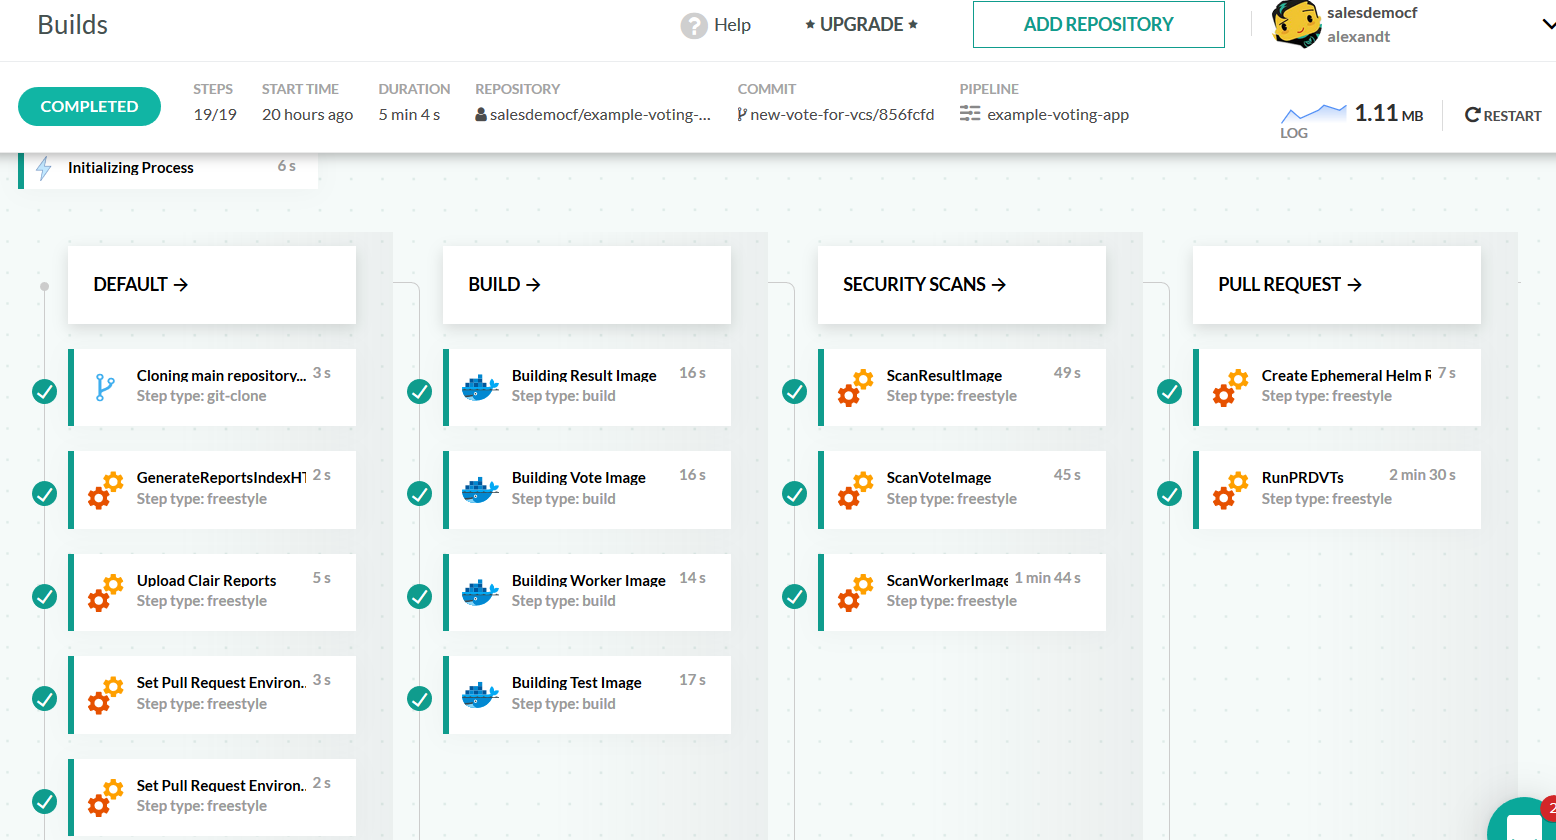
Here is an example:
- The first step runs under the context of a Node image that prepares the application and runs unit tests.
- The second step uses an image with s3 command line tools and uploads the test results to a bucket that holds test reports.
- The third step creates a Helm chart and pushes it to a Helm repository.
You don’t need to contact Codefresh and ask them to add the S3 executable on the build runners. You just use a prebuilt Docker image that contains it. The version used for Node is defined by you and if you wish to upgrade to another version you simply change the definition of the pipeline.
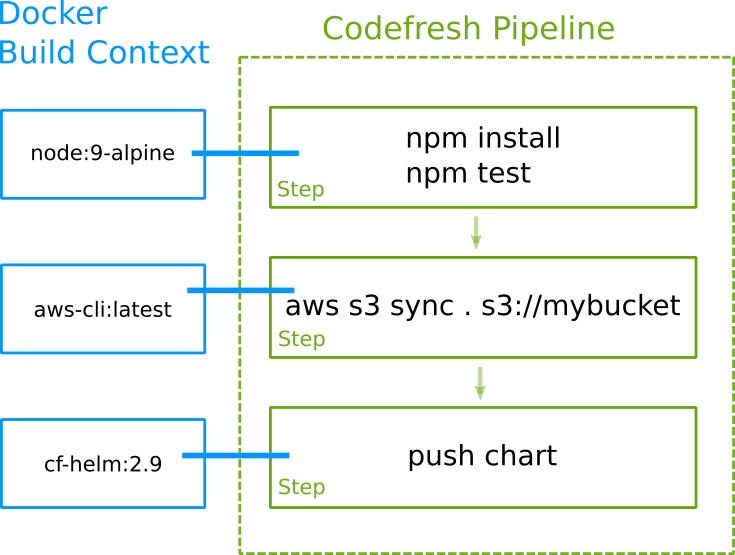
Here is another example:
- The first step runs under the context of a Maven image that compiles the code and creates an executable.
- The second step uses a Docker image that contains terraform and creates a single ECS instance in AWS.
- The third step uses a custom Docker image that deploys to the ECS container that was just created.
- The last step uploads the Maven reports that were created in step 1 to an FTP site.
You should now start seeing the endless possibilities. You can mix and match any Docker image (either a public one or your own) to use a build context in your step. This makes Codefresh a future-proof solution for all build tools that exist now and all of them that will appear in the future. As long as there is a Docker image for a tool, Codefresh can use it in a pipeline without any extra configuration.
Codefresh also offers a marketplace with dozens of existing plugins.
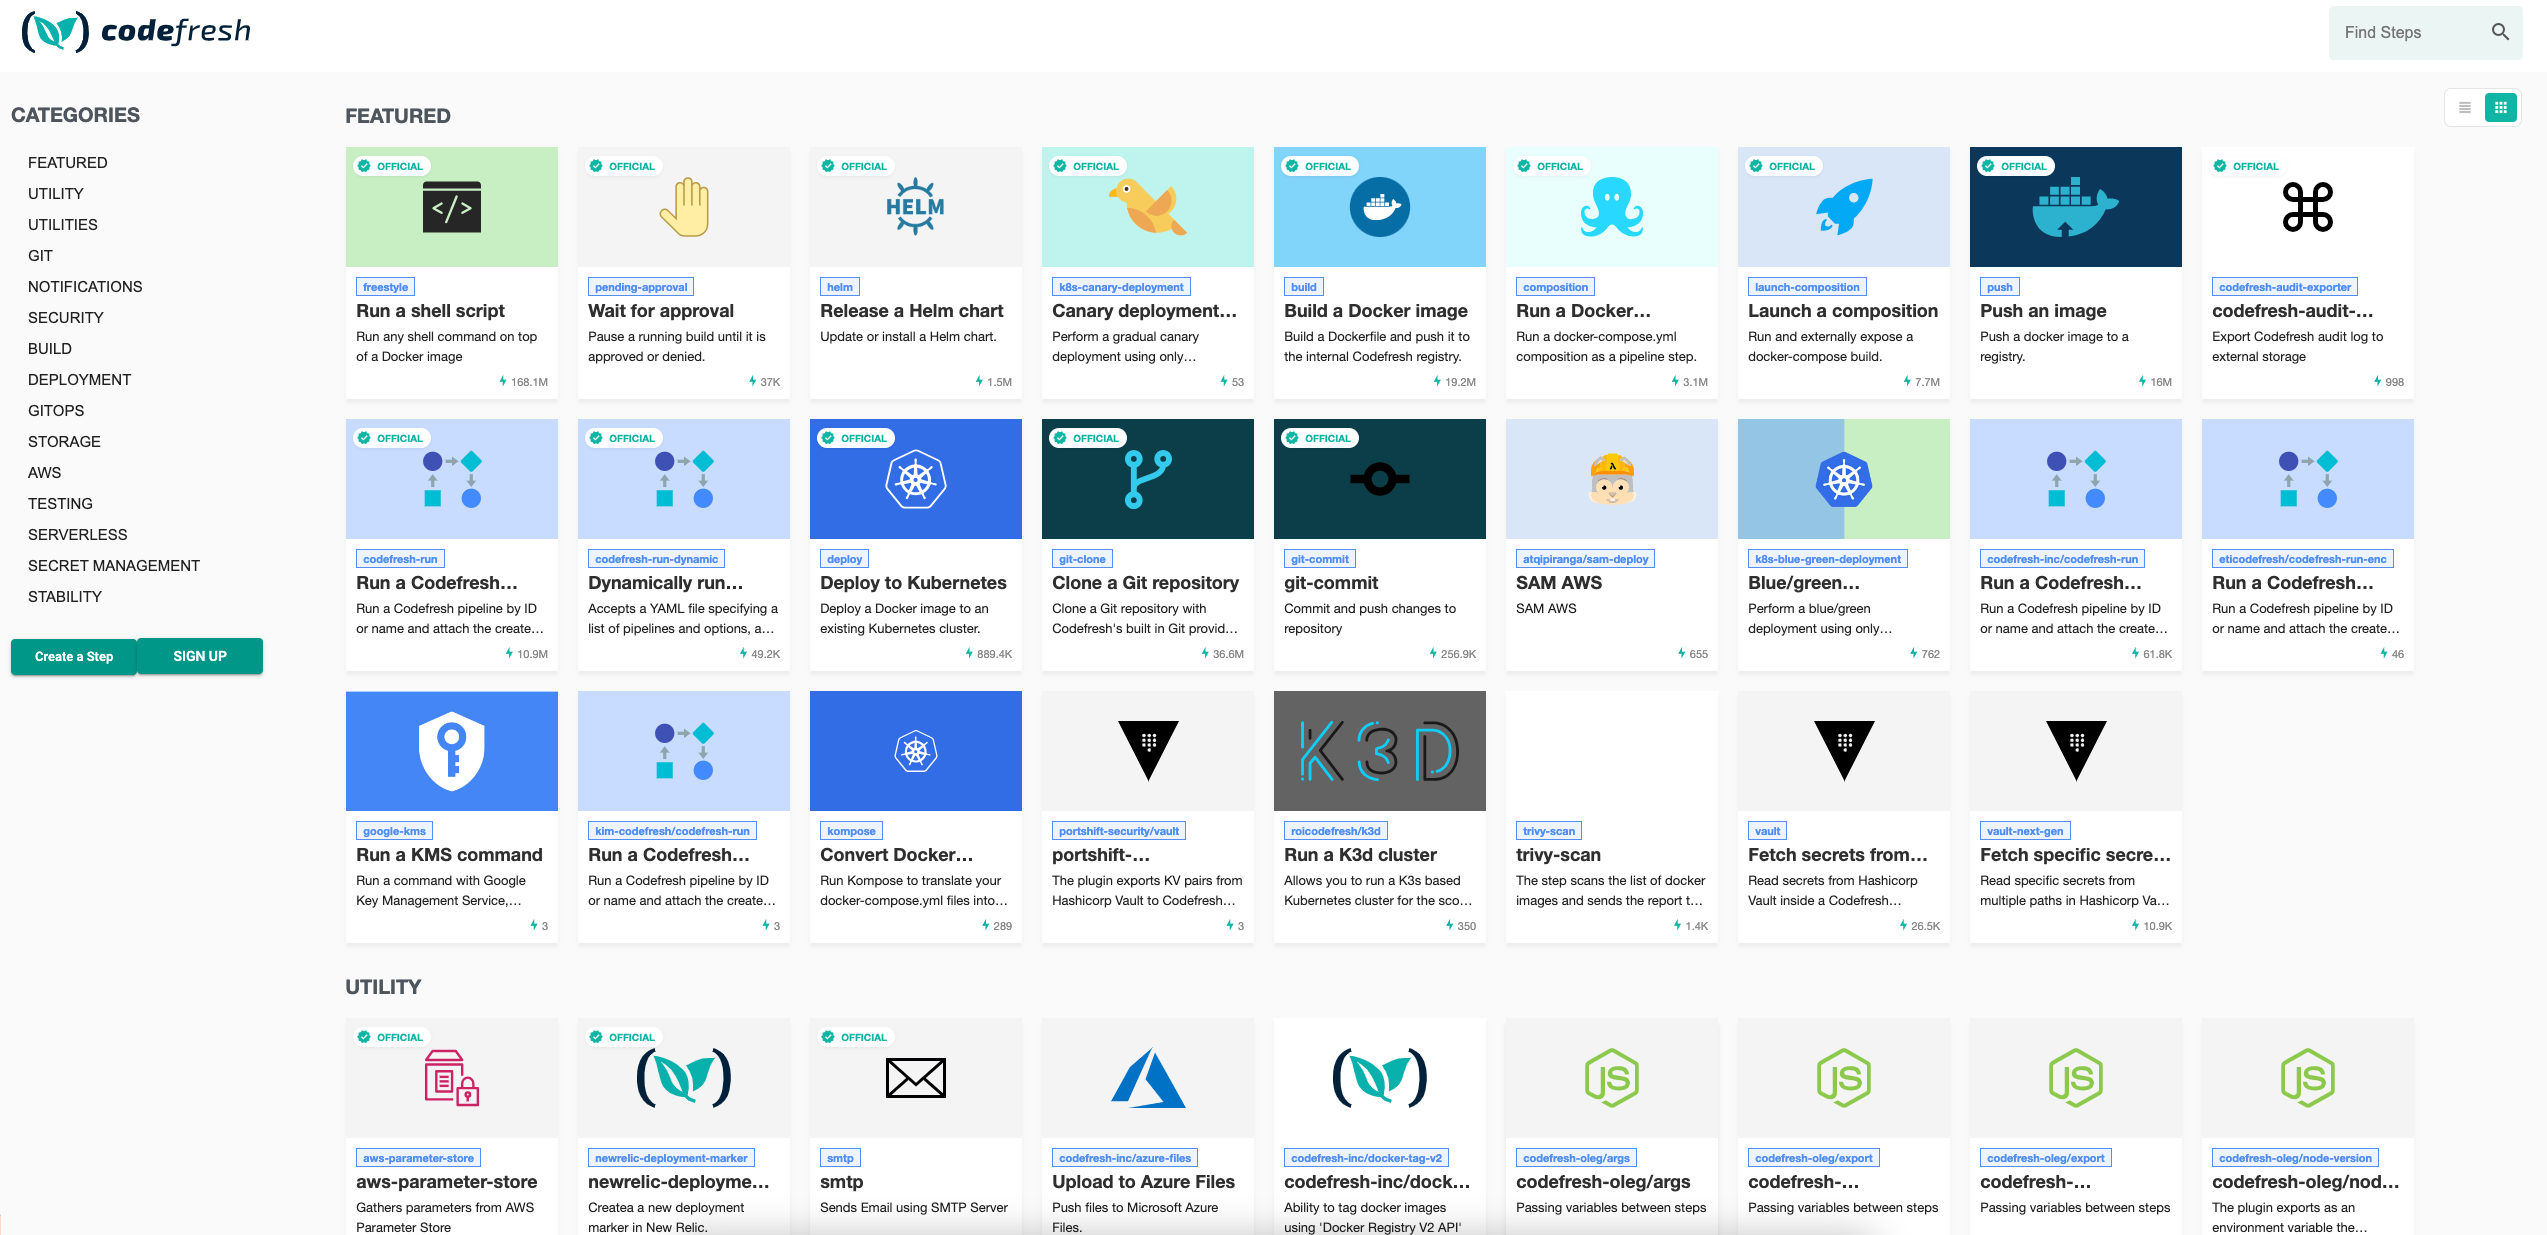
All plugins in the marketplace are open-source, and we accept external contributions so you can easily add your own.
Sharing the workspace between build steps
We have seen in the previous section that Codefresh can use Docker images as the context of a build step. The second important point to understand regarding Codefresh CI pipelines is that the default workspace of each step is shared between all steps in a pipeline.
This happens via a Docker volume which is attached to all Docker containers that represent each step. This volume is
always available at /codefresh/volume, and is used as the parent folder where the project is cloned.
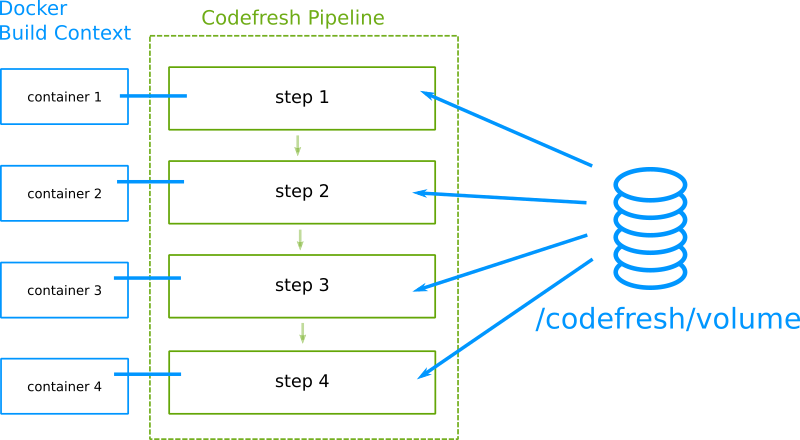
Anything in this volume is available to all steps of the pipeline (as well as to subsequent executions of the same pipeline as we will see later).
Again, this places Codefresh ahead of traditional solutions that execute build steps in a completely isolated manner. In traditional VM-based builds, using artifacts produced from one step in another step, is a complicated process as one must declare which artifact folders should be re-used. Artifact re-use sometimes happens with compression/decompression of the respective folder resulting in really slow builds if a project is very big.
Codefresh does not need to bother the user with artifact reuse across steps. Anything that is placed in the shared Codefresh volume will automatically be available to the next steps in the pipeline without any extra configuration.
Example 1
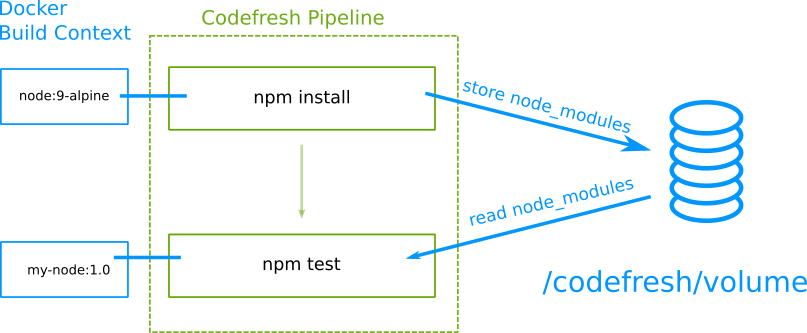
- The first step runs
npm installand downloads all libraries innode_modulesinto the shared Codefresh volume. - The second step runs
npm test. The foldernode_modulesis still present from the previous step.
Example 2
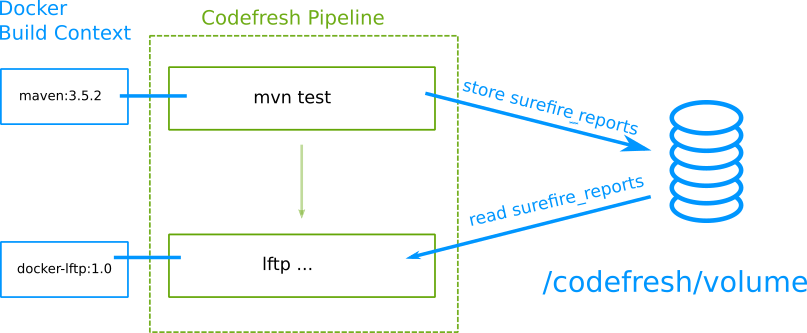
- The first step runs
mvn testand produces some test reports intarget/surefire_reportsinto the shared Codefresh volume. - The next step uploads these reports using FTP to an external site.
The common volume shared among build steps makes it very easy to create pipelines that work in a gradual manner where any step in the pipeline is using artifacts produced by a previous one.
NOTE
The shared volume is NOT available in build steps. This is not a Codefresh limitation. Docker itself does not allow volumes during builds. There is no folder/codefresh/volumeinside a Dockerfile for you to access.
You can also use environment variables to share information between steps. All predefined environment variables are available to all steps, and each individual step can use cf_export to dynamically inject extra environment variables during the build process.
Working with Codefresh pipelines
Now that we know the basics, we can see how you can take advantage of Docker-based pipelines in order to build and deploy your projects.
Cloning the source code
You can clone source code using the built-in Git-clone step as the first step in a CI pipeline, or manually run your own Git clone commands in a freestyle step. Codefresh has built-in Git integration with all popular git providers (both cloud and on-premises installations).
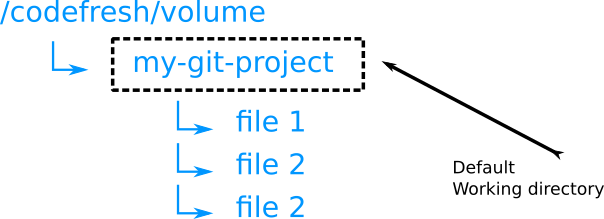
Codefresh uses the shared volume as the parent folder of the project. So if your pipeline is connected to a Git repo that contains my-project the following will happen:
/codefresh/volumeis the shared directory for all steps/codefresh/volume/my-projectis where the source code exists. This is also the current working directory- Any other directory (e.g.
/bin,/var,/opt) depends on the current container image that is used as build context
There are three important points to consider regarding these folders:
-
The working directory of each step is by default the project folder (e.g.
/codefresh/volume/my-project). Therefore your build step can run commands exactly as you would run them locally (e.g.npm install, pip install, mvn package, bundle install). -
Notice that the project folder is placed on the Codefresh volume, so by default it is also available to all other steps. The code that you check out in the beginning, as well as all other files that are created on it, are available to all steps. Once you create
node_modules, or any other folder that exists inside the project folder, it will automatically persist for all other steps. -
Finally,
/codefresh/volumeis an internal folder name, and you should use${{CF_VOLUME_PATH}}in your codefresh.yml file if you really want to reference this folder. You can also reference your project folder as${{CF_VOLUME_PATH}}/${{CF_REPO_NAME}}if you need it.
See system variables for more information.
Working with Docker inside a Codefresh pipeline
We have already seen that Codefresh pipelines are based on Docker images and that each step runs inside the context of a Docker container. You might be wondering how you can run Docker commands directly inside a Codefresh pipeline.
The answer is that you don’t. Even though in the future Codefresh might allow for Docker-in-Docker capabilities, at the moment this is not supported for security reasons (only enterprise customers have access to the underlying Docker daemon). Any scripts that you already have that run Docker commands on their own will need to be adapted to Codefresh pipelines.
Usually you want to run a docker command for four reasons:
- To build a Docker image
- To push a Docker image
- To run a docker-compose setup
- To run a Docker container
For all these situations Codefresh gives you special pipeline steps that perform the respective action. These are:
- The build step
- The push step
- The compositions step
- The freestyle step
The commands you define in a freestyle step run automatically in a Docker container that is attached to that step once the pipeline executes.
Therefore, this command on your local workstation:
docker run python:3.6.4-alpine3.6 pip install .
will become in Codefresh
CollectAllMyDeps:
  title: Install dependencies
  image: python:3.6.4-alpine3.6
  commands:
    - pip install .
For the plugins in the Step Marketplace we already give an example of the YAML part that must be included in your pipeline:
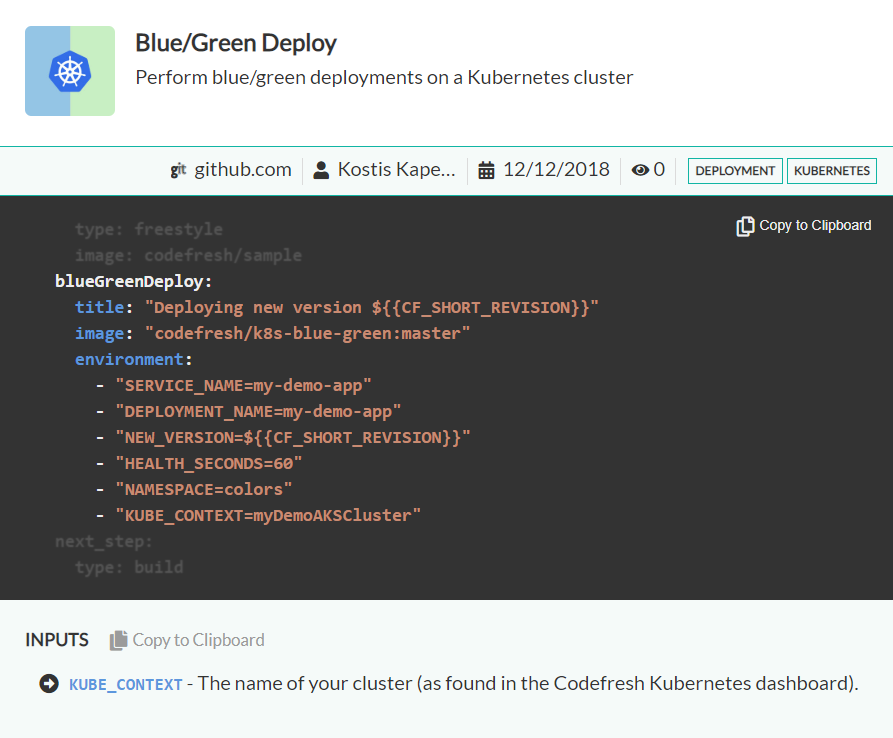
Each plugin also defines its input/output in the form of environment variables and files.
Creating Docker images dynamically as build tools
Now we reach one of the most powerful features of Codefresh pipelines. We have already seen that freestyle steps in pipelines are just a series of commands that run inside the context of a Docker container. In most cases the images used for the freestyle steps are known in advance and come from public (e.g. Dockerhub) or private Docker registries.
Codefresh is one the few CI/CD solutions that not only offers easy Docker registry integration accessible to all pipelines but also allows you to build docker images on demand in the same pipeline where they are required.
This means that you can create a special Docker image in an early step inside a Codefresh pipeline and then reference it in a later step in the same pipeline.
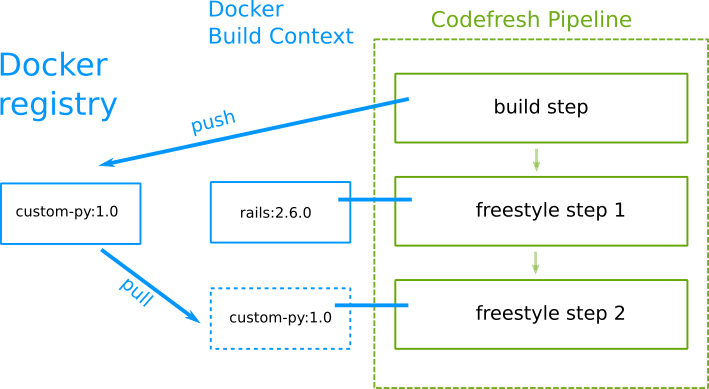
Let’s say for example that you are moving a legacy application to Codefresh which is deployed using a special Python script. Your main application is a Ruby-On-Rails app. Both applications exist in the same git repository (we mention this for simplicity reasons, Codefresh also supports checking out code from multiple repositories).
You can create a single pipeline with Codefresh that does the following:
- Checks out the code
- Creates a Docker image based on Python for the deployment tool
- Uploads the Python tool Docker image to the internal registry
- Builds the Ruby application using a freestyle step with the R-O-R image from Dockerhub
- Deploys the Ruby application by running the Python based deployment tool image (after pulling it first)
This concept is ground-breaking as it allows you to automatically update your build tools that are used in any pipeline. Even though you could manually create the Docker images yourself before-hand, it is better to completely automate them inside the pipeline they are actually needed. This ensures that both the application and its tooling are always at the latest version.
How caching works in Codefresh
Codefresh employs several caching mechanisms for both Dockerized and non-dockerized applications. The shared volume is also cached behind the scenes automatically. See our caching guide for more details.
Calling other pipelines
It is also possible to chain multiple pipelines together in Codefresh. To accomplish this, Codefresh offers a special Docker image that contains the Codefresh CLI and allows you to trigger another pipeline using its name.
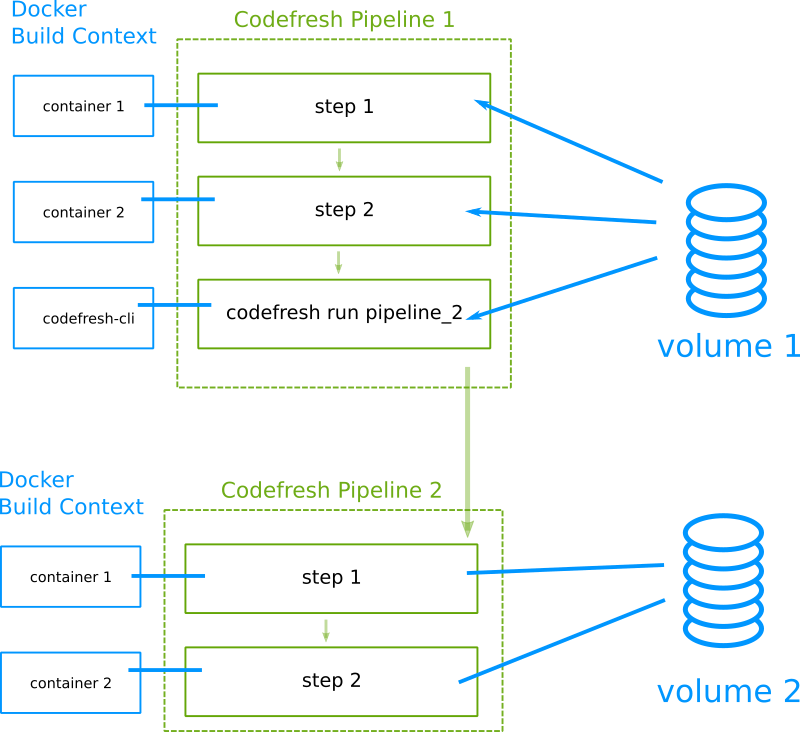
Notice that each pipeline in Codefresh is completely isolated from the other. They use a different Docker volume so the build context of each one cannot access files from the other. This may change in the future, but for the time being you should know that only steps within the same pipeline can share artifacts.
Related articles
Creating pipelines
Codefresh YAML for pipeline definitions
Build and Docker caching