Codefresh Runner installation
Run Codefresh pipelines on your private Kubernetes cluster
Install the Codefresh Runner on your Kubernetes cluster to run pipelines and access secure internal services without compromising on-premises security requirements. These pipelines run on your infrastructure, even behind the firewall, and keep code on your Kubernetes cluster secure.
The Codefresh Runner does not rely on specific dockershim features. It can work with any container runtime that adheres to the standards. In Codefresh pipelines, the docker socket/daemon is an internal docker daemon created and managed by the pipeline itself. It is also distinct from the docker daemon on the host node, which may not even exist in cases where containerd or cri-o is used. Review Runner architecture and how the Runner works behind firewalls.
IMPORTANT:
We have transitioned to a new Helm-based installation for the Codefresh Runner, which is now the default for all Runner installations.
We encourage you to transition existing installations, both CLI- and Helm-based, to the new Helm installation.
The CLI-based installation and configuration is considered legacy, and will not be actively maintained going forward.
Codefresh Runner with spot instances
Using spot instances can cause failures in Codefresh pipeline builds as they can be taken down without notice.
If you require 100% availability, we do not recommend using spot instances.
After installing the Codefresh Runner, you can:
- View Runner components and resources
- View the Runner Agent and its Runtime Environments
- Configure different aspects of the Runner
System requirements
| Item | Requirement |
|---|---|
| Kubernetes cluster | Server version 1.21 or higher. Tip: To check the server version, run: kubectl version --short. |
| Helm | 3.8.0 and higher |
| Container runtime | Any compliant container runtime, as the runner is not dependent on any special dockershim features. Examples: |
| Codefresh API Token |
|
Install Codefresh Runner with Helm
To install the latest version of Codefresh Runner, follow the chart installation instructions on ArtifactHub.
Migrating existing installations
You need to migrate existing CLI- and Helm-based installations of the Codefresh Runner to the new Helm installation.
- CLI installations
- Uninstall the existing Runner installation
- Reinstall the latest Helm version, making sure you add all the manual overrides you made to the Runtime specifications to the new Helm values file.
For example storage configuration in.values.storage, dind/engine configuration in.Values.runtime.dind/engine.
- Helm installations
Based on the chart version of the Runner installed, from 3.x or higher, you need to migrate the existing Helm chart to the latest version.- For Helm chart customization, see Chart Configuration on ArtifactHub.
- For upgrade instructions per chart version, see the Upgrade Chart section, also on ArtifactHub.
If you need help, please reach out to Codefresh support.
Runner components and resources
Once installed, the Codefresh Runner is similar to any Kubernetes application, and you can monitor it using your existing tools.
Among the Runner components, only the runner pod persists within your cluster. Other components, such as the engine, exist for the duration of pipeline build.
To monitor the Runner, list the resources inside the namespace you chose during installation:
$ kubectl get pods -n codefresh-runtime
NAME                                              READY   STATUS    RESTARTS   AGE
dind-5ee7577017ef40908b784388                     1/1     Running   0          22s
dind-lv-monitor-runner-hn64g                      1/1     Running   0          3d
dind-lv-monitor-runner-pj84r                      1/1     Running   0          3d
dind-lv-monitor-runner-v2lhc                      1/1     Running   0          3d
dind-volume-provisioner-runner-64994bbb84-lgg7v   1/1     Running   0          3d
engine-5ee7577017ef40908b784388                   1/1     Running   0          22s
monitor-648b4778bd-tvzcr                          1/1     Running   0          3d
runner-5d549f8bc5-7h5rc                           1/1     Running   0          3d
You can also list secrets, config-maps, logs, volumes, etc. for the Codefresh builds.
The Runner uses the following pods:
runner: Picks tasks (builds) from the Codefresh APIengine: Runs pipelinesdind: Builds and uses Docker imagesdind-volume-provisioner: Provisions volumes (PVs) fordinddind-lv-monitor: Cleans local volumes
Networking Requirements
dind: Pod creates an internal network in the cluster to run all the pipeline steps; needs outgoing/egress access to Docker Hub andquay.io.runner: Pod needs outgoing/egress access tog.codefresh.io; needs network access to app-proxy if installed.engine: Pod needs outgoing/egress access tog.codefresh.io,*.firebaseio.comandquay.io; needs network access todindpod
All CNI providers/plugins are compatible with the runner components.
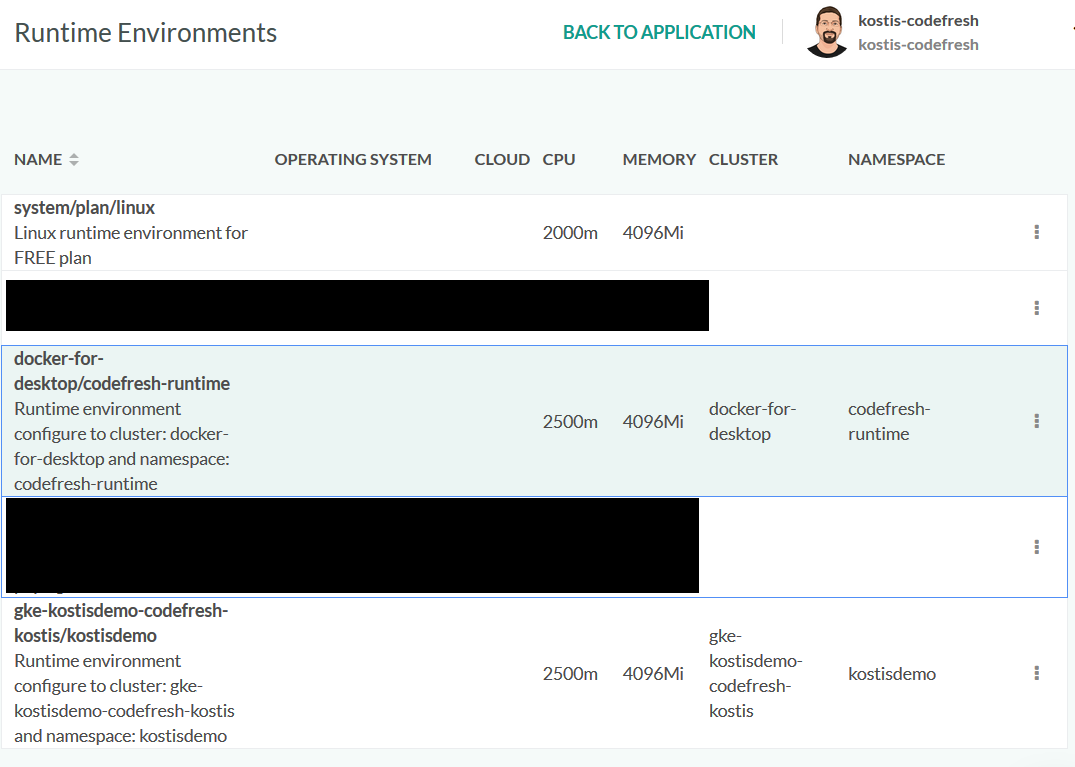
Runner Agents and Runtime Environments
View Codefresh Runners installed for your account and their status. The Codefresh Runners tab in Pipeline Runtimes displays the list of Agents for the account. Every Agent is attached to one or more Runtime Environments. The API token is the one provided during Runner installation.
The Runner polls the Codefresh platform every three seconds by default to automatically create all resources needed for running pipelines.
- In the Codefresh UI, click the Settings icon on the toolbar.
- From the sidebar, select Pipeline Runtimes, and then click Codefresh Runners.
- To add an Agent, click New Agent, and do the following:
- In the Agent Name field, enter the name of the Agent.
- From the list of Runtime Environments, select one or more Runtime Environments to attach to the Agent.
- Click Save.
Select a default Runtime Environment
If you have multiple Runtime Environments for an Agent, select the one to use as the default environment for all the pipelines in the account. You can always override the default Runtime Environment if needed for a specific pipeline.
- In the Codefresh UI, click the Settings icon on the toolbar.
- From the sidebar, select Pipeline Runtimes.
- From the list of Pipeline Runtimes, select the row with the runtime to set as the default.
- Click the context menu on the right, and select Set as Default.
The selected Runtime Environment is outlined to indicate that it is the default.
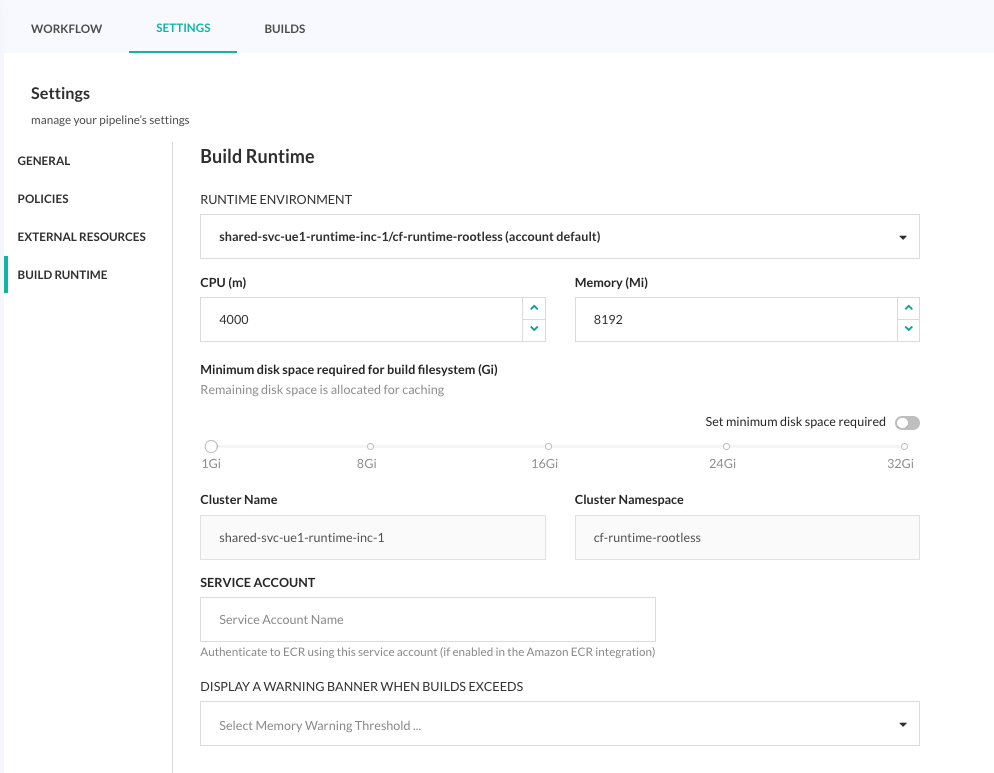
Override default Runtime Environment for a pipeline
Override the default Runtime Environment for a specific pipeline through the pipeline’s Build Runtime settings.
Runner configuration
After you install the Codefresh Runner, use the configuration options to customize the installation for your organization.
For detailed information, see Configuration in ArtifactHub.
Runner volume configuration options
- Custom volume mounts
Add custom volumes and volume mounts to the runtime environment for all pipeline steps to have access to the same set of external files.
See Custom volume mounts. -
Volume reuse
Configure the value ofreuseVolumeSelectorin the runtime environment to define volume reuse behavior.
See Volume reuse policy. -
Volume cleaners
Manage disk space and prevent out-of-sapce errors for Codefresh pipelines.
See Volume cleaners. -
EBS volume configuration
Assign permissions todind-volume-provisionerto create/attach/detach/delete/get EBS volumes.
See EBS backend. -
Azure Disks volume configuration
Assign permissions todind-volume-provisionerto create/delete/get Azure disks.
See Azure Disks backend. - GCE Disks volume configuration
AssignComputeEngine.StorageAdminpermissions todind-volume-provisioner.
See GCE Disks backend.
Runner custom environment variables
Add custom environment variables to the Runtime Environment that all pipeline steps can access.
See Custom global environment variables.
Runner rootless DinD
To run the docker daemon as non-root user in rootless mode, configure the dind image tag.
See Docker daemon in rootless mode.
Runner ARM builds
Run native ARM64v8 builds with nodeSelector or tolerations for dind pods.
See Run native ARM builds.
Runner on OpenShift
Install Runner on OpenShift by configuring values.yaml.
See Install Runner on OpenShift.
Runner in Agentless mode
For on-premises installations, install Runner in agentless mode.
See Agentless install mode for on-premises.
Runtime Environment specifications
The section describes the specifications for the Runtime Environment.
There are additional and hidden fields auto-generated by Codefresh that complete the specifications. You can view and edit these fields only for Codefresh On-Premises installations.
Example: Default Runtime Environment specifications
Below is an example of the default and basic runtime spec after you’ve installed the Codefresh Runner:
version: 1
metadata:
  ...
runtimeScheduler:
  cluster:
    clusterProvider:
      accountId: 5f048d85eb107d52b16c53ea
      selector: my-eks-cluster
    namespace: codefresh
    serviceAccount: codefresh-engine
  annotations: {}
dockerDaemonScheduler:
  cluster:
    clusterProvider:
      accountId: 5f048d85eb107d52b16c53ea
      selector: my-eks-cluster
    namespace: codefresh
    serviceAccount: codefresh-engine
  annotations: {}
  userAccess: true
  defaultDindResources:
    requests: ''
  pvcs:
    dind:
      storageClassName: dind-local-volumes-runner-codefresh
extends:
  - system/default/hybrid/k8s_low_limits
description: '...'
accountId: 5f048d85eb107d52b16c53ea
Top-level fields
| Field name | Type | Value |
|---|---|---|
version |
string | Runtime environment version |
metadata |
object | Meta-information |
runtimeScheduler |
object | Engine pod definition |
dockerDaemonScheduler |
object | Dind pod definition |
extends |
array | System field (links to full runtime spec from Codefresh API) |
description |
string | Runtime environment description (k8s context name and namespace) |
accountId |
string | Account to which this runtime belongs |
appProxy |
object | Optional filed for app-proxy |
runtimeScheduler fields (engine)
| Field name | Type | Value |
|---|---|---|
image |
string | Override default engine image |
imagePullPolicy |
string | Override image pull policy (default IfNotPresent) |
type |
string KubernetesPod |
|
envVars |
object | Override or add environment variables passed into the engine pod |
userEnvVars |
object | Add external env var(s) to the pipeline. See Custom Global Environment Variables. |
cluster |
object | k8s related information (namespace, serviceAccount, nodeSelector) |
resources |
object | Specify non-default requests and limits for engine pod. For memory, use Mi (mebibytes).For CPU, use m (millicpu). |
tolerations |
array | Add tolerations to engine pod |
annotations |
object | Add custom annotations to engine pod (empty by default {}) |
labels |
object | Add custom labels to engine pod (empty by default {}) |
dnsPolicy |
string | Engine pod’s DNS policy |
dnsConfig |
object | Engine pod’s DNS config |
runtimeScheduler example:
runtimeScheduler:
  imagePullPolicy: Always
  cluster:
    clusterProvider:
      accountId: 5f048d85eb107d52b16c53ea
      selector: my-eks-cluster
    nodeSelector: #schedule engine pod onto a node whose labels match the nodeSelector
      node-type: engine
    namespace: codefresh
    serviceAccount: codefresh-engine
  annotations: {}
  labels:
    spotinst.io/restrict-scale-down: "true" #optional label to prevent node scaling down when the runner is deployed on spot instances using spot.io
  envVars:
    NODE_TLS_REJECT_UNAUTHORIZED: '0' #disable certificate validation for TLS connections (e.g. to g.codefresh.io)
    METRICS_PROMETHEUS_ENABLED: 'true' #enable /metrics on engine pod
    DEBUGGER_TIMEOUT: '30' #debug mode timeout duration (in minutes)
  userEnvVars:
    - name: GITHUB_TOKEN
      valueFrom:
        secretKeyRef:
          name: github-token
          key: token
  resources:
    requests:
      cpu: 60m
      memory: 500Mi
    limits:
      cpu: 1000m
      memory: 2048Mi
  tolerations:
    - effect: NoSchedule
      key: codefresh.io
      operator: Equal
      value: engine
dockerDaemonScheduler fields (dind)
| Field name | Type | Value |
|---|---|---|
dindImage |
string | Override default dind image |
type |
string | DindPodPvc |
envVars |
object | Override or add environment variables passed into the dind pod. See IN-DIND cleaner |
userVolumeMounts with userVolumes |
object | Add volume mounts to the pipeline. See Custom Volume Mounts. |
cluster |
object | k8s related information (namespace, serviceAccount, nodeSelector) |
defaultDindResources |
object | Override requests and limits for dind pod (defaults are cpu: 400m and memory:800Mi). For memory, use Mi (mebibytes); for CPU, use m (millicpu). |
tolerations |
array | Add tolerations to dind pod |
annotations |
object | Add custom annotations to dind pod (empty by default {}) |
labels |
object | Add custom labels to dind pod (empty by default {}) |
pvc |
object | Override default storage configuration for PersistentVolumeClaim (PVC) with storageClassName, volumeSize, reuseVolumeSelector. See Volume reuse policy. |
dnsPolicy |
string | Dind pod’s DNS policy |
dnsConfig |
object | Dind pod’s DNS config |
dockerDaemonScheduler example:
dockerDaemonScheduler:
  cluster:
    clusterProvider:
      accountId: 5f048d85eb107d52b16c53ea
      selector: my-eks-cluster
    nodeSelector: #schedule dind pod onto a node whose labels match the nodeSelector
      node-type: dind
    namespace: codefresh
    serviceAccount: codefresh-engine
  annotations: {}
  labels:
    spotinst.io/restrict-scale-down: "true" #optional label to prevent node scaling down when the runner is deployed on spot instances using spot.io
  userAccess: true
  defaultDindResources:
    requests: ''
    limits:
      cpu: 1000m
      memory: 2048Mi
  userVolumeMounts:
    my-cert:
      name: cert
      mountPath: /etc/ssl/cert
      readOnly: true
  userVolumes:
    my-cert:
      name: cert
      secret:
        secretName: tls-secret
  pvcs:
    dind:
      storageClassName: dind-local-volumes-runner-codefresh
      volumeSize: 30Gi
      reuseVolumeSelector: 'codefresh-app,io.codefresh.accountName,pipeline_id'
  tolerations:
    - key: codefresh.io
      operator: Equal
      value: dinds
      effect: NoSchedule
Replacing expired certificates
If your builds are stuck in Pending or failing with Failed to validate connection to Docker daemon; caused by Error: certificate has expired, you can verify if your certificates have expired, and then replace them if needed.
For Codefresh Runner installed with HELM chart
- Re-apply the
cf-runtimehelm chart.
Post-upgrade, thegencerts-dindHelm hook regenerates the DinD certificates using a new CA (Certificate Authority).
For Codefresh Runner installed with legacy CLI
- Delete
codefresh-certs-serverk8s secret; - Download
./configure-dind-certs.shscript and run it:
# Ensure the following environment variables are defined before running the command:
# $RUNTIME_NAMESPACE: The namespace where the runtime is installed.
# $CODEFRESH_HOST: The Codefresh host URL (e.g., g.codefresh.io).
# $CODEFRESH_API_TOKEN: Your Codefresh API token with the required scopes.

kubectl -n $RUNTIME_NAMESPACE delete secret codefresh-certs-server

chmod +x ./configure-dind-certs.sh
./configure-dind-certs.sh -n $RUNTIME_NAMESPACE https://$CODEFRESH_HOST $CODEFRESH_API_TOKEN
CLI-based Codefresh Runner installation
LEGACY CONTENT
Please be aware that the content in this section, including installation and configuration, is no longer actively updated.
We have transitioned to a new Helm-based installation for the Codefresh Runner. As a result, this content will be deprecated in the coming months.
If you have the new Helm-based Runner, skip the remaining sections.
Access to the Codefresh CLI is only needed when installing the Codefresh Runner. After installation, the Runner authenticates on its own using the details provided. You don’t need to install the Codefresh CLI on the cluster running Codefresh pipelines.
During installation, you can see which API token will be used by the Runner (if you don’t provide one). The printed token includes the permissions used by the Runner to communicate with the Codefresh platform and run pipelines. If you save the token, even if or when you delete the deployment, you can use the same token to restore the Runner’s permissions without having to re-install the Codefresh Runner.
If the Kubernetes cluster with the Codefresh Runner is behind a proxy server without direct access to g.codefresh.io, you need additional steps to complete the installation.
NOTE
Only a Codefresh account administrator can install the Codefresh Runner.
Install Codefresh Runner through CLI Wizard
Before you begin
Make sure you have a:
- Codefresh account
- API token with the required scopes to authenticate the CLI
How to
- Install the Codefresh CLI:
npm install -g codefresh - Authenticate the Codefresh CLI:
codefresh auth create-context --api-key {API_KEY}where:
{API_KEY}is the API key you generated from User Settings. - Start the installation:
codefresh runner init
TIP:
To inspect all available options run init with the --help flag: codefresh runner init --help
- Follow the instructions in the CLI Wizard to complete the installation.
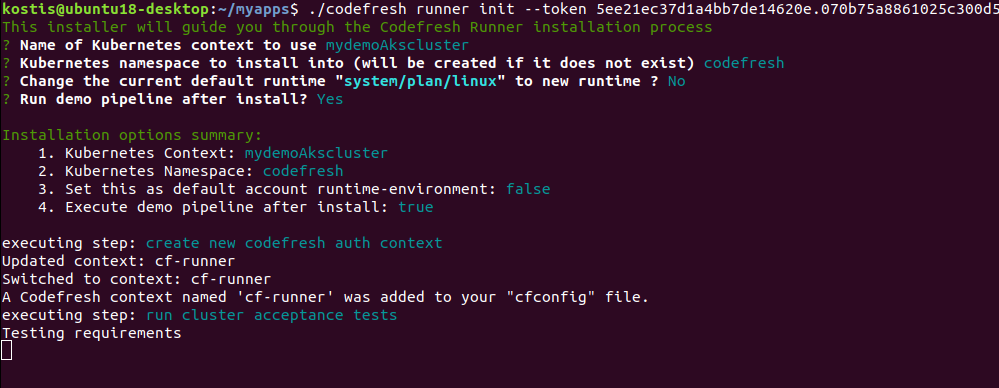
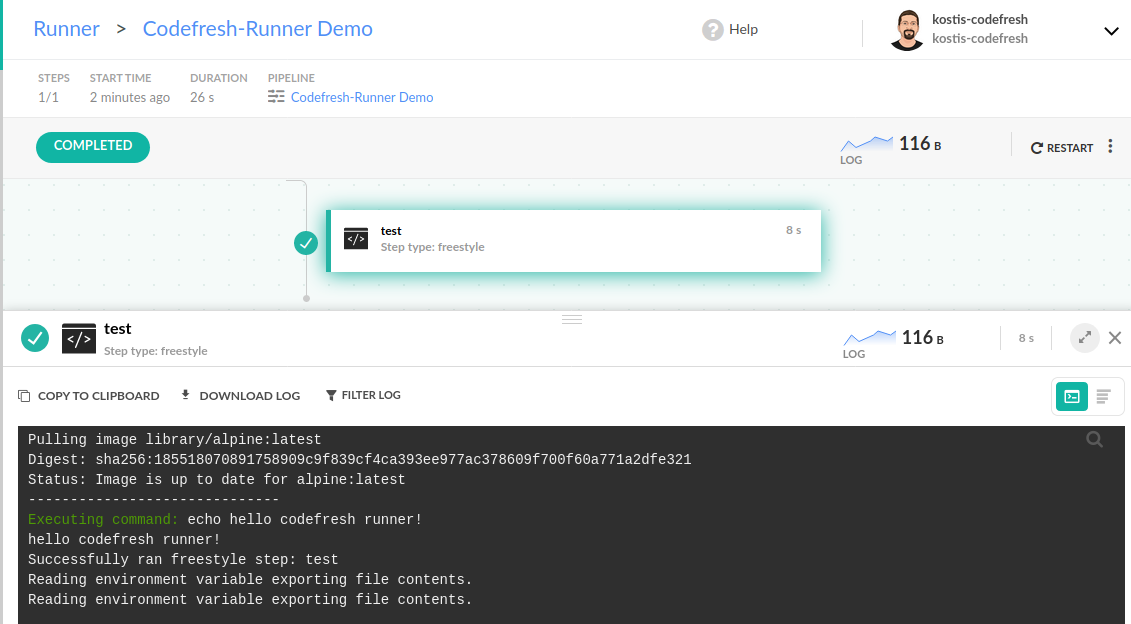
The Wizard also creates and runs a sample pipeline that you can see in your Codefresh UI.
- Optional. If the Kubernetes cluster with the Codefresh Runner is behind a proxy, do the following:
- Run
kubectl edit deployment runner -n codefresh-runtimeand add the proxy variables:spec: containers: - env: - name: HTTP_PROXY value: http://<ip of proxy server>:port - name: HTTPS_PROXY value: http://<ip of proxy server>:port - name: http_proxy value: http://<ip of proxy server>:port - name: https_proxy value: http://<ip of proxy server>:port - name: no_proxy value: localhost,127.0.0.1,<local_ip_of_machine> - name: NO_PROXY value: localhost,127.0.0.1,<local_ip_of_machine>
- Add the following variables to your
runtime.yaml, both to theruntimeScheduler:and to thedockerDaemonScheduler:blocks, within theenvVars:section:HTTP_PROXY: http://<ip of proxy server>:port http_proxy: http://<ip of proxy server>:port HTTPS_PROXY: http://<ip of proxy server>:port https_proxy: http://<ip of proxy server>:port No_proxy: localhost, 127.0.0.1, <local_ip_of_machine> NO_PROXY: localhost, 127.0.0.1, <local_ip_of_machine> - Add
.firebaseio.comto the allowed-sites of the proxy server. - Exec into the
dindpod, and runifconfig. - If the MTU value for
docker0is greater than or equal to the MTU value ofeth0(sometimes thedocker0MTU is 1500, whileeth0MTU is 1440), change thedocker0MTU value to be lower than theeth0MTU.- To change the
docker0MTU value, edit theconfigmapin thecodefresh-runtimenamespace:kubectl edit cm codefresh-dind-config -n codefresh-runtime - Add the string after one of the commas:
\"mtu\":1440,
- To change the
- Optional. Verify your installation:
codefresh runner info
After installation, configure the Kubernetes cluster with the Codefresh Runner to better match your environment and cloud provider.
AWS backend volume configuration
For Codefresh Runners on EKS or any other custom cluster in Amazon, such as kops for example, configure the Runner to work with EBS volumes to support caching during pipeline execution.
NOTE
The configuration assumes that you have installed the Runner with the default options:codefresh runner init.
dind-volume-provisioner permissions
The dind-volume-provisioner deployment should have permissions to create/attach/detach/delete/get EBS volumes.
There are three options for this:
- Run
dind-volume-provisionerpod on the node/node-group with IAM role - Mount K8s secret in AWS credential format:
To ~/.aws/credentials
OR
By passing theAWS_ACCESS_KEY_IDandAWS_SECRET_ACCESS_KEYas environment variables to thedind-volume-provisionerpod - Use AWS identity for Service Account IAM role assigned to
volume-provisioner-runnerservice account
Minimal policy for dind-volume-provisioner
{
  "Version": "2012-10-17",
  "Statement": [
    {
      "Effect": "Allow",
      "Action": [
        "ec2:AttachVolume",
        "ec2:CreateSnapshot",
        "ec2:CreateTags",
        "ec2:CreateVolume",
        "ec2:DeleteSnapshot",
        "ec2:DeleteTags",
        "ec2:DeleteVolume",
        "ec2:DescribeInstances",
        "ec2:DescribeSnapshots",
        "ec2:DescribeTags",
        "ec2:DescribeVolumes",
        "ec2:DetachVolume"
      ],
      "Resource": "*"
    }
  ]
}
Configuration
Step 1: Create Storage Class for EBS volumes:
NOTE
Choose one of the Availability Zones (AZs)to be used for your pipeline builds. Multi AZ configuration is not supported.
- Storage Class (gp2)
kind: StorageClass
apiVersion: storage.k8s.io/v1
metadata:
  name: dind-ebs
### Specify name of provisioner
provisioner: codefresh.io/dind-volume-provisioner-runner-<-NAMESPACE-> # <---- rename <-NAMESPACE-> with the runner namespace
volumeBindingMode: Immediate
parameters:
  # ebs or ebs-csi
  volumeBackend: ebs
  # Valid zone
  AvailabilityZone: us-central1-a # <---- change it to your AZ
  #  gp2, gp3 or io1
  VolumeType: gp2
  # in case of io1 you can set iops
  # iops: 1000
  # ext4 or xfs (default to xfs, ensure that there is xfstools )
  fsType: xfs
- Storage Class (gp3)
kind: StorageClass
apiVersion: storage.k8s.io/v1
metadata:
  name: dind-ebs
### Specify name of provisioner
provisioner: codefresh.io/dind-volume-provisioner-runner-<-NAMESPACE-> # <---- rename <-NAMESPACE-> with the runner namespace
volumeBindingMode: Immediate
parameters:
  # ebs or ebs-csi
  volumeBackend: ebs
  # Valid zone
  AvailabilityZone: us-central1-a  # <---- change it to your AZ
  #  gp2, gp3 or io1
  VolumeType: gp3
  # ext4 or xfs (default to xfs, ensure that there is xfstools )
  fsType: xfs
  # I/O operations per second. Only effetive when gp3 volume type is specified.
  # Default value - 3000.
  # Max - 16,000
  iops: "5000"
  # Throughput in MiB/s. Only effective when gp3 volume type is specified.
  # Default value - 125.
  # Max - 1000.
  throughput: "500"
Step 2: Apply storage class manifest:
kubectl apply -f dind-ebs.yaml
Step 3: Get the YAML representation of the runtime you just added:
- Get a list of all available runtimes:
codefresh get runtime-environments - Select the runtime you just added, and get its YAML representation:
codefresh get runtime-environments my-eks-cluster/codefresh -o yaml > runtime.yaml
Step 4: Modify the YAML:
- In
dockerDaemonScheduler.cluster, addnodeSelector: topology.kubernetes.io/zone: <your_az_here>. > Make sure you define the same AZ you selected for Runtime Configuration. - Modify
pvcs.dindto use the Storage Class you created above (dind-ebs).
Here is an example of the runtime.yaml including the required updates:
version: 1
metadata:
  ...
runtimeScheduler:
  cluster:
    clusterProvider:
      accountId: 5f048d85eb107d52b16c53ea
      selector: my-eks-cluster
    namespace: codefresh
    serviceAccount: codefresh-engine
  annotations: {}
dockerDaemonScheduler:
  cluster:
    clusterProvider:
      accountId: 5f048d85eb107d52b16c53ea
      selector: my-eks-cluster
    namespace: codefresh
    nodeSelector:
      topology.kubernetes.io/zone: us-central1-a
    serviceAccount: codefresh-engine
  annotations: {}
  userAccess: true
  defaultDindResources:
    requests: ''
  pvcs:
    dind:
      volumeSize: 30Gi
      storageClassName: dind-ebs
      reuseVolumeSelector: 'codefresh-app,io.codefresh.accountName'
extends:
  - system/default/hybrid/k8s_low_limits
description: '...'
accountId: 5f048d85eb107d52b16c53ea
Step 5: Update your runtime environment with the patch command:
codefresh patch runtime-environment my-eks-cluster/codefresh -f runtime.yaml
Step 6: If necessary, delete all existing PV (Persistent Volume) and PVC (Persistent Volume Claim ) objects that remain from the default local provisioner:
kubectl delete pvc -l codefresh-app=dind -n <your_runner_ns>
kubectl delete pv -l codefresh-app=dind -n <your_runner_ns>
Step 7: Restart the volume provisioner pod.
GKE (Google Kubernetes Engine) backend volume configuration
GKE volume configuration includes:
Local SSD storage configuration
Configure the Codefresh Runner to use local SSDs for your pipeline volumes:
GCE disk storage configuration
Prerequisites
The dind-volume-provisioner should have permissions to create/delete/get GCE disks.
There are three options to provide cloud credentials:
- Run
dind-volume-provisioner-runnerpod on a node with an IAM role which can create/delete/get GCE disks - Create Google Service Account with
ComputeEngine.StorageAdminrole, download its key in JSON format, and pass it tocodefresh runner initwith--set-file=Storage.GooogleServiceAccount=/path/to/google-service-account.json - Use Google Workload Identity to assign IAM role to
volume-provisioner-runnerservice account
Notice that builds run in a single Availability Zone (AZ), so you must specify Availability Zone parameters.
Using multiple Availability Zones
Currently, to support effective caching with GCE disks, the builds/pods need to be scheduled in a single AZ. Note that this is more related to a GCP limitation than a Codefresh Runner issue.
To use the Codefresh Runner on Kubernetes nodes running in multiple Availability Zones, check out our suggestions:
Provision a new Kubernetes cluster that runs in a single AZ This is the preferred solution and avoids extra complexity. The cluster should be dedicated for usage with the Codefresh Runner.
Install Codefresh Runner in your multi-zone cluster and run it in the default Node Pool
You must specify:
--build-node-selector=<node-az-label> (e.g.: --build-node-selector=topology.kubernetes.io/zone=us-central1-c)
OR
Do the following:
- Modify the Runtime environment as below:
codefresh get re $RUNTIME_NAME -o yaml > re.yaml - Edit the yaml:
version: 2 metadata: ... runtimeScheduler: cluster: nodeSelector: #schedule engine pod onto a node whose labels match the nodeSelector topology.kubernetes.io/zone: us-central1-c ... dockerDaemonScheduler: cluster: nodeSelector: #schedule dind pod onto a node whose labels match the nodeSelector topology.kubernetes.io/zone: us-central1-c ... pvcs: dind: ... - Apply changes with:
codefresh patch re -f re.yaml
Install Codefresh Runner in your multi-zone cluster and run it with a dedicated Node Pool Follow the instructions for the default Node Pool.
Install a Codefresh Runner for every Availability Zone Install separate Codefresh Runners in each Availability Zone, one for AZ A, and the other for AZ B, for example. This is technically viable, but to distribute the builds across the Codefresh Runner runtime environments, you must manually specify the runtime environment for the pipelines that don’t use the default runtime environment.
For example, let’s say Venona-zoneA is the default runtime environment, for the pipelines to run in Venona-zoneB, modify their RE settings, and explicitly set Venona-zoneB as the one to use.
The Codefresh Runner does not currently support Regional Persistent Disks.
Configure internal registry mirror
You can configure your Codefresh Runner to use an internal registry as a mirror for any container images that are specified in your pipelines.
- Set up an internal registry as described in https://docs.docker.com/registry/recipes/mirror/.
- Locate the
codefresh-dind-configconfig map in the namespace that houses the Runner.kubectl -n codefresh edit configmap codefresh-dind-config - Add the line
\ \"registry-mirrors\": [ \"https://<my-docker-mirror-host>\" ], \nto define the single registry to use as a mirror todataafter thetlskey:data: daemon.json: "{\n \"hosts\": [ \"unix:///var/run/docker.sock\",\n \"tcp://0.0.0.0:1300\"],\n \ \"storage-driver\": \"overlay2\",\n \"tlsverify\": true, \n \"tls\": true,\n \ \"tlscacert\": \"/etc/ssl/cf-client/ca.pem\",\n \"tlscert\": \"/etc/ssl/cf/server-cert.pem\",\n \ \"tlskey\": \"/etc/ssl/cf/server-key.pem\",\n \"insecure-registries\" : [\"192.168.99.100:5000\"],\n \ \"registry-mirrors\": [ \"https://<my-docker-mirror-host>\" ], \n \ \"metrics-addr\" : \"0.0.0.0:9323\",\n \"experimental\" : true\n}\n" - Save and quit by typing
:wq.
Now any container image used in your pipeline and isn’t fully qualified, will be pulled through the Docker registry that is configured as a mirror.
Add custom labels to dind and engine pods
Add custom labels to your Engine and Dind pods in Runtime Environment (RE) by patching it.
- Get the configuration of the RE and place it in a file named
runtime.yaml.codefresh get runtime-environments -o yaml <$RUNTIME_ENVIRONMENT> > runtime.yamlwhere:$RUNTIME_ENVIRONMENTmust be replaced with the name of your RE. - Edit the
dockerDaemonScheduler.labelsorruntimeScheduler.labelsproperty ofruntime.yamlto include the label, as in the example below. If thedockerDaemonScheduler.labelsare not included in the RE configuration by default, add them.version: 1 metadata: [...] runtimeScheduler: labels: my-custom-ENGINE-label: "true" cluster: [...] dockerDaemonScheduler: cluster: [...] annotations: {} labels: my-custom-DIND-label: "true" [...] - Patch the runtime environment:
codefresh patch re $RUNTIME_ENVIRONMENT -f runtime.yamlwhere:$RUNTIME_ENVIRONMENTmust be replaced with the name of your RE.
Once you have applied the patch, future builds will include the label preventing eviction.
Install monitoring component
If your cluster is located behind the firewall, you can use the Runner’s monitoring component to get valuable information about cluster resources to Codefresh dashboards. For example, to Kubernetes and Helm Releases dashboards.
You can install the monitoring component during Runner installation with cluster integration, or after Runner installation without cluster integration.
Install with cluster integration during Runner install
The cluster integration is created automatically during Runner installation.
codefresh runner init --install-monitor
where:
--install-monitoris by default set totrueand installs the monitoring component that makes valuable data on the cluster available to Codefresh.
Install without cluster integration after Runner install
If you defined the --skip-cluster-integration flag to skip cluster integration during Runner installation, then you cannot install the monitoring component during the installation. Install the monitoring component separately after completing the Runner installation to get cluster resource information to the Codefresh dashboards.
codefresh install monitor --kube-context-name <CONTEXT> --kube-namespace <NAMESPACE> --cluster-id <CLUSTER_NAME> --token <TOKEN>
where:
<CONTEXT>,<NAMESPACE>, ‘' are the context, namespace, and the name of the cluster to which install the monitoring component. <TOKEN>is the token to authenticate to the cluster.
Injecting AWS ARN roles into the cluster
Step 1 - Make sure the OIDC provider is connected to the cluster
See:
- https://docs.aws.amazon.com/eks/latest/userguide/enable-iam-roles-for-service-accounts.html
- https://aws.amazon.com/blogs/opensource/introducing-fine-grained-iam-roles-service-accounts/
Step 2 - Create IAM role and policy as explained in https://docs.aws.amazon.com/eks/latest/userguide/create-service-account-iam-policy-and-role.html
Here, in addition to the policy explained, you need a Trust Relationship established between this role and the OIDC entity.
{
  "Version": "2012-10-17",
  "Statement": [
    {
      "Effect": "Allow",
      "Principal": {
        "Federated": "arn:aws:iam::${ACCOUNT_ID}:oidc-provider/${OIDC_PROVIDER}"
      },
      "Action": "sts:AssumeRoleWithWebIdentity",
      "Condition": {
        "StringEquals": {
          "${OIDC_PROVIDER}:sub": "system:serviceaccount:${CODEFRESH_NAMESPACE}:codefresh-engine"
        }
      }
    }
  ]
}
Step 3 - Annotate the codefresh-engine Kubernetes Service Account in the namespace where the Codefresh Runner is installed with the proper IAM role.
kubectl annotate -n ${CODEFRESH_NAMESPACE} sa codefresh-engine eks.amazonaws.com/role-arn=${ROLE_ARN}
Once the annotation is added, you should see it when you describe the Service Account.
kubectl describe -n ${CODEFRESH_NAMESPACE} sa codefresh-engine

Name:                codefresh-engine
Namespace:           codefresh
Labels:              app=app-proxy
                     version=1.6.8
Annotations:         eks.amazonaws.com/role-arn: arn:aws:iam::123456789012:role/Codefresh
Image pull secrets:  <none>
Mountable secrets:   codefresh-engine-token-msj8d
Tokens:              codefresh-engine-token-msj8d
Events:              <none>
Step 4 - Using the AWS assumed role identity
After annotating the Service Account, run a pipeline to test the AWS resource access:
RunAwsCli:
      title : Communication with AWS
      image : mesosphere/aws-cli
      stage: "build"
      commands :
         - apk update
         - apk add jq
         - env
         - cat /codefresh/volume/sensitive/.kube/web_id_token
         - aws sts assume-role-with-web-identity --role-arn $AWS_ROLE_ARN --role-session-name mh9test --web-identity-token file://$AWS_WEB_IDENTITY_TOKEN_FILE --duration-seconds 1000 > /tmp/irp-cred.txt
         - export AWS_ACCESS_KEY_ID="$(cat /tmp/irp-cred.txt | jq -r ".Credentials.AccessKeyId")"
         - export AWS_SECRET_ACCESS_KEY="$(cat /tmp/irp-cred.txt | jq -r ".Credentials.SecretAccessKey")"
         - export AWS_SESSION_TOKEN="$(cat /tmp/irp-cred.txt | jq -r ".Credentials.SessionToken")"
         - rm /tmp/irp-cred.txt
         - aws s3api get-object --bucket jags-cf-eks-pod-secrets-bucket --key  eks-pod2019-12-10-21-18-32-560931EEF8561BC4 getObjectNotWorks.txt
Modify runtime
- Get a list of all available runtimes:
codefresh get runtime-environments #or codefresh get re - Choose the runtime you want to inspect or modify, and get its yaml/json representation:
codefresh get re my-eks-cluster/codefresh -o yaml > runtime.yaml #or codefresh get re my-eks-cluster/codefresh -o json > runtime.json - Update your runtime environment with the patch command:
codefresh patch re my-eks-cluster/codefresh -f runtime.yaml
Customized Codefresh Runner installations
App-Proxy installation
The App-Proxy is an optional component of the Runner, used mainly when the Git provider server is installed on-premises, behind the firewall.
App-Proxy requirements
App-Proxy requires a Kubernetes cluster:
- With the Codefresh Runner installed
- With an active ingress controller. The ingress controller must allow incoming connections from the VPC/VPN where users are browsing the Codefresh UI. The ingress connection must have a hostname assigned for this route, and must be configured to perform SSL termination.
NOTE
Currently, App-Proxy is supported for both SaaS and on-prem versions of GitHub and GitLab, and Bitbucket Data Center.
Install App-Proxy
On a Kubernetes cluster with existing Codefresh Runner:
codefresh install app-proxy --host=<hostname-of-ingress>
Install Codefresh Runner and App-Proxy:
codefresh runner init --app-proxy --app-proxy-host=<hostname-of-ingress>
Define the ingress class for App-Proxy:
If you have multiple ingress controllers in the Kubernetes cluster, use the --app-proxy-ingress-class parameter to define which ingress will be used.
For additional security, to further limit the web browsers that can access the ingress, you can also define an allowlist of IPs/ranges. Check the documentation of your ingress controller for the exact details.
By default, the app-proxy ingress uses the path hostname/app-proxy. You can change that default by using the values file in the installation with the flag --values values.yaml.
See the AppProxy section in the example values.yaml.
codefresh install app-proxy --values values.yaml
App-Proxy architecture
Here is the architecture of the App-Proxy:
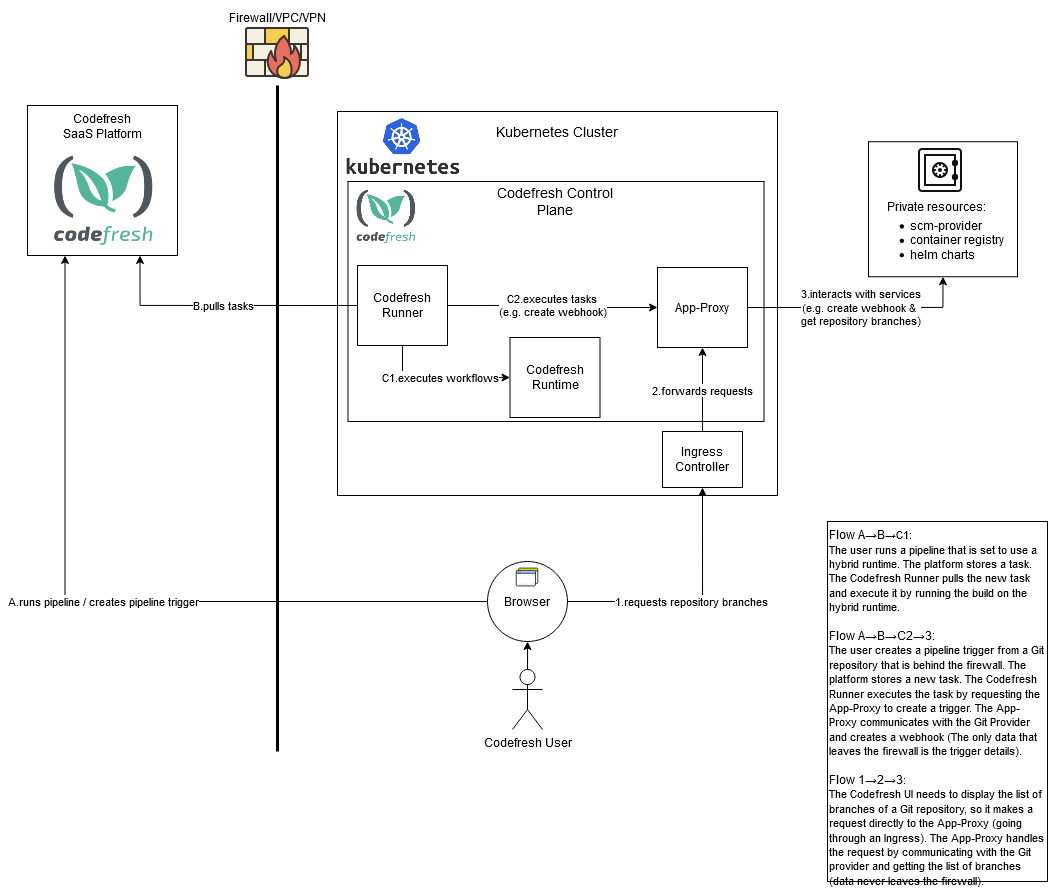
The App-Proxy:
- Enables you to automatically create webhooks for Git in the Codefresh UI (identical to the SaaS experience)
- Sends commit status information back to your Git provider (identical to the SaaS experience)
- Makes all Git operations in the GUI work exactly like the SaaS installation of Codefresh
For a Git GET operation, the Codefresh UI communicates with the App-Proxy to route the request to the Git provider. The confidential Git information never leaves the firewall premises, and the connection between the browser and the ingress is SSL/HTTPS.
The App-Proxy has to work over HTTPS, and by default it uses the ingress controller to terminate the SSL. Therefore, the ingress controller must be configured to perform SSL termination. Check the documentation of your ingress controller (for example nginx ingress). This means that the App-Proxy does not compromise security in any way.
Install multiple runtimes with a single Runner (Agent)
Advanced users can install a single Codefresh Runner (agent) to manage multiple runtime environments.
NOTE
Make sure the cluster on which the Runner (agent) is installed has network access to the other clusters in the runtime environments.
# 1. Create namespace for the agent:
kubectl create namespace codefresh-agent

# 2. Install the agent in the namespace ( give your agent a unique name as $NAME):
# Note down the token and use it in the second command.
codefresh create agent $NAME
codefresh install agent --token $TOKEN --kube-namespace codefresh-agent
codefresh get agents

# 3. Create namespace for the first runtime:
kubectl create namespace codefresh-runtime-1

# 4. Install the first runtime in the namespace
# 5. the runtime name is printed
codefresh install runtime --runtime-kube-namespace codefresh-runtime-1

# 6. Attach the first runtime to agent:
codefresh attach runtime --agent-name $AGENT_NAME --agent-kube-namespace codefresh-agent --runtime-name $RUNTIME_NAME --runtime-kube-namespace codefresh-runtime-1

# 7. Restart the runner pod in namespace `codefresh-agent`
kubectl delete pods $RUNNER_POD

# 8. Create namespace for the second runtime
kubectl create namespace codefresh-runtime-2

# 9. Install the second runtime on the namespace
codefresh install runtime --runtime-kube-namespace codefresh-runtime-2

# 10. Attach the second runtime to agent and restart the Venona pod automatically
codefresh attach runtime --agent-name $AGENT_NAME --agent-kube-namespace codefresh-agent --runtime-name $RUNTIME_NAME --runtime-kube-namespace codefresh-runtime-2 --restart-agent
Install Codefresh Runner on Google Kubernetes Engine (GKE)
You can install the Codefresh Runner on GKE Kubernetes cluster. Codefresh supports the following GKE configurations:
- Install on GKE with local SSD
- Install Codefresh Runner on GKE with GCE disks and Google SA JSON key
- Install Codefresh Runner on GKE with GCE disks with Workload Identity and IAM role
Common prerequisites
Before you start the installation, verify the following:
- Make sure your user has
Kubernetes Engine Cluster Adminrole in Google console - Bind your user with
cluster-adminKubernetes cluster role.
kubectl create clusterrolebinding cluster-admin-binding \
  --clusterrole cluster-admin \
  --user $(gcloud config get-value account)
Install on GKE with local SSD
Prerequisites GKE cluster with local SSD
How to
- Run the CLI Wizard with these options:
codefresh runner init [options] --set-value=Storage.LocalVolumeParentDir=/mnt/disks/ssd0/codefresh-volumes \ --build-node-selector=cloud.google.com/gke-local-ssd=true - Based on the installation mode, edit the predfined
values-example.yamlvalues file or the generated Helm values file:... ### Storage parameters example for gke-local-ssd Storage: Backend: local LocalVolumeParentDir: /mnt/disks/ssd0/codefresh-volumes NodeSelector: cloud.google.com/gke-local-ssd=true ... Runtime: NodeSelector: # dind and engine pods node-selector (--build-node-selector) cloud.google.com/gke-local-ssd: "true" ...codefresh runner init [options] --values values-example.yaml
Install Codefresh Runner on GKE with GCE disks and Google SA JSON key
With the CLI Wizard:
codefresh runner init [options] \
  --set-value=Storage.Backend=gcedisk \
  --set-value=Storage.AvailabilityZone=us-central1-c \
  --kube-node-selector=topology.kubernetes.io/zone=us-central1-c \
  --build-node-selector=topology.kubernetes.io/zone=us-central1-c \
  --set-file=Storage.GoogleServiceAccount=/path/to/google-service-account.json
With the values values-example.yaml file:
...
### Storage parameter example for GCE disks
 Storage:
   Backend: gcedisk
   AvailabilityZone: us-central1-c
   GoogleServiceAccount: > #serviceAccount.json content
     {
      "type": "service_account",
      "project_id": "...",
      "private_key_id": "...",
      "private_key": "...",
      "client_email": "...",
      "client_id": "...",
      "auth_uri": "...",
      "token_uri": "...",
      "auth_provider_x509_cert_url": "...",
      "client_x509_cert_url": "..."
      }
 NodeSelector: topology.kubernetes.io/zone=us-central1-c
...
 Runtime:
   NodeSelector: # dind and engine pods node-selector (--build-node-selector)
     topology.kubernetes.io/zone: us-central1-c
...
codefresh runner init [options] --values values-example.yaml
Install Codefresh Runner on GKE with GCE disks with Workload Identity and IAM role
With the values values-example.yaml file:
- Configure the storage options for GCE disks as in the example below.
... ### Storage parameter example for GCE disks Storage: Backend: gcedisk AvailabilityZone: us-central1-c VolumeProvisioner: ServiceAccount: Annotations: #annotation to the volume-provisioner service account, using the email address of the Google service account iam.gke.io/gcp-service-account: <GSA_NAME>@<PROJECT_ID>.iam.gserviceaccount.com NodeSelector: topology.kubernetes.io/zone=us-central1-c ... Runtime: NodeSelector: # dind and engine pods node-selector (--build-node-selector) topology.kubernetes.io/zone: us-central1-c ... - Install the Codefresh Runner with
values-example.yaml:codefresh runner init [options] --values values-example.yaml - Create the binding between Kubernetes service account and the Google service account:
export K8S_NAMESPACE=codefresh
export KSA_NAME=volume-provisioner-runner
export GSA_NAME=<google_sa_name>
export PROJECT_ID=<google_project_name>
gcloud iam service-accounts add-iam-policy-binding \
  --role roles/iam.workloadIdentityUser \
  --member "serviceAccount:${PROJECT_ID}.svc.id.goog[${K8S_NAMESPACE}/${KSA_NAME}]" \
  ${GSA_NAME}@${PROJECT_ID}.iam.gserviceaccount.com
Install Codefresh Runner on EKS
Installing the Codefresh Runner on EKS includes:
Step 1: Create an EKS cluster
Step 2: Install autoscaler on EKS cluster
Step 3: (Optional) Configure overprovisioning with Cluster Autoscaler
Step 4: Add an EKS cluster as Runner to the Codefresh platform with EBS support
Step 1: Create an EKS cluster
You need to create three files:
cluster.yamlfile with separate node pools for dind, engine and other services, like runner, cluster-autoscaler etc- Create two separate IAM policies for:
- Volume-provisioner controller(
policy/runner-ebs) for creating and deleting volumes - Dind pods(
policy/dind-ebs) for attaching/detaching the volumes to the appropriate nodes using IAM attachPolicyARNs options.
- Volume-provisioner controller(
policy/runner-ebs:
{
    "Version": "2012-10-17",
    "Statement": [
        {
            "Effect": "Allow",
            "Action": [
                "ec2:AttachVolume",
                "ec2:CreateSnapshot",
                "ec2:CreateTags",
                "ec2:CreateVolume",
                "ec2:DeleteSnapshot",
                "ec2:DeleteTags",
                "ec2:DeleteVolume",
                "ec2:DescribeInstances",
                "ec2:DescribeSnapshots",
                "ec2:DescribeTags",
                "ec2:DescribeVolumes",
                "ec2:DetachVolume"
            ],
            "Resource": "*"
        }
    ]
}
policy/dind-ebs:
{
    "Version": "2012-10-17",
    "Statement": [
        {
            "Effect": "Allow",
            "Action": [
                "ec2:DescribeVolumes"
            ],
            "Resource": [
                "*"
            ]
        },
        {
            "Effect": "Allow",
            "Action": [
                "ec2:DetachVolume",
                "ec2:AttachVolume"
            ],
            "Resource": [
                "*"
            ]
        }
    ]
}
How to
- Create the
cluster.yamlas in the example below (my-eks-cluster.yaml).apiVersion: eksctl.io/v1alpha5 kind: ClusterConfig metadata: name: my-eks region: us-west-2 version: "1.15" nodeGroups: - name: dind instanceType: m5.2xlarge desiredCapacity: 1 iam: attachPolicyARNs: - arn:aws:iam::aws:policy/AmazonEKSWorkerNodePolicy - arn:aws:iam::aws:policy/AmazonEKS_CNI_Policy - arn:aws:iam::aws:policy/ElasticLoadBalancingFullAccess - arn:aws:iam::XXXXXXXXXXXX:policy/dind-ebs withAddonPolicies: autoScaler: true ssh: # import public key from file publicKeyPath: ~/.ssh/id_rsa.pub minSize: 1 maxSize: 50 volumeSize: 50 volumeType: gp2 ebsOptimized: true availabilityZones: ["us-west-2a"] kubeletExtraConfig: enableControllerAttachDetach: false labels: node-type: dind taints: codefresh.io: "dinds:NoSchedule" - name: engine instanceType: m5.large desiredCapacity: 1 iam: withAddonPolicies: autoScaler: true minSize: 1 maxSize: 10 volumeSize: 50 volumeType: gp2 availabilityZones: ["us-west-2a"] labels: node-type: engine taints: codefresh.io: "engine:NoSchedule" - name: addons instanceType: m5.2xlarge desiredCapacity: 1 ssh: # import public key from file publicKeyPath: ~/.ssh/id_rsa.pub minSize: 1 maxSize: 10 volumeSize: 50 volumeType: gp2 ebsOptimized: true availabilityZones: ["us-west-2a"] labels: node-type: addons iam: attachPolicyARNs: - arn:aws:iam::aws:policy/AmazonEKSWorkerNodePolicy - arn:aws:iam::aws:policy/AmazonEKS_CNI_Policy - arn:aws:iam::aws:policy/ElasticLoadBalancingFullAccess - arn:aws:iam::XXXXXXXXXXXX:policy/runner-ebs withAddonPolicies: autoScaler: true availabilityZones: ["us-west-2a", "us-west-2b", "us-west-2c"] - Execute:
eksctl create cluster -f my-eks-cluster.yaml
The configuration leverages Amazon Linux 2 as the default operating system for the nodes in the node group.
Bottlerocket-based nodes Bottlerocket is an open source Linux based Operating System specifically built to run containers. It focuses on security, simplicity and easy updates via transactions. Find more information in the official repository.
To leverage Bottlerocket-based nodes:
- Specify the AMI Family using
amiFamily: Bottlerocket - Add these additional IAM Policies:
arn:aws:iam::aws:policy/AmazonEC2ContainerRegistryReadOnlyarn:aws:iam::aws:policy/AmazonSSMManagedInstanceCore
Step 2: Install autoscaler on EKS cluster
Once the cluster is up and running, install the cluster autoscaler.
Because we used IAM AddonPolicies "autoScaler: true" in the cluster.yaml file, everything is done automatically, and there is no need to create a separate IAM policy or add Auto Scaling group tags.
- Deploy the cluster autoscaler:
kubectl apply -f https://raw.githubusercontent.com/kubernetes/autoscaler/master/cluster-autoscaler/cloudprovider/aws/examples/cluster-autoscaler-autodiscover.yaml
- Add the
cluster-autoscaler.kubernetes.io/safe-to-evictannotation:kubectl -n kube-system annotate deployment.apps/cluster-autoscaler cluster-autoscaler.kubernetes.io/safe-to-evict="false" - Edit the
cluster-autoscalercontainer command:
kubectl -n kube-system edit deployment.apps/cluster-autoscaler
- Do the following as in the example below:
- Replace
<YOUR CLUSTER NAME>with the name of the clustercluster.yaml - Add the following options:
--balance-similar-node-groups--skip-nodes-with-system-pods=false
- Replace
spec:
      containers:
      - command:
        - ./cluster-autoscaler
        - --v=4
        - --stderrthreshold=info
        - --cloud-provider=aws
        - --skip-nodes-with-local-storage=false
        - --expander=least-waste
        - --node-group-auto-discovery=asg:tag=k8s.io/cluster-autoscaler/enabled,k8s.io/cluster-autoscaler/my-eks
        - --balance-similar-node-groups
        - --skip-nodes-with-system-pods=false
- Set the autoscaler version: If the version of the EKS cluster 1.15, the corresponding autoscaler version according to https://github.com/kubernetes/autoscaler/releases is 1.15.6.
kubectl -n kube-system set image deployment.apps/cluster-autoscaler cluster-autoscaler=us.gcr.io/k8s-artifacts-prod/autoscaling/cluster-autoscaler:v1.15.6
NOTE
Check your version of the EKS to make sure that the you have the correct autoscaler version for it.
Step 3: (Optional) Configure overprovisioning with Cluster Autoscaler
For details, see the FAQ.
Step 4: Add an EKS cluster as Runner to the Codefresh platform with EBS support
- Make sure to target the correct cluster:
$ kubectl config current-context
my-aws-runner
- Install the Runner with additional options:
- Specify the zone in which to create your volumes, for example:
--set-value=Storage.AvailabilityZone=us-west-2a. - (Optional) To assign the volume-provisioner to a specific node, for example, a specific node group with an IAM role that can create EBS volumes,
--set-value Storage.VolumeProvisioner.NodeSelector=node-type=addons. - To use encrypted EBS volumes, add the custom value
--set-value=Storage.Encrypted=true. - If you already have a key, add its ARN via
--set-value=Storage.KmsKeyId=<key id> value. Otherwise a key is generated by AWS.
Here is an example with all the options configured:
- Specify the zone in which to create your volumes, for example:
codefresh runner init \
--name my-aws-runner \
--kube-node-selector=topology.kubernetes.io/zone=us-west-2a \
--build-node-selector=topology.kubernetes.io/zone=us-west-2a \
--kube-namespace cf --kube-context-name my-aws-runner \
--set-value Storage.VolumeProvisioner.NodeSelector=node-type=addons \
--set-value=Storage.Backend=ebs \
--set-value=Storage.AvailabilityZone=us-west-2a\
--set-value=Storage.Encrypted=[false|true] \
--set-value=Storage.KmsKeyId=<key id>
For descriptions of the other options, run `codefresh runner init --help`.
- When the Wizard completes the installation, modify the runtime environment of
my-aws-runnerto specify the necessary toleration, nodeSelector and disk size:- Run:
codefresh get re --limit=100 my-aws-runner/cf -o yaml > my-runtime.yml - Modify the file
my-runtime.ymlas shown below:
- Run:
version: null
metadata:
  agent: true
  trial:
    endingAt: 1593596844167
    reason: Codefresh hybrid runtime
    started: 1592387244207
  name: my-aws-runner/cf
  changedBy: ivan-codefresh
  creationTime: '2020/06/17 09:47:24'
runtimeScheduler:
  cluster:
    clusterProvider:
      accountId: 5cb563d0506083262ba1f327
      selector: my-aws-runner
    namespace: cf
    nodeSelector:
      node-type: engine
  tolerations:
  - effect: NoSchedule
    key: codefresh.io
    operator: Equal
    value: engine
  annotations: {}
dockerDaemonScheduler:
  cluster:
    clusterProvider:
      accountId: 5cb563d0506083262ba1f327
      selector: my-aws-runner
    namespace: cf
    nodeSelector:
      node-type: dind
  annotations: {}
  defaultDindResources:
    requests: ''
  tolerations:
  - effect: NoSchedule
    key: codefresh.io
    operator: Equal
    value: dinds
  pvcs:
    dind:
      volumeSize: 30Gi
      reuseVolumeSelector: 'codefresh-app,io.codefresh.accountName'
      storageClassName: dind-local-volumes-runner-cf
  userAccess: true
extends:
  - system/default/hybrid/k8s_low_limits
description: 'Runtime environment configure to cluster: my-aws-runner and namespace: cf'
accountId: 5cb563d0506083262ba1f327
- Apply changes.
codefresh patch re my-aws-runner/cf -f my-runtime.yml
You have completed installing the Codefresh Runner on an EKS cluster. You can try runing a pipeline on the runtime environment my-aws-runner/cf.
Uninstall Codefresh Runner
You may want to uninstall the Codefresh Runner.
NOTE
Uninstalling the Codefresh Runner does not affect pipelines. You continue to see existing pipelines and can create new pipelines.
- Run:
codefresh runner delete
- Answer the prompts as required.
To use the CLI, run: (--help to see the available options):
codefresh runner delete --help
Install Codefresh Runner on Rancher RKE 2.X
Installing Codefresh Runner on Rancher RKE 2.X includes these steps:
- Step 1: Configure kubelet for Runner StorageClass
- Step 2: Set kubeconfig user permissions
- Step 3: Install the Runner
- Step 4: Update Runner Docker MTU
- Step 5: Create the cluster integration
Step 1: Configure kubelet for Runner StorageClass
Configure the cluster to allow the Runner’s default StorageClass to create the persistent cache volume from local storage on each node.
- In the Rancher UI: For Rancher v2.5.9 and earlier, drill into the target cluster, and then click Edit Cluster at the top-right.
For Rancher v2.6+ with the updated UI, open Cluster Management in the left panel, then click the three-dot menu near the corresponding cluster and select Edit Config.
- On the edit cluster page, scroll down to the Cluster Options section, and click its Edit as YAML button
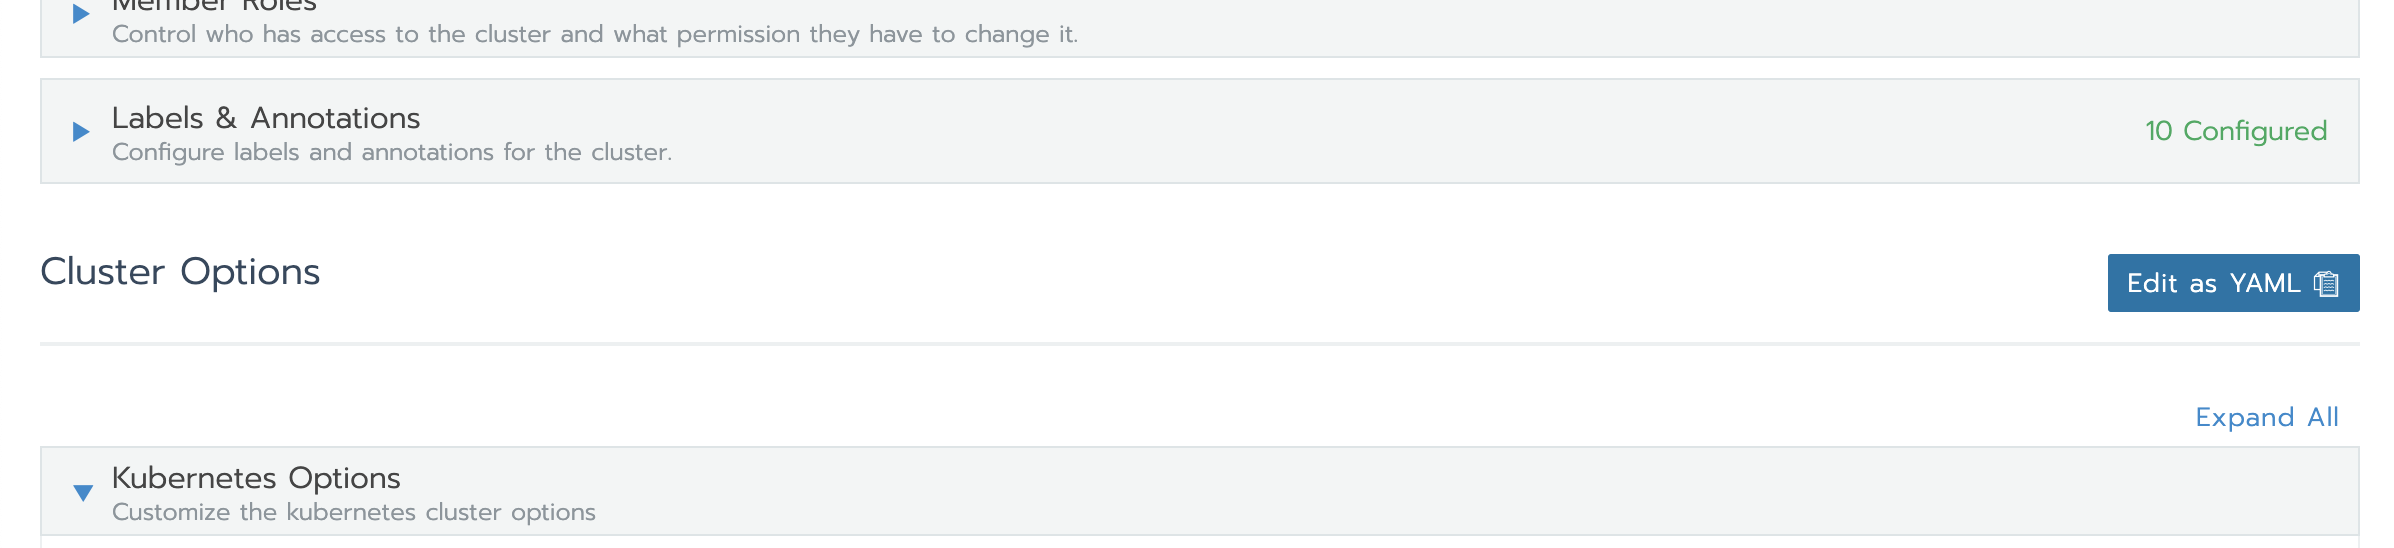
- Edit the YAML to include an extra mount in the kubelet service:
rancher_kubernetes_engine_config:
  ...
  services:
    ...
    kubelet:
      extra_binds:
        - '/var/lib/codefresh:/var/lib/codefresh:rshared'

Step 2: Set kubeconfig user permissions
The user in your kubeconfig must be a ClusterAdmin to install the Runner.
There are two options to create a user:
-
For your pipelines to connect to this cluster as a cluster admin, create a Codefresh user in the Rancher UI with a non-expiring
kubeconfigtoken. This is the easiest way install Codefresh Runner. -
For your pipelines to connect to this cluster with fewer privileges, use your personal user account with
ClusterAdminprivileges for the installation, and then create a Codefresh account with fewer privileges later.
- Do one of the following:
- To create a Codefresh user with
ClusterAdminrights in the Rancher, start from step 2. - To use your personal user account with
ClusterAdminprivileges for the installation, continue from Step 3: Install the Runner.
- To create a Codefresh user with
- In the Rancher UI do the following:
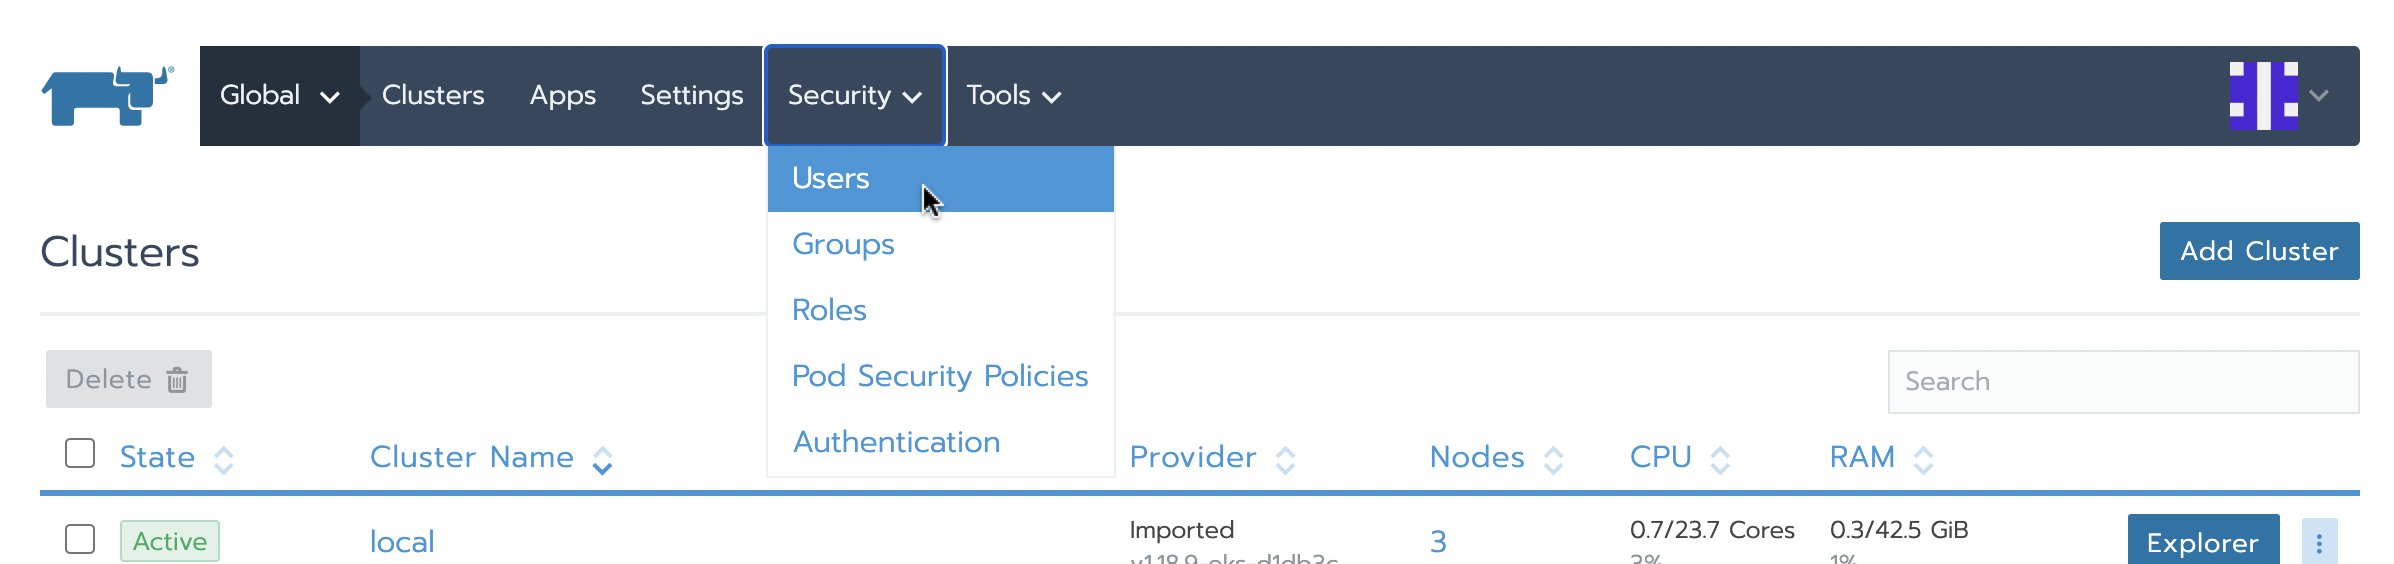
- Click Security at the top, and then select Users.
- Click Add User, and below Global Permissions, select Restricted Administrstor.
- Log out of the Rancher UI, and then log back in as the new user.
- Click your user icon at the top-right, and then choose API & Keys.
- Click Add Key, and create a
kubeconfigtoken with Expires set to Never. - Copy the Bearer Token field (combines Access Key and Secret Key).
- Edit your
kubeconfigand paste the Bearer Token you copied in thetokenfield of your user.
Step 3: Install the Runner
If you’ve created your kubeconfig in the Rancher UI, it includes an API endpoint that is not reachable internally from within the cluster. To work around this, the Runner should use Kubernetes’ generic internal API endpoint. If your kubeconfig contains your personal user account, then you should also add the --skip-cluster-integration option.
- Do one of the following
- Install the Runner with a Codefresh user (
ClusterAdmin, non-expiring token):codefresh runner init \ --set-value KubernetesHost=https://kubernetes.default.svc.cluster.local - Install the runner with your personal user account:
codefresh runner init \ --set-value KubernetesHost=https://kubernetes.default.svc.cluster.local \ --skip-cluster-integration
- Install the Runner with a Codefresh user (
- Answer the prompts to complete the installation.
Step 4: Update Runner Docker MTU
By default, RKE nodes use the Canal CNI, which combines elements of Flannel and Calico, and uses VXLAN encapsulation. The VXLAN encapsulation has a 50-byte overhead, and reduces the MTU of its virtual interfaces from the standard 1500 to 1450.
For example, when running ifconfig on an RKE 2.5.5 node, you might see several interfaces like this. Note the MTU:1450.
cali0f8ac592086 Link encap:Ethernet  HWaddr ee:ee:ee:ee:ee:ee
          inet6 addr: fe80::ecee:eeff:feee:eeee/64 Scope:Link
          UP BROADCAST RUNNING MULTICAST  MTU:1450  Metric:1
          RX packets:11106 errors:0 dropped:0 overruns:0 frame:0
          TX packets:10908 errors:0 dropped:0 overruns:0 carrier:0
          collisions:0 txqueuelen:0
          RX bytes:922373 (922.3 KB)  TX bytes:9825590 (9.8 MB)
Reduce the Docker MTU used by the Runner’s Docker in Docker (dind) pods to match this lower MTU:
- Edit the
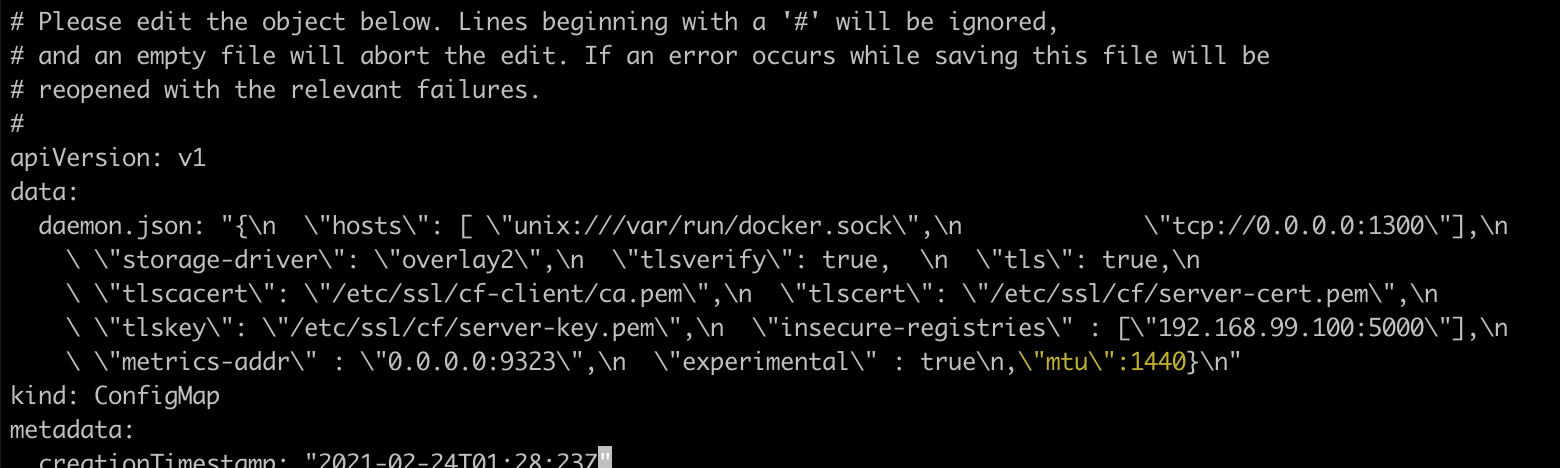
configmapin the namespace where the Runner is installed: The example shows the edit command if you installed the Runner in thecodefreshnamespacekubectl edit cm codefresh-dind-config -n codefresh - In the editor, update the daemon.json field, by adding
,\"mtu\":1440before the final closing curley brace (highlighted in the example below).
Step 5: Create the cluster integration
If you installed the Runner with the --skip-cluster-integration option, then must add a Rancher cluster to your to your Kubernetes integrations.
Once complete, you can go to the Codefresh UI and run a pipeline on the new runtime, including steps that deploy to the Kubernetes Integration.
Troubleshooting TLS Errors
Depending on your Rancher configuration, you may need to allow insecure HTTPS/TLS connections, by adding an environment variable to the Runner deployment.
- Edit the Runner deployment:
The example below assumes that you installed the Runner in the
codefreshnamespace.
kubectl edit deploy runner -n codefresh
- In the editor, add this environment variable below
spec.containers.env[]:
- name: NODE_TLS_REJECT_UNAUTHORIZED
  value: "0"
Install Codefresh Runner on Azure Kubernetes Service (AKS)
Prerequisites
-
Volume provisioner (
dind-volume-provisioner) with permissions to create/delete/get Azure Disks -
Minimal IAM role for
dind-volume-provisioner: <br />dind-volume-provisioner-role.json`{ "Name": "CodefreshDindVolumeProvisioner", "Description": "Perform create/delete/get disks", "IsCustom": true, "Actions": [ "Microsoft.Compute/disks/read", "Microsoft.Compute/disks/write", "Microsoft.Compute/disks/delete" ], "AssignableScopes": ["/subscriptions/<your-subsripton_id>"] }How to
- If you use AKS with managed identities for node group, you can run the script below to assign
CodefreshDindVolumeProvisionerrole to AKS node identity:
export ROLE_DEFINITIN_FILE=dind-volume-provisioner-role.json
export SUBSCRIPTION_ID=$(az account show --query "id" | xargs echo )
export RESOURCE_GROUP=codefresh-rt1
export AKS_NAME=codefresh-rt1
export LOCATION=$(az aks show -g $RESOURCE_GROUP -n $AKS_NAME --query location | xargs echo)
export NODES_RESOURCE_GROUP=MC_${RESOURCE_GROUP}_${AKS_NAME}_${LOCATION}
export NODE_SERVICE_PRINCIPAL=$(az aks show -g $RESOURCE_GROUP -n $AKS_NAME --query identityProfile.kubeletidentity.objectId | xargs echo)

az role definition create --role-definition @${ROLE_DEFINITIN_FILE}
az role assignment create --assignee $NODE_SERVICE_PRINCIPAL --scope /subscriptions/$SUBSCRIPTION_ID/resourceGroups/$NODES_RESOURCE_GROUP --role CodefreshDindVolumeProvisioner
- Install Codefresh Runner using one of these options:
CLI Wizard:codefresh runner init --set-value Storage.Backend=azuredisk --set Storage.VolumeProvisioner.MountAzureJson=true
Storage:
  Backend: azuredisk
  VolumeProvisioner:
    MountAzureJson: true
codefresh runner init --values values-example.yaml
Helm chart values.yaml:
storage:
  backend: azuredisk
  azuredisk:
    skuName: Premium_LRS

volumeProvisioner:
  mountAzureJson: true
helm install cf-runtime cf-runtime/cf-runtime -f ./generated_values.yaml -f values.yaml --create-namespace --namespace codefresh
Troubleshooting
For troubleshooting information, refer to the Knowledge Base.
Related articles
Codefresh platform deployment
Codefresh on-premises deployment
Codefresh API