Check out Git repositories
Use the Codefresh native GIT integration
Codefresh has native support for Git repositories and Git triggers. First you need to set up a Git integration (your administrator might also have done this for you already).
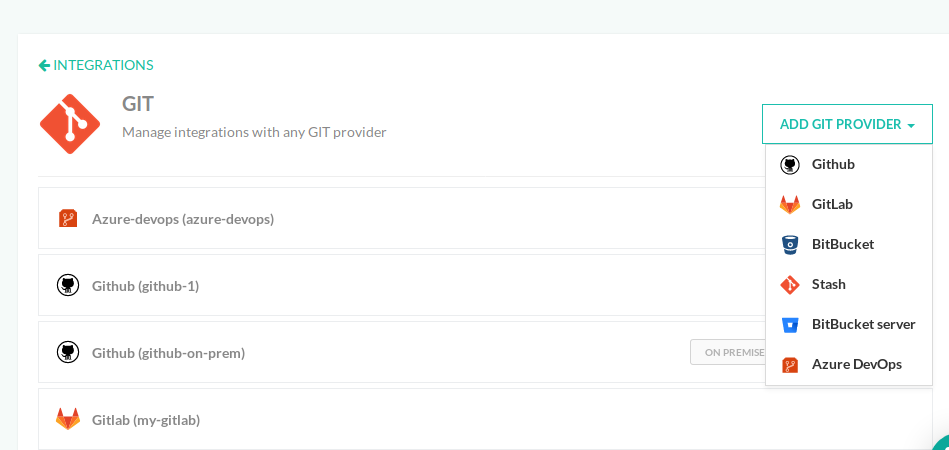
You can add a new integration for any cloud provider or even on-premises ones. By default you will also have a provider set up if you used one for Codefresh signup (GitHub, GitLab or Bitbucket).
For each Git Integration, make sure that you note down its name, as you will use in your pipeline inside a git-clone step.
Cloning a specific repository
The simplest way to clone using your git provider is by specifying the exact repository details. Here is a pipeline that clones a git repository and creates a Docker image from a Dockerfile:
codefresh.yml
version: '1.0'
steps:
  main_clone:
    title: 'Cloning main repository...'
    type: git-clone
    repo: kostis-codefresh/example_nodejs_postgres
    revision: master
    git: github-1
  myDockerImage:
    title: 'Building My Docker Image'
    type: build
    dockerfile: Dockerfile
    image_name: my-app-image
    tag: from-master-branch
This syntax is very simple to use, but it has the disadvantage that ties your pipeline to a specific repository. This makes the pipeline impossible to re-use among different micro-services (that are built in a similar manner).
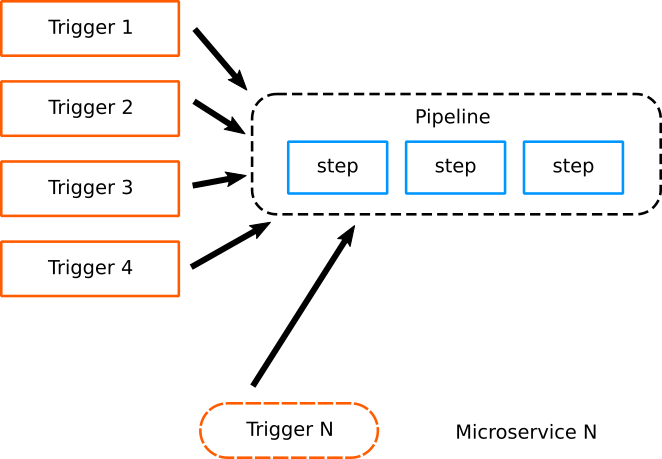
Cloning the triggered repository (recommended)
The proper way to use git-clone steps is to make them trigger specific. Instead of hard-coding the git repository that is checked-out, it is best to check out the same one that triggered the pipeline. This is what you want in most scenarios anyway.
This can be achieved by using Codefresh variables to refer to the trigger. Here is the same pipeline as before, written in a generic way:
codefresh.yml
version: '1.0'
steps:
  main_clone:
    title: 'Cloning main repository...'
    type: git-clone
    repo: '${{CF_REPO_OWNER}}/${{CF_REPO_NAME}}'
    revision: '${{CF_REVISION}}'
    git: github-1
  myDockerImage:
    title: 'Building My Docker Image'
    type: build
    dockerfile: Dockerfile
    image_name: my-app-image
    tag: ${{CF_BRANCH_TAG_NORMALIZED}}
The big advantage of this pipeline is that it can be reused for ALL your projects that follow the same pattern of having a Dockerfile in the root of the git repository.
Thus you can have a single pipeline and when you want to enable it for a new micro-service you can simply add a new Git trigger for it.
You still run the pipeline manually if you wish. In this case you will be asked which trigger you want to “simulate” so that the variable pipelines are correctly replaced by Codefresh.

This is the recommended way of creating re-usable pipelines in Codefresh.
Cloning a repository with Codefresh Runner
If you have the Codefresh Runner installed, you need to use the fully qualified path of the Git repository:
codefresh.yml
version: '1.0'
steps:
    main_clone:
        title: 'Cloning main repository...'
        type: git-clone
        repo: https://github-internal.example.com/my-username/my-app
        revision: '${{CF_REVISION}}'
        git: my-internal-git-provider
    PrintFileList:
        title: 'Listing files'
        image: alpine:latest
        commands:
            - 'ls -l'
More details can be found in the private Git instructions page.
Working inside the cloned directory
Normally each pipeline step in Codefresh can be named as you want. Specifically, for the Git-clone step however the name main_clone is special.
If you name your clone step as main_clone, Codefresh automatically changes the working directory for all the next (non Git-clone) pipeline steps, to be the same as the project that was just checked out. This only applies to built-in Codefresh steps and not custom plugins.
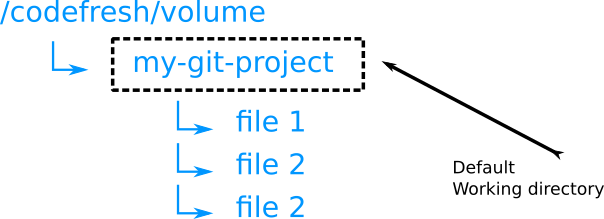
This is probably what you want anyway, so make sure that you name your Git-clone steps as main_clone. If you use any other name, then the working folder will be the parent of the checked-out project which is the shared Codefresh volume at /codefresh/volume.
If you have more then one clone step in a pipeline, it is recommended to define the working directory explicitly (see next example), instead
of depending on the main_clone naming convention, which is best used in pipelines with a single clone step.
Cloning multiple repositories
You can use as many clone steps as you want and at any position in the pipeline.
Here is an example where two repositories are checked out and two docker images are then built.
codefresh.yml
version: '1.0'
steps:
  checkoutApp1:
    title: 'Cloning first repository...'
    type: git-clone
    repo: kostis-codefresh/example_nodejs_postgres
    revision: experiment1
    git: github
  myFirstDockerImage:
    title: 'Building First Docker Image'
    type: build
    dockerfile: Dockerfile
    image_name: my-nodejs-image
    tag: from-develop-branch
    working_directory: './example_nodejs_postgres'
  checkoutApp2:
    title: 'Cloning second repository...'
    type: git-clone
    repo: kostis-codefresh/trivial-go-web
    revision: master
    git: github
  mySecondDockerImage:
    title: 'Building Second Docker Image'
    type: build
    dockerfile: Dockerfile
    working_directory: './trivial-go-web'
    image_name: my-app-image
    tag: from-master-branch
Notice that in this case the git-clone steps are not named main_clone and therefore we specify exactly what is the working directory for each one.
Related articles
CI/CD pipeline examples
Git integrations
Custom git commands
Steps in pipelines