Creating Argo CD applications

Codefresh provides all the options and functionality to create and manage Argo CD applications in the Codefresh UI.

Create Argo CD applications that are fully GitOps compliant, from generating the application configuration manifest, committing it to Git, and syncing and deploying to the cluster.

Creating an Argo CD application in Codefresh includes defining:

  • Application name and location
  • General configuration settings
  • Advanced configuration settings

The Create application wizard guides you through the process of creating an application. For how-to information, see Create an Argo CD application.

For example Argo CD applications, see this repo.

Remember you need a valid Git Source to be able to create and commit an Argo CD application.

Once created and synced to clusters, Argo CD applications are displayed in the GitOps Apps dashboard. Here, you can monitor and manage individual Argo CD applications.

After creating Argo CD applications in Codefresh, you can also monitor and manage them in the GitOps Environments and Products dashboards by creating Environment and Product resources. See GitOps Environments dashboard and GitOps Products dashboard.

Application: Definitions

Application definitions include the application name, the GitOps Runtime, and the name of the YAML manifest. By default, the YAML manifest has the same name as that of the application.

Application definitions

Application definitions

Application: General configuration settings

General configuration settings define the group to which the application belongs, source, destination, and sync policies for the application.

General configuration settings

General configuration settings

Groups

Optional. The group or groups to which to add the application.
You can group applications based on criteria meaningful to your organization, such as environment, region, or any other relevant attribute. You can then view deployments for these applications in the same location in the Groups tab of the GitOps Apps dashboard. A new view for Argo CD applications, Groups allow you to collate multiple applications and view their timelines.

Select an existing group or groups, or create a new application group by typing a name and pressing Enter.

Source

The Git repository to be tracked for changes to the application’s source code.

  • Repository URL: The Git repo or the Helm package repo with the application source code, to be tracked for changes.
    If SSH is configured for the runtime, you can connect to the repo with either HTTPS or SSH. On selecting the repository, Codefresh automatically updates the URL format. See Configure SSH for runtimes.
    If the Argo CD project is not the default project, make sure that the repo has the correct access roles for your application.
    • Revision and Path: Applies to Git repositories.
    • Chart: Applies to Helm repositories. The name of the Helm package with all the resource definitions for the application, and the version.
    For more information, see Tracking and Deployment Strategies.

Destination

The cluster and namespace to which to deploy the application.

  • Cluster: The cluster to which to deploy the application, defined as a URL, or as the user-defined display NAME.
  • Namespace: The namespace in the cluster to which to deploy the application.

Sync Settings

Sync Policy

The synchronization policy to apply when there are differences between the desired state in Git and the actual state in the cluster.

  • Manual: Manually sync the changes from the Argo CD UI.
  • Automatic: Automatically sync changes, with the following options if selected:
    • Prune resources:When selected, removes legacy resources that do not exist currently in Git.
    • Self heal: When selected, always enforces a sync to the desired state in Git, if and when there is a change to the actual state in the cluster. See Automatic self-healing.

Sync Options

Common to both manual and automatic sync policies.

  • Skip schema validation: When selected, bypasses validating the YAML schema.
  • Auto-create namespace: When selected, automatically create the namespace if the specified namespace does not exist in the cluster.
  • Prune last: When selected, removes those resources that do not exist in the currently deployed version during the final wave of the sync operation. See Prune last.
  • Apply out of sync only: When selected, syncs only those resources in the application that have been changed and are OutOfSync, instead of syncing every resource regardless of their state. This option is useful to reduce load and save time when you have thousands of resources in an application. See Selective Sync.

Prune propagation policy

Defines how resources are pruned, applying Kubernetes cascading deletion prune policies. For more information, see Kubernetes - Cascading deletion.

  • Foreground: The default prune propagation policy used by Argo CD. With this policy, Kubernetes changes the state of the owner resource to `deletion in progress`, until the controller deletes the dependent resources and finally the owner resource itself.
  • Background: When selected, Kubernetes deletes the owner resource immediately, and then deletes the dependent resources in the background.
  • Orphan: When selected, Kubernetes deletes the dependent resources that remain orphaned after the owner resource is deleted.

All Prune propagation policies can be used with:

Replace: When selected, Argo CD executes kubectl replace or kubectl create, instead of the default kubectl apply to enforce the changes in Git. This action will potentially recreate resources and should be used with care. See Replace Resource Instead Of Applying Change.

Retry: When selected, retries a failed sync operation, based on the retry settings configured:

  • Maximum number of sync retries (Limit)
  • Duration of each retry attempt in seconds, minutes, or hours (Duration)
  • Maximum duration permitted for each retry (Max Duration)
  • Factor by which to multiply the Duration in the event of a failed retry (Factor). A factor of 2 for example, attempts the second retry in 2 X 2 seconds, where 2 seconds is the Duration.

Application: Advanced configuration settings

Advanced settings define the tool used to create the application, and related toll-specific settings.

Advanced configuration settings

Advanced configuration settings

ArgoCD Project

The project group to which the application belongs. A project is useful to enforce restrictions on permitted sources and targets for applications and roles. If not defined, the application is automatically assigned to the default project, which is created automatically by Argo CD and has no restrictions.
For more information, see Argo CD’s documentation on Projects.

Propagation policy for application deletion

Defines how resources are pruned, applying Kubernetes cascading deletion prune policies when you delete the application. For more information, see Argo CD’s app deletion..

  • Foreground The default prune propagation policy used by Argo CD. With this policy, Kubernetes changes the state of the owner resource to deletion in progress, until the controller deletes the dependent resources and finally the owner resource itself.
  • Background When selected, Kubernetes deletes the owner resource immediately, and then deletes the dependent resources in the background.
  • Non-cascading When selected, Kubernetes deletes only the application and not its resources.

Type of Application

The tool used to create the application’s manifests. Codefresh supports defining application manifests as a directory, Helm charts, or Kustomize. If you are using other tools to define application manifests, use the Plugin type. For more information, see the Argo CD’s documentation on Tools.

  • Directory: A directory application, which is the default application type in Argo CD.
    • Directory recurse: Optional. Select to include subdirectories.
    • Top-level arguments: Optional. Select and define parameters.
    • External variables: Optional. Select and define external variables.
  • Helm: Create the application as a Helm chart.
    • Values files: One or more values.yaml files to store the parameters.
    • Values: Optional. When defined, new values not in values.yaml files are added, and existing values are overridden.
  • Kustomize: Create a Kustomize application, with the following settings:
    • Version: The version of Kustomize used to create the application.
    • Name Prefix and Name Suffix: Optional. The prefix and suffix to be appended to the resources of the application.
  • Plugin: Use for any other tool.
    • Name: The name of the Plugin used to create the application.
    • External Variables: The variables to use in the application.

For example applications, go to the Argo CD example applications repo.

Create an Argo CD application

Create a new application from the GitOps Apps dashboard with the Add Application wizard. Edit the manifest directly in YAML mode, or define the settings in the Form mode. Toggle between the modes as convenient. You can also edit the YAML manifest directly at all stages, after defining configuration settings, and before the final commit.

Before you begin

How to

  1. In the Codefresh UI, from Ops in the sidebar, select GitOps Apps.
  2. On the top-right, select Add Application.
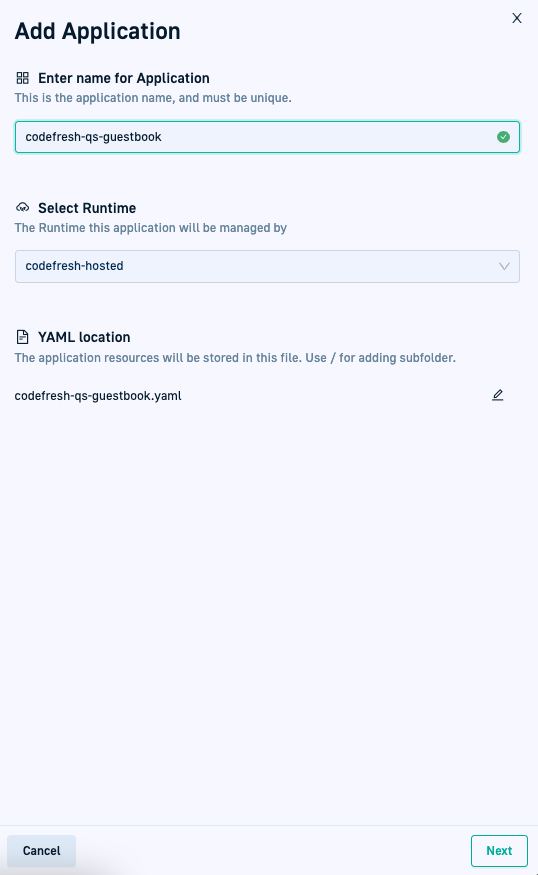
  3. In the Add Application panel, add definitions for the application:
    • Application name: Must be unique within the cluster.
    • Runtime: The runtime to associate with the application.
    • YAML filename: The name of the application’s configuration manifest, assigned on commit to Git. By default, the manifest is assigned the application name. Change the name as required.

    NOTE
    The application definitions cannot be changed after you continue to the Configuration settings.

Add Application panel

Add Application panel
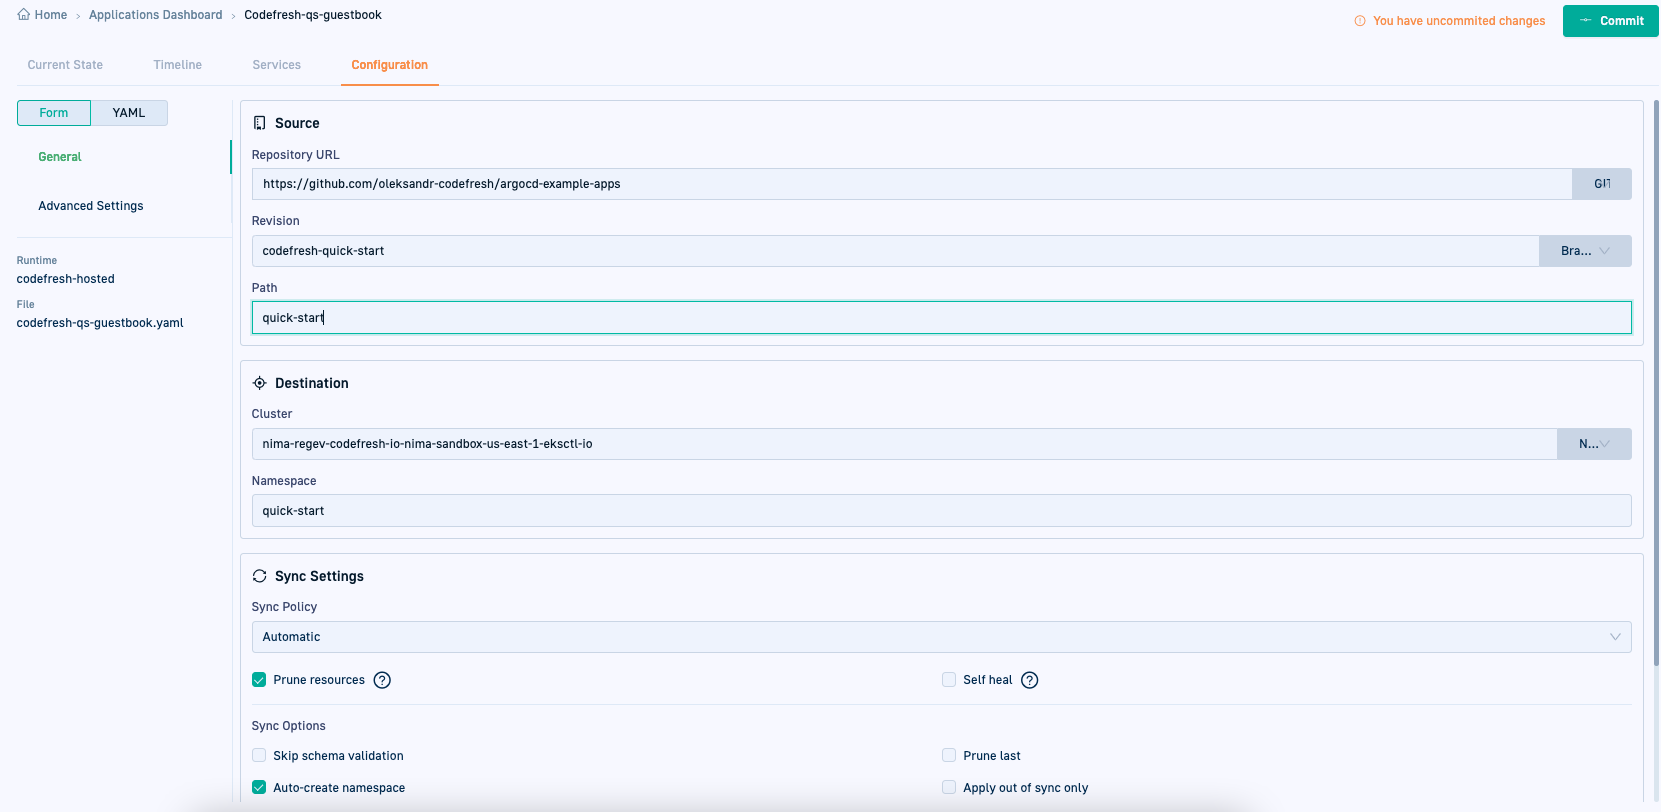
  1. Select Next to go to the Configuration tab.
    By default you are in Form mode. You can toggle between the Form and YAML modes as you define the application’s configuration settings. You can edit the YAML manifest.
  2. Define the General settings for the application.

Add Application: Advanced settings

Add Application: Advanced settings
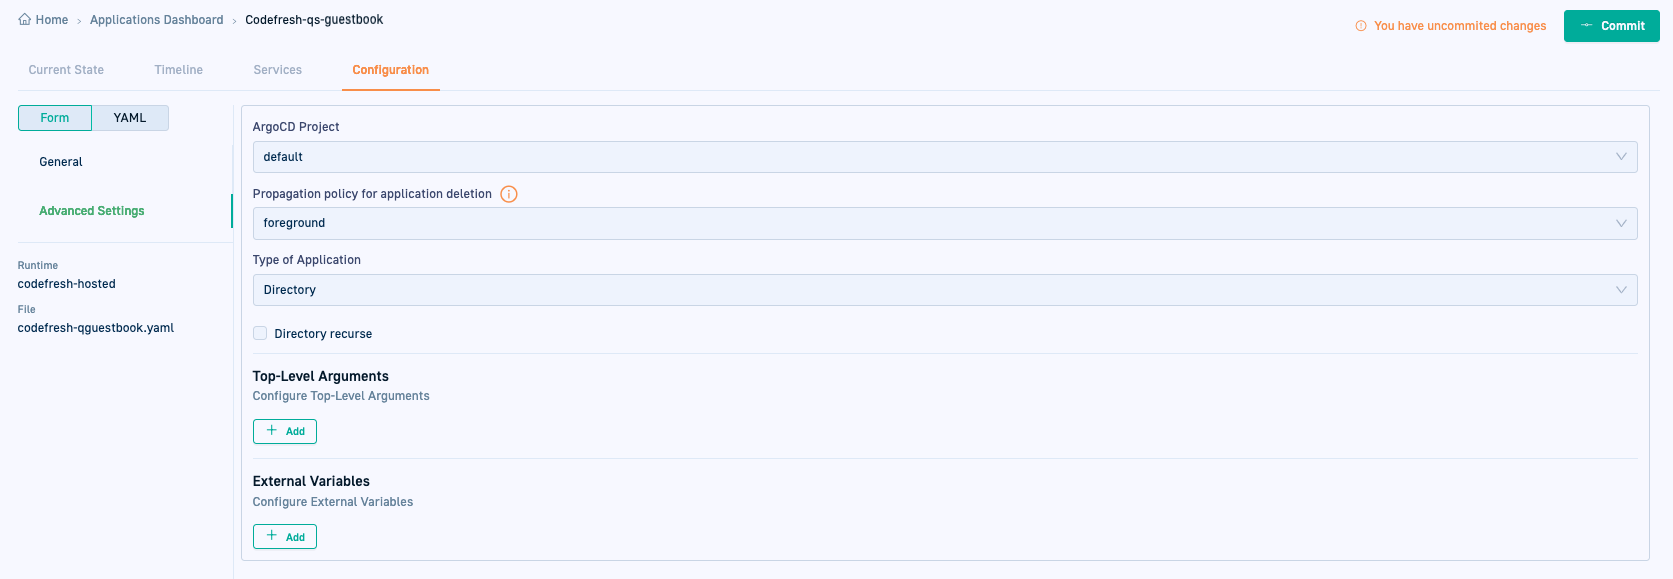
  1. Define the Advanced settings for the application.

Add Application: Advanced settings

Add Application: Advanced settings
  1. To commit all your changes, select Commit.
    The Commit form is displayed with the application’s definition on the left, and the read-only version of the manifest with the configuration settings you defined on the right.
  2. Enter the path to the Git Source to which to commit the application configuration manifest.

Add Application: Commit to Git

Add Application: Commit to Git
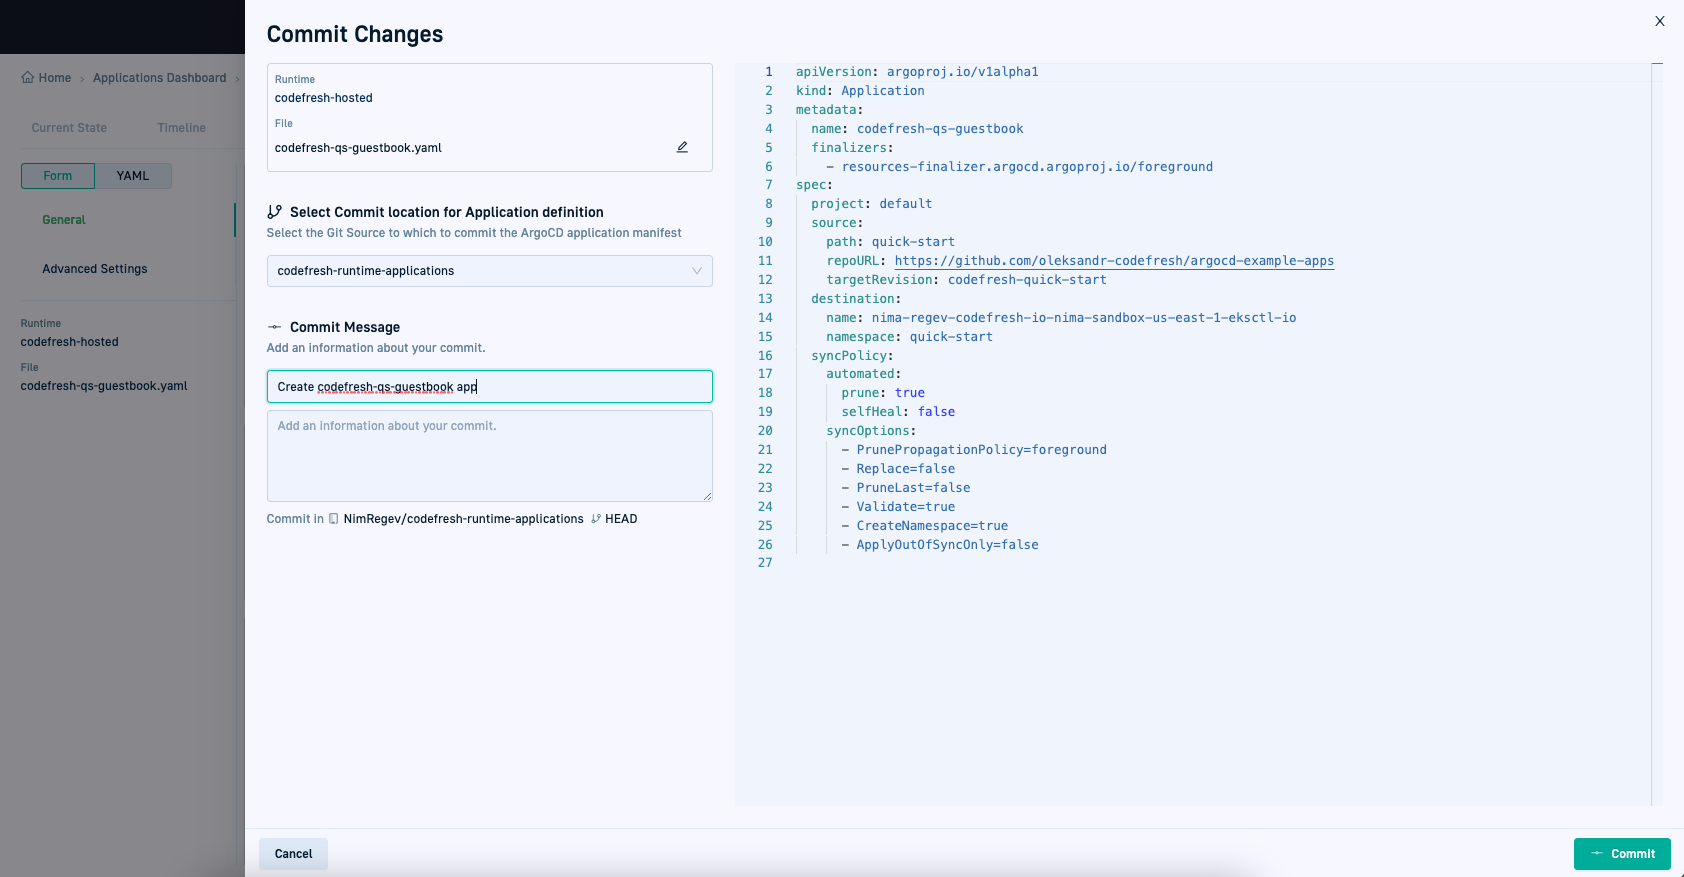
  1. Add a commit message and then select Commit on the bottom-right of the panel.

Your application is first committed to Git, and then synced to the cluster which may take a few moments.
Monitor the application.

Monitoring Argo CD applications
Managing Argo CD applications
GitOps Environments dashboard
GitOps Products dashboard
Home Dashboard
DORA metrics