Creating test reports
Create and view test reports in Codefresh with cloud storage integrations
Codefresh can integrate with cloud storage providers giving you the capability to store test results for pipeline builds. You can then harness Codefresh pipelines to generate comprehensive test reports, providing valuable insights into your testing processes.
Currently, Codefresh supports storing test reports for the following providers:
- Google buckets
Product overview of Cloud Storage - S3 buckets
Buckets overview - Azure Storage
Azure Storage documentation - MinIO objects
MinIO Object Storage for Kubernetes
Set up cloud storage for test reports
Before creating test reports, there are two steps to follow:
- Create a storage bucket with your preferred cloud storage provider to store test reports.
- Connect the cloud storage provider to Codefresh to provide an integration you can reference in Codefresh pipelines:
Codefresh creates subfolders for every build in the bucket with the build IDs as the names of the subfolders. Test reports generated for a build are uploaded to the respective folder. The same bucket can store test reports from multiple pipeline builds.
Test report modes
There are two modes for processing test reports in Codefresh, built-in and custom test reporting:
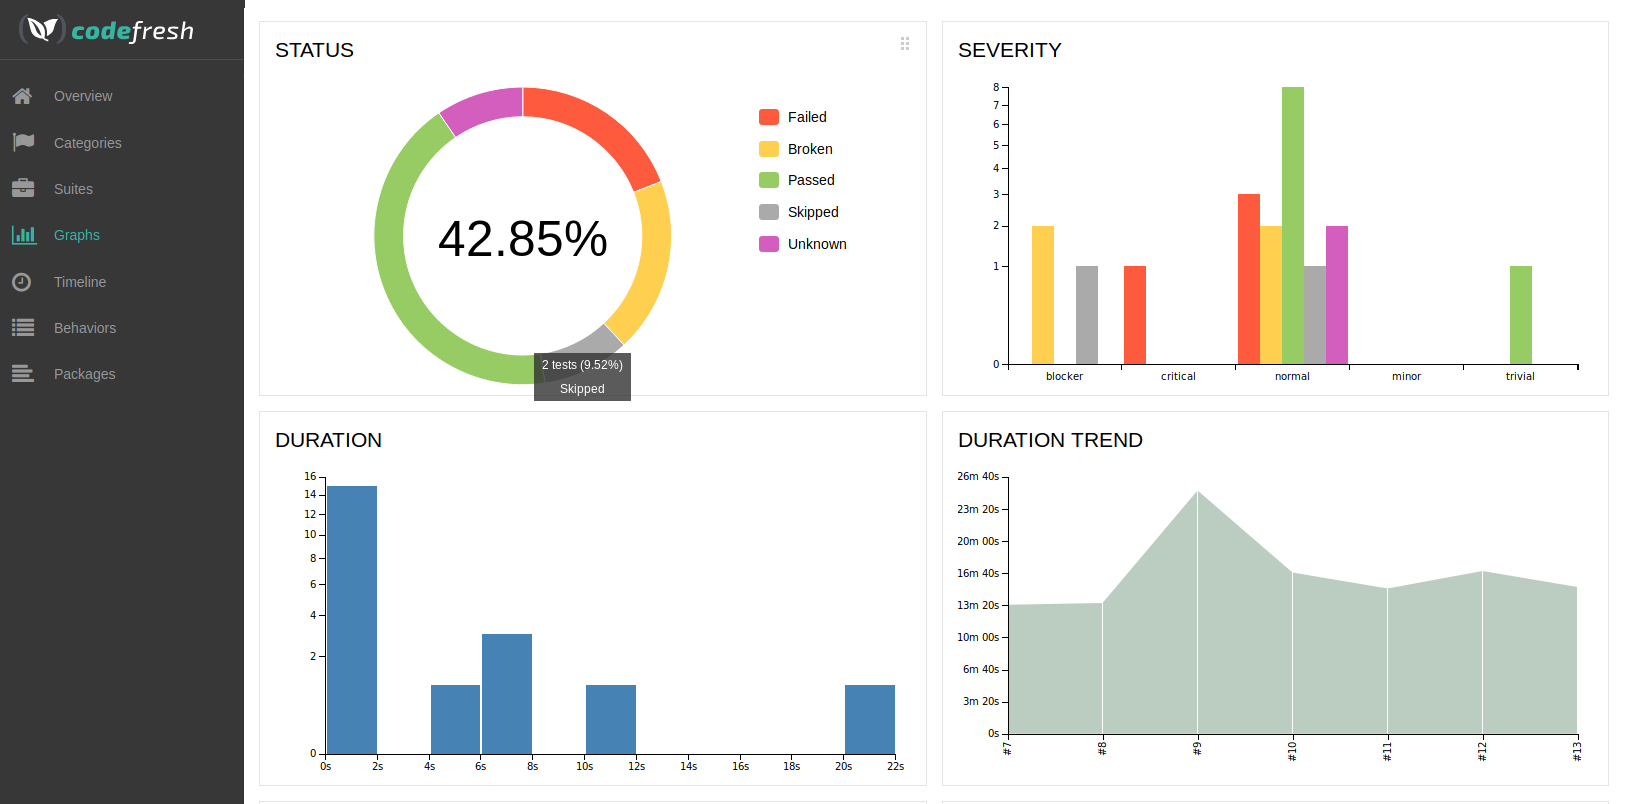
- Built-in test reporting based on the Allure framework
Allure is an open-source test framework that can produce HTML reports, as in the example below.
For more details, see the official Allure documentation.
Allure supports popular testing frameworks such as:- Java/JUnit/TestNG/Cucumber
- Python/pytest
- JavaScript/Jasmine/Mocha
- Ruby/Rspec
- Groovy/Spock
- .NET/Nunit/mstest
- Scala/Scalatest
- PHP/PhpUnit
- Custom reporting for any static website (HTML) content
If you use the custom reporting mode, you can select any kind of tool that you want, as long as it produces a static website in the end. You can also use the custom reporting mode for reports that are not test reports, such as security reports or quality reports.
Integration example in Codefresh pipeline
See an example of cloud storage provider integration in a pipeline:
version: "1.0"
stages:
  - "clone"
  - "test"

steps:
  clone:
    title: "Cloning repository"
    type: "git-clone"
    repo: "https://github.com/vadim-kharin-codefresh/test/"
    revision: "master"
    stage: "clone"
  unit_test_reporting_step:
    title: Upload Mocha test reports
    image: codefresh/cf-docker-test-reporting
    working_directory: "$"
    stage: "test"
    environment:
        - REPORT_DIR=mochawesome-report
        - REPORT_INDEX_FILE=mochawesome.html
        - BUCKET_NAME=codefresh-test-reporting
        - CF_STORAGE_INTEGRATION=minio
        - CF_BRANCH_TAG_NORMALIZED=test
Producing Allure test reports from Codefresh pipelines
To obtain test reports with Allure through a pipeline, the general process is the following:
- Generate test results using Allure and store them in a folder named
allure-results, which is the default folder created by Allure. - Copy this folder to the Codefresh volume to make it available to the next pipeline step.
- Use the special
cf-docker-test-reportingpipeline step with a working directory for the folder that contains theallure-resultssubfolder.
Let’s see these requirements in order:
Collecting Allure test results
The first step is to run your unit/integration tests using Allure to gather the results.
The process is different for every programming language. Follow the official Allure documentation. You can also take a look at any of the examples.
By default, Allure creates a folder named allure-results containing all the tests. The Codefresh reporting step looks for that folder to upload it to the cloud storage. If you change the default name, then you also need to add an extra parameter in the Codefresh reporting step.
To pass the reports to the next step, you need to place them anywhere in the Codefresh volume that is automatically shared between all Codefresh steps.
TIP
You can also leave the test results in the project folder that was checked out from Git, as this folder is already inside the shared Codefresh volume.
Therefore, once you create the reports with your testing framework, make sure to copy them to ${{CF_VOLUME_PATH}} which is the Codefresh variable that points to the shared volume.
An example for Node tests would be the following:
running_tests:
   image: node
   title: Running Unit tests
   commands:
    - npm test
    - cp -r -f ./allure-results $CF_VOLUME_PATH/allure-results
Here the tests are executed and then copied to /codefresh/volume/allure-results
Creating the Allure test reports
Once the test results are collected, the next step is the same, regardless of your programming language and testing framework.
 unit_test_reporting_step:
   title: Generate test reporting
   image: codefresh/cf-docker-test-reporting
   working_directory: '${{CF_VOLUME_PATH}}/'
   environment:
     - BUCKET_NAME=my-bucket-name
     - CF_STORAGE_INTEGRATION=google
Here, we execute the special cf-docker-test-reporting image as a freestyle step. The important point is that this image searches for allure-results in its working directory. This is why we pass /codefresh/volume/ as the working directory as this is the parent folder of the test results.
The required environment variables are:
BUCKET_NAME, the name of the bucket that you created in your cloud provider. Multiple pipelines can use the same bucket.CF_STORAGE_INTEGRATION, the name of the cloud integration you created in the Codefresh UI.
If you used another directory name, you can configure the test reporting step to include ALLURE_DIR, as in the example below:
unit_test_reporting_step:
title: Generate test reporting
image: codefresh/cf-docker-test-reporting
working_directory: '${{CF_VOLUME_PATH}}/'
environment:
- ALLURE_DIR=my-own-allure-results-folder
- BUCKET_NAME=my-bucket-name
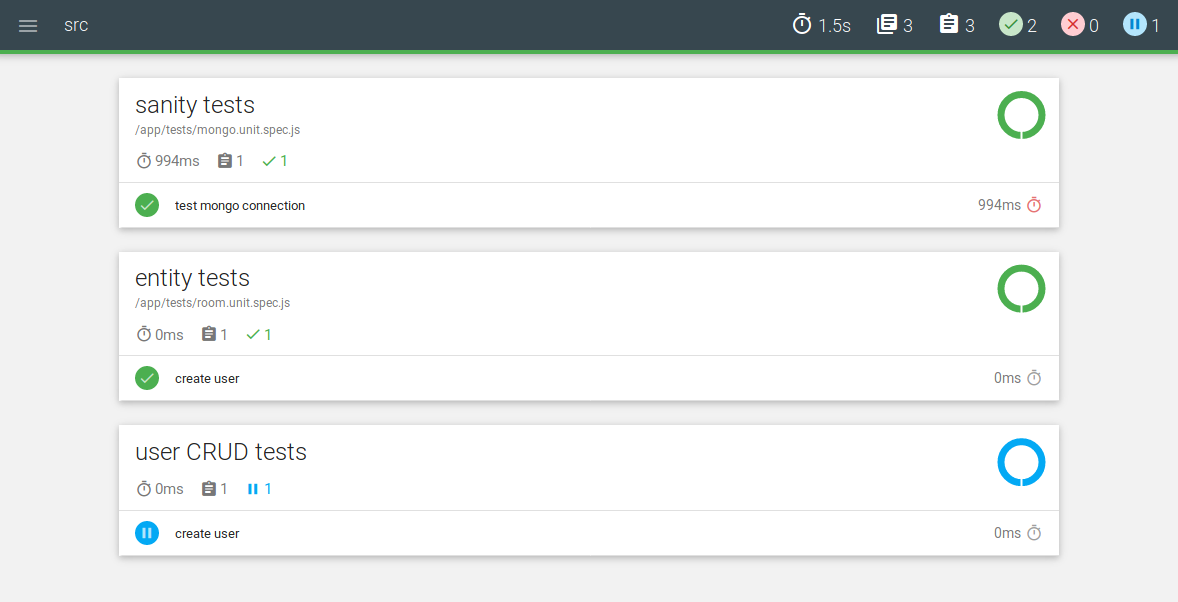
- CF_STORAGE_INTEGRATION=googleOnce that is done, the results are uploaded to Codefresh infrastructure. You can access the report for any build by clicking Test Report to the right of each build.

Note that behind the scenes, Codefresh automatically handles Allure history for you. For each test run, Codefresh finds the historical results from previous runs, and recreates them. Codefresh handles all folders inside the storage bucket, so make sure not to tamper with them. Make sure also that the account/role you are using for the bucket has delete privileges.
Using the custom mode for generic reporting
If you don’t want to use Allure or wish to create some other kind of report, you can use the alternative Custom reporting mode for the Codefresh reporting step.
Here is an example of a custom reporting step via Mocha. The reports are placed in the folder /codefresh/volume/demochat/mochawesome-report.
 unit_test_reporting_step:
   title: Upload Mocha test reports
   image: codefresh/cf-docker-test-reporting
   working_directory: /codefresh/volume/demochat/
   environment:
     - REPORT_DIR=mochawesome-report
     - REPORT_INDEX_FILE=mochawesome.html
     - BUCKET_NAME=my-bucket-name
     - CF_STORAGE_INTEGRATION=google
The environment variables are:
BUCKET_NAME, the name of the bucket that you created in your cloud provider.CF_STORAGE_INTEGRATION, the name of the cloud integration you created in the Codefresh UI.REPORT_PATH, the subfolder name in the bucket for each test report.- Data is saved to the bucket in following path:
{bucketName}/{pipelineId}/{REPORT_PATH}/{branchName}/{buildId}/
- Data is saved to the bucket in following path:
REPORT_DIR, the name of the folder to be uploaded.REPORT_INDEX_FILE, the name of file to serve as the index file.
In the above example, we define a non-Allure report directory and the file that serves as the index file.
Here is the result:
In a similar manner, you can upload reports from any other custom tool you have in your pipeline.
If your report is only one file, simply use the REPORT_INDEX_FILE environment variable on its own, as below:
 unit_test_reporting_step:
   title: Upload single html file report
   image: codefresh/cf-docker-test-reporting
   working_directory: /codefresh/volume/my-app/
   environment:
     - REPORT_INDEX_FILE=my-test-report/my-result.html
     - BUCKET_NAME=my-bucket-name
     - CF_STORAGE_INTEGRATION=google
Cleaning the reports from the previous run
In a typical scenario, the tests are run, the results are collected and saved in a folder, and then Codefresh creates the report.
If something goes wrong with the actual tests, once the Codefresh reporting step runs, it actually picks the old reports from the previous build. Remember that everything that is placed in the Codefresh volume is not only shared between build steps, but also persists between different builds of the same pipeline for caching purposes.
If that is a problem for you, pass the additional CLEAR_TEST_REPORT environment variable to the reporting step. This deletes the previous test results once uploaded, so are not available to the subsequent build.
Here is an example:
 unit_test_reporting_step:
   title: Upload Mocha test reports
   image: codefresh/cf-docker-test-reporting
   working_directory: /codefresh/volume/demochat/
   environment:
     - REPORT_DIR=mochawesome-report
     - REPORT_INDEX_FILE=mochawesome.html
     - CLEAR_TEST_REPORT=true
     - BUCKET_NAME=my-bucket-name
     - CF_STORAGE_INTEGRATION=google
NOTE
In the Built-in test (Allure) reporting mode, Codefresh automatically clears the test results. There is no need to manually define theCLEAR_TEST_REPORTvariable.
Creating multiple reports
You can create multiple reports from a single pipeline. As an example, you can create a single pipeline that creates two reports, one for code coverage, and the other one for security vulnerabilities.
To achieve this, you only need to repeat the variables mentioned in this article with an index number that matches them to the report, REPORT_DIR.0, REPORT_DIR.1, REPORT_DIR.2 and so on.
The following variables can be indexed:
REPORT_DIRREPORT_INDEX_FILEALLURE_DIRCLEAR_TEST_REPORTREPORT_TYPE(explained later on)
Here is an example of a pipeline that creates two reports, one for code coverage, and one for unit tests. Notice the index number (.0 and .1) used in the variables.
 unit_test_reporting_step:
   title: Upload Mocha test reports
   image: codefresh/cf-docker-test-reporting
   working_directory: /codefresh/volume/demochat/
   environment:
      - BUCKET_NAME=codefresh-test-report
      - CF_STORAGE_INTEGRATION=testReporting
      - REPORT_DIR.0=coverage
      - REPORT_INDEX_FILE.0=lcov-report/index.html
      - REPORT_TYPE.0=coverage
      - ALLURE_DIR.1=allure-results
      - REPORT_TYPE.1=allure
This is the top-level HTML file created by the reporting step:
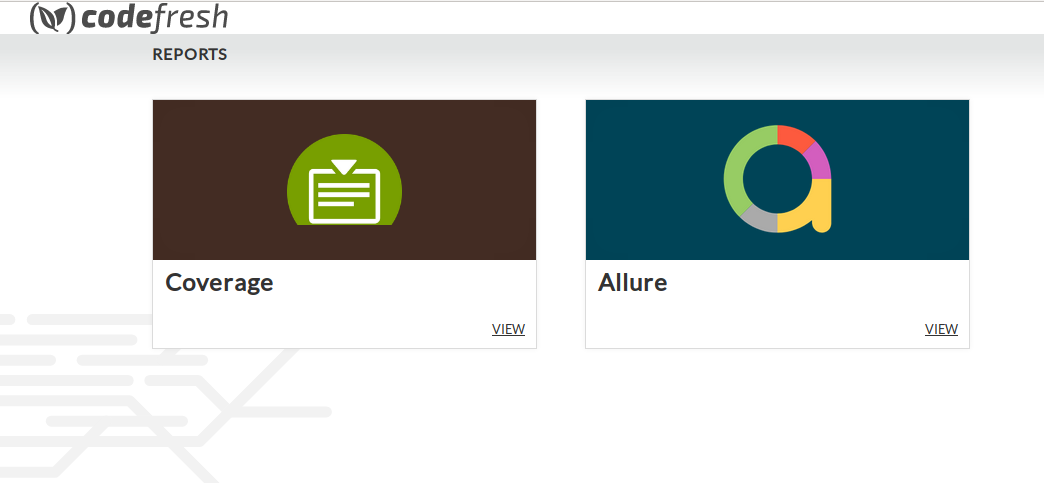
The icons shown are specified by the REPORT_TYPE variable. The following options are possible: allure, mocha, spock, coverage, junit, testng, cucumber, pytest, rspec, phpunit, nunit, spectest.
If you don’t provide a REPORT_TYPE, Codefresh uses a default icon.
Uploading large test reports
By default, the maximum size for a test report is 1000MB. Override the default size through the MAX_UPLOAD_SIZE_MB environment variable.
Example:
unit_test_reporting_step:
title: Upload Mocha test reports
image: codefresh/cf-docker-test-reporting
working_directory: /codefresh/volume/demochat/
environment:
- REPORT_DIR=mochawesome-report
- REPORT_INDEX_FILE=mochawesome.html
- CLEAR_TEST_REPORT=true
- BUCKET_NAME=my-bucket-name
- CF_STORAGE_INTEGRATION=google
- MAX_UPLOAD_SIZE_MB=3000
Getting results from tests that fail
By default, if unit tests fail, the pipeline stops execution. If you want the pipeline to keep running even if the tests fail,
add the fail_fast property to the pipeline and set it to false.
Here is an example:
  RunMyUnitTests:
    image: node:latest
    title: Running my UnitTests
    fail_fast: false
    commands:
    - npm run test
The pipeline continue its run, and any steps later in the pipeline that collect reports, also run as usual, with access to test results.
Marking the whole pipeline as failed if tests failed
When you use the fail_fast:false property in your pipeline, the pipeline “succeeds” even if the tests fail, because test results are essentially ignored.
To fail the pipeline when tests fail, use conditional execution.
As the last step in your pipeline, add the following step:
  MarkMyPipelineStatus:
    image: alpine:latest
    title: Marking pipeline status
    commands:
    - echo "Unit tests failed"
    - exit 1
    when:
      condition:
        all:
          myCondition: RunMyUnitTests.result == 'failure'
This step verifies the outcome of your unit tests. If the tests fail, it halts the entire pipeline by exiting with an error.
Replace RunMyUnitTests with the name of your step that runs unit tests.
Here is a full pipeline example:
codefresh.yml
version: '1.0'
steps:
  RunMyUnitTests:
    image: alpine:latest
    title: Running my UnitTests that will fail
    fail_fast: false
    commands:
    - exit 1 #simulate test fail
  CollectingMyTestresults:
    image: alpine:latest
    title: Collecting test results
    commands:
    - echo "collecting/copy test results"
  MarkMyPipelineStatus:
    image: alpine:latest
    title: Checking Unit test result
    commands:
    - echo "Unit tests failed, marking the whole pipeline as failed"
    - exit 1
    when:
      condition:
        all:
          myCondition: RunMyUnitTests.result == 'failure'
If you run this pipeline, you will see:
- The
RunMyUnitTestswill fail but the pipeline will continue - The
CollectingMyTestresultsstep will always run even if tests fail - The
MarkMyPipelineStatusstep will mark the whole pipeline as failed
Running the test reporting step in parallel mode
Test reporting works well with the parallel pipeline mode, where each step is evaluated any time there is a change in the workflow.
Here is how you can define the test reporting step to run regardless of pipeline result:
 unit_test_reporting_step:
   [...]
   when:
     condition:
       any:
         mySuccessCondition: workflow.status == 'success'
         myFailureCondition: workflow.status == 'failure'
See handling errors in a pipeline for more details.
Related articles
Codefresh YAML for pipeline definitions
Steps in pipelines
Parallel workflows in pipelines