Annotations in pipelines
Mark your builds and projects with extra annotations
Codefresh supports adding custom annotations to several entities, such as projects, pipelines, builds, and Docker images. Custom annotations can store any optional information you wish to keep associated with an entity. Examples would be storing the test coverage for a particular build, a special settings file for a pipeline, identifying environments for builds.
You can add, view, and manage annotations:
- In the Codefresh UI
- Through the Codefresh CLI
- Directly in Codefresh steps
NOTE
The syntax shown for the step examples in this article is deprecated but still supported. For the new syntax, see hooks in pipelines.
Adding annotations
You can add annotations to projects, pipelines, builds, and Docker images. The method is identical for all entities. Every annotation has a name, type, and value.
NOTE
Annotation names must start with a letter, can be alphanumeric, and include the underscore character.
Add annotations in the Codefresh UI
- In the Codefresh UI, from the sidebar, select the entity for which to add annotations:
- From the Projects/Pipelines/Builds page, select the specific project/pipeline/build.
- Click the context menu on the right, and select Annotations.

- Do the following:
- Click Add Annotation.
- In the Annotation Key field, type the name of the annotation.
- Select the annotation type from the Annotation Type dropdown.
- Enter the value of the annotation.
- To confirm, click Save.
Add annotations to a Codefresh step
In the most basic scenario, use the post-step operations of any Codefresh step to add annotations.
You can add annotations for any entity, not just the current pipeline. You can add annotations to a project, a different pipeline and build, as shown in the examples below.
Example 1: Annotation for project
codefresh.yml
version: '1.0'
steps:
  my_custom_step:
    title: Adding annotations to a project
    image: alpine:3.9
    commands:
     - echo "Hello"
    on_success:
      annotations:
        set:
          - entity_id: annotate-examples
            entity_type: project
            annotations:
            - my_annotation_example1: 10.45
            - my_empty_annotation
            - my_string_annotation: Hello World
This pipeline adds three annotations to a project called annotate-examples.
For the entity_id value you can also use an actual ID instead of a name. The entity_id and entity_type define which entity will hold the annotations. The possible entity types are:
project(for a project, even a different one)pipeline(for a pipeline, even a different one)build(for a build, even a different one)image(for a docker image)
If you don’t define them, then by default the current build is used with these values:
entity_idis${{CF_BUILD_ID}}(i.e. the current build)entity_typeisbuild
Example 2: Add annotation for a different pipeline and build
Here is another example where we add annotations to a different pipeline and a different build (instead of the current one).
You can store annotations for any Codefresh entity, and not just the ones that are connected to the build where you are defining the annotation.
codefresh.yml
version: '1.0'
steps:
  my_custom_step:
    title: Adding annotations to multiple entities
    image: alpine:3.9
    commands:
     - echo "Hello"
    on_success:
      annotations:
        set:
          - entity_id: my-project/my-basic-pipeline
            entity_type: pipeline
            annotations:
            - my_annotation_example1: 10.45
            - my_empty_annotation
            - my_string_annotation: Hello World
          - entity_id: 5ce2a0e869e2ed0a60c1e203
            entity_type: build
            annotations:
            - my_coverage: 70
            - my_url_example: http://www.example.com
Example 3: Add annotations to the current build/image
To add an annotation to the current build or image without defining the entity type and ID, add it at the root level of the build step.
This method provides a way to add annotations without the entity type and ID, compared to post-step operations where you explicitly define the target type and ID.
codefresh.yml
version: '1.0'
steps:
  main_clone:
    title: Cloning main repository...
    type: git-clone
    repo: 'kostis-codefresh/nestjs-example'
    revision: 'master'
  MyAppDockerImage:
    title: Building Docker Image
    type: build
    image_name: my-app-image
    working_directory: ./
    tag: 'sample'
    dockerfile: Dockerfile
    annotations:
      set:
        - annotations:
          - my_number_annotation: 9999
          - my_empty_annotation
          - my_docker_file: "file:Dockerfile"
          - my_text_annotation: simple_text
After running this pipeline at least once, you can retrieve the annotations from any previous build by using the respective ID:
codefresh get annotation build 5ce26f5ff2ed0edd561fa2fc
You can also define entity_type as image and don’t enter any entity_id. In this case the image created from the build step will be annotated.
cf_predecessor for BUILD_ID of parent pipeline
Codefresh has native support to navigate from parent to child builds.
To navigate from the child build to its parent, we have the cf_predecessor annotation.
The cf_predecessor annotation is automatically added to builds executed by calls to a codefresh-run plugin.
By querying the value of this annotation in the child build, you can get the ID of the parent build.
Managing annotations
Once you add an annotation to an entity, you can do the following:
- Configure annotation to display for build
- Filter builds by display annotations
- View annotations for an entity via the UI or via the CLI
- Edit/delete annotations via UI
- Delete annotations in pipeline YAML
Configure annotation to display for build
Configure an annotation as the display annotation for a build by adding the display attribute to the pipeline workflow. When you have large numbers of builds per pipeline, display annotations help group related builds for easy viewing and filtering.
For example, annotate builds by environments by configuring the display attribute set to ENV. You can filter the Builds list by annotations and ENV values to view builds by their environments.
Before you begin
- Add at least one annotation to the pipeline
How to
- In the Codefresh UI, from the sidebar, select Pipeline.
- Select the pipeline for which to configure the build display annotation.
- In the Workflow tab, scroll down to the list of annotations in the YAML.
- At the end of the annotation list, add
display, and set it one of the annotations defined, for example,ENV.
codefresh.yml
version: '1.0'
steps:
  test:
    title: Test
    image: ubuntu:latest
    commands:
     - echo "Tests"
    on_success:
      annotations:
        set:
          - annotations:
            - success: true
            - ENV: 'sec'
            - user: 'kim'
            - NUM: 1
display: ENV- Click Save and Run.
- Switch to the Builds page. The display annotation is shown for the build. The number to the right indicates that the build has additional annotations.
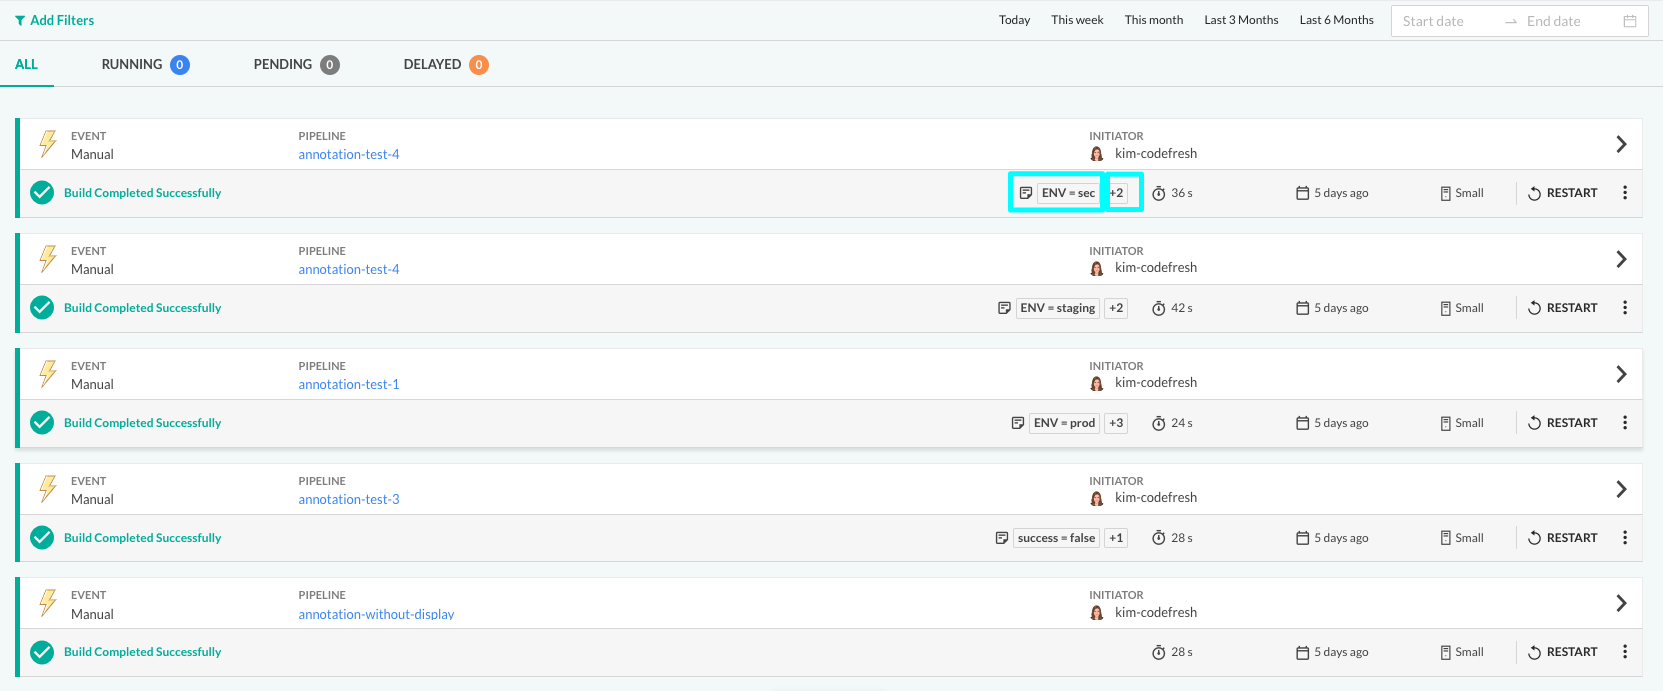
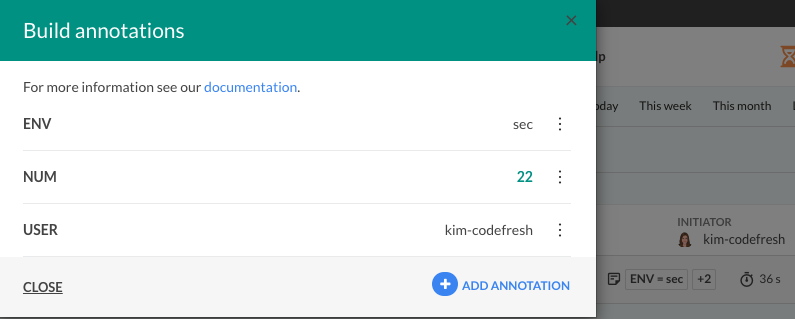
- To view all annotations available for the build, click the number.
Filter builds by annotations
Filter the Builds list by build annotations to view builds that share the same annotations. This includes both the build display annotation, and other build annotations.
Combine this with the other filters available for builds to create a customized view of the Builds page.
- In the Codefresh UI, from the sidebar, select Builds.
- From the list of filters, select
annotations, and select the annotation to filter by from the list.
You can filter by multiple values for the same annotation.

View annotations via UI
- In the Codefresh UI, from the sidebar, select the entity for which to view annotations:
- From the Projects/Pipelines/Builds page, select the specific project/pipeline/build.
- From the context menu, select Annotations.
View annotations via CLI
codefresh get annotation <entity> annotate-examples
where, <entity> can be project, pipeline, or build.
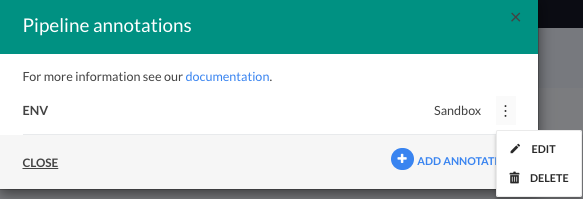
Edit/delete annotations via UI
- From the Projects/Pipelines/Builds page, select the specific project/pipeline/build.
- From the context menu, select Annotations.
- From the list of annotations, click the context menu of the annotation to edit or delete.
- Select Edit or Delete, and modify or delete the annotation.
Delete annotations in pipeline YAML
Delete annotations by defining them by name in the YAML with unset.
NOTE
Useunsetannotation with all post-step operations,on_success,on_fail,on_finish.
codefresh.yml
version: '1.0'
steps:
  my_custom_step:
    title: Adding annotations to a pipeline
    image: alpine:3.9
    commands:
     - echo "Hello"
    on_success:
      annotations:
        set:
          - entity_id: my-project/my-basic-pipeline
            entity_type: pipeline
            annotations:
            - my_annotation_example1: 10.45
            - my_empty_annotation
            - my_string_annotation: Hello World
            - my_second_annotation: This one will stay
  my_unit_tests:
    title: Removing annotations
    image: alpine:3.9
    commands:
     - echo "Tests failed"
     - exit 1
    on_fail:
      annotations:
        unset:
          - entity_id: my-project/my-basic-pipeline
            entity_type: pipeline
            annotations:
            - my_annotation_example1
            - my_empty_annotation
            - my_string_annotation
You can also use both unset and set block in a single annotations block. And of course, you can remove annotations from multiple entities.
Complex annotation values
Apart from scalar values, you can also store more complex expressions in annotations, using Codefresh variables, text files from the build, and even evaluations from conditional expressions.
NOTE
The pipeline in this example uses dynamic Git repository variables. For the pipeline to work, it must be linked to least one Git trigger.
codefresh.yml
version: '1.0'
steps:
  main_clone:
    title: Cloning main repository...
    type: git-clone
    repo: 'kostis-codefresh/nestjs-example'
    revision: '${{CF_REVISION}}'
  my_custom_step:
    title: Complex annotations
    image: alpine:3.9
    commands:
     - echo "Hello"
     - echo "Sample content" > /tmp/my-file.txt
    on_finish:
      annotations:
        set:
          - entity_id: annotate-examples/simple
            entity_type: pipeline
            annotations:
              - qa: pending
              - commit_message: ${{CF_COMMIT_MESSAGE}}
              - is_main_branch:
                  evaluate: "'${{CF_BRANCH}}' == 'main'"
              - my_json_file: "file:/tmp/my-file.txt"
              - my_docker_file: "file:Dockerfile"
The last two annotations add the text of a file as a value:
- You can define an absolute or relative path.
- No processing is done on the file before being stored.
- If a file is not found, the annotation will still be added verbatim.
We suggest you only store small text files in this manner as annotations values.