Custom kubectl commands
Use kubectl in your Codefresh pipelines
As described in Deployment options for Kubernetes, Codefresh has built-in functionality for deploying to Kubernetes clusters.
For maximum flexibility with cluster deployments, you can run your own custom kubectl commands in a freestyle step.
Kubectl is the command line interface for managing kubernetes clusters.
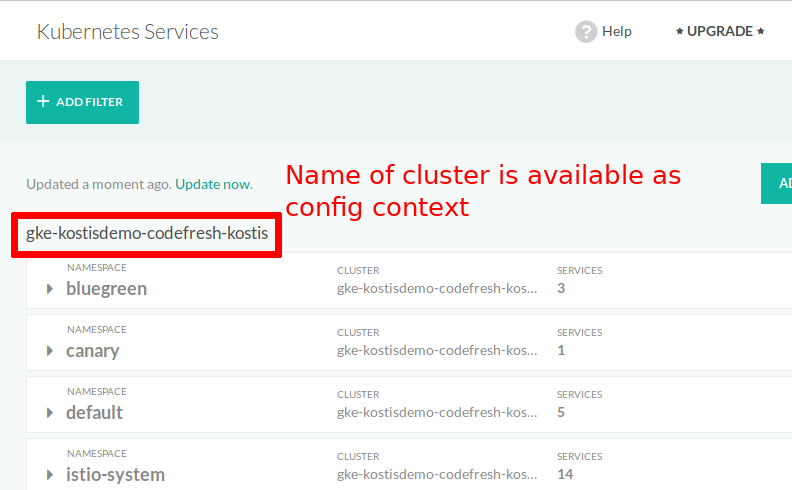
Codefresh automatically sets up your config context with your connected clusters.
The config context is automatically placed for you at the path of the variable $CF_KUBECONFIG_PATH.
In the current Codefresh implementation, this expands to /codefresh/volume/sensitive/.kube/config, within the shared step volume.
When you use custom kubectl commands, it is your responsibility to template your manifests using any of the available options. To employ Codefresh for templating, it is better to use the dedicated cf-deploy-kubernetes step, which provides simple templating capabilities.
Getting a config context
The important thing to know when running custom kubectl commands is that Codefresh automatically sets up
your kubeconfig files for you with the cluster information present in integrations.
If you run this pipeline, you will see the names of all your connected clusters:
YAML
version: '1.0'
steps:
  MyCustomKubectlCommands:
    title: Running Kubectl
    image: codefresh/kubectl
    commands:
      - kubectl config get-contexts
With two sample clusters, the output of this pipeline is the following:
Running freestyle step: Running Kubectl
Pulling image codefresh/kubectl:latest
Status: Image is up to date for codefresh/kubectl:latest
NAME                              CLUSTER                           AUTHINFO                          NAMESPACE
gke-kostisdemo-codefresh-kostis   gke-kostisdemo-codefresh-kostis   gke-kostisdemo-codefresh-kostis   default
kostis-demo@FirstKubernetes       kostis-demo@FirstKubernetes       kostis-demo@FirstKubernetes       default
You can modify the current config context and run any kubectl command you want applied to that context. The next pipeline will print all the nodes of the first cluster:
YAML
version: '1.0'
steps:
  MyCustomKubectlCommands:
    title: Running Kubectl
    image: codefresh/kubectl
    commands:
      - kubectl config get-contexts
      - kubectl config use-context "gke-kostisdemo-codefresh-kostis"
      - kubectl get nodes
Example of parallel deployment with kubectl
Let’s see a full example. In this pipeline, we will create two Docker images and deploy them on two separate clusters, using custom kubectl commands. We will also use the parallel capability of Codefresh pipelines.
Here is the pipeline:
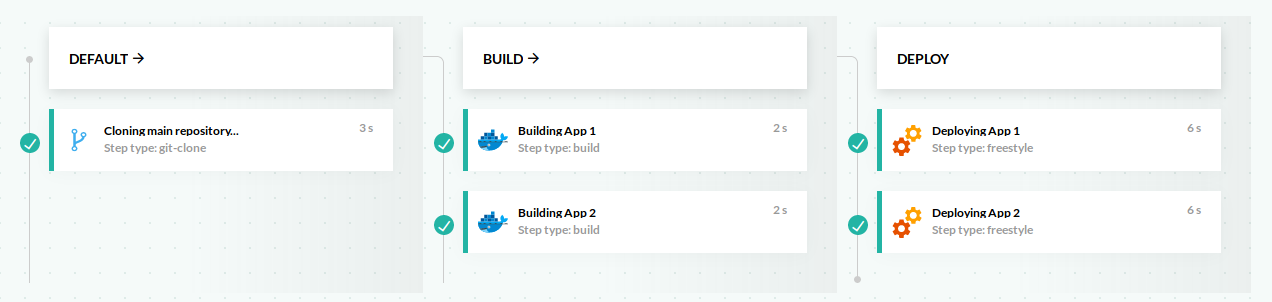
And here is the complete codefresh.yml:
YAML
version: '1.0'

stages:
- build
- deploy

steps:
  BuildingApps:
    type: parallel
    stage: 'build'
    steps:
      BuildingApp1:
        title: Building App 1
        type: build
        stage: build
        image_name: nestjs-app
        working_directory: ./my-nestjs-project/
        dockerfile: Dockerfile
      BuildingApp2:
        title: Building App 2
        type: build
        stage: build
        image_name: rails
        working_directory: ./my-rails-project/
        dockerfile: Dockerfile
  DeployingApps:
    type: parallel
    stage: 'deploy'
    steps:
      DeployApp1:
        title: Deploying App 1
        stage: deploy
        image: codefresh/kubectl
        working_directory: ./my-nestjs-project/
        commands:
          - kubectl config get-contexts
          - kubectl config use-context "gke-kostisdemo-codefresh-kostis"
          - kubectl apply -f service.yml deployment.yml
      DeployApp2:
        title: Deploying App 2
        stage: deploy
        image: codefresh/kubectl
        working_directory: ./my-rails-project/
        commands:
          - kubectl config get-contexts
          - kubectl config use-context "kostis-demo@FirstKubernetes"
          - kubectl apply -f service.yml deployment.yml configmap.yml
In the example above, we select one of the clusters in each deployment step, and then apply several Kubernetes manifests that constitute an application.
Related articles
Managing Kubernetes clusters
Accessing a Docker registry from cluster