Using Helm in a Codefresh pipeline
Deploy and push Helm charts with Codefresh
We created a special Helm step for easy integration of Helm in Codefresh pipelines. The Helm step facilitates authentication, configuration, and execution of Helm commands.
NOTE
If you have a special use case that is not covered by the Codefresh Helm step, you can always use the regularhelmCLI command in afreestylestep.
In this case, you can use the simpler containercodefresh/kube-helmwhich includes only Kubectl and helm tools.kube-helmis available on DockerHub: https://hub.docker.com/r/codefresh/kube-helm/.
If you are just starting with Helm, refer to our Helm quick start guide. If you prefer to work directly with code, see our full Helm example.
Helm setup
To use Helm in your Codefresh pipeline you must do the following:
- Make sure that your application has a Helm chart
- Create a Helm package for your application from the chart
- Add a Kubernetes cluster in Codefresh
- Define a Helm repository or use the one offered by Codefresh to all accounts
- Import the Helm configuration into your pipeline variables
- Use the Helm step in your Pipeline definitions YAML
Let’s see these steps in order.
Step 1: Create a Helm chart for your application
Helm applications are bundled in special archives called Charts. You can create a Helm chart for your application by following the official documentation on charts.
The example Codefresh application includes a sample chart, used in our Helm quick start guide, mentioned earlier in this article.
You can create the chart manually or by using the helm create command on your workstation. There are also several third-party tools that can create Helm packages for you such as Draft.
Once your Helm chart is ready, commit it to a folder called charts, in the same Git repository that contains the source code of your application.
Codefresh can also work with Helm charts that are in different Git repositories. We suggest however that you keep both the source code and the Helm chart of an application in the same Git repository to make chart management much easier.
Step 2: Select Kubernetes cluster for deployment
The Helm pipeline step requires the configuration of a kube_context variable that determines the Kubernetes cluster used for the deployment.
-
Provide the cluster to the Helm step by adding the
KUBE_CONTEXTvariable, where the value is the connection name entered when you created the connection.TIP
The connection name also appears as the title of the cluster in Kubernetes integration settings (Settings > Pipeline Integrations > Kubernetes).
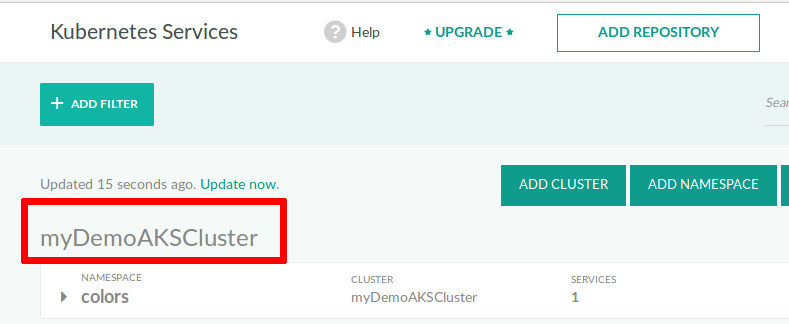
- Verify that your cluster is set up for Helm, from the sidebar, below DevOps Insights, select Helm Releases. The Helm releases in your cluster are displayed. If you have just started using Helm, the release page may be empty.
Step 3: Define a Helm repository
To push your chart to a Helm repository, configure the target repository to work with. It is always a good practice to save Helm charts in Helm repositories.
Codefresh supports a variety of private, authenticated Helm repositories, in addition to public HTTP repositories. Codefresh also provides a free, managed Helm repository for every account.
- Either connect your repository with Codefresh
OR - Obtain your managed Helm repository URL
Step 4: (Optional) Import Helm configuration(s) into your pipeline definition
Once you have Helm repositories connected to Codefresh, you can import one or more of them into the pipeline. This step is needed in pipelines that actually upload/fetch Helm charts from/to Helm repositories. If you have a pipeline that directly installs a Helm chart from the Git filesystem, there is no need to import a Helm configuration.
- Click the Variables tab on the right sidebar, and then click the Settings (gear) icon.
- Click Import from shared configuration, and select the Helm context or contexts to import into the pipeline:
- To import a single context, select the context. The
CF_HELM_DEFAULTis the Helm repo provided by Codefresh. See also shared configuration. - To import multiple contexts, select each context to import.
TIP
You can also click on Add shared configuration directly from the three dots menu for the same functionality. - To import a single context, select the context. The
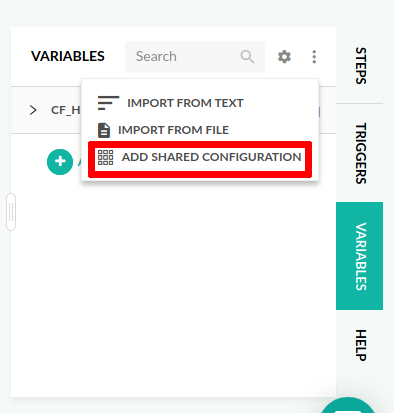
This concludes the Helm setup for Codefresh. Now you can use the Helm freestyle step in the pipeline codefresh.yml file.
Step 5: Use the Helm freestyle step in the pipeline
You can now use the Helm freestyle step in the codefresh.yml file. This step is only needed in pipelines that actually upload/fetch Helm charts to/from Helm repositories. If your pipeline directly installs a Helm chart from the Git filesystem, there is no need to import a Helm configuration.
NOTE
Currently, you can use only one Helm configuration in the same pipeline. We are aware of this limitation, and will soon improve the way Codefresh works with multiple Helm configurations.
- Use the Helm typed step from the Step Marketplace.
- Configure the Helm step using environment variables, as described in user-defined variables.
The example below illustrates how to provide variables as part of the Helm step definition:
deploy:
  type: helm:1.1.12
  arguments:
    action: install
    chart_name: test_chart
    release_name: first
    helm_version: 3.0.3
    kube_context: my-kubernetes-context
    custom_values:
      - 'pat.arr="{one,two,three}"'
      - 'STR_WITH_COMAS="one\,two\,three"'
Helm step action modes
The Helm step can operate in one of three modes, as defined by the action argument, which can be one of the following:
install: Installs the Helm chart into a Kubernetes cluster. This is the default mode if one is not explicitly set.push: Packages the Helm chart and pushes it to the repository.auth: Sets up authentication, and adds one or more Helm repos. This mode is useful to write your own Helm commands using the freestyle step’scommandsproperty, but still allow the step to handle authentication.
Multiple Helm contexts for pipeline
If you have imported multiple Helm contexts into the same pipeline:
- For the
installandpushactions, you need to define the primary Helm context to use through theprimary_helm_contextargument. - For the
authaction, to use the repos from the Helm contexts imported into the pipeline, adduse_repos_for_auth_action: 'true'. Otherwise, imported contexts, if any, are ignored for theauthaction.
For a description of these and other arguments, see Helm step configuration fields.
Helm values
- To supply a
valuesfile, add to the Helm step,custom_values_file, with the value pointing to an existing values file. - To override specific values, add to the Helm step,
custom_valuesfollowed by the path to the value to set. For example,myservice_imageTag. Note that.(dot) should be replaced with_(underscore). The value of the variable is used to override or set the templated property.
Examples:
...
    custom_values:
      - 'myimage_pullPolicy=Always'
...
results in:
--set myimage.pullPolicy=Always
...
    custom_value_files:
    - 'values-prod.yaml'
...
results in:
--values values-prod.yaml
If a variable already contains an underscore (_) in its name, replace it with a double underscore (__).
).
Helm usage examples
The following sections illustrate all three modes of Helm usage.
You can also look at the GitHub repository of our Helm example for full pipelines:
- Pipeline YAML for deploying a chart
- Pipeline YAML for both storing and deploying a chart
Helm usage example: Installing a Helm Chart
The following example includes the minimum configuration to install a Helm chart from a repository. For more configuration options, see the Argument reference.
deploy:
  type: helm:1.1.12
  arguments:
    action: install
    chart_name: /home/user/charts/mywebapp
    release_name: first
    helm_version: 3.0.3
    kube_context: my-kubernetes-context
Helm usage example: Pushing a Helm Chart
The following example illustrates how to package and push a Helm chart into a repository.
deploy:
  type: helm:1.1.12
  arguments:
    action: push
    chart_name: /codefresh/volume/repo/chart
    chart_repo_url: 'cm://h.cfcr.io/useraccount/default'
NOTES
- Assumes that a Git repository with the Helm chart files was cloned as a part of the pipeline.
- The Git repository contains the chart files in the
chartdirectory.chart_repo_urlis optional. If a Helm repository configuration is attached to the pipeline, this setting is ignored.
Helm usage example: Authenticating only
The following example illustrates the Helm mode for authentication only.
deploy:
  type: helm:1.1.12
  arguments:
    action: auth
    kube_context: my-kubernetes-context
    commands:
      - helm list
Helm usage example: Custom Helm commands
The following example illustrates executing custom Helm commands.
codefresh.yml
my_custom_helm_command:
  type: helm:1.1.12
  arguments:
    action: auth
    kube_context: my-kubernetes-context
    commands:
      - source /opt/bin/release_chart
      - helm repo add incubator https://kubernetes-charts-incubator.storage.googleapis.com/
      - helm repo add stable https://kubernetes-charts.storage.googleapis.com
      - helm repo list
      - helm repo update
      - helm list
NOTE
The directory that contains a chart MUST have the same name as the chart. Thus, a chart namedmy-chartMUST be created in a directory calledmy-chart/. This is a requirement of the Helm Chart format.
Helm step configuration fields
| Name | Description | Required |
|---|---|---|
action |
The operation performed by the Helm step, and can be of the following:
|
Required |
chart_name |
The chart to use for the install and push actions. The chart name can be either:
CHART_NAME should not be used anymore. |
Required |
chart_repo_url |
Helm chart repository URL. If a Helm repository configuration is attached to the pipeline, this setting is ignored. | Optional |
chart_subdir |
The subfolder where the chart is located in the JFrog Artifactory Helm repository. | Optional |
chart_version |
The version identifier used to track and communicate the version of the Helm chart itself, instead of the version of the application or service that the chart deploys. When not specified, uses the version in the chart.yaml file of the chart. |
Optional |
cmd_ps |
The Postscript command to be appended as is to the generated Helm command string. Use to set additional parameters supported by the command but not exposed as configuration options. |
Optional |
commands |
Commands to execute in plugin after auth action. | Optional |
credentials_in_arguments |
The username and password credentials to add to the Helm command as arguments. If not added to the Helm command, the credentials are passed in the URL http(s)://username:password@url. Should be enabled for JFrog Artifactory Helm repositories. |
Optional |
custom_value_files |
The values file to provide to Helm as --values or -f. |
Optional |
custom_values |
The values to provide to Helm as --set. |
Optional |
helm_repository_context |
The name of the Helm repository integration configured in Codefresh. | Optional |
helm_version |
The version of the cfstep-helm image. | Optional |
kube_context |
The Kubernetes context to use when the action for the Helm step is set to install. The name of the cluster as configured in Codefresh. |
Optional |
namespace |
The target Kubernetes namespace to deploy to. | Optional |
primary_helm_context |
The Helm context to use for the Helm command, when the Helm action is either install or push, and the pipeline has multiple Helm contexts. When omitted, uses the repo most recently added to the pipeline. |
Optional |
release_name |
The Helm release name to use when the Helm action is set to install. If the release exists, it is upgraded. |
Optional |
repos |
Array of custom repositories. | Optional |
set_file |
The values to set from the respective files specified by the command line in key=value format. To specify multiple key-value pairs, separate them with commas. |
Optional |
skip_cf_stable_helm_repo |
When set to true, the default, does not add a stable repository. |
Optional |
timeout |
The maximum time, in seconds, to wait for Kubernetes commands to complete. | Optional |
use_debian_image |
Use Debian-based cfstep-helm image. |
Optional |
use_repos_for_auth_action |
Uses repos from attached contexts, and is required when the Helm step action is set to auth action. When required, set value to true. |
Optional |
wait |
When specified, waits until all pods are in state ready to mark the release as successful. Otherwise, release is marked as successful when the minimum number of pods are ready and the Services have IP addresses. |
Optional |
tiller_namespace |
Deprecated. Kubernetes namespace where Tiller is installed . | Optional |
Full Helm pipeline example
The pipeline in this example builds a docker image, runs unit tests, stores the Helm chart in the Codefresh private Helm repository and finally deploys the Helm chart to a cluster.
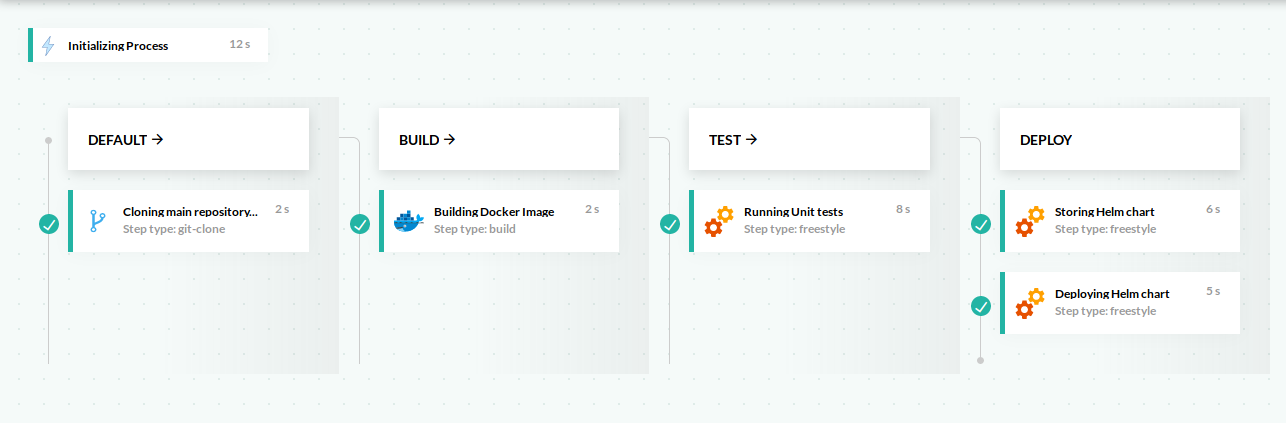
This is the pipeline definition:
codefresh.yml
version: '1.0'
stages:
  - checkout
  - build
  - test
steps:
  clone:
    title: Cloning main repository...
    stage: checkout
    type: git-clone
    arguments:
      repo: 'codefresh-contrib/python-flask-sample-app'
      revision: with-helm
      git: github
  MyAppDockerImage:
    title: Building Docker Image
    stage: build
    type: build
    working_directory: '${{clone}}'
    arguments:
      image_name: kostis-codefresh/python-flask-sample-app
      tag: 'master'
      dockerfile: Dockerfile
  MyUnitTests:
    title: Running Unit tests
    stage: test
    type: freestyle
    working_directory: '${{clone}}'
    arguments:
      image: ${{MyAppDockerImage}}
      commands:
        - python setup.py test
  StoreChart:
    title: Storing Helm Chart
    type: helm:1.1.12
    stage: store
    working_directory: ./python-flask-sample-app
    arguments:
      action: push
      chart_name: charts/python
      kube_context: kostis-demo@FirstKubernetes
  DeployMyChart:
      type: helm:1.1.12
      stage: deploy
      working_directory: ./python-flask-sample-app
      arguments:
        action: install
        chart_name: charts/python
        release_name: my-python-chart
        helm_version: 3.0.2
        kube_context: kostis-demo@FirstKubernetes
        custom_values:
          - 'buildID=${{CF_BUILD_ID}}'
          - 'image_pullPolicy=Always'
          - 'image_tag=master'
          - 'image_pullSecret=codefresh-generated-r.cfcr.io-cfcr-default'
You can see the source code in our example section.
Related articles
Helm charts and repositories
Using managed Helm repositories
Helm Promotion boards