Managing Git PATs
Generate, assign, and manage Git user tokens for GitOps Runtimes
Git user token management
As a user in Codefresh, you must authorize access to your Git provider accounts and authenticate Git-based actions from Codefresh clients, per provisioned GitOps Runtime. This is done through the Git user token, which is an access token unique to each user. For more details, including required scopes and how the Git user token differs from the Git Runtime token, see Git tokens in Codefresh.
The authorization mode depends on the authorization method set up by your account admin:
- OAuth2
If your admin has set up authentication with OAuth2, you can authorize access using OAuth2. - Git user token
You can always generate a Git user token from your Git provider and then add the same to the GitOps Runtime in Codefresh to authorize access.
NOTE
Codefresh GitOps does not officially support fine-grained tokens, or tokens with custom scopes. If you are using such tokens, make sure you turn off validation for Git tokens in thevalues.yamlfile, as described in Skipping token values.yaml.
Authorize Git access to GitOps Runtimes with OAuth2
Authorize Git access to GitOps Runtimes with OAuth2 if your account admin has set up Codefresh as an OAuth application, or alternatively through Git user access tokens from your Git provider.
If you have access to more than one GitOps Runtime in the same or in different accounts, you can use the same Git user token for all the Runtimes you have access to. You must however authorize access for each GitOps Runtime individually.
NOTE
For OAuth2, the administrator pre-configures the permissions and expiry date. Once you supply your credentials for authorization, you are automatically directed to the Git Personal Tokens page.
Before you begin
Make sure you have:
- For Bitbucket only, your Bitbucket account username
- If needed, a user access token from your Git provider with the required scopes:
- Make sure you have a user access token with the required scopes for GitHub
How to
- In the Codefresh UI, on the toolbar, click your avatar, and then select Git Personal Access Token.
- Select the GitOps Runtime to authenticate to, and then click Add Token.
- Do as needed:
- For OAuth2:
- Click Authorize Access to GitHub.
- Enter your credentials, and select Sign In.
- Complete the verification if required, as when two-factor authentication is configured, for example.
- For Git user tokens:
- Expand Advanced authorization options.
- For Bitbucket, enter your Bitbucket username.
- In the Personal Access Token field, paste the token you generated.
- For OAuth2:
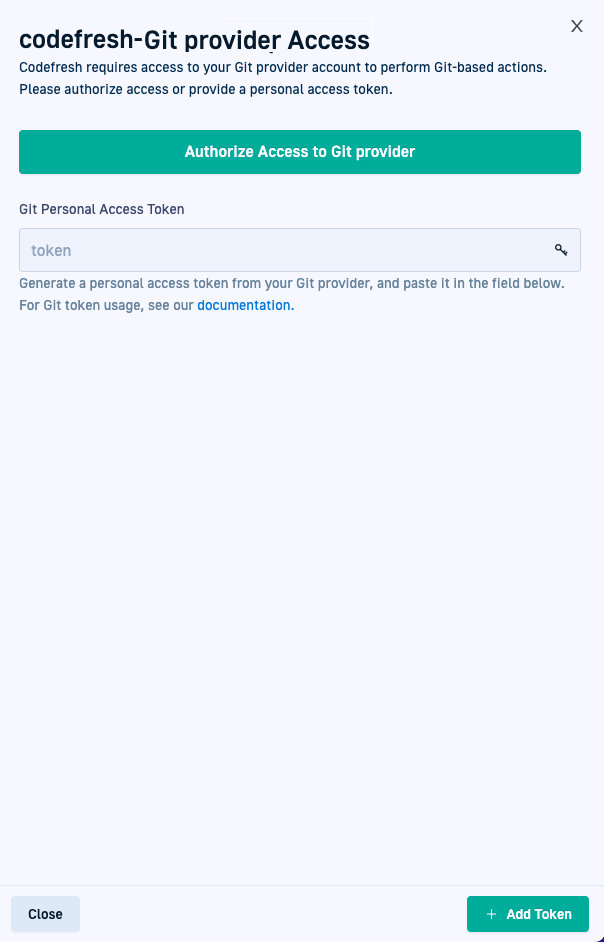
- Click Add Token.
In the Git Personal Access Tokens list, you can see that the new token is assigned to the GitOps Runtime.
Manage Git user tokens for GitOps Runtimes
Once you authorize access to one or more GitOps Runtimes through OAuth or Git user tokens, the GitOps Runtimes and their associated tokens are listed in the Git Personal Access Tokens page.
Manage Git user access tokens
You can manage Git user tokens for any GitOps Runtime, without affecting the GitOps Runtime at the account-level. Deleting the Git user token for a GitOps Runtime will deny you access to the Git repositories, Git Sources and other resources associated with that Runtime, while the Runtime itself is not affected.
Notifications for GitOps Runtimes
If you have turned on notifications for GitOps Runtimes, Codefresh alerts you to those Runtimes with invalid or expired Git personal access tokens.
You can turn off these notifications for selectively for Runtimes for which these alerts are less critical.
Before you begin
Have your Git user token handy
How to
- In the Codefresh UI, on the toolbar, click your avatar, and then select Git Personal Access Token.
- To replace/delete the Git user token for a Runtime, do one of the following:
- To replace, click Add Token, and then either click Authorize Access to Git provider for OAuth2, or paste your Git user token into the Git Personal Access Token field.
- To delete, click Delete Token. The token is deleted and the Add Token button is displayed next to the Runtime.
- To turn off notifications, click the context menu at the right of the row with the Runtime and enable Hide notifications.


Generate GitHub user access tokens
- Log in to your GitHub or GitHub Enterprise account.
- Select Settings > Developer Settings > Personal Access Tokens > Tokens (classic).
- Define the following:
- Token name
- Expiration date
- Select scopes:
repoadmin:repo_hook
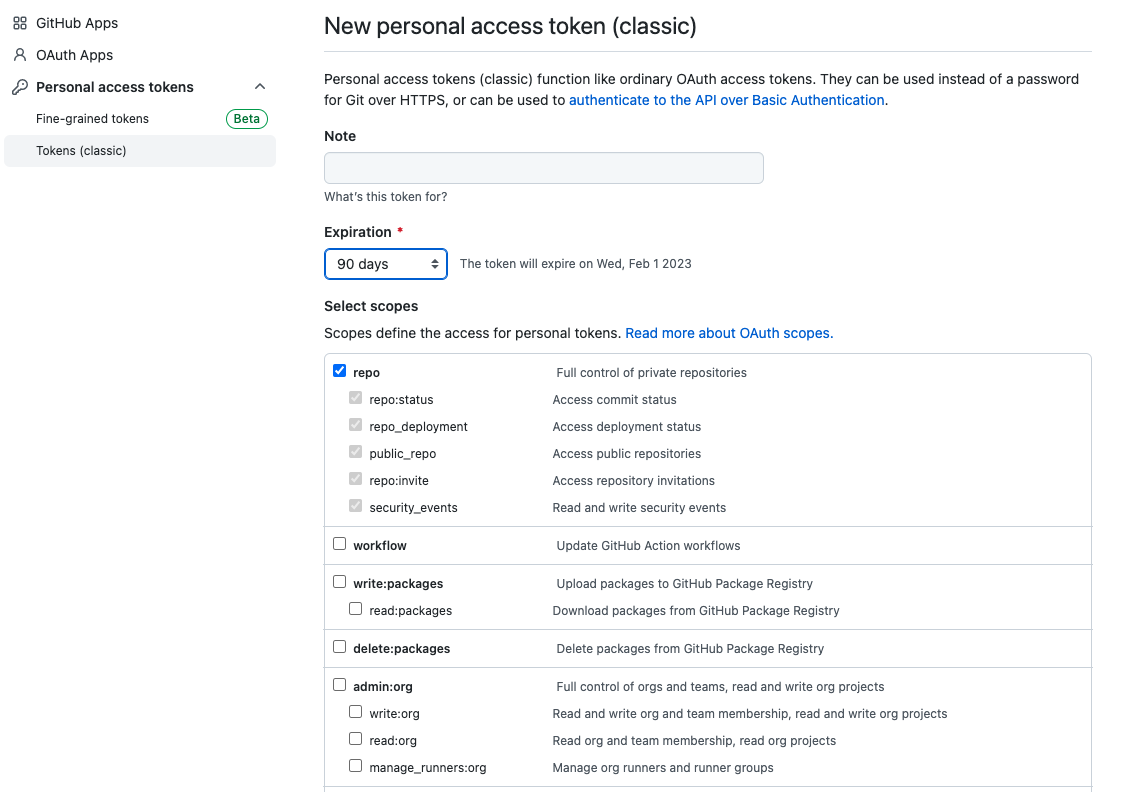
- Copy the user access token generated as you will need it to authorize access.