Creating pipelines
Define pipelines in Codefresh
Before creating a pipeline, make sure you are familiar with the theory behind Codefresh pipelines.
Pipeline concepts
The aim of Codefresh pipelines is to have reusable sequences of steps that can be used for different applications (or microservices) via the use of Git triggers.
The main concepts are shown below:
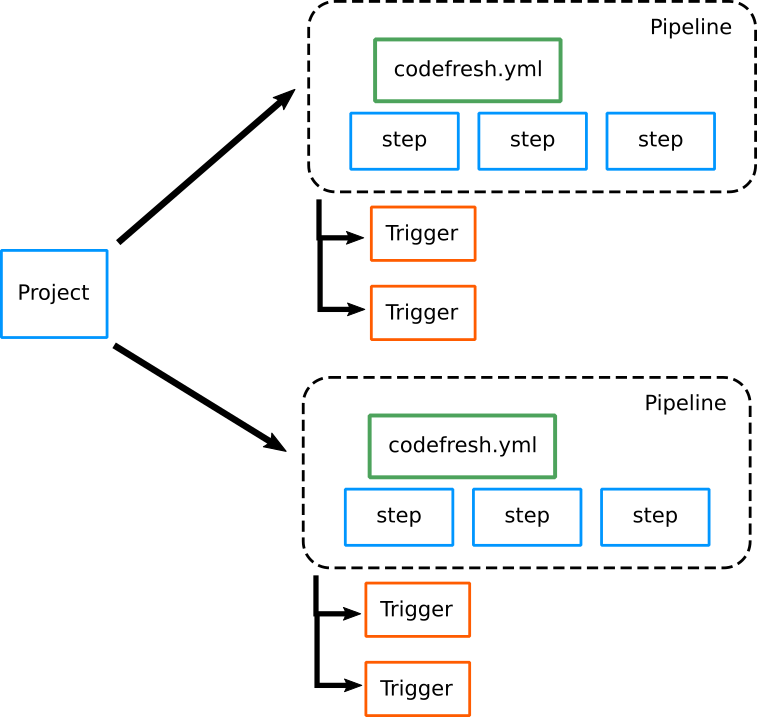
- Projects: The top-level concept in Codefresh CI/CD. Projects are used to group related CI pipelines. In most cases, a single project will be a single application that itself contains many microservices. You are free to use projects as you see fit. For example, you could create a project for a specific Kubernetes cluster or for a specific team/department.
NOTE
A project can include up to 500 pipelines.
-
Pipelines: Each project can have multiple pipelines. Pipelines that belong to a single project can be managed as a unit. You can also create a new pipeline by copying an existing pipeline. Notice that unlike other CI solutions, a pipeline in Codefresh is NOT tied to a specific Git repository. You should try to make your pipelines generic enough so that they can be reused for similar applications even when they exist in different Git repositories (a fairly typical setup for microservices).
-
Pipeline steps: Each pipeline has a definition that defines the pipeline steps that are executed each time the pipeline is triggered. The definition of a pipeline is described in a special codefresh.yml file. The
codefresh.ymlfile can be fetched from the same repository as that of the source code, from a completely different repository, or even defined in-place in the Codefresh pipeline editor. Again, notice you can have a pipeline that checks out its source code from Git repository A, but actually defines its steps in acodefresh.ymlfile that is fetched from Git repository B. -
Triggers: A pipeline can have zero, one, or many triggers. Triggers are the linking medium between a pipeline and a Git repository. Codefresh supports several kinds of triggers such as Git, Cron, and Docker push triggers.
Triggers that happen with Git webhooks can come from the same Git repository that contains the git code, OR, a completely different repository. You can have a pipeline with multiple triggers to be executed when a code change happens to any of them.
With these basic building blocks, you can define many complex workflows. In particular, it is very easy in Codefresh to create a scenario where:
- A pipeline is launched because a trigger exists for Git repository A
- The pipeline reads its
codefresh.ymlfile from Git repository B - The pipeline clones source code from Git repository C (and starts packaging/compiling it)
Of course, you can also have a simpler scenario where the trigger, the pipeline steps and the source code of the application are all defined for the same Git repository.
Creating a pipeline
You can create new projects by clicking on Projects in the left sidebar and then selecting the New Project button on the top right corner. A dialog will appear that will ask you for the project name and optional tags that you can use for access control.
NOTE
You can assign up to 500 pipelines to a project.
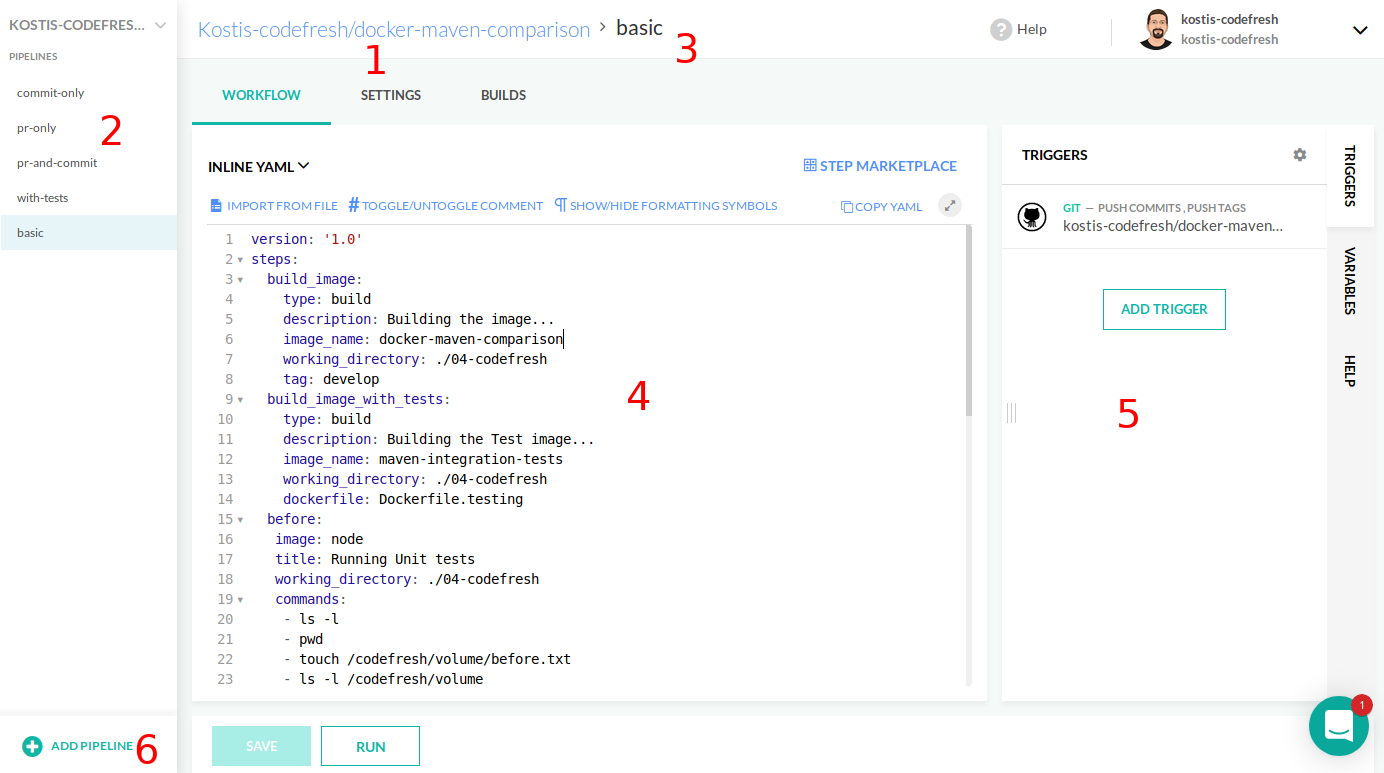
Once you are inside the project view you can start editing pipelines with a UI environment that works similar to a traditional IDE.
-
On the top left you can see your current project. You can also change it by clicking on the drop-down on the top left corner.
-
On the left side of the screen you can see all pipelines that currently belong to this project. Click on each one to edit it. On the bottom part of this panel the New pipeline button allows you to create a new pipeline on the same project either from scratch or by copying an existing one from the same project or a completely different project.
-
The name of the currently edited pipeline is shown at the top of the window.
-
The main window shows the definition of the current pipeline. The screenshot shows the inline editor but pipelines can also be defined from external files (checked into source control) as explained later.
-
The right part of the window shows extra settings for this pipeline such as predefined steps, triggers, and launch variables/parameters.
Using the Inline pipeline editor
When first creating a pipeline, you will see an inline editor that allows you to define the pipeline YAML right there in the Codefresh UI. This is great when you are starting a new project because it offers you really quick feedback. You can edit the YAML steps, run a build, edit again, run a build and so on.
On the top right of the panel you have additional controls:
- The import button allows you to bring a
codefresh.ymlfrom your local workstation into the editor - The comment button allows you to quickly comment/uncomment the currently selected text. The hotkey
Ctrl-/also performs the same action - The formatting button enriches the editor with special symbols for line breaks, spaces and tabs. This allows you to easily fix common formatting errors
- The copy button quickly copies the whole pipeline text in your clipboard
- You can use
Ctrl-]andCtrl-[to change indentation of the current line (use the Command key instead on MacOsX)
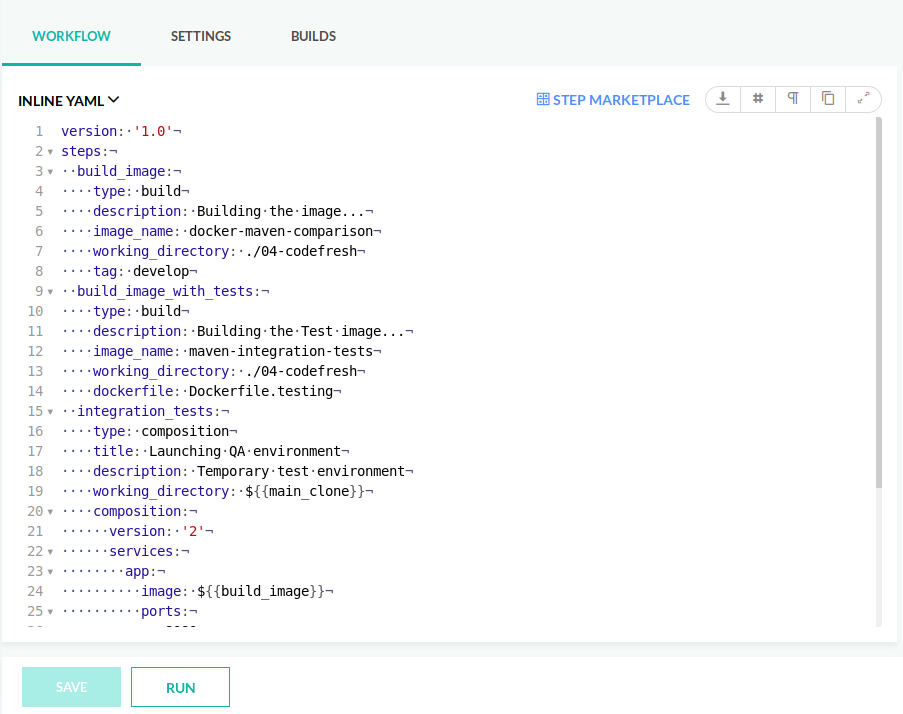
Notice that in the editor you can expand/collapse individual yaml blocks using the arrow triangles on the left of each blocks. The initial pipeline presented in the editor is suggested by Codefresh according to the contents of your Git repository.
TIP
You can also see the suggested Codefresh pipeline for any public Git repository by using the Codefresh CLI’s analyze option.
Loading codefresh.yml from Version Control
Working with the inline editor is very convenient in the beginning, but it makes your pipeline definition only exist within the Codefresh UI and therefore goes against the basic principles of infrastructure as code.
Once you are happy with how your pipeline works you should commit it to a Git repository, either the same one that has the source code of the application or a completely different one.
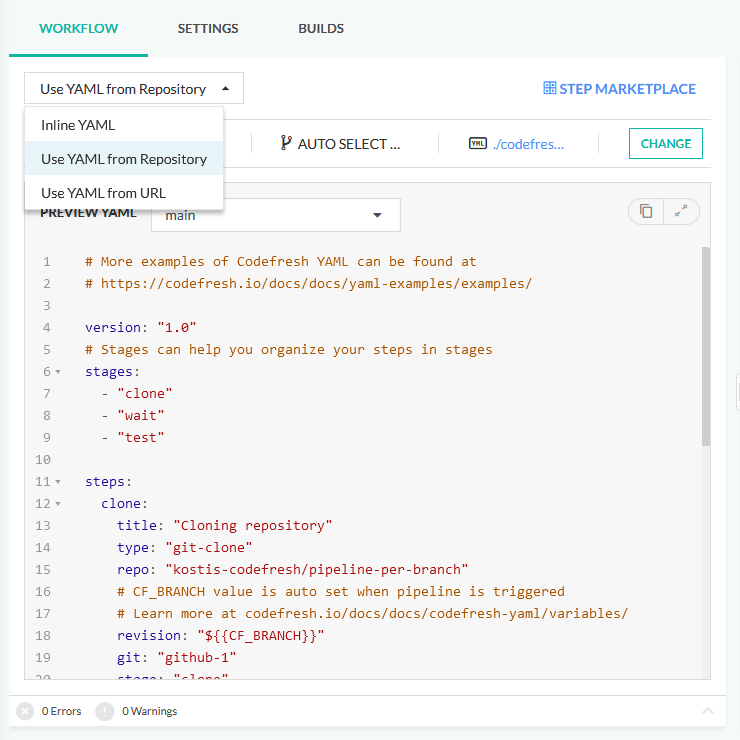
- From the Inline YAML dropdown, select Use YAML from URL or Use YAML from Repository.
Using another Git repository
Loading the pipeline from a Git repository is the recommended way to associate a pipeline with a project once you are finished with it. Even though the inline editor is great for quick prototyping and experimentation, ideally all your pipelines should be under source control.
Selecting Use YAML from Repository, allows you to select any Git repository already connected to Codefresh along with a preview of the pipeline.
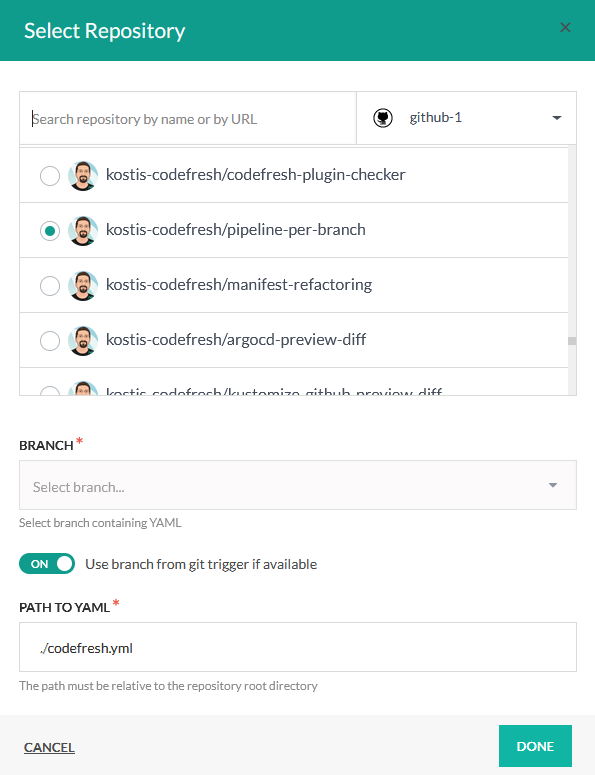
Unlike other CI options, the Git repository that contains the pipeline can be completely different from the Git repository that has the source code of your application.
Use branch from Git trigger
The Use branch from Git trigger option is very important, as it defines the branch in the Git repo from which the pipeline is loaded. In most cases, you want to keep this enabled as it loads the pipeline from the same branch that triggered the build.
For example, if you open a new pull request for a branch named feature-x, that has changes both in source code and in the pipeline definition itself, ideally you would want the pipeline responsible for the build to be the same one that contains the new changes in the feature-x branch.
If you disable this option, then you can select a specific branch from the field directly above the switch. The option is great for organizations that want to lock down their pipelines.
For example, if you define master as the branch to use for this pipeline, then even if a developer creates a custom branch for their source code changes, they will not be able to change the pipeline itself to do something different. Their pipeline changes in their own branch will be ignored as all builds will always load the pipeline from master. This can be very useful for security-sensitive pipelines.
Using any public URL
The Use YAML from URL option allows you to load the pipeline definition from any public URL.
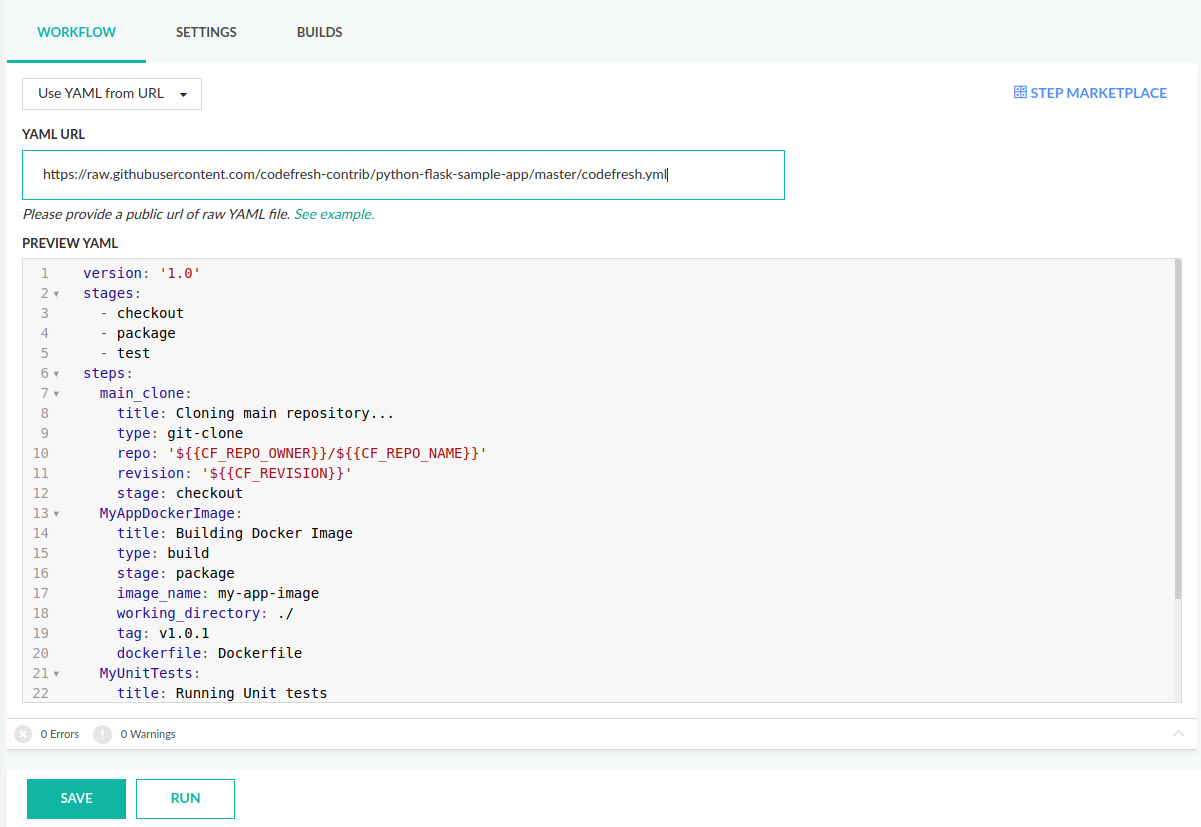
You can then copy and paste the URL to a raw Codefresh YAML file. This will allow you to load a Codefresh YAML from any URL.
NOTE
GitHub requires a raw URL.
As an example:
Instead of:https://github.com/codefresh-contrib/example-voting-app/blob/master/codefresh.yml,
use:
https://raw.githubusercontent.com/codefresh-contrib/example-voting-app/master/codefresh.yml
Pipeline settings
Once you create your pipeline, in addition to the steps and other definitions you add to the workflow YAML file, you can also define several settings for the individual pipeline through the Settings* tab.
NOTE
Settings defined for an individual pipeline override the account-level settings defined by account administrators.
General
The table below describes the General settings.
| Setting | Description |
|---|---|
| Pipeline Name | The name of the pipeline, useful when working with the Codefresh CLI. When working with the Codefresh CLI, the Pipeline ID is interchangeable with the Pipeline Name. |
| Pipeline ID | The ID of the pipeline automatically generated when the pipeline is created. Useful when working with the Codefresh CLI. When working with the Codefresh CLI, the Pipeline ID is interchangeable with the Pipeline Name. |
| Pipeline Description | Additional information describing the pipeline in free text. |
| Pipeline Tags | One or more tags used for access control. |
| Public Build Logs | When enabled, allows users without a Codefresh account to view the builds of this pipeline. |
| Pipeline Template | Convert this pipeline to a template which users can use to create new pipelines. The (see the next section for details on templates). |
| Badges | Simple images to display the most recent build status. |
Policies
The table below describes the Policy settings.
| Setting | Description |
|---|---|
| Kubernetes clusters | Control pipeline access to Kubernetes clusters integrated with Codefresh.
|
| Priority | The priority of the pipeline build, determining the order in which the build is queued. The priority can range from 100 (highest priority) to -100 (lowest priority). Priority 0 is the default level. |
| Concurrency | The number of concurrent builds, triggers, and per-branch builds for the pipeline. You can control the three types of concurrency settings for the same pipeline.
|
| Build termination | The termination behavior for the pipeline builds, based on a specific trigger or any trigger. By default, all build termination settings are disabled.
|
| Pending approval | The pipeline volume retention and concurrency policy for pipeline builds pending approval. See pipeline volume and approval
|
| Determines if a build that is pending approval [counts against] the concurrency limits or | |
| Restart pipeline | The restart behavior for failed pipelines, either allowing users to restart the pipeline directly from the failed step, or restart the pipeline from the beginning.
|
Select Kubernetes cluster contexts
By default, all clusters integrated with Codefresh are automatically available for all pipelines in the account. The inject cluster option when enabled for the account allows you to selectively restrict the clusters which can be accessed from pipelines created for the user account.
NOTE
This option is only available to Enterprise customers.
Increase security by restricting access to users from different teams.
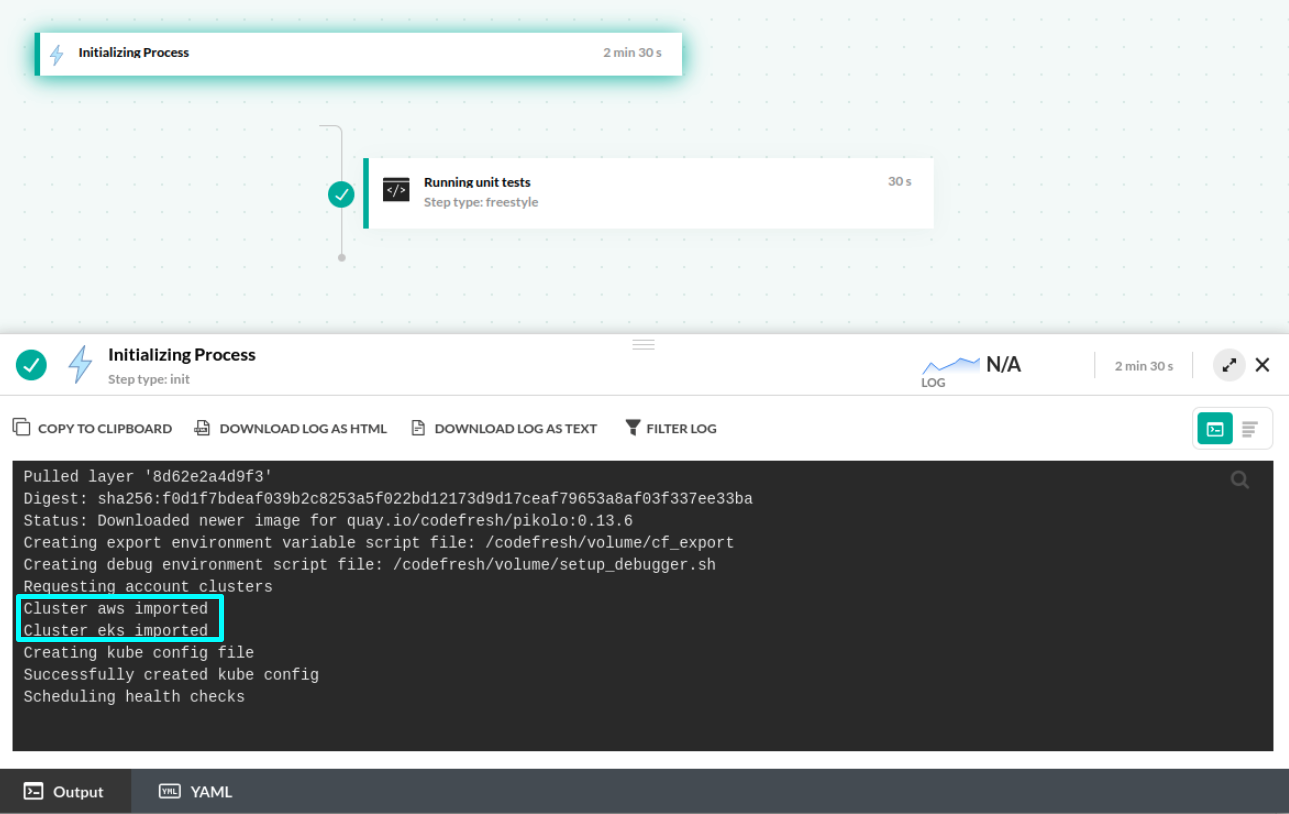
Codefresh authenticates the credentials of each cluster during the build initialization phase. Fewer clusters mean shorter initializations and reduced build durations.
Prerequisites
-
Account-level pipeline setting Kubernetes cluster context pipeline injection enabled
The option to select clusters for a pipeline is available only when the account-level pipeline setting is enabled. See Enabling cluster contexts for pipelines. -
Update Cluster permission for users in the Codefresh UI through Permissions.
For more information, see Access Control.
As part of the Pipeline > Policies, you can either allow access to all clusters (the default), or only specific clusters as in the example below.
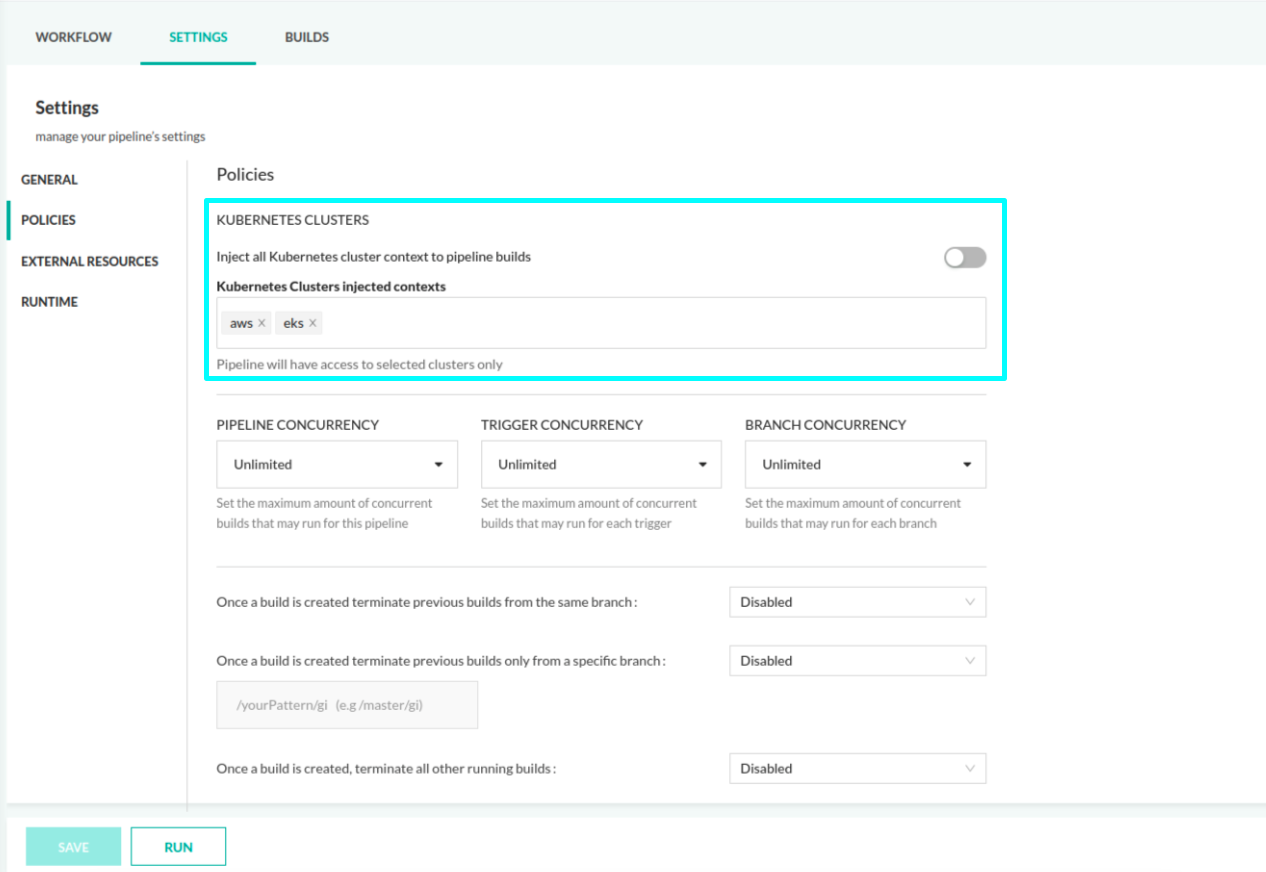
When specific clusters are defined:
- All users in the account with the Update Cluster permission have access only to the selected clusters.
- The cluster contexts are injected during the build
- The initialization step displays the selected cluster contexts
Pipeline concurrency
The Pipeline and Trigger Concurrency limits are very important as they allow you to define how many instances of a pipeline can run in parallel when there are multiple commits or multiple pull requests.
Balancing concurrency and performance
While a single Runtime Environment technically supports concurrent build executions in the hundreds, it is essential to be aware of the actual number of concurrent builds that are initiated at the same point in time. To prevent potential slowdowns due to extremely large build-bursts, we recommend capping the number of concurrent builds initiated for a Runtime Environment to a maximum of 500.
NOTE
Pipeline and trigger concurrency limits are unrelated to parallelism within a single pipeline.
Some common scenarios are:
- a pipeline that uses a shared resource such as a database or queue and you want to limit how many pipelines can access it
- a pipeline that deploys to a single production environment (in most cases you only want one active pipeline touching production)
Concurrency recommendation per Runtime Environment
Concurrency limits control the number of simultaneous builds for Codefresh pipelines. Concurrency limits are set at both the account and specific pipeline levels.
Build termination
The Build Termination settings are useful for pipelines where you commit too fast (i.e. faster then the actual runtime of the pipeline). All these settings allow you to lesser the build instance for pipelines when too many triggers are launched at the same time. You will find them very useful in cases where too many developers are performing small commits and builds take a long time to finish (i.e. build takes 10 minutes to finish and developers perform multiple pushes every 2 minutes)
Some common scenarios are:
- You are interested only on the latest commit of a branch. If pipelines from earlier commits are still running you want to terminate them.
- You don’t want to wait for child pipelines - when a pipeline calls another pipeline - to finish, or when a new build starts for a parent pipeline.
For the volume behavior during approvals, note that if you keep the volume available for the pipeline while it is waiting for approval, it still counts as “running” against your pricing tier limit.
External resources
Large organizations may have reusable scripts or other resources such as Dockerfiles they want to use in multiple pipelines.
Instead of fetching them manually in freestyle steps, defining them as external resources as part of the pipeline’s settings ensures that all files/folders are available to all freestyle steps in the paths defined as the destination folder.
You can define multiple external resources for the same pipeline.
Below is an example of External Resource settings.
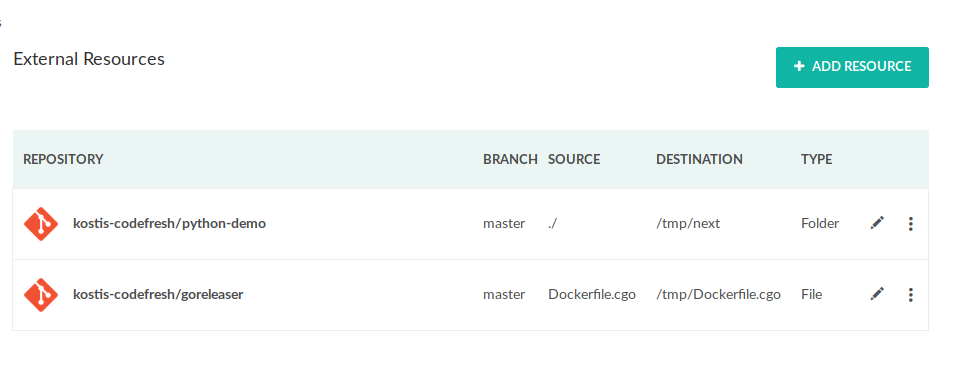
The table describes the settings you define for external resources.
| Setting | Description |
|---|---|
| Select Git integration | An existing integration with a Git provider, or a new integration, where the . |
| Repository | The Git repository containing the external files/folder to bring in to the pipeline workspace. |
| Resource type | The type of external resource to add to the pipeline workspace, and can be either File or Folder. |
| Source | The relative path to the source file or folder in the Git repo defined in Repository from which to retrieve the resource. |
| Destination | The absolute path to the target folder in the pipeline workspace to which to copy the file or folder for the external resource. |
Build Runtime
Build Runtime settings allow you to:
- Select the runtime environment, runtime OS, and resources for the pipeline
- Set the minimum disk space for the pipeline build
- Set the memory-usage threshold for the pipeline, overriding the account-level threshold

The table describes the Build Runtime settings.
| Setting | Description |
|---|---|
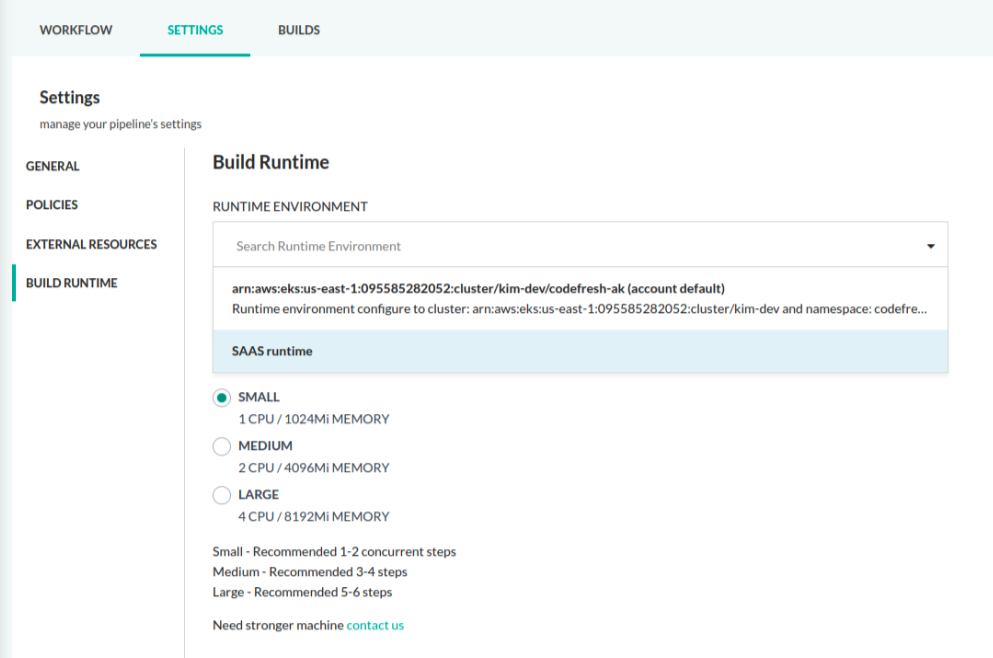
| Runtime Environment | The runtime environment for the pipeline. If your account admin has selected a default runtime environment for the account, this environment is automatically selected. You can override the default runtime environment by selecting a different one for the pipeline. See also Runtime environments for pipelines. |
| CPU | The CPU, in millicores (m) to allocate to the pipeline. |
| Memory | The memory, in mebibytes (Mi) to allocate to the pipeline. |
| Minimum disk space required for build filesystem (Gi) | The minimum disk space you need for the pipeline’s build volume, inherited by all the builds run for the pipeline. When defined, Codefresh assigns either a cached disk with sufficient disk space or a new empty disk at the start of the build. Track the actual disk usage in Builds > Metrics. If not defined, because a portion of the disk space is already utilized by cache, a build can run out of disk space and fail with the ‘no space left on device’ error. To configure the disk space for a specific trigger used by the pipeline or for a specific run, see Set minimum disk space for build volume by trigger. |
| Cluster Name and Cluster Namespace | The name of the cluster and the namespace where the pipeline build runs. |
| Display a warning banner when builds exceeds | The memory-usage threshold exceeding which to display a banner notification indicating the same. To inherit the account-level memory-usage threshold, leave empty. Useful depending on the resources needed for pipeline execution. For example, if the account-level memory usage is set at 90%, and the specific pipeline is resource-intensive, you want to be warned when the usage exceeds 70%, instead of 90%. Conversely, if the account-level memory usage is set to 70%, and the specific pipeline is likely to use between 80% and 90% for example, you can safely set the memory-usage threshold to 100% to avoid unnecessary usage warnings. |
Runtime environments for pipelines
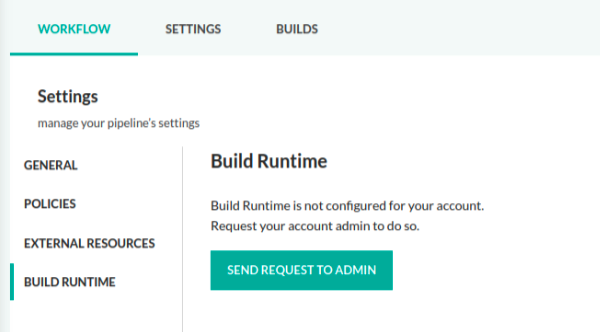
You need at least one runtime environment configured for your account to run a pipeline.
Runtime environments are available on installing the Codefresh Runner.
NOTE
You need at least one runtime environment to run the pipeline.
User request for runtime environment
If, as a user, you do not have a runtime environment, send a request to your account admin.
Configure runtime environment
As an account admin, if the account is not configured with a runtime environment, Codefresh displays the steps to install the Runner.
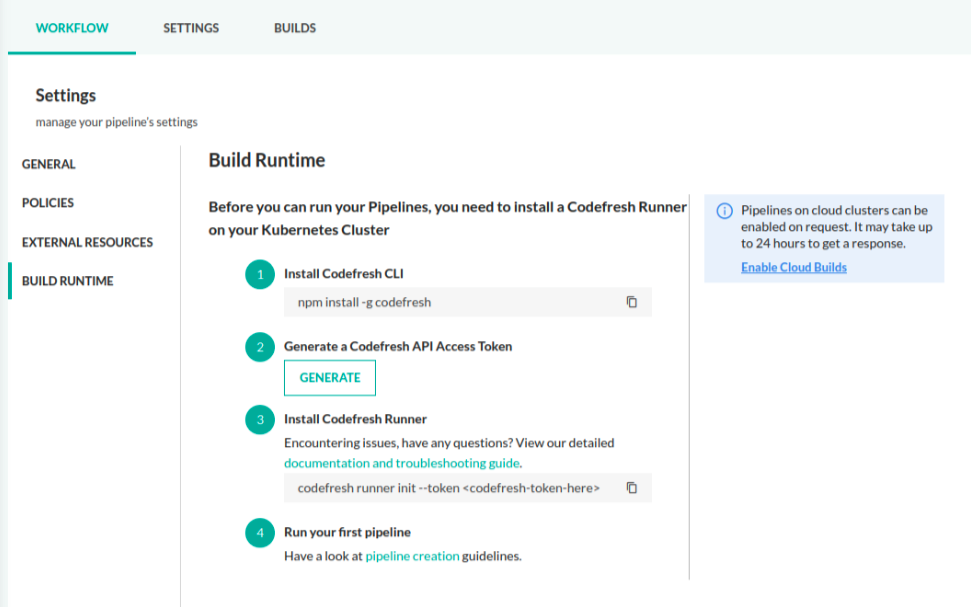
As the account admin, you can also request a Cloud Build (SaaS runtime environment) to be enabled for the pipeline, which is not available by default. Clicking the Enable Cloud Builds button sends an automated email request, with a response time frame of 24 hours. If approved, you should see the SaaS runtime in the list of Runtime Environments.
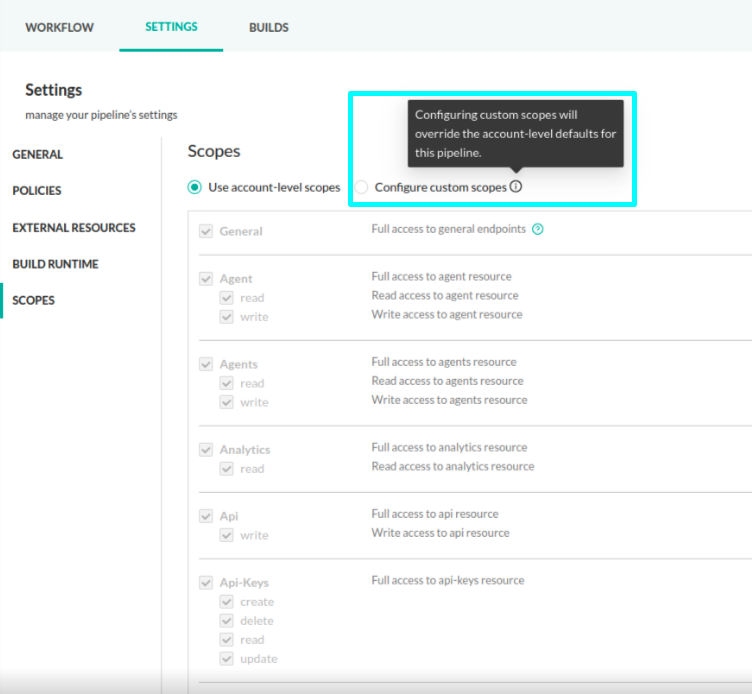
Scopes
If needed, Codefresh account administrators can override the scopes set at the account-level (the default), with custom scopes for the individual pipeline. All the pipeline’s builds inherit the custom scopes.
Using pipeline templates
When enabled for the account, you can create a new pipeline from existing pipelines tagged as Templates.
To do so, you need to first convert existing pipelines to pipeline templates.
Create a pipeline template
Convert an existing pipeline into a pipeline template, by tagging it as such.
- In the Codefresh UI, from the sidebar, select Pipelines to view all your pipelines.
- Select the pipeline to convert to a template.
- From the sidebar, mouse over the pipeline name, and from the context menu, select Create Template.
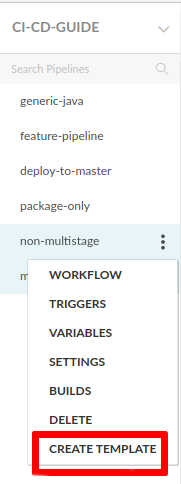
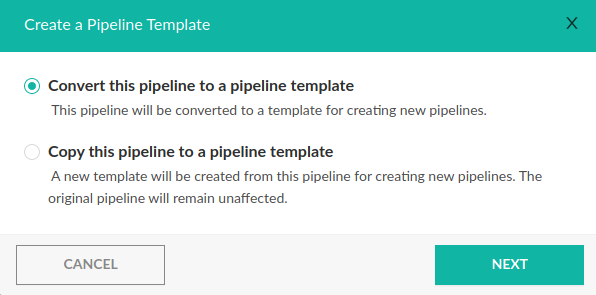
- Do one of the following:
- To convert the pipeline to a pipeline template, select Convert the pipeline itself to a template.
- To create a copy of the pipeline and convert the copy into a pipeline template, select Copy this pipeline to a pipeline template.
Define the template name, project and tags.
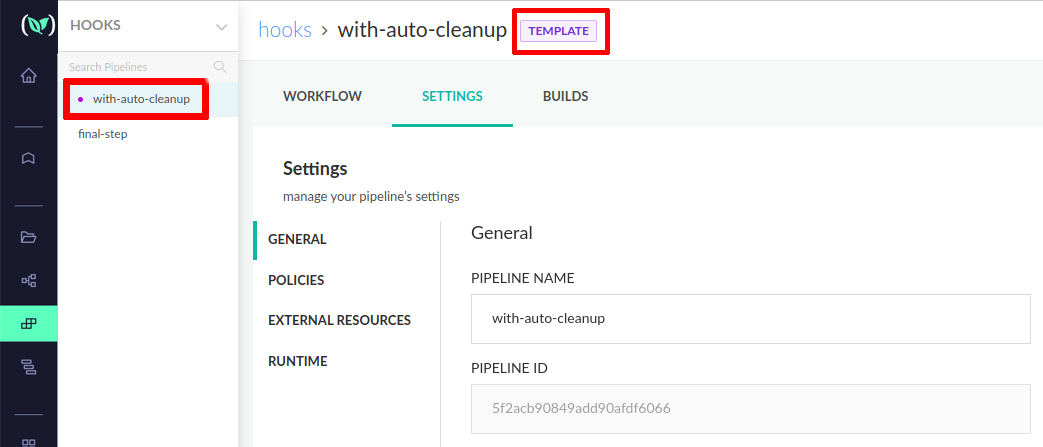
On the Pipelines page, pipeline templates are marked TEMPLATES. On selecting a pipeline, pipeline templates in the sidebar are prefixed with a dot.
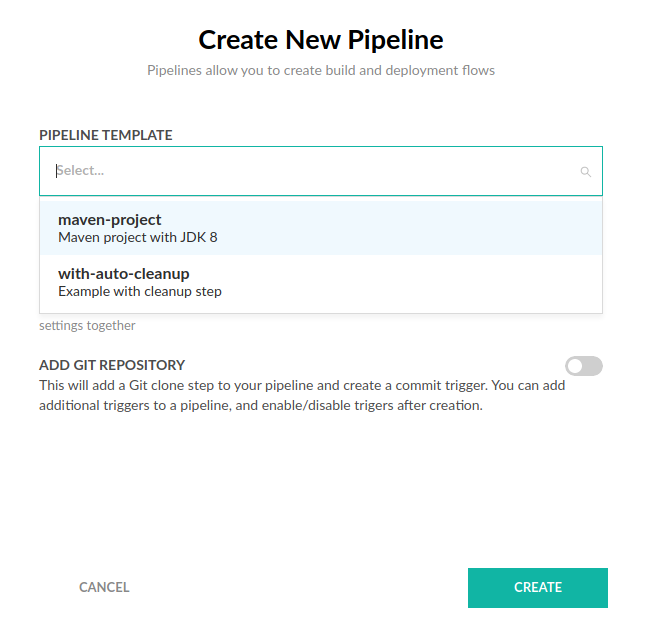
Create a pipeline from a pipeline template
Now when you create a new pipeline, you can also select which pipeline template will be used as an initial pipeline definition:
NOTE
Selecting a pipeline template, applies the template’s settings when the pipeline is created. Subsequent changes to the pipeline template do not impact pipelines already created from that template.
TIP
You can also quickly convert a pipeline to a template in the General tab of the pipeline’s settings.
Pipelines that do not belong to any project
Although we recommend adding all your pipelines to a project, this is not a hard requirement. You can create pipelines that do not belong to a project from the Pipelines section on the left sidebar. If you have a Codefresh account created before May 2019 you might already have several pipelines that are like this.
If you change your mind, you can also add detached pipelines (i.e. pipelines that are not part of a project) manually from the 3-dot menu that is found on the right of each pipeline.
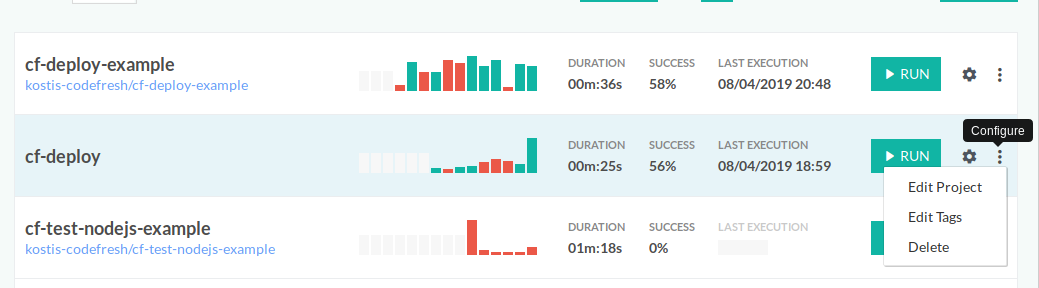
Pipelines that belong to a project will mention it below their name so it is very easy to understand which pipelines belong to a project and which do not.
Data retention for pipeline builds and logs
Codefresh retains build and log data for pipelines for a period of six months, for both on-premises and SaaS installation configurations.
For on-premises, for configuration details, see Retention policy for builds and logs in ArtifactHub.
Related articles
Global pipeline settings
Codefresh YAML for pipeline definitions
Steps in pipelines
Docker registry integrations
Example catalog