Keycloak SSO via OIDC
Set up Keycloak SSO for OIDC
Set up SSO for Keycloak using OIDC. For a general overview on OIDC, see Setting up OIDC Federated SSO.
Set up OIDC SSO for Keycloak in Codefresh by:
- Creating a client in Keycloak
- Configuring SSO settings for Keycloak in Codefresh
- Configuring redirect URIs in Keycloak
IMPORTANT
KeycloakServer changed /auth endpoint from version 17.0.0. Currently, Codefresh does not support Keycloak version 17.0.0 or higher.
As a workaround, start KeycloakServer with this parameter: --http-relative-path=/auth/.
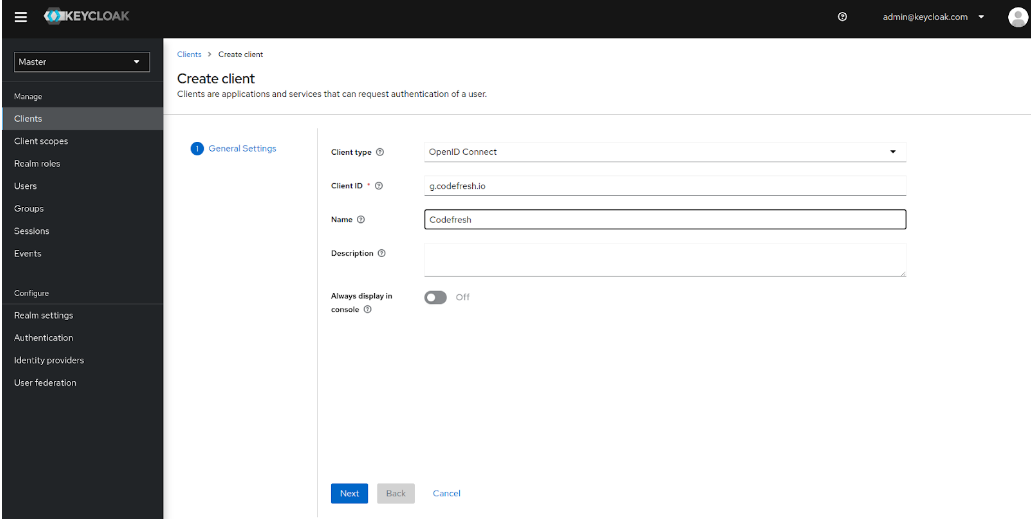
Step 1: Create Client in Keycloak
Create a Keycloak client for Codefresh.
- Log in to Keycloak.
- Select the Realm, and from the sidebar, select Clients.
- Click Create Client, and the Clients list tab.
- Define the General Settings:
- From the Client type drop-down, select OpenID Connect.
- In the Client ID field, enter
g.codefresh.io. - In the Name field, enter a display name for the client, for example,
Codefresh. - Click Next.
- Define the Capablity config settings:
- Toggle Client authentication to ON.
- Click Save.

- Copy and paste the following:
- Go back to Settings.
- From the General Settings tab, copy the Client ID to your machine.
- Click the Credentials tab, and copy and paste the Client secret to your machine.
- From the sidebar, select Realm Settings, and copy and paste the Realm ID. You will need the Client ID, Client Secret, and Realm ID to configure SSO for Keycloak in Codefresh.
- Continue with Step 2: Configure SSO settings for Keycloak in Codefresh.
Step 2: Configure SSO settings for Keycloak in Codefresh
Before you begin
- Make sure you have:
- The Client ID, Client Secret, and Realm ID from Keycloak in Step 1
How to
- In the Codefresh UI, from the toolbar click the Settings icon.
- In the sidebar, from Access & Collaboration, select Single Sign-On.
- Click + Add Single Sign-On, select Keycloak, and then click Next.
- Enter the following:
- Client Name: For auto-generation, leave empty. Codefresh generates the client name once you save the settings.
- Display Name: Meaningful name that identifies the integration with this SSO provider.
- Client ID: The Client ID for Codefresh you copied from Keycloak.
- Client Secret: The Client Secret for Codefresh you also copied from Keycloak.
- Host: The Keycloak URL.
- Realm: Optional. The Realm ID for Codefresh you copied from Keycloak.
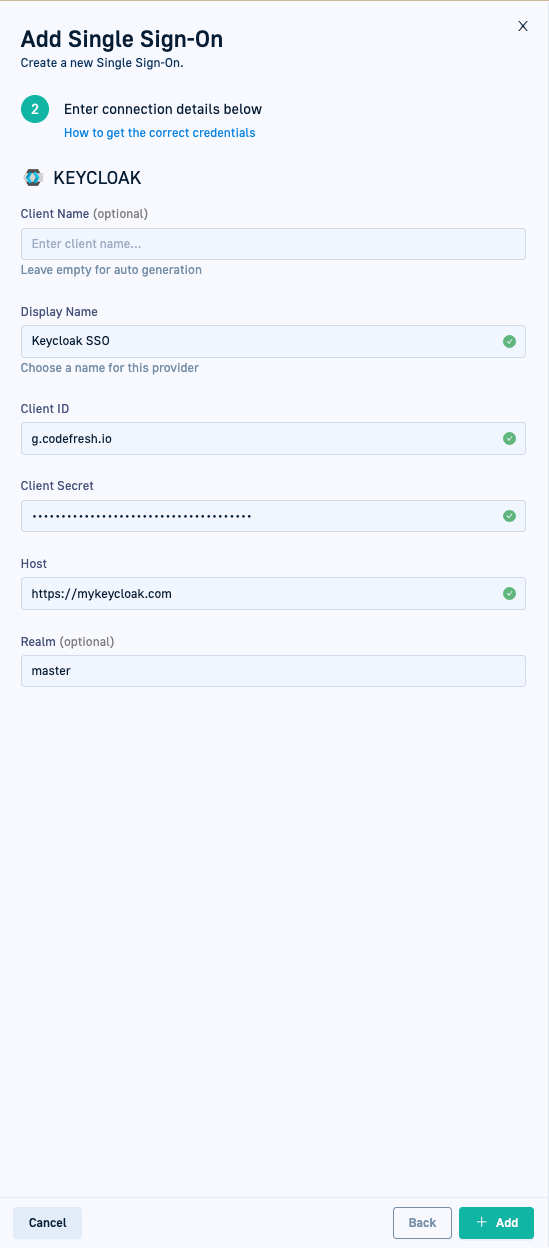
- Click Add. Codefresh creates Keycloak as an identity provider, with the auto-generated Client Name.
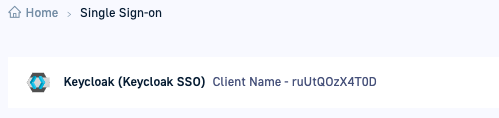
- Note down the Client Name, as you need it to set the redirect URI in Keycloak.
- Continue with Step 3: Set up Redirect URI in Keycloak.
Step 3: Set up Redirect URI in Keycloak
- Log in again to Keycloak.
- From the sidebar, select Clients and then select Codefresh from the Clients List.
- Click the Settings tab, and then define the Access Settings:
- In the Root URL and Home URL fields, enter
https://g.codefresh.io. -
In the Valid redirect URIs field, enter
https://g.codefresh.io/api/auth/<your_codefresh_client_name>/callback
where:<your_codefresh_client_name>is the Client Name auto-generated by Codefresh, for example,https://g.codefresh.io/api/auth/ruUtQOzX4T0D/callback. - Click Save.
- In the Root URL and Home URL fields, enter
You have now completed SSO setup for Keycloak via OIDC.
Sync teams via CLI
Sync users and teams through the CLI.
Related articles
About Federated Single Sign-On (SSO)
Setting up OIDC Federated SSO
Common configuration for SSO providers