GitOps deployments
Deploy with Codefresh and ArgoCD
Apart from traditional push-based Helm deployments, you can use Codefresh for GitOps deployments powered by Argo CD.
For an overview on GitOps, Argo CD, and how Codefresh implements both, see Codefresh and GitOps.
Even though GitOps is not specific to Kubernetes, current GitOps tools work great with Kubernetes in the form of cluster controllers. The GitOps controller monitors the state of the Git repository, and when there is a commit, instructs the cluster to match the same state.
Codefresh has native support for GitOps, from creating Argo CD applications, deploying, monitoring, and managing them via the GitOps paradigm, and deployments with dedicated dashboards compai GitOps.
Starting with pointers on setting up Git repos, this guide takes you through the process of implementing a GitOps deployment in Codefresh:
- Connecting Argo CD and Codefresh
- Creating a CI pipeline for GitOps
- Creating an Argo CD application for GitOps
- Deploying the Argo CD application
- Working with the GitOps Apps dashboard, and GitOps Dashboard (Home) and DORA dashboards for additional insights
Setting up your Git repositories
One of the central ideas of GitOps is to use Git for ALL resources. Meaning that you need to store every resource of the application in Git, and not just the source code as most developers using Git are familiar with.
In the case of Kubernetes, this means that you should store all Kubernetes manifests in a Git repository as well. For the most simple scenario, you have the main repository of your application (mostly interesting to developers), and a second Git repository with Kubernetes manifests (more relevant to operators/SREs).
As a live example you can use:
-
For the application code, the https://github.com/codefresh-contrib/gitops-app-source-code repository.
The repository with the application code contains the source code plus a Dockerfile. You can use any Git workflow for this repository. We will create a pipeline in Codefresh that creates a container image on each commit. - For the Kubernetes configuration, the https://github.com/codefresh-contrib/gitops-kubernetes-configuration repository.
The configuration repository holds the Kubernetes manifests.
This is one of the critical points of GitOps:- The configuration repository holds the manifests that are also present in the Kubernetes cluster
- Whenever there is a commit to the configuration repository, the cluster is notified to deploy the new version of the files (we will set up a pipeline for this)
- Every subsequent configuration change should become a Git commit. Ad-hoc changes to the cluster with
kubectlcommands are NOT allowed
- For the pipelines, the https://github.com/codefresh-contrib/gitops-pipelines repository. The third Git repository houses pipelines because pipelines are also part of the application.
Fork repositories
- Before continuing, if you don’t have your own example application, fork all three repositories into your own GitHub account.
Connecting Arg CD and Codefresh
GitOps deployments are powered by ArgoCD, so you need an active ArgoCD installation in your cluster.
This is easy with our GitOps Runtimes. Argo CD is installed automatically on installing a GitOps runtime, either the Hosted or Hybrid versions.
See Install GitOps runtime.
Creating a CI Pipeline for image enrichment with GitOps Jira integration
Creating a CI pipeline for GitOps is no different from creating a standard pipeline. The only difference is that as the final action for the pipeline, you should add the report image action provided by Codefresh. The report image action correlates the Docker image with the Git repository details, Jira issues associated with it, and additional information from the registry that stores the image.
Follow these steps to create a CI pipeline for GitOps:
- Set up issue-tracking and container registry integrations for GitOps
You need to connect Jira and your container registry to Codefresh.
NOTE
These integrations are specific to GitOps, and differ from the Jira and container registry integrations that you may have already set up for pipelines.
Once you set up the GitOps integrations for Jira and container registries, you can reference them in the CI pipeline’s report image step for Codefresh to retrieve the necessary information. - Set up Codefresh pipeline integration for GitOps
- Create your Codefresh pipeline as you usually do, using the [Example CI pipeline for GitOps] as a guide:
Use existing CI actions for compiling code, running unit tests, security scanning etc.- Place the final action in the pipeline as the “report image” action provided by Codefresh.
- When the pipeline completes execution, Codefresh retrieves the information on the image that was built and its metadata through the integration names specified.
- View the enriched image in Codefresh’s Images dashboard, and in any application in which it is used.
You can see the associated metadata in the Images dashboard.
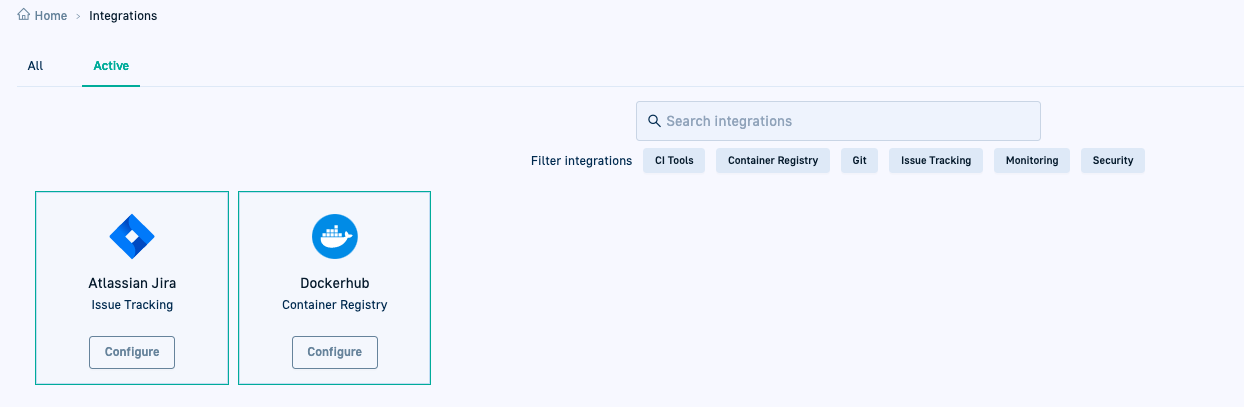
Set up Jira and Docker Hub integrations for GitOps image enrichment
GitOps integration for Atlassian Jira allows you to both enrich images with information from Jira, and report the deployment information back to Jira. For this guide, you need to select the image enrichment option.
Codefresh GitOps can integrate with popular container registries such as Docker Hub, JFrog Artifactory, and more. See GitOps container registry integrations.
For this guide, we’ll connect Docker Hub to Codefresh as the container registry for GitOps.
- In the Codefresh UI, on the toolbar, click the Settings icon.
- From Configuration in the sidebar, select GitOps Integrations.
- For Jira:
- Filter by Issue Tracking, select Atlassian Jira and click Configure.
- From the Add Integration dropdown, select Image enrichment.
- Define the integration settings for Jira. The Integration name must be unique.
- For Docker Hub:
- Complete the prerequisites
- Filter by Container Registry, select Docker Hub, and click Configure.
- Define the integration settings for Docker Hub.
Don’t forget to click Commit. It may take a few moments for the new integrations to be synced to the cluster before they appear in the list of Active integrations.
Set up Codefresh pipeline integration for GitOps
After completing the Jira and Docker Hub integrations for GitOps, we can set up the pipeline integration as well for GitOps. Why would you do this? When you create the CI pipeline as you usually do, you’ll see that the final report image step references several Codefresh variables to report image information to Codefresh for image enrichment.
Read more in GitOps CI integrations, and make sure to also review Templatization examples for CF arguments.
- In the Codefresh UI, on the toolbar, click the Settings icon.
- From Configuration in the sidebar, select GitOps Integrations.
- Filter by CI tools, select Codefresh and click Add.
- Define the integration settings for Codefresh pipelines.
Example CI pipeline for GitOps
Below is an example of a CI pipeline for GitOps.
The pipeline:
- Packages your Docker images
- Runs tests
- Performs security scans
- Reports image information to Codefresh
codefresh.yml
version: "1.0"
stages:
  - "clone"
  - "build"
  - "report"

steps:
  clone:
    title: "Cloning repository"
    type: "git-clone"
    repo: "${{CF_REPO_OWNER}}/${{CF_REPO_NAME}}"
    revision: "${{CF_BRANCH}}"
    stage: "clone"

  build:
    title: "Building Docker image"
    type: "build"
    image_name: "${{CF_REPO_OWNER}}/color"
    working_directory: "${{clone}}"
    tag: "${{CF_SHORT_REVISION}}"
    dockerfile: "Dockerfile"
    registry: docker-lr
    stage: "build"

  ReportImageMetadataAll:
    title: Report image to Codefresh CD
    type: codefresh-report-image:1.0.10
    working_directory: /code
    stage: "report"
    arguments:
      CF_API_KEY: '${{CF_API_KEY}}'
      CF_IMAGE: 'docker.io/${{CF_REPO_OWNER}}/color:${{CF_SHORT_REVISION}}'
      CF_CONTAINER_REGISTRY_INTEGRATION: docker
      CF_RUNTIME_NAME: "codefresh-hosted"
      CF_GITHUB_TOKEN: '${{GITHUB_TOKEN}}'
      CF_GIT_PROVIDER: github
      CF_GIT_REPO: '${{CF_REPO_OWNER}}/${{CF_REPO_NAME}}'
      CF_GIT_BRANCH: '${{CF_BRANCH}}'
      CF_ISSUE_TRACKING_INTEGRATION: jira
      CF_JIRA_MESSAGE: "${{CF_COMMIT_MESSAGE}}"
      CF_JIRA_PROJECT_PREFIX: CR
Pipeline steps:
- Git-clone step: Checks out the source code of an application
- Build step: Builds a Docker image
codefresh-report-image: Reports the Jira and registry information to Codefresh. Populates the values of the Codefresh Git variables from those you defined in the respective GitOps integrations.
Creating an Argo CD application for GitOps
Codefresh provides an easy-to-use editor to create GitOps-compatible Argo CD applications. When creating the application, you can use the Form mode or the YAML editor, and always toggle between the two.
An Argo CD application in Codefresh includes:
- Application definitions
Application definitions include the name, runtime, and the location of the YAML manifest. You can define subfolders by adding / to the path. - General configuration settings
General configuration settings define the source, destination, and sync policies for the application. These options are identical to those in the Argo CD UI. We recommend selecting automated sync for your application. - Advanced configuration settings
Advanced settings define the tool used to create the application, and related tool-specific settings.
For detailed information on the settings and options, see Creating GitOps applications.
How to
- In the Codefresh UI, from Ops in the sidebar, select GitOps Apps.
- On the top-right, click New Application.
- Define a name for the application, its runtime, and location.
- Define the General settings:
- Repository URL: The URL to the repo in Git where you created the YAML resource files for the application.
- Revision: The branch in Git with the resource files.
- Path: The folder in Git with the resource files.
- Namespace: Optional. If needed, define a namespace.
- Sync Policy: Change to Automatic, and select Prune resources to automatically remove unused resources.
- Sync Options: If you defined a namespace, select Auto-create namespace to ensure that the namespace is created if it doesn’t exist.
- Retain the Advanced settings.
- Click Commit.
Codefresh validates the settings, and alerts you to empty or invalid fields.
Once validated, you can see the Commit form with the application’s definition on the left, and the read-only version of the manifest with the configuration settings you defined on the right. - Enter the path to the Git Source to which to commit the application configuration manifest.
It may take a few minutes for the new application to be synced to the cluster.
Deploy the GitOps application
The next step after creating the GitOps application is to deploy it. To deploy the GitOps application you created, you need to create and commit the following resources:
- A folder in Git to save resources for the application
Rolloutresource defining the deployment strategyServiceresource to expose the application to external traffic
You will also need to install Argo Rollouts on the cluster to which you are deploying the application.
Create rollout.yaml
Create a rollout resource for the application you want to deploy.
To leverage Argo Rollouts’ deployment capabilities, we use Argo’s rollout resource instead of the native Kubernetes Deployment object.
For detailed information on the fields you can define, see Argo Rollout specification.
- In the Git repository create the
rollout.yamlfile, as in the example below.
apiVersion: argoproj.io/v1alpha1
kind: Rollout
metadata:
  name: codefresh-guestbook-rollout
spec:
  replicas: 4
  revisionHistoryLimit: 2
  selector:
    matchLabels:
      app: codefresh-guestbook
  template:
    metadata:
      labels:
        app: codefresh-guestbook
    spec:
      containers:
        - image: gcr.io/heptio-images/ks-guestbook-demo:0.1
          name: codefresh-guestbook
          ports:
            - name: http
              containerPort: 80
              protocol: TCP
  minReadySeconds: 30
  strategy:
    canary:
      steps:
        - setWeight: 25
        - pause: {duration: 20s}
        - setWeight: 75
        - pause: {duration: 15s}
Create a service resource
Create a service resource to expose your application to external traffic.
- Create a
service.yamlresource for the application you want to deploy, as in the example below.NOTE
Create it in the same folder in which you savedrollout.yaml.
apiVersion: v1
kind: Service
metadata:
  name: codefresh-guestbook-svc
spec:
  ports:
    - port: 8080
      targetPort: 80
  selector:
    app: codefresh-guestbook # must be the same as the selector defined in rollouts.yaml
  type: LoadBalancer
Once you create and commit the rollout and service resources, return to the GitOps Apps dashboard. See the following section, Working with the GitOps Apps dashboard for detailed information on all aspects of monitoring your app and deployments.
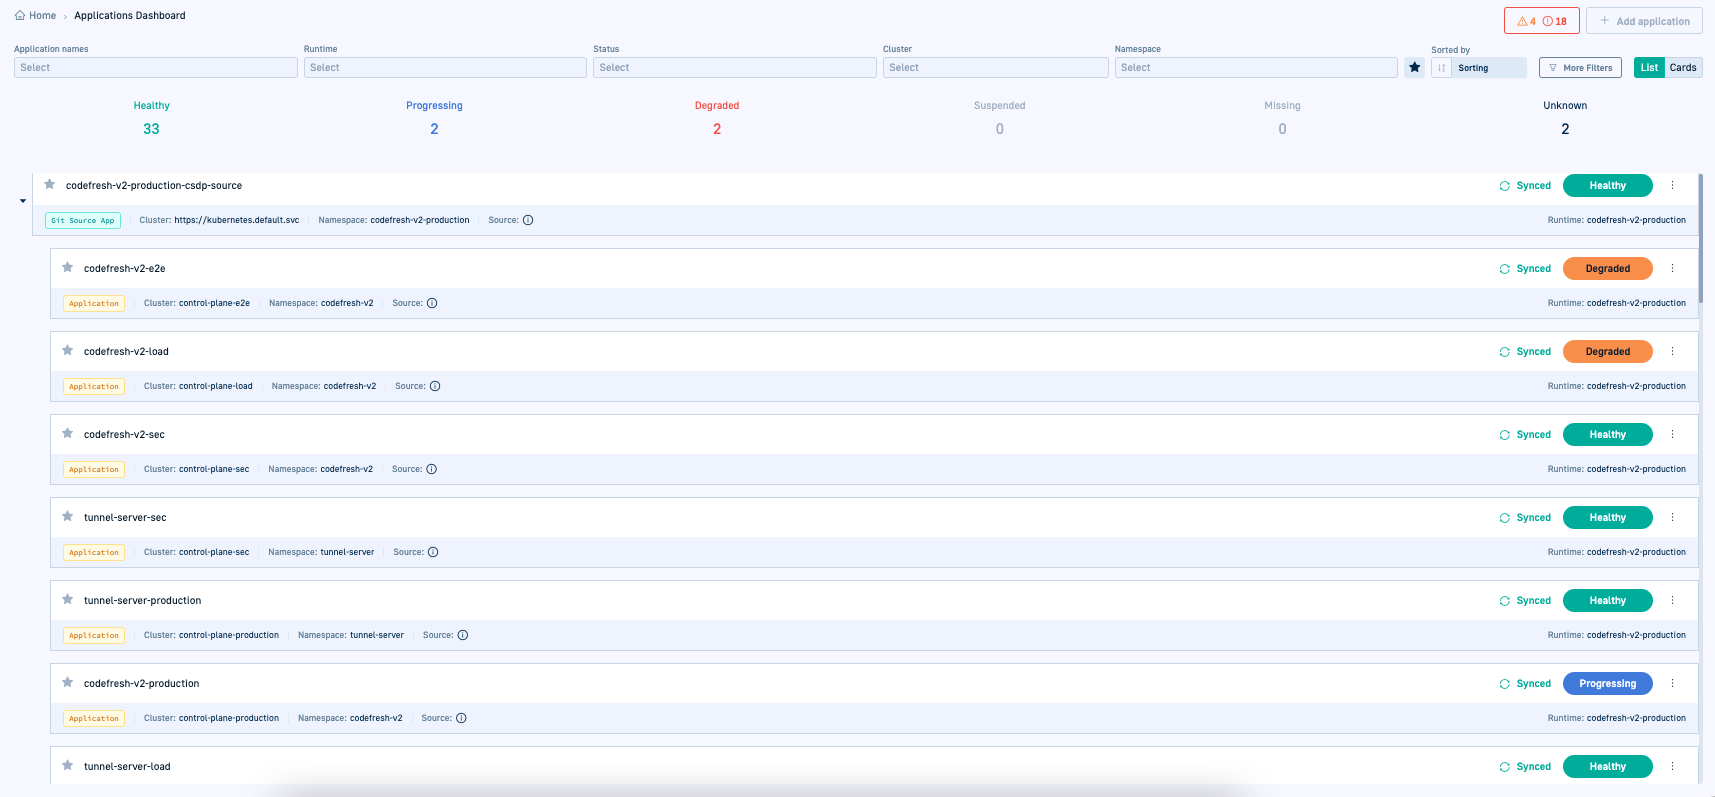
Working with the GitOps Apps dashboard
After you create an ArgoCD application in Codefresh, you can track and monitor the application’s deployments, resources, and more in the GitOps Apps dashboard.
Let’s review the important features.
Customize the dashboard view
-
View format: Select the view format for the GitOps Apps dashboard as List or Card.
-
Filters: Customize the scope through the global filters to display the information you need.
-
Detailed info on application: To get detailed information on an application, either select the option/action from the app’s context menu, or simply click the application.
For more information, see Applications dashboard information.
Application header
When you select an application, the application header displayed at the top provides a wealth of useful information at a glance.

Here you can see:
- Application health status
- Current sync status and previous sync result, and even terminate an on-going sync if needed
- Auto-Sync as enabled or disabled
Monitor application resources in Current State
Monitor the resources deployed in the current version of the selected application in the Current State tab.
This is the tab displayed when you select the application from the GitOps Apps dashboard.
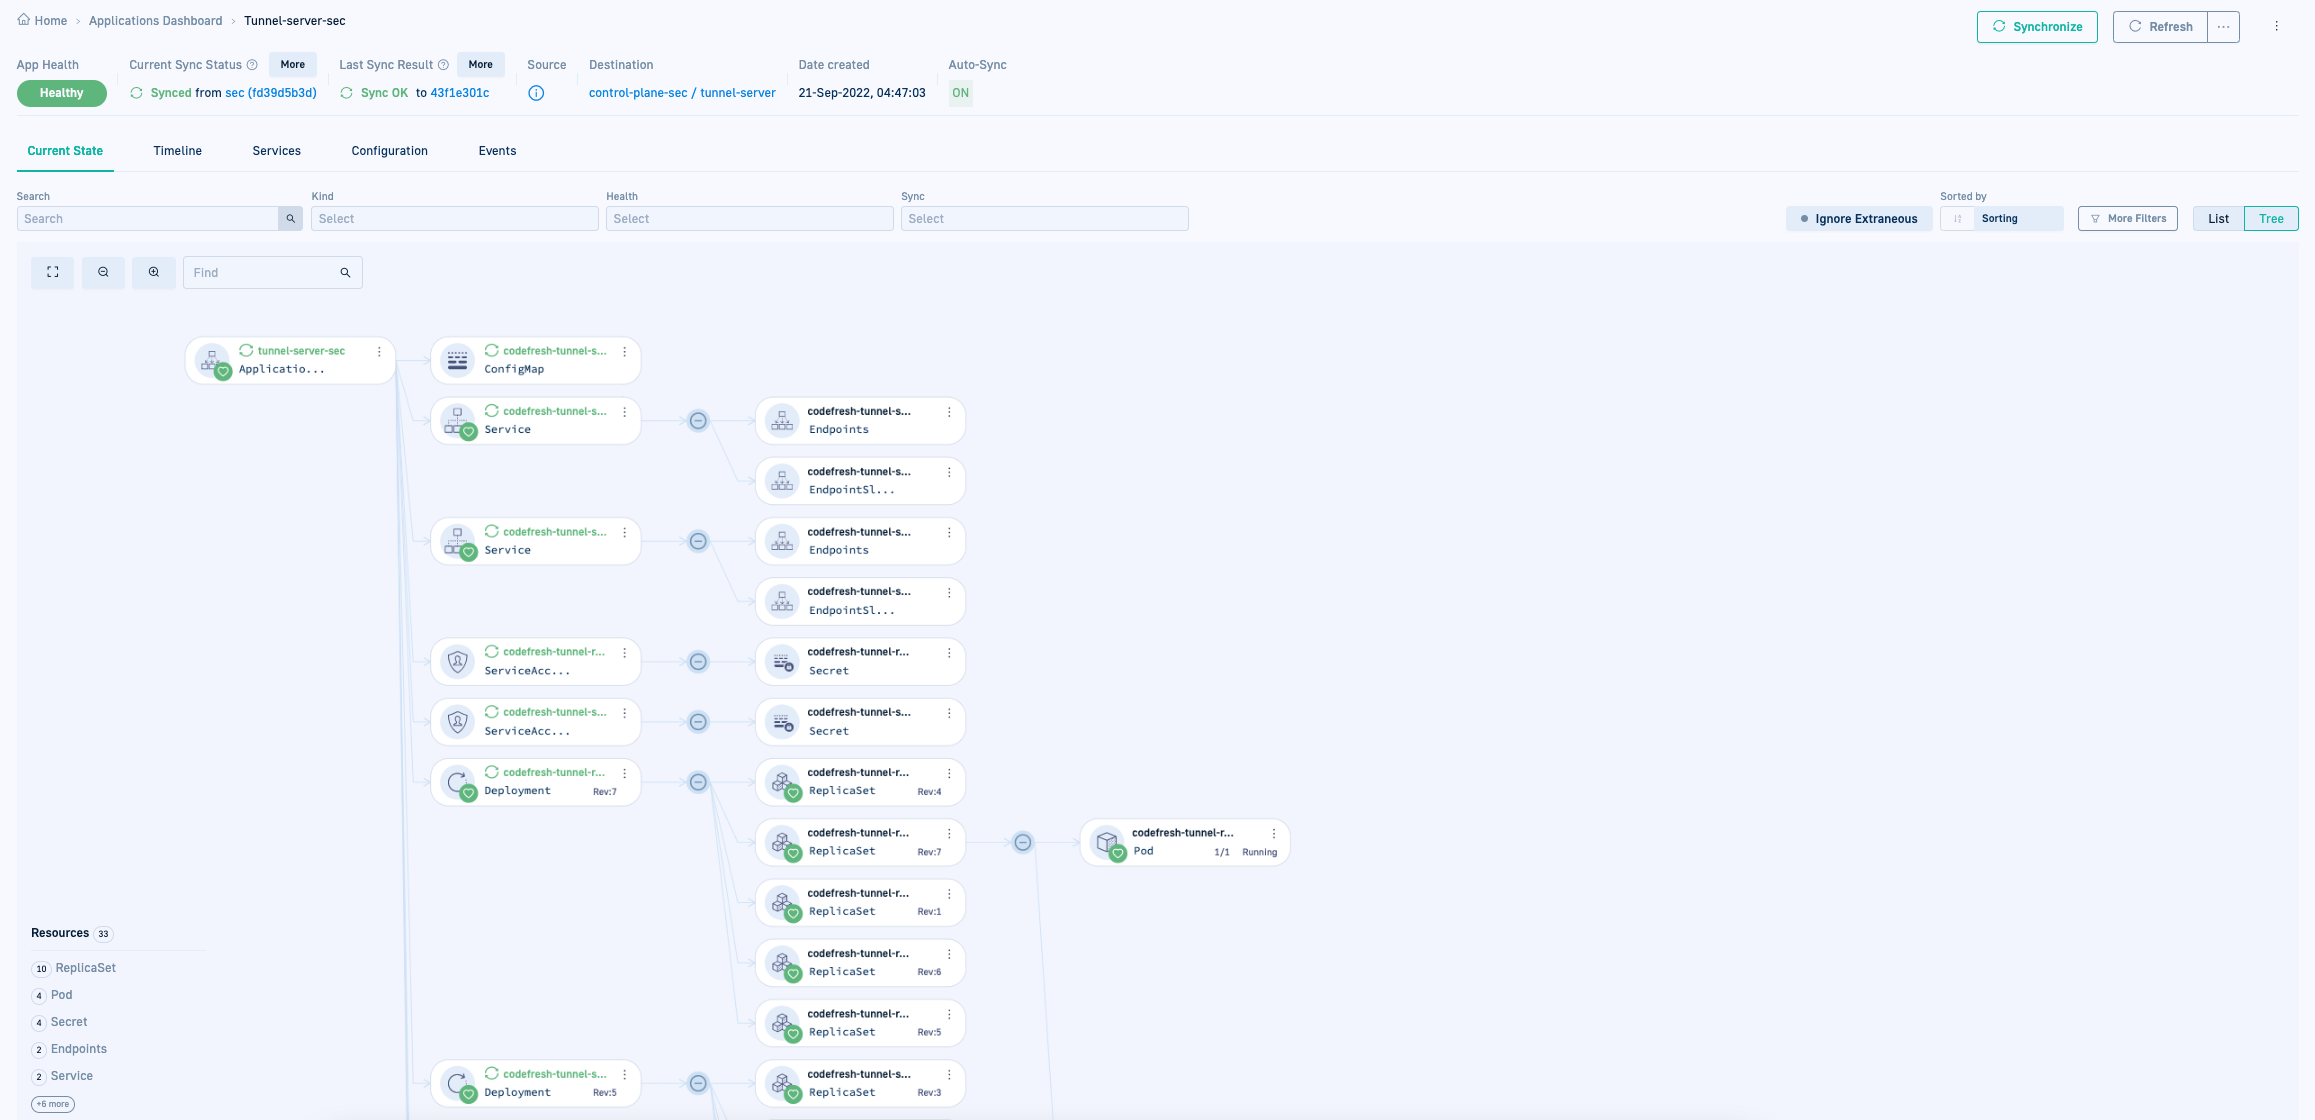
Here you can view the live state of the application’s resources (Kubernetes objects) on the cluster in List or Tree views, set filters, and monitor for each resource:
- Health status
- Sync status
- Manifests
- Logs
- Events
TIP
To quickly filter by resource type, click the type in the Resource Inventory (bottom-left).
For detailed information, see Monitor resources for selected application.
Monitor deployments in Timeline
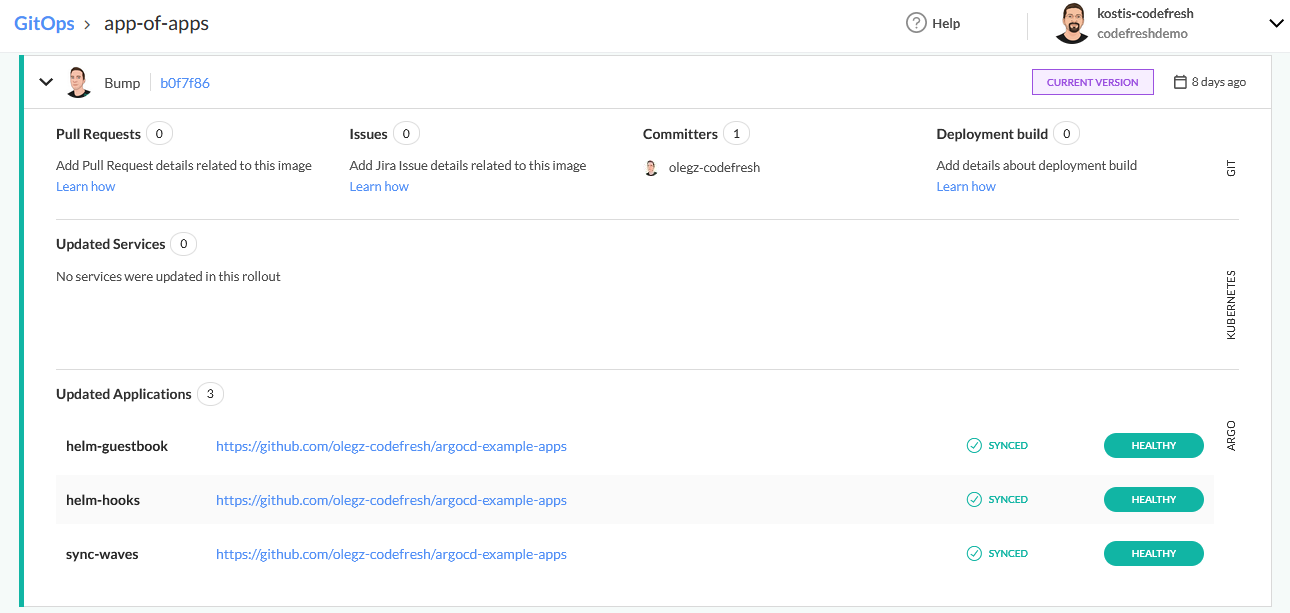
The Timeline tab (next to the Current State), displays the history of deployments for the selected application. Here’s where to monitor an ongoing deployment and review historical deployments. The deployments are sorted by the most recent one, labeled Current Version at the top.
To view day-to-day deployment information for the selected time period, mouse over the dot on the deployment chart
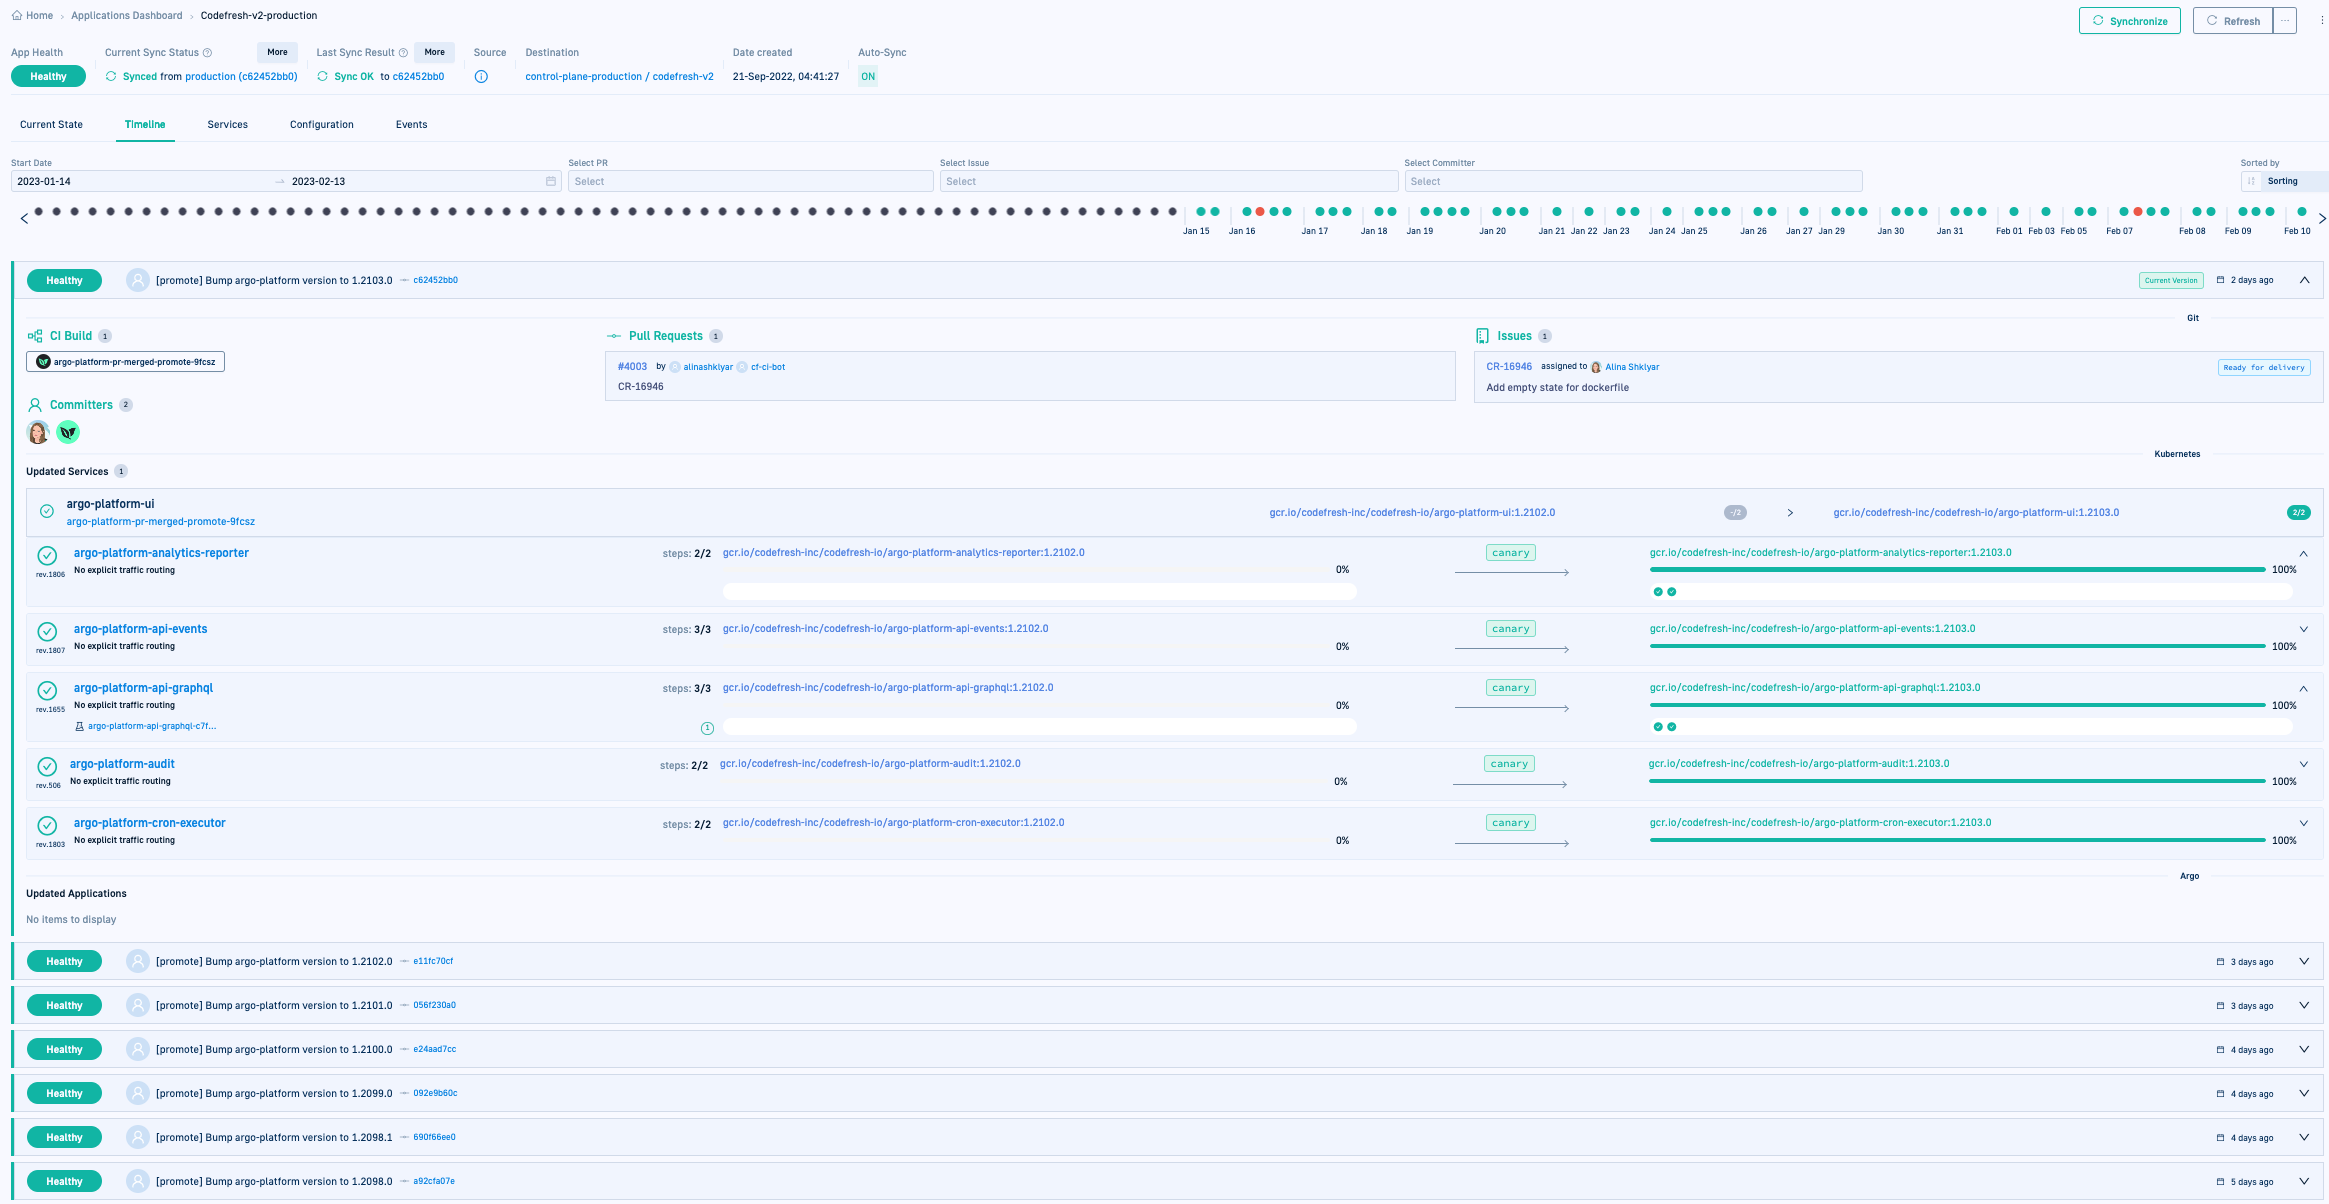
You can see the:
- Complete history of deployments according to Git hash. For each deployment you can also the Pull Request (PR) used for the commit, the committer, and the Jira issues resolved by the PR
- The Kubernetes services added or modified during the deployment
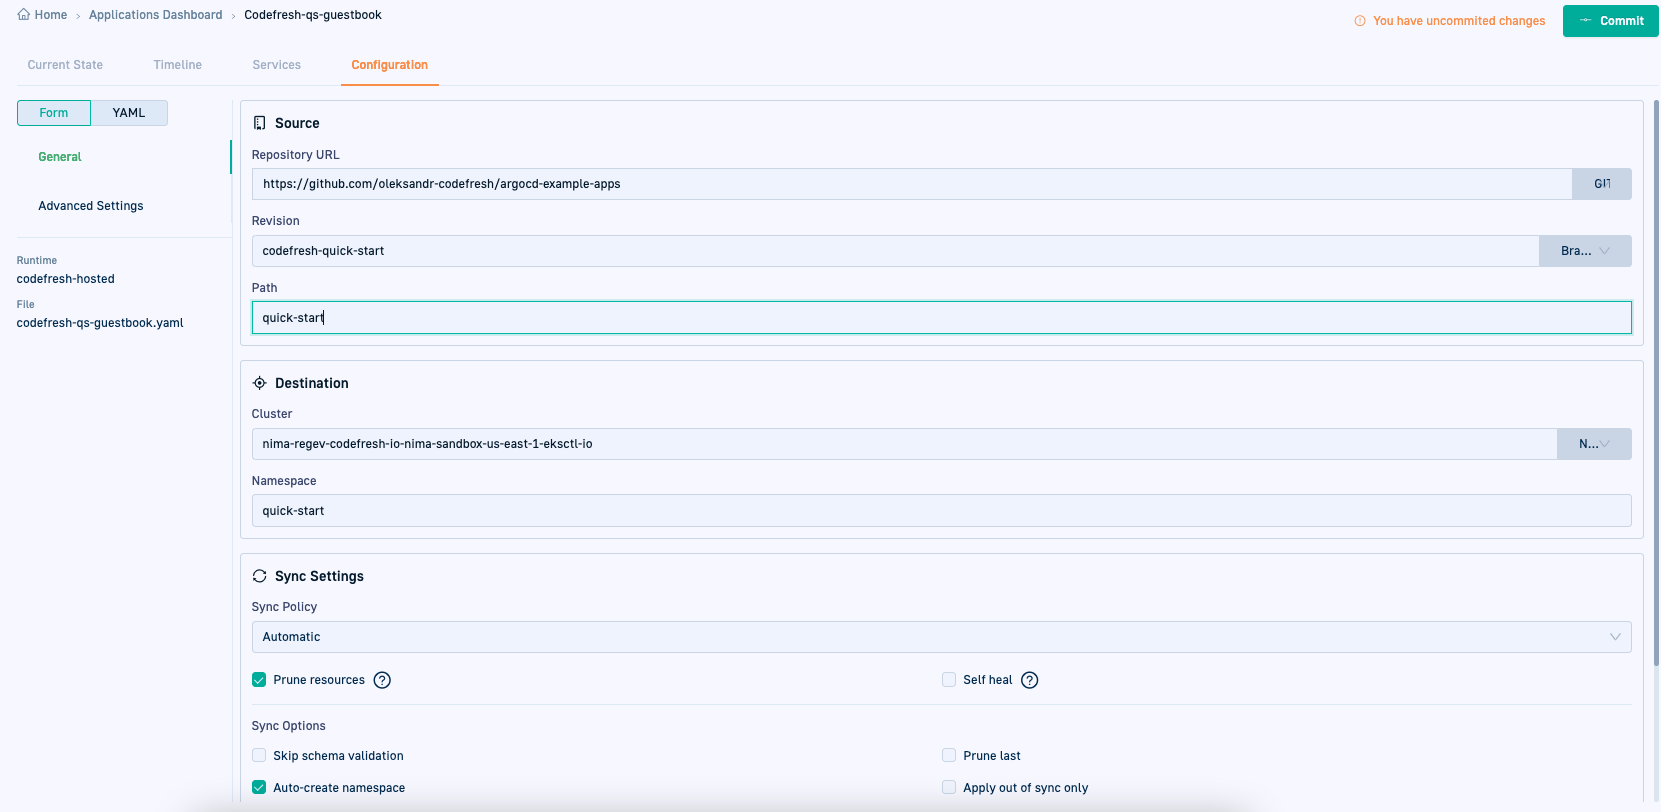
Review and update application Configuration
The Configuration tab displays the definitions for the application. Apart from the application name and runtime, you can change any setting, and commit the changes.
For more information on application definitions, see Creating GitOps applications.
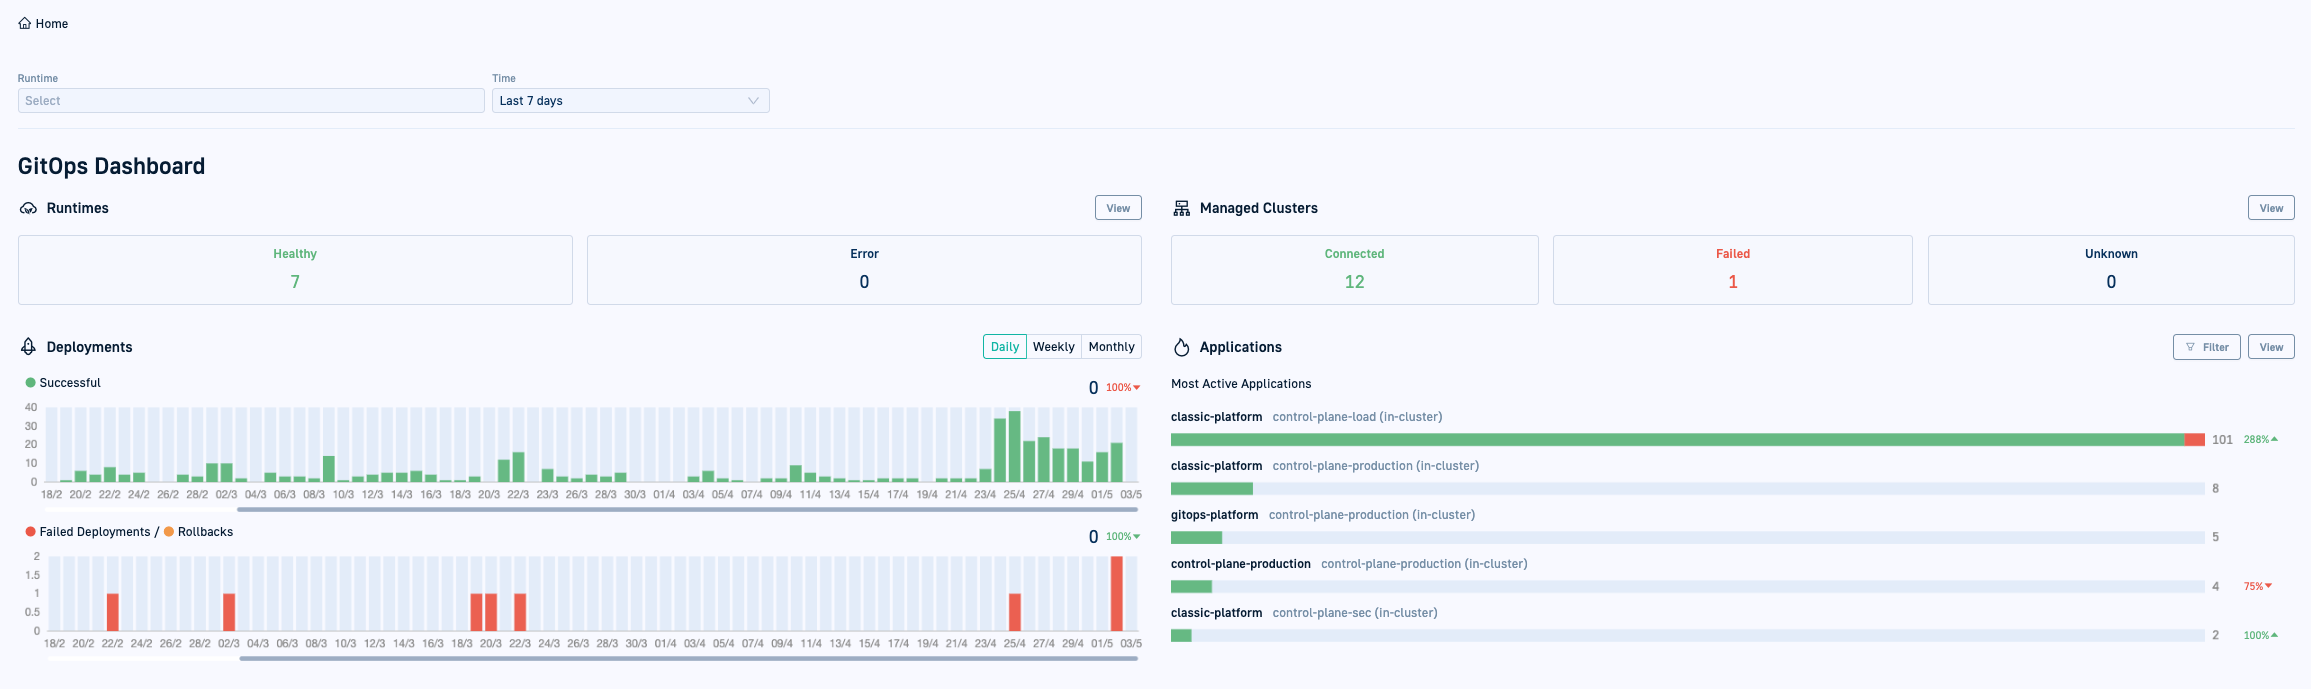
Home and DORA Metrics dashboards
If you have several applications and deployments, the Home Dashboard and the DORA Metrics dashboards are the go-to dashboards for managers and developers alike.
The GitOps Dashboard in the Home dashboard offers a global view of GitOps Runtimes, managed clusters, deployments, and applications. For system-wide visualization in real-time, this is your dashboard of choice in Codefresh.
- Go to Home Dashboard.
For detailed information, see GitOps Dashboard.
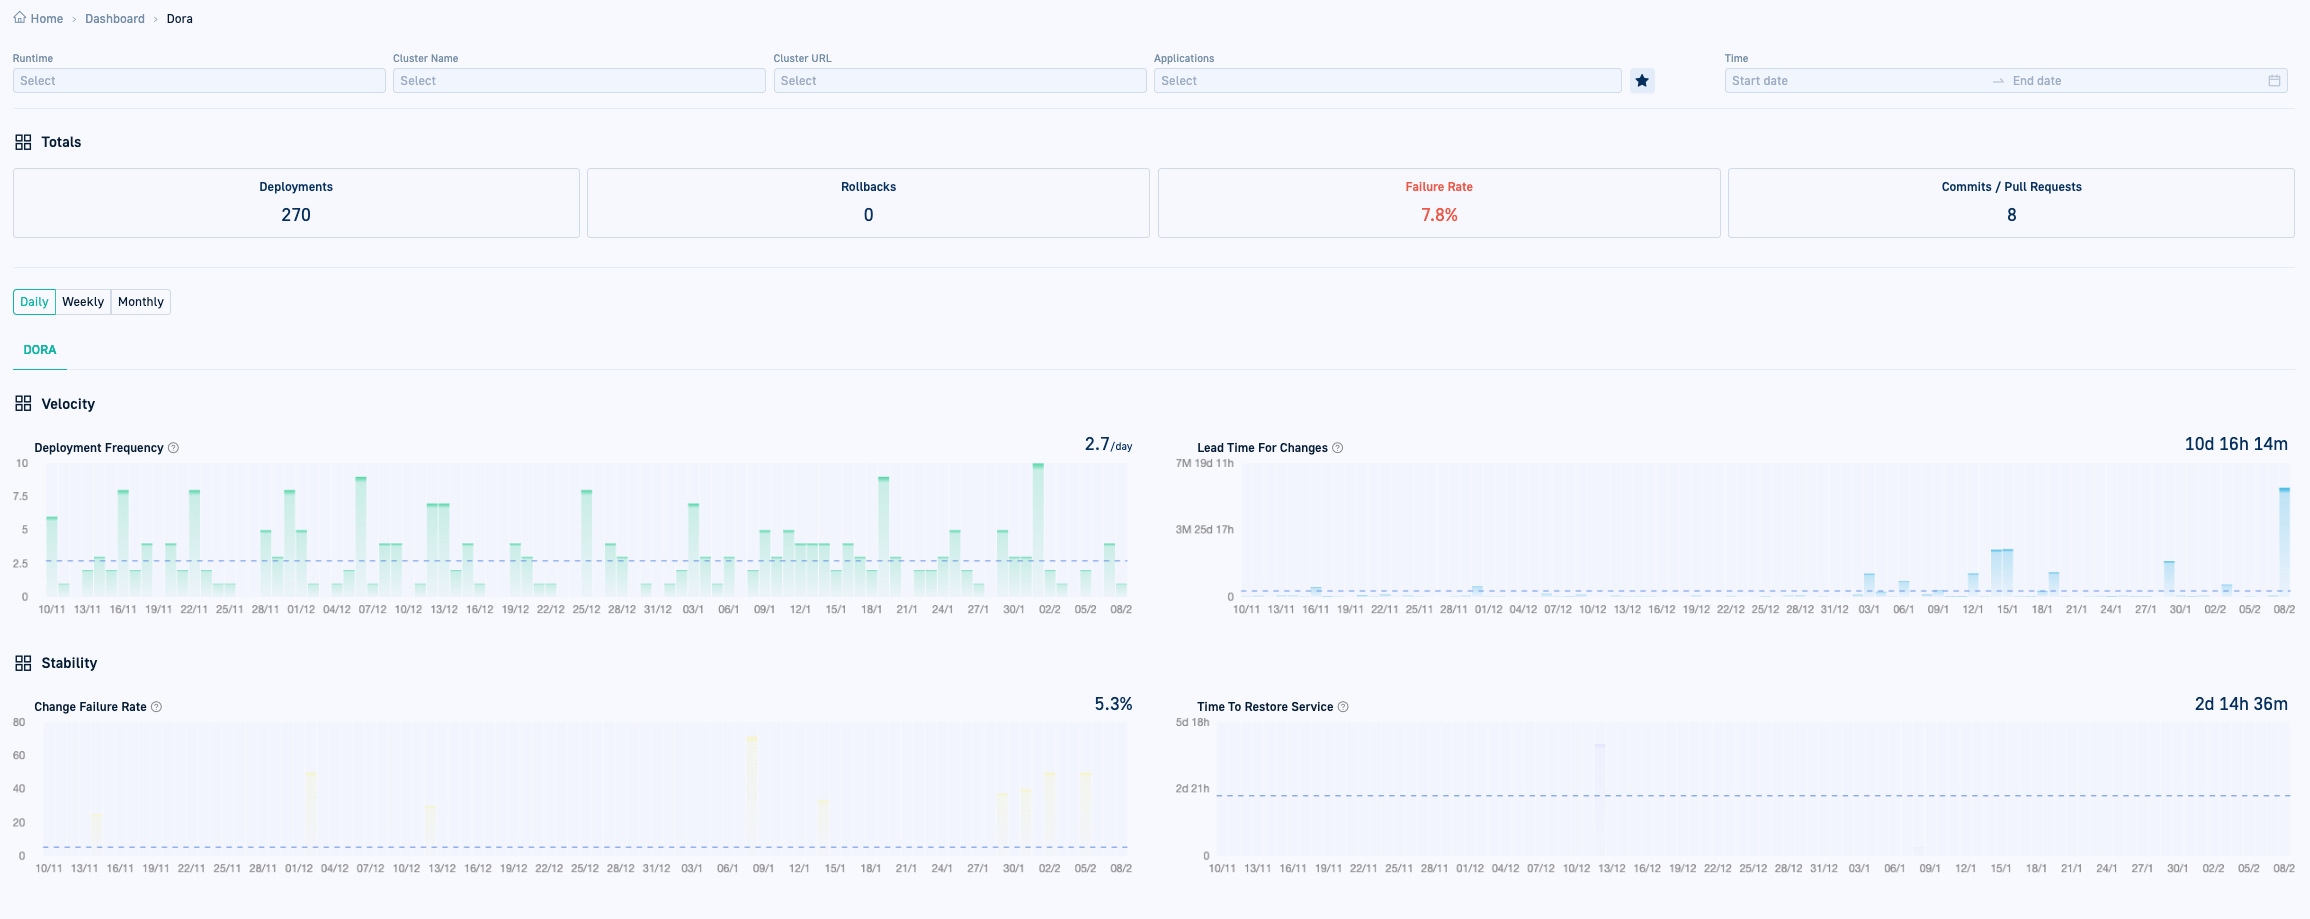
Monitoring DORA metrics can help identify delivery issues in your organization by detecting bottlenecks among teams, and help to optimize your deployments, at technical or organizational levels. Codefresh offers support for DORA metrics out of the box. For more information, see DORA metrics.
Using the App-of-Apps pattern
The GitOps Apps dashboard displays applications created using the app-of-apps pattern. If you have a number of applications that are related, and you always install them as a set in your cluster, you can group them in a single Application. The parent application can be defined using declarative Argo Resources.
As an example, you might find that you always install in your cluster Linkerd, Prometheus, and Ambassador. You can group all of them as a single application and deploy them all at once.
You can find an existing example of app-of-apps at https://github.com/argoproj/argocd-example-apps/tree/master/apps. It uses Helm, but you can use any other Kubernetes templating mechanism such as Kustomize, or even plain manifests.
Once you deploy the application with Codefresh, the parent app is displayed in the GitOps Apps dashboard with an arrow. Clicking the arrow expand and displays the child applications.
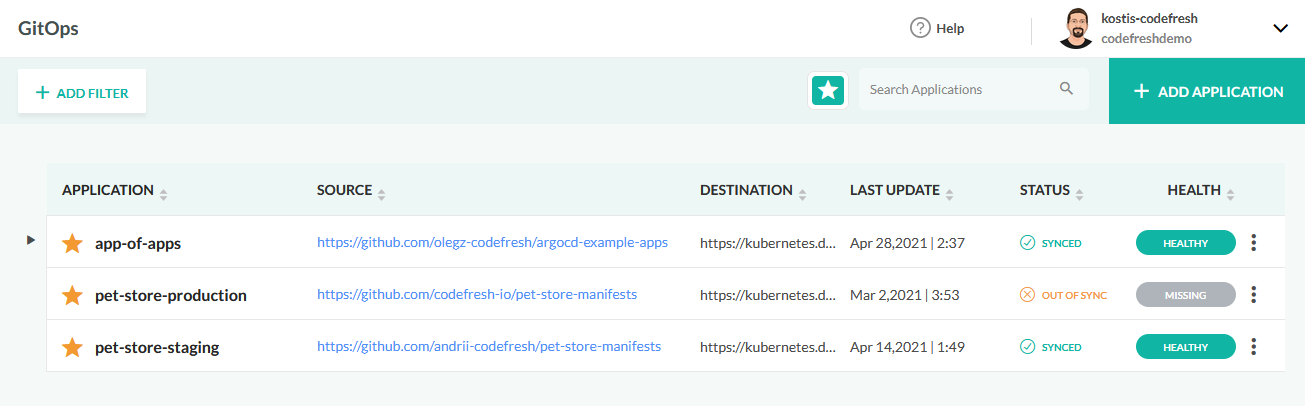
Clicking on the parent application takes you to the Current State tab with the child applications. Clicking a child application takes you to the Current State tab displaying the application’s resources.
TIP
The app of apps pattern is best suited for related but not interdependent applications. If you have applications that depend on each other, such as a frontend that needs a backend, and a backend that needs a database, we suggest using the standard Helm dependency mechanism.
Related articles
Image enrichment with integrations for GitOps
GitOps issue tracking integrations
GitOps container registry integrations