Google Marketplace pipeline integration
Learn how to run Codefresh pipelines inside your GKE cluster
Codefresh has partnered with Google Cloud and allows you to install a Codefresh pipeline builder within your own Kubernetes cluster.
The integration is available in the Google Marketplace for Kubernetes apps at https://console.cloud.google.com/marketplace/product/codefresh-gke/codefresh-saas.
Once you configure Codefresh to use your own Kubernetes cluster for builds, you can enjoy all benefits of a hybrid installation as the Codefresh UI and management dashboards will still run in a SAAS manner, while the actual builds and pipelines will execute in your own cluster.
The major benefits are the following:
- You define exactly what resources are used for your builds instead of relying on Codefresh infrastructure.
- The management UI still runs in the Codefresh premises and is managed by the Codefresh team allowing you to focus on your builds.
- The Codefresh builder has access to all private resources that run in your cluster so it is very easy to use resources that should not be exposed to the Internet for any reason.
- Unified billing. You pay a single bill to Google that includes the price for your Kubernetes cluster as well as the Codefresh pipelines.
To start the integration, you need the following:
- A Google Cloud account with billing enabled
- A GKE cluster that will run all builds and pipelines
- A Codefresh account (creating an account is free, you pay only for builds)
Then visit the Codefresh GKE page at https://console.cloud.google.com/marketplace/product/codefresh-gke/codefresh-saas.
Using Codefresh from the Google Marketplace
When you configure Codefresh integration from the Google Marketplace, a special Codefresh Runner is installed in your own cluster.
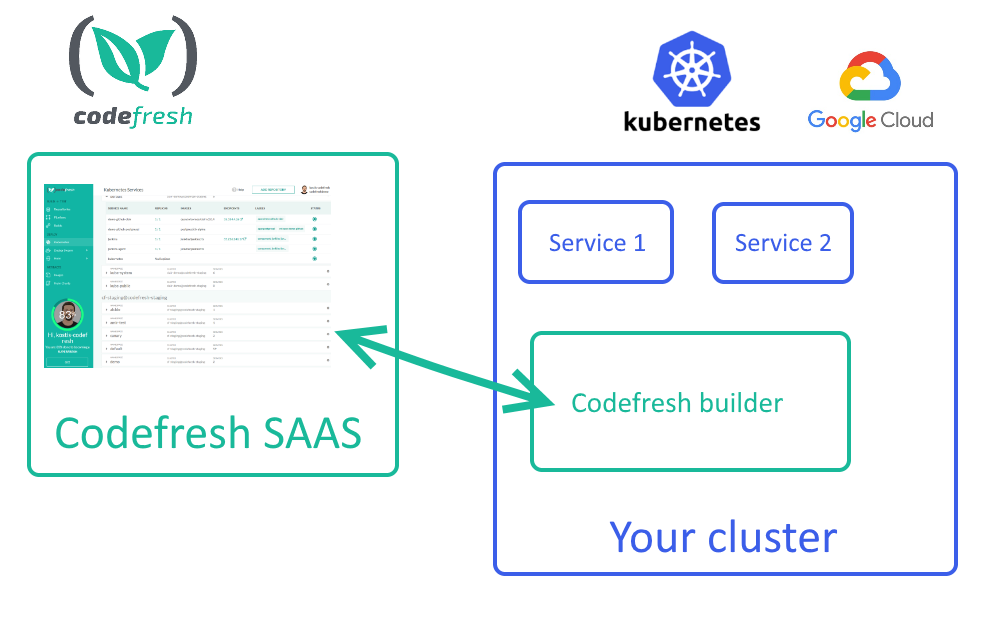
The Codefresh UI is still hosted by Codefresh in a SAAS manner. The builds themselves however run inside your own cluster.
The builder is responsible for executing all your builds and notifying the Codefresh UI of their status. You can also access internal cluster resources that are normally not accessible to the SAAS hosted Codefresh builders.
You can still run builds in the Codefresh SAAS infrastructure if you wish, and therefore both approaches are valid at the same time.
Usage and billing
To start using the service, you need to enable billing in your Google Cloud account. Once that is done, Codefresh billing is integrated into your Google invoices.
You will pay for the cluster resources to Google, plus the Codefresh builds. Codefresh does not collect any payment from you directly. Google Cloud will invoice you for both the cluster infrastructure and the cluster usage.
Current pricing for Codefresh builds is always shown in the marketplace page.
Install the Google Marketplace
Step 1: Create a Codefresh API key
- Log in to your Codefresh account, and from your avatar dropdown, select User Settings.
- Scroll down to API Keys.
- To create a new API key, click Generate, and do the following:
- Key Name: Enter the name of the key, preferable one that will help you remember its purpose. The token is tied to your Codefresh account and should be considered sensitive information.
- Scopes: Select all the scopes.
- Copy the token to your clipboard.
- Click Create.
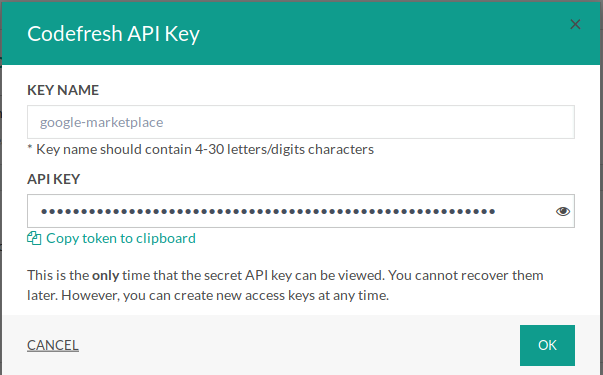
With the token at hand, we can go to the Google marketplace.
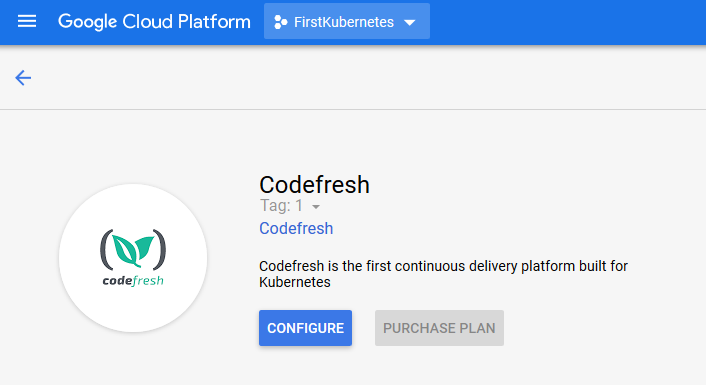
Step 2: Install the Codefresh application in your Google Cloud cluster
- Navigate to https://console.cloud.google.com/marketplace/product/codefresh-gke/codefresh-saas.
- From the dropdown menu at the top of the page, select a Google project that has billing enabled.
- Click Configure.
- Define the general settings for the installation.
These include:- The cluster that will be used for installation
- An existing or new namespace where the Codefresh builder will reside
- A name for your installation (arbitrary choice)
- Your Codefresh API token that you created in the previous section
- The selection of the account that will be used for the cluster management.
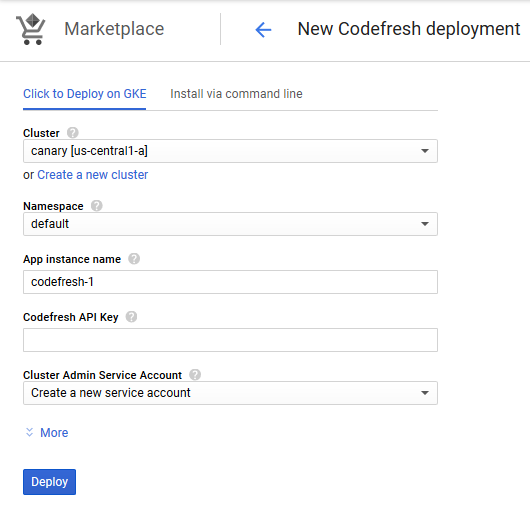
- Note down the namespace you used, as it becomes important later on inside the Codefresh UI.
- After defining all the settings, to install, click Deploy. Wait for a few minutes for the installation complete.
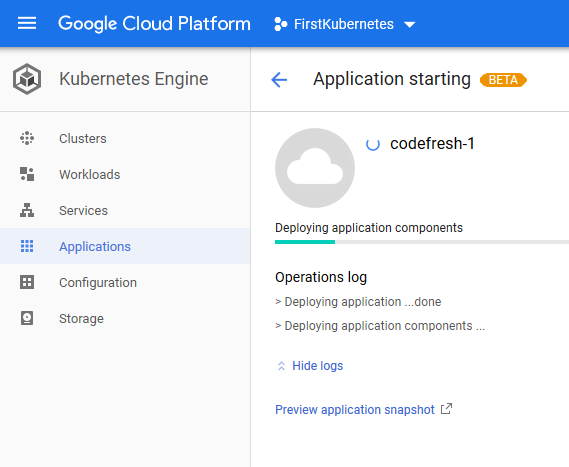
The Codefresh application is now installed on your cluster.
Step 3: Set up communication with Codefresh SaaS
To finish the installation, we need to make Codefresh SaaS aware of the new builder.
- On the right hand-side, copy the full command to complete the installation.
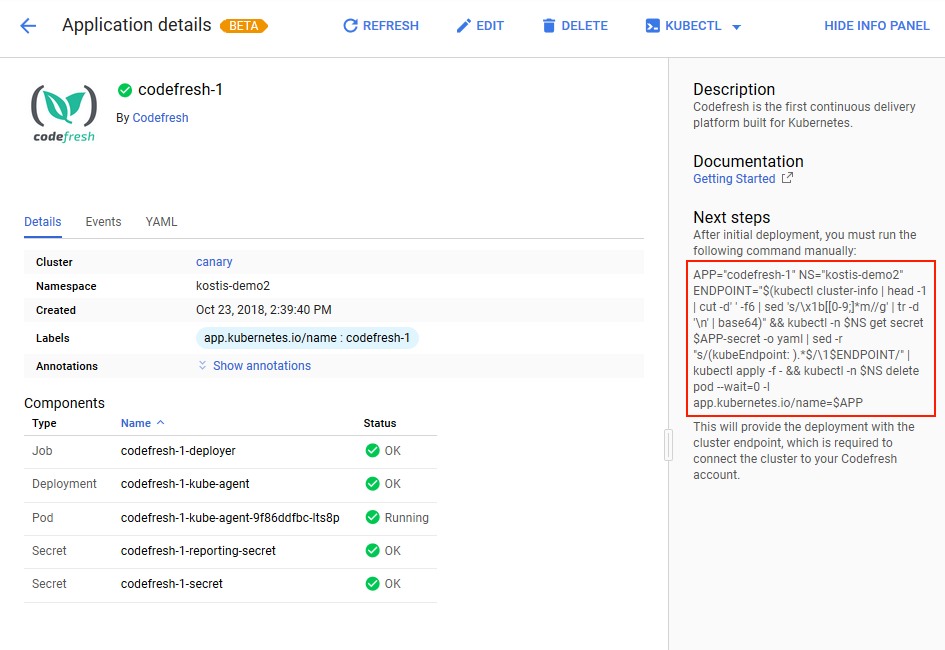
This command must be executed from a shell that has kubectl installed with the correct configuration for the cluster that was used for the installation. If you already have a local shell that points to your cluster, feel free to paste the command there and run it.
The easiest way to run it in any other case is via the Google shell. Click the Activate Google shell icon from the top right and wait a bit until the shell appears at the bottom part of the window.
First you need to set up kubectl access. Run:
Google shell
gcloud container clusters listThis will show you a list of your clusters. Find the one that has the Codefresh application and run:
Google shell
gcloud container clusters get-credentials [my-cluster-name] --zone=[my-cluster-zone]This will set up kubectl access. You can try running some command such as kubectl get nodes and kubectl cluster-info to verify that cluster communication is setup correctly.
Then run the full command. Here is an example:
Google shell
$ APP="codefresh-kostis" NS="kostisdemo" ENDPOINT="$(kubectl cluster-info | head -1 | cut -d' ' -f6 | sed 's/\x1b[[0-9;]*m//g' | tr -d '\n' | base64)" && kubectl -n $NS get s
ecret $APP-secret -o yaml | sed -r "s/(kubeEndpoint: ).*$/\1$ENDPOINT/" | kubectl apply -f - && kubectl -n $NS delete pod -l app.kubernetes.io/name=$APP

secret "codefresh-kostis-secret" configured
pod "codefresh-kostis-kube-agent-86dbcc67c4-9gqqb" deleted
Once the command is run, you can visit the Codefresh Kubernetes dashboard and you will see your Google Cloud cluster already configured.
The full integration is now ready, and you can start running Codefresh pipelines in your own cluster.
Step 4: Start running pipelines
Now whenever you set up a Codefresh pipeline, you can choose its execution environment and point it to your own cluster with the Codefresh builder.
TIP
At this point if you have a Codefresh browser window open, make sure that you log out and then log in again so that the new UI options regarding your cluster become available.
Open any Codefresh pipeline and toggle the Run on Environment switch. Select the cluster and the namespace that you used for the installation in step 2.
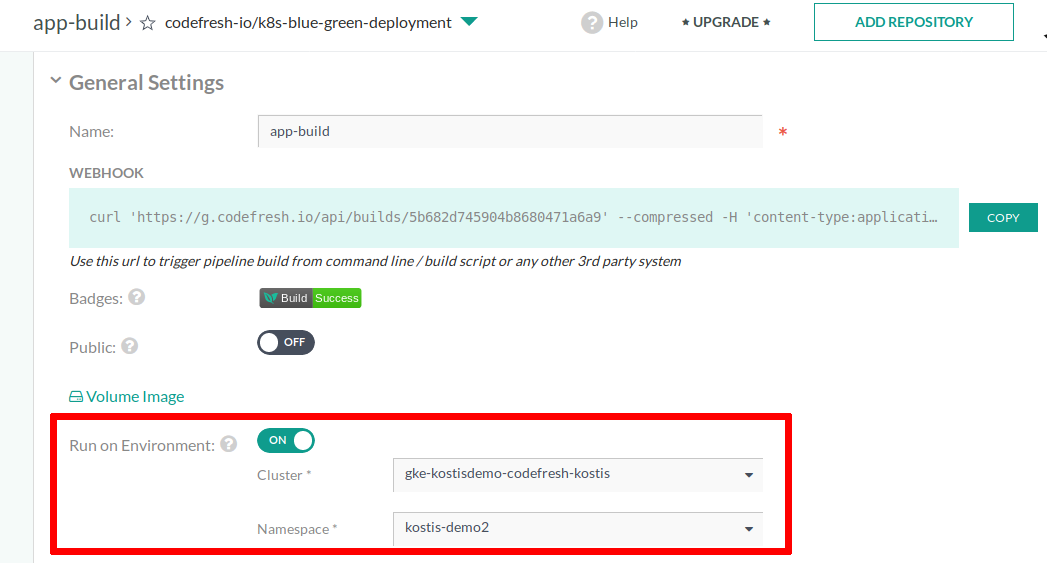
You can still use the Codefresh SAAS if you don’t enable this switch. You can choose which pipelines run in Codefresh SAAS and which use your cluster depending on your needs.
Alternative installation from the command line
Instead of installing via the Google Cloud console, you can also install the Codefresh application using command line procedures.
For this installation mode, see the manual installation guide.
Removing the installation
If you want to remove the Codefresh builder from your cluster, navigate to the “Applications” page in the Google Cloud console and click the Delete button.

You can install the Codefresh builder again from the marketplace.
Related articles
Manage your cluster
Creating pipelines
Codefresh YAML for pipeline definitions