GitOps Products
Create Products to group and manage interrelated Argo CD applications environments
NOTE
This feature is currently in Beta.
Explore the power of Products for Argo CD applications in Codefresh GitOps.
Managing complex applications across multiple environments is a common challenge faced by developers and platform engineers. The diverse nature of applications and the variety of environments they deploy to can lead to fragmented management and deployment processes.
In Codefresh GitOps, Products serve as a strategic layer that bridges this gap. Products group different yet interconnected applications based on their similarities and dependencies. By grouping applications, Products enhance Environments, allowing complete visibility for efficient management across Environments.
Read more on the world’s first dashboard for GitOps Environments and Products in this blog.
What is a Product in Codefresh GitOps?
In Codefresh GitOps, a Product is a custom entity that allows you to group interconnected Argo CD applications, providing a cohesive view as the applications progress through the development and deployment lifecyle.
Consider a practical scenario of numerous applications connected to billing or payment. Instead of monitoring each application separately, creating a Product enables you to track and manage them collectively.
The diagram illustrates how Argo CD applications connected to a Product are grouped by that Product and organized by Environments. It also shows applications not assigned to any Product.
Benefits of Products
-
Unified application management
Managing complex Argo CD applications across multiple Environments can be challenging.
By grouping similar Argo CD applications into a unit, Products allow you to also efficiently manage them cohesively. -
Bridging applications and Environments
Products act as a bridge between applications and their respective Environments. By linking applications to Products, you can easily track their deployment across different environments, providing clarity and control over your deployment pipelines. -
Effortless creation
As with Environments, creating a Product is equally straightforward. You can create Products from the UI, or declaratively through annotations in your application manifests. -
Real-time insights with integrated views
The Products dashboard offers three distinct views - Pods, Git, and Features. These views provide real-time insights into the changes in the application repo, deployment details, code changes, and feature tracking. Whether you’re a developer tracking the latest commits or a project manager monitoring feature releases, these integrated views offer valuable insights tailored to your role.
How do you view applications by Product?
In two simple steps:
-
Create the Product
Begin by creating a Product, and assigning a meaningful name based on your use case. You can do this in the UI, or through annotations in app manifests. -
Connect applications to the Product
Bring your applications into the picture. Link applications to the Products you’ve created to create the associations you need.
Codefresh seamlessly identifies and organizes the applications in the correct Environments.
You can then work with Products, and with applications in Products.
Understanding the role of Environments for Products
In the Products dashboard, application visibility is closely tied to the definition and mapping of Environments.
Note that Products will not display any applications in these scenarios:
-
No Environments defined
If you have not created Environments in Codefresh, the Products dashboard will not display any applications, even when applications are assigned to Products. -
Unmapped cluster-namespace
Even if Environments are defined, applications are not displayed within Products if the corresponding clusters or namespaces are not mapped to any existing Environment.
Create Products
Create a Product with a unique name and define the annotations through which to connect related Argo CD applications to it.
Before you begin
- Create one or more Environments for applications
How to
- In the Codefresh UI, from the Ops in the sidebar, select Products.
- Click Add Product.
- Define the following:
- Name: A unique name for your Product, which is also unique in the cluster.
- Connect Applications: The applications to associate with this Product by adding the default or custom annotation to the application manifest.
- To use the default annotation, copy and paste it into the application’s manifest.
- To use a custom annotation, click Add custom annotation, and then define the Key-Value for the annotation. Copy and paste it into the manifest.
- Tags: Any metadata providing additional context and information about the Product, used for filtering and organization purposes.
- Click Add. The Product is displayed in the Products dashboard.
Products dashboard
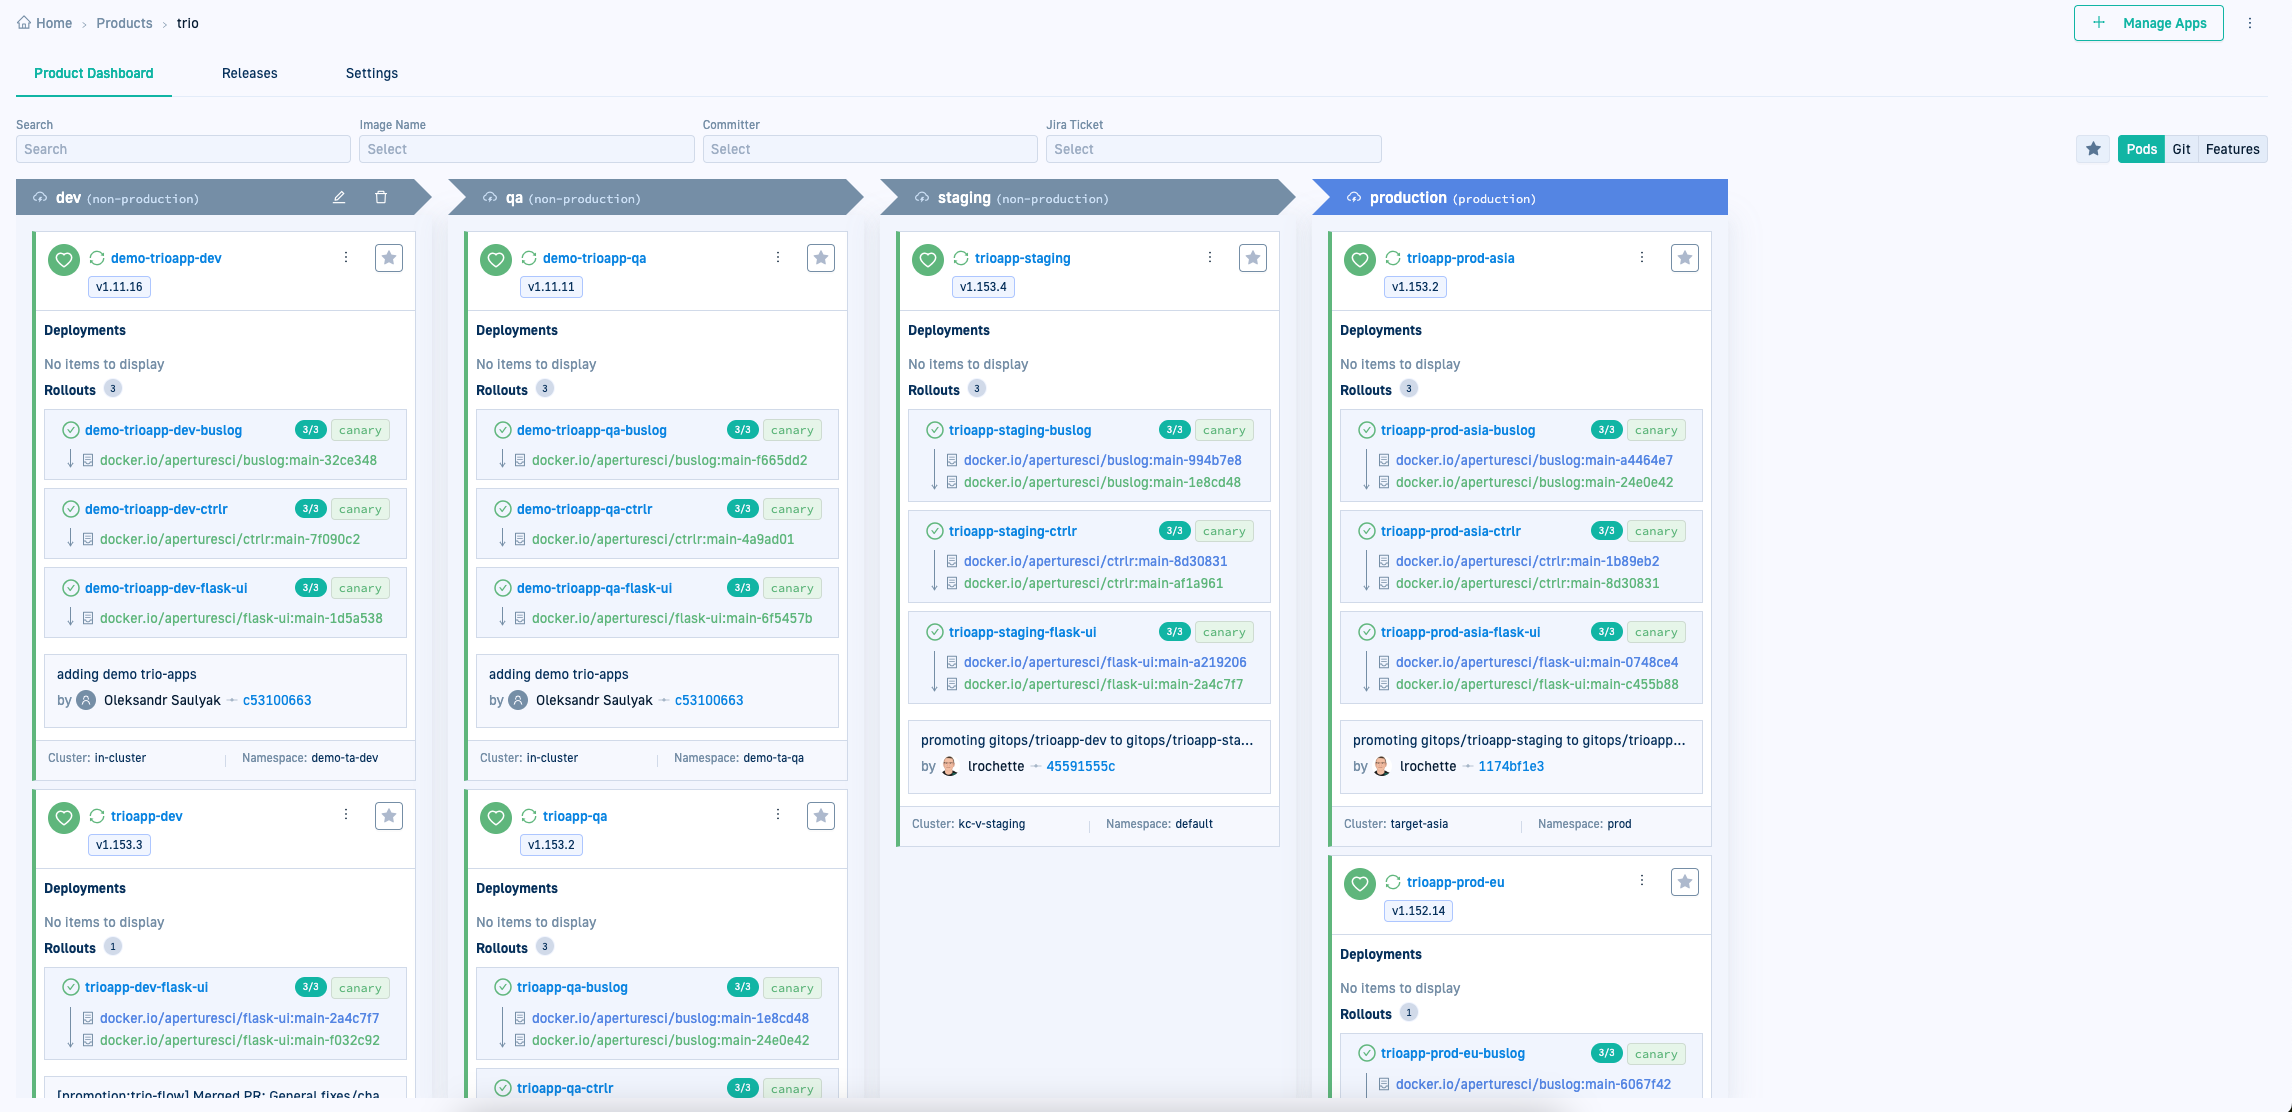
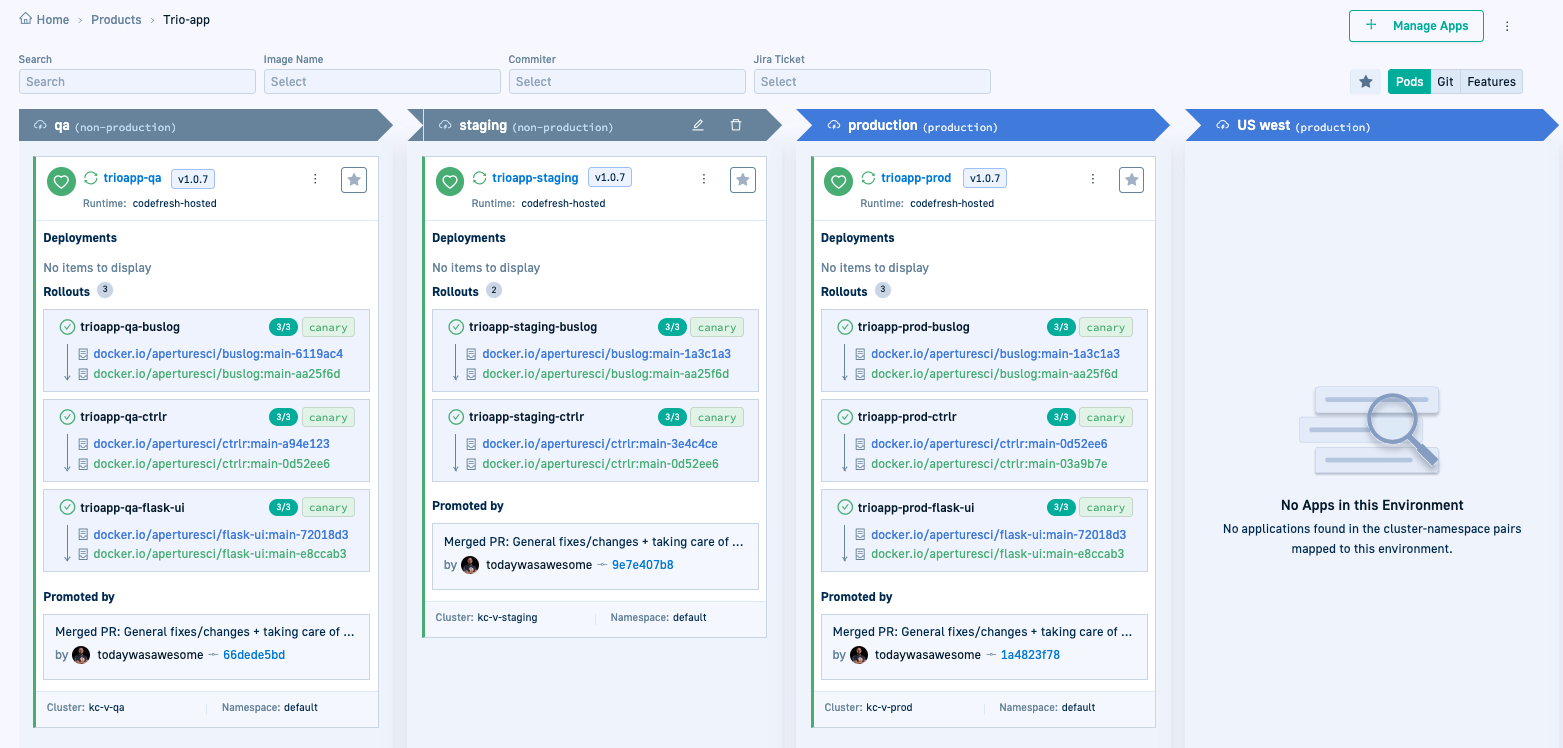
Here’s an example of the Products dashboard.
As with all Codefresh dashboards, filter the view of the Products dashboard by Product Name, Application, or Environment.
Here are some key features of the Products dashboard.
Collapsed & expanded views
- Collapsed view: The default view, displays the Product name alongside the Environments with the number of applications in each Environment.
The options on the right allow you to manage Product. - Expanded view: The expanded view displays the applications in the Product organized by their Environments.</li></ul>{:/}
Product management options
Mouse over the row with the Product to display possible actions:
- Edit: Edit the Product's settings. See Edit/delete Product.
- Manage Applications: Manually assign unassigned applications to environments in the Products dashboard. See Manually assign applications to Products.
- Delete: Remove the Product from the Products dashboard, unassigning any manually-assigned applications. See Edit/delete Product.
Drill into individual Products
Clicking a Product name navigates you to a detailed view of the Product and its applications. Unique to Product view are integrated insights into Git and issue-tracking systems and how they relate to deployments.
In addition, the application version and enriched image information are especially useful.
Application release version
- Version information, currently supported for Helm-based applications, identifies the specific release of the application in different Environments.
- Clicking the version displays the application’s dependencies, enabling comparison across different applications.
See View and compare deployed versions for dependencies.
Integrated Pod/Git/Feature information
- The Products dashboard correlates sync information with other parts of the software lifecycle, such as issue-tracking systems.
- Switch between Pods, Git, and Features views to gain insights beyond development, including source code commits, affected services, commit authorship, and incorporated features in releases.
See Application lifecycle insights with pods, Git and features.
Manage applications
Manage individual applications without navigating away from the Products dashboard. The actions available mirror those in the GitOps Apps dashboard.
Working with Products
Assigning applications to Products
Codefresh offers two methods to assign applications to a Product:
-
Manual assignment from the Products dashboard
A one-click action, this method is for quick assignment from the UI. Unlike other UI actions, manual assignment does not require a commit action. Recommended for testing and not as the preferred method. -
Declarative assignment through annotations
This method defines an annotation with the Product name in the application manifest. If the Product doesn’t exist, Codefresh automatically creates it for you.
Recommended method which is fully GitOps-compatible.
Manually assign applications to Products
Manually assign an application to a Product directly from the Products dashboard.
This is one of two methods for assigning applications to Products. The other method involves adding annotations to the application’s manifest, as described in Use annotations to connect applications to Products.
- In the Codefresh UI, from the sidebar, select Products.
- If needed, search for the application, or use the Application and Environment filters.
- Do one of the following:
- Click the name of the Product for which to assign applications, and then click Manage Applications.
- Mouse over the row with the Product to which to assign the application, and click .
- In the list of Unassigned apps on the left, if you have created Environments, select the Environment by which to filter unassigned applications, or in the search field, type a part of the application name.
- To assign the application, click .
- To confirm the assignment, click Save. If you have defined an Environment for the application, Codefresh adds it to the Environment defined for it.
Use annotations to connect applications to Products
Connect an application to a Product declaratively by adding the default or custom annotation to the application’s manifest. The annotation is defined as part of the Product’s settings.
This is one of two methods for assigning applications to Products. The other method is to manually assign them from the Products dashboard, as described in Manually assigning applications to Prodcuts.
- Copy the Product’s annotation:
- In the Codefresh UI, from the sidebar, select Products.
- Mouse over the row with the Product name, and then select Edit .
- In the Edit Product form, copy the annotation to add to the application’s manifest and close the form.
- Add the annotation to the application’s manifest:
- From the sidebar, select GitOps Apps.
- Select the application to which to add the annotation.
- Click the Configuration tab and switch to YAML format.
- Add the annotation as in the example below.
- Commit to save the changes.
If you return to the GitOps Products dashboard and expand the Product, you’ll now see the application as part of the Product.
Unassigning applications from Products
Depending on how you assigned the application to the Product, unassign it either directly from the Products dashboard or by removing the annotation from its manifest.
Unassign application from the GitOps Product dashboard
Unassign an application manually assigned to a Product directly from the GitOps Products dashboard.
A disabled icon indicates that the application is connected through an annotation.
- In the Codefresh UI, from the sidebar, select Products.
- Mouse over the row with the Product from which to unassign the application, and click Manage Apps.
- In the card with the application to unassign, click .
You can see that the Unassign icon is dsiabled for theguestbook-app-prod
.
- To confirm, click Save. The application reappears in the list of Unassigned applications.
Unassign application by removing annotation
- In the Codefresh UI, from the Ops in the sidebar, select Products.
- Select the Product with the application to unassign.
- In the card with the application to unassign, click the application name, and then click Go to Full View.
- Click the Configuration tab and switch to YAML view.
- Remove the annotation from the application’s manifest.
Resolve conflicts for application assigned to multiple Products
Resolve conflicts when the same application is assigned to more than one Product. Unassign the application from any one of the Products.
When Codefresh detects an application assigned to two different Products, it alerts you of the same through a popup in the UI. This conflict typically occurs when you manually assign an application to a Product from the Unassigned list, and then add an annotation to the same application’s manifest connecting it to a different Product.
Edit/delete Products
Edit settings for an existing Product or delete the Product from the Products dashboard.
- Edit: Update settings for the Product, including the name of the Product, and the annotations defined for it.
- Delete: Delete a Product from the Products dashboard. Deleting a Product unassigns all the applications manually assigned to it in the Products dashboard. If the application is connected through an annotation, the annotation is not deleted.
How to
- In the Codefresh UI, from the sidebar, select Products.
- From the Products dashboard, select the Product to edit or delete.
- From the context menu on the right, select the required option.
- Edit settings, or follow the instructions to delete the Product.
Working with applications in Products
Selecting a Product displays the applications assigned to that Product, organized by the Environments defined for them.
View and compare deployed versions for dependencies
View the dependencies included with each application, and compare versions of the application and dependencies deployed in different Environments.
Helm-based applications show the release version of the application. This is the app version as defined in the Helm chart, identifying the specific release version in the different Environments.
You can:
- View the application’s dependencies and their versions. Useful to identify which version is deployed where.
- Compare release versions of the dependencies across deployments in different Environments. Useful for troubleshooting as you can identify if the version that works in dev is the same as the version with the problem in staging.
How to
- In the Codefresh UI, from the sidebar, select Products.
- Expand the Product with the applications you want to view/compare.
- Click the version number of the application.
- To compare different applications, enable Compare.
- Click within the field Select applications to compare, and select the applications.
- For up to two applications, switch between YAML and Table views.
- For more than two applications, the comparison view automatically switches to Table.
Integrated insights with Pod, Git, Feature views
Navigate seamlessly between Kubernetes (Pods), version control (Git), and issue-tracking (Features) views for the Product to get consolidated data from the same location.
Pods
Deployment, Rollout, and Promotion information for the application.
- Deployments: Source image, new image and tag, replicas for each deployment
- Rollouts: The services rolled out, the type of rollout, the result of the rollout, promote/pause rollout action
- Promotion: The change that resulted in the promotion, with details on who committed the change, and the commit hash
- Cluster and Namespace the application is deployed to
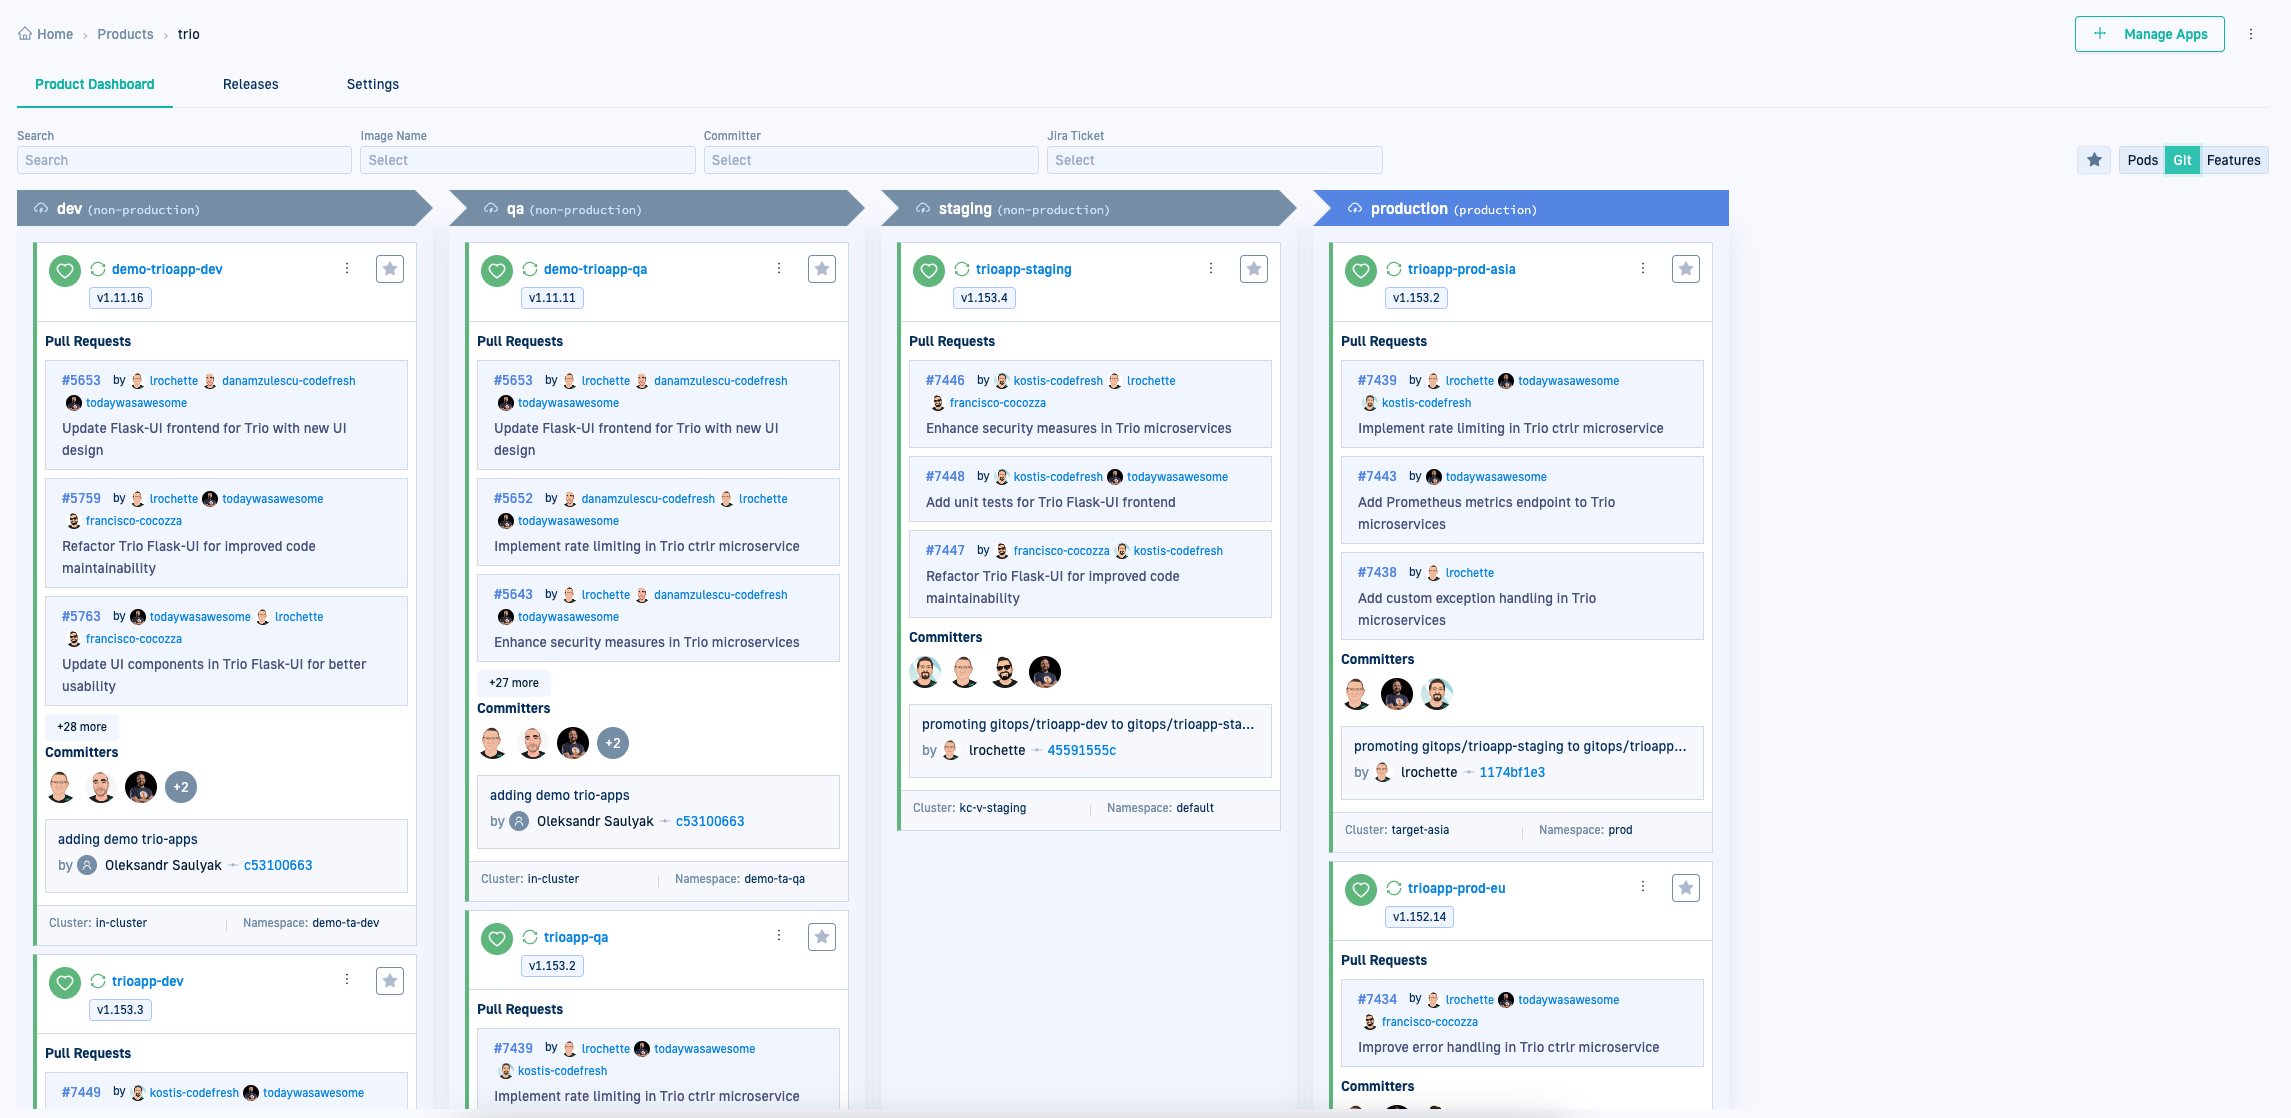
Git
Codefresh retrieves the data here directly from the application repository, not the GitOps repository. You can trace the complete commit history of the application’s repo, up to the commit that initiated the build and deployed the new version.
History of individual commits with deep links to source control.
Useful for project managers and developers to trace:
- PR (pull request) history
- Committer and commit information
- Promotion
- Cluster and Namespace the application is deployed to
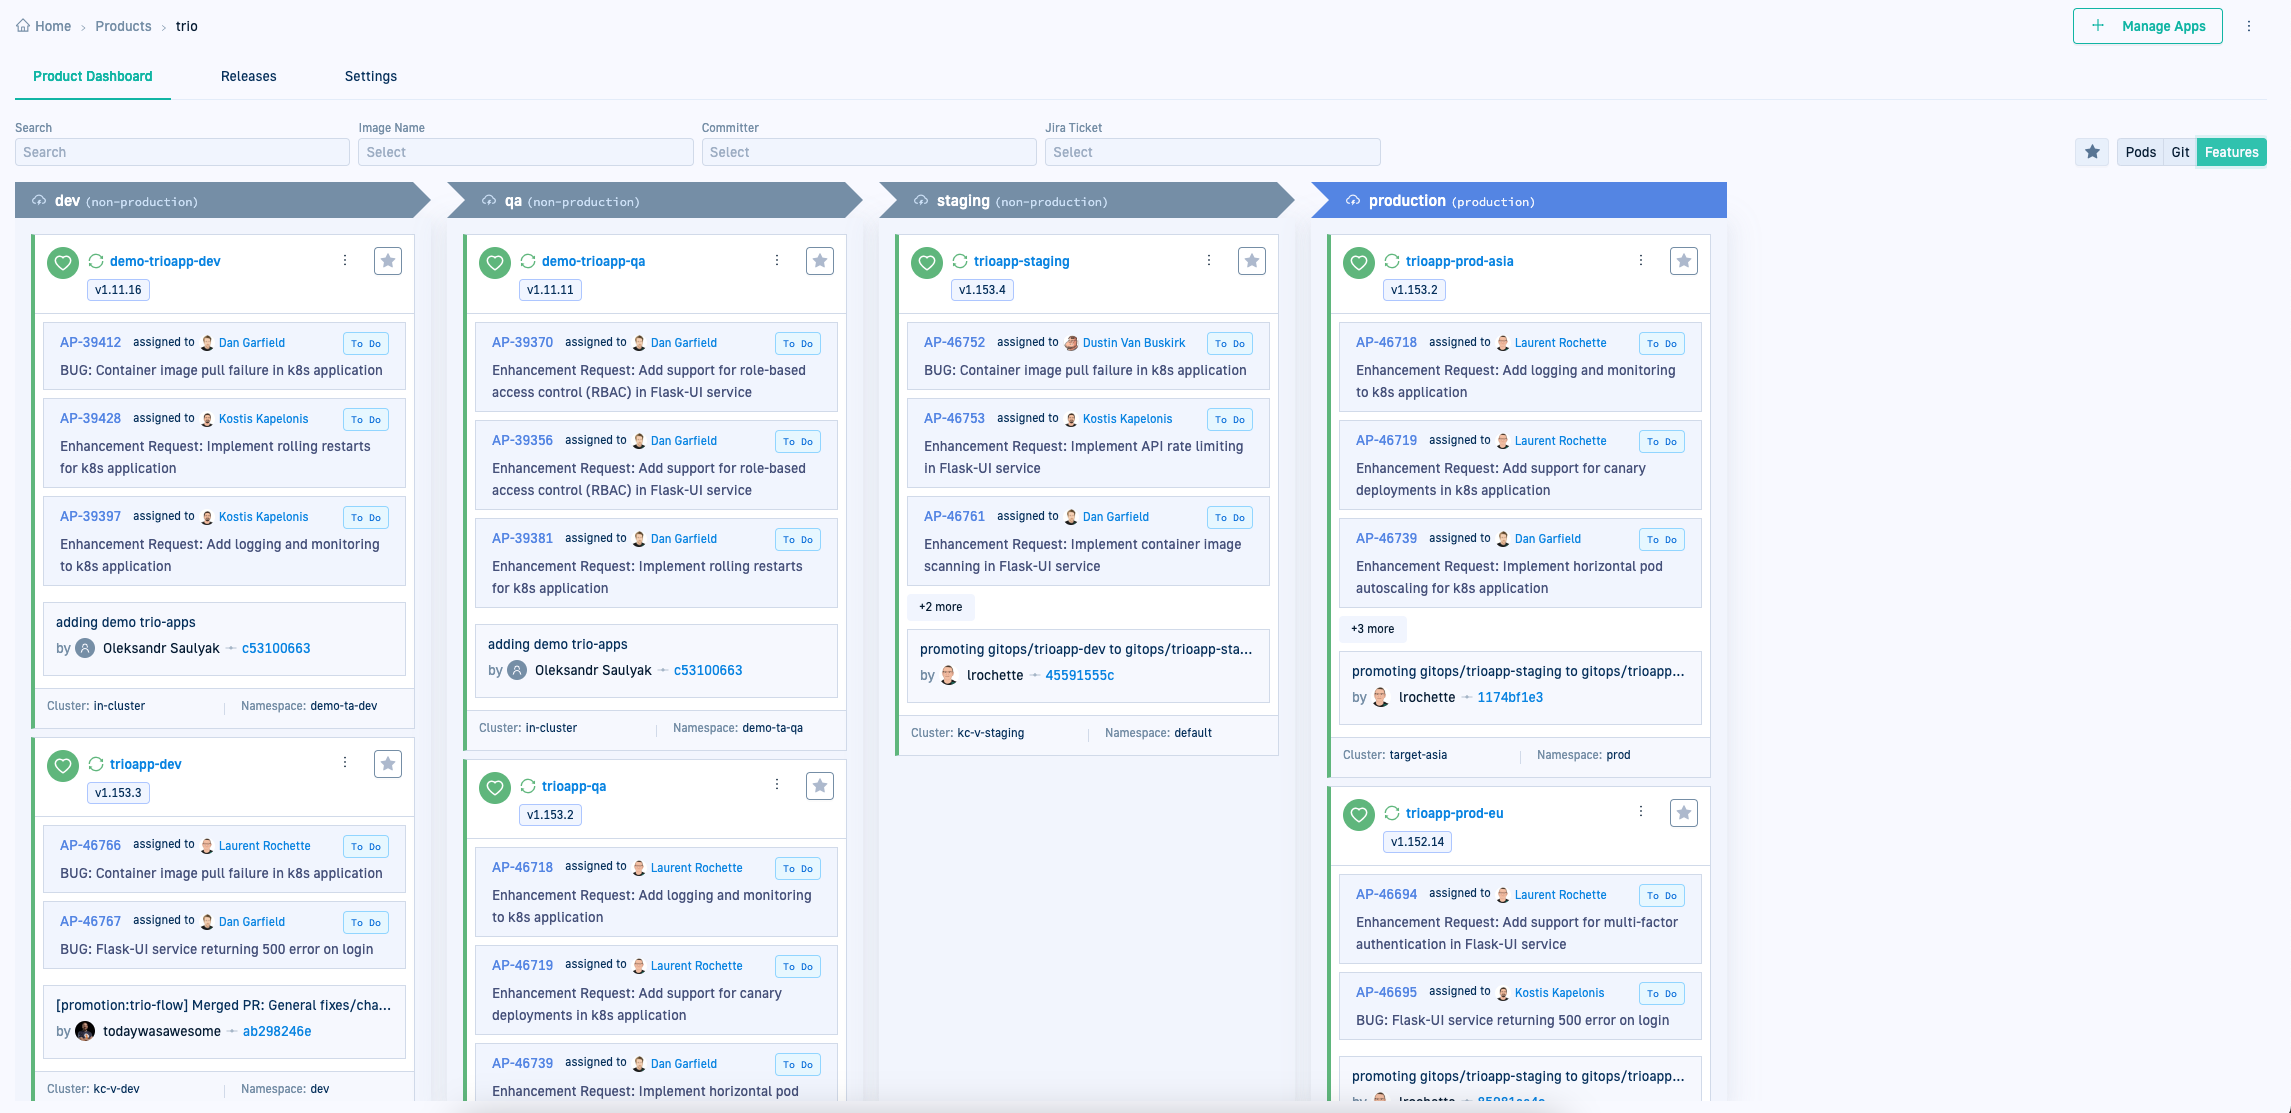
Features
Connect commits to the application repo to tickets in your issue-tracking tool or system. This integration enhances traceability and context, enabling you to monitor the deployment’s impact by tying deployed features to specific feature requests or bug fixes.
- Gain insights into deployment specifics
- Review all commits leading up to the latest one that triggered the deployment
- Align deployed features with related feature requests
View deployment (Timeline) history for applications
Review the deployments for a specific application in the Products dashboard.
- In the Codefresh UI, from the sidebar, select Products.
- In the Environment column with the product you require, click the context menu and then select Application info > Timeline to view deployment history.
- To view all the application’s tabs, including the Current State, Configuration, and others, click the link to Full View at the top.
Manage applications in Products
Manage applications grouped within a Product through each application’s context menu, that includes manual sync, refresh, and other options.
- In the Codefresh UI, from the sidebar, select Products.
- Select the Product with the application for which to take action.
- Click the context menu to the right of the application, and select the option:
- Quick View: View deployment, definition, and event information for the selected application in the same location.
- Diff View: Analyze out of sync applications. This option is disabled when applications are synced.
- Synchronize: Manually synchronize the application to expedite Git-to-cluster sync.
- Refresh/Hard Refresh: As an alternative to manually syncing an application, either sync the application with the desired state in Git (refresh), or sync the application with the desired state Git while removing the cache (hard refresh).
- Edit: Update General or Advanced configuration settings for the application.
- Delete: Delete the application from Codefresh.
Troubleshooting Products
Here are a few tips to troubleshoot issues you may encounter
Applications not displayed for Product
You have created the Product but not assigned or connected any applications to it.
You must assign every application to the Product, either directly in the Products dashboard or through an annotation in the application’s manifest.
See Assigning applications to Products.
Applications assigned to Products not displayed
Issue
Applications assigned to a Product are not displayed in the Products dashboard.
Possible cause
One of the following:
- No Environments created
- Application does not exist in the clusters-namespaces mapped to existing Environments.
Possible solution
Applications assigned to Products are only relevant in the context of the Environments they are defined in. Either create an Environment or add the cluster-namespace defined for the application to the existing Environment’s definition.
Step 1: Create an Environment
- If required, Create an Environment.
Step 2: Add application’s destination settings to Environment definition
- In the Codefresh UI, from the Ops in the sidebar, select Environments.
In the example below, there are two Environments defined:test
andprod
. There are no applications in thetest
Environment.
- Mouse over the toolbar for the Environment and click .
- Check the Clusters and Namespaces mapped to the Environment.
In the example, the namespacedev
is mapped to this Environment.
- Add the namespace defined for the application to the Environment settings.
- Go back to the Products dashboard.
You will now see your application in the Product and in the correct Environment.
Related articles
GitOps Environments dashboard
Monitoring Argo CD applications
Home dashboard
DORA metrics
Creating Argo CD applications