Cron (timer) triggers
Run pipelines on a time schedule
Cron triggers offer a way to run Codefresh pipelines based on a specific time schedule. Cron triggers are particularly useful for tasks like regular maintenance, periodic checks, or any repetitive workflows.
Integrate additional settings in the Cron trigger such as simulating a Git event to enrich pipelines with repository details, adding/customizing environment variables, and caching, volume reuse, and notification configurations for the build.
By integrating these additional options, Cron triggers can initiate pipeline executions at the predefined time intervals and at the same time populate the pipeline with repo and branch information from the Git trigger, required environment variables, and specialized behavior, for the build.
Create and manage Cron triggers for pipelines through Codefresh UI, as described in this article.
For the specifications, see Cron trigger specifications in pipelines.
NOTE
Cron triggers are created in the UTC timezone.
Legacy Cron triggers in Codefresh
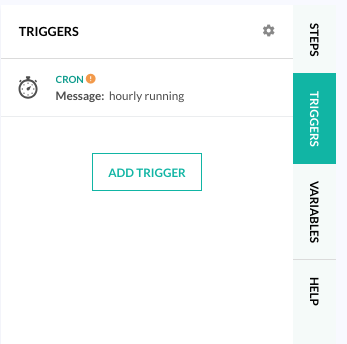
If you see Cron triggers for your pipeline tagged with ![]() tag, it indicates that you are using the legacy version.
tag, it indicates that you are using the legacy version.
Migrate legacy trigger
- Click the Edit icon to view the trigger.
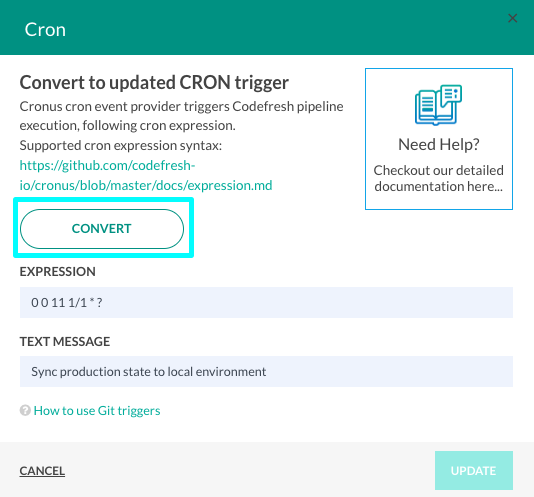
- To migrate, click Convert.
Codefresh migrates the legacy Cron trigger and displays a Trigger updated successfully message.
- Open the trigger displays the Settings tab with additional options.
Cron triggers in Codefresh UI
Create and manage Cron triggers for pipelines in the Codefresh UI.
There are two parts to creating a Cron trigger in the UI:
- Defining the schedule for the trigger
To learn about supportedcronexpression formats and aliases, see Cron expression formats in this article. - (Optional) Selecting additional options:
- Git trigger event to simulate when the Cron trigger timer is activated. The pipeline is populated with the information from the Git repo such as the repo URL, branch name, latest commit information, including the date and author of the commit.
- Variables to populate for the build
- Caching, volume reuse and notification behavior to override for the build
How to: Create a Cron trigger in UI
Before you begin
Review:
How to
- In the Codefresh UI, from the sidebar, select Pipelines.
- Select the pipeline to which to add the trigger, and then click the Workflow tab.
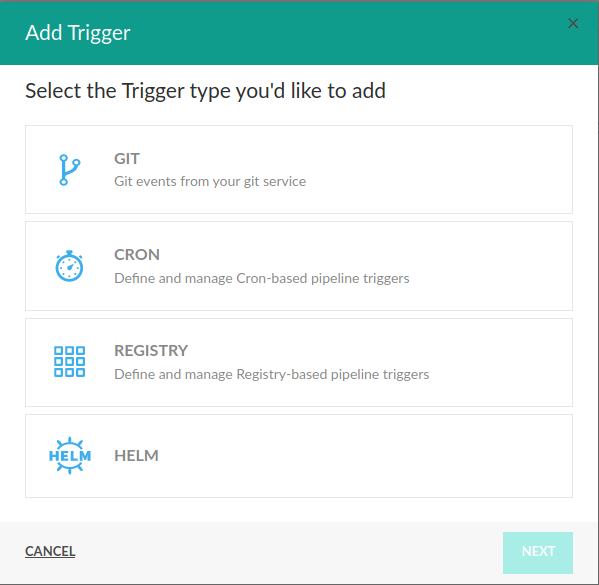
- On the right, click Triggers, and then click Add Trigger.
- Click Cron, click Next.
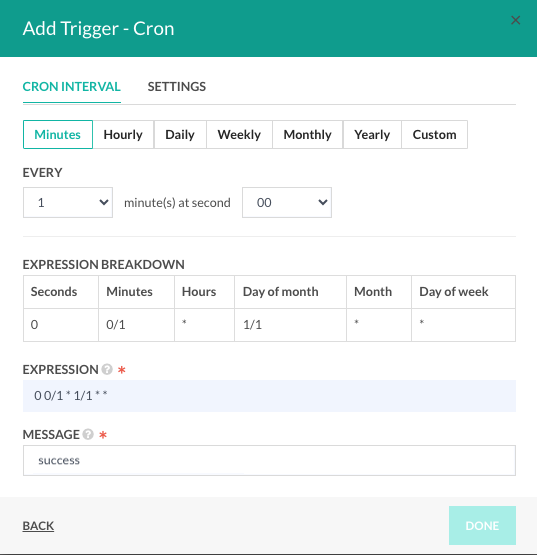
- In the Cron Interval tab, configure the schedule for the Cron trigger:
- Select the time interval and the frequency at which to run the pipeline.
- Use the info in the Expression Breakdown table to create a valid Cron Expression, or write a custom expression.
- Add a free-text message to be sent as an additional event payload every time the Cron is executed.
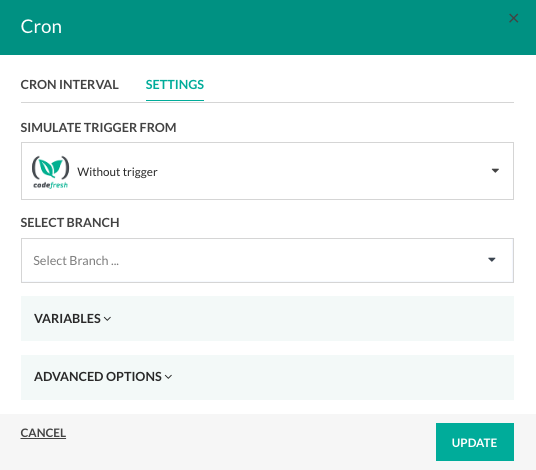
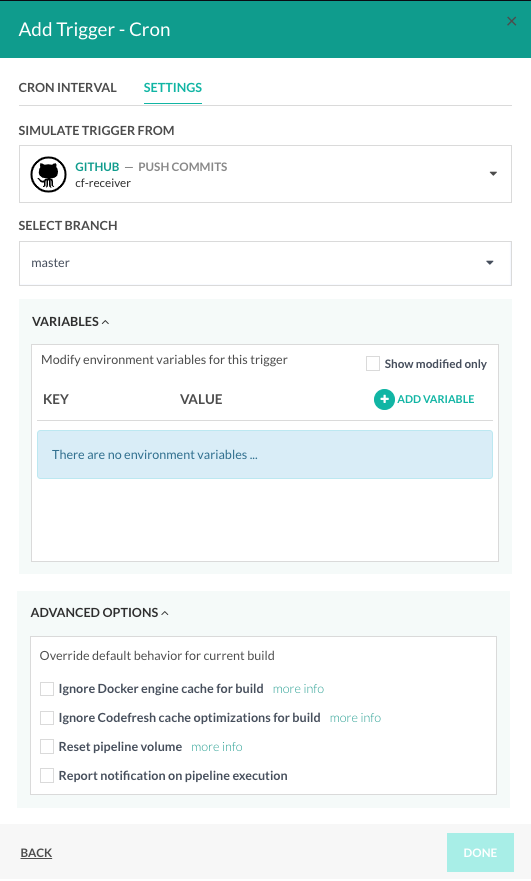
- Click Settings.
- Define the Git trigger simulation options:
- From the Simulate Trigger From drop-down list, select the type of Git trigger to simulate.
The list displays all the Git triggers defined for the pipeline. - From the Select Branch drop-down list, select the branch of the repository for this build.
- From the Simulate Trigger From drop-down list, select the type of Git trigger to simulate.
- Expand Variables, and add or modify environment variables for this build.
- Expand Advanced Options and select the overrides for this build. See Advanced options.
- To confirm click Done.
- If you defined only the Timer settings, the build is triggered according to the Cron expression.
- If you defined both the Timer and additional Settings, the build is triggered according to the Cron expression, and depending on the settings, the pipeline is populated with the information from the Git repo, additional variables, and notifications when configured.
TIP
To edit a Cron trigger after creating it, click the Edit icon.
Cron expression formats
A Cron expression represents a set of time fields through five space-separated fields. You can also use predefined schedules or fixed interval scheduling in place of Cron expressions.
Cron expression fields
The table below describes the fields you can define in a Cron expression.
| Field | Mandatory | Allowed values | Allowed special characters |
|---|---|---|---|
| Seconds | No | 0-59 | * / , - |
| Minutes | Yes | 0-59 | * / , - |
| Hours | Yes | 0-23 | * / , - |
| Day of month | Yes | 1-31 | * / , - ? |
| Month | Yes | 1-12 or JAN-DEC | * / , - |
| Day of week | Yes | 0-6 or SUN-SAT | * / , - ? |
Special characters in Cron expressions
The table below describes the purpose of the special characters in a Cron expression.
| Special Character | Description |
|---|---|
Asterisk (*) |
Indicates that the Cron expression will match for all values of the field. Using an asterisk in the 5th field (month), would indicate every month. |
Slash (/) |
Slashes are used to describe increments of ranges. For example 3-59/15 in the 1st field (minutes) would indicate the 3rd minute of the hour and every 15 minutes thereafter. The form *\/... is equivalent to the form first-last/..., that is, an increment over the largest possible range of the field. The form N/... is accepted as meaning N-MAX/..., that is, starting at N, use the increment until the end of that specific range. It does not wrap around. |
Comma (,) |
Commas are used to separate items of a list. For example, using MON,WED,FRI in the 5th field (day of week) would mean Mondays, Wednesdays and Fridays. |
Hyphen (-) |
Hyphens are used to define ranges. For example, 9-17 would indicate every hour between 9am and 5pm inclusive. |
Question mark (?) |
Question marks can be used instead of asterisks (*) for leaving either day-of-month or day-of-week blank. |
Predefined scheduling for Cron jobs
You can use one of several predefined schedules instead of a Cron expression. The table below describes the predefined schedules supported.
| Predefined schedule | Description | Equivalent to |
|---|---|---|
| @yearly (or @annually) | Run once a year, midnight, Jan. 1st | 0 0 0 1 1 * |
| @monthly | Run once a month, midnight, first of month | 0 0 0 1 * * |
| @weekly | Run once a week, midnight on Sunday | 0 0 0 * * 0 |
| @daily (or @midnight) | Run once a day, midnight | 0 0 0 * * * |
| @hourly | Run once an hour, beginning of hour | 0 0 * * * * |
Fixed interval scheduling for Cron jobs
You can also schedule a job to execute at fixed intervals by adding @every <interval>. The
For example, @every 1h30m10s would indicate a schedule that triggers every 1 hour, 30 minutes, 10 seconds.
NOTE
The interval does not take the runtime of the job into account. For example, if a job takes three minutes to run, and it is scheduled to run every five minutes, it will have only two minutes of idle time between each run.
Conditional triggers for Cron jobs
Take a look at our Knowledge Base how-to: Skip pipeline step if triggered by Cron job.
Cron triggers with Codefresh CLI
NOTE
This section is relevant only for legacy Cron triggers and will be deprecated.
You can also create and manage Cron triggers for pipelines via the Codefresh CLI.
Create Cron trigger event via CLI
Create a new cron trigger by defining a Cron expression and message.
To learn about supported cron expression formats and aliases, see Cron expression formats in this article.
The text message is passed to linked pipelines, whenever the specified cron timer is triggered.
# create recurring event 'once in 20 minutes'
codefresh create trigger-event --type cron --kind codefresh --value expression="0 */20 * * * *" --value message="hello-once-in-20-min"

# on success trigger-event UID will be printed out
Trigger event: "cron:codefresh:codefresh:0 */20 * * * *:hello-once-in-20-min:107e9db97062" was successfully created.
Set up pipeline trigger
Now, lets create a new pipeline trigger, linking previously defined cron trigger-event to one or more Codefresh pipelines.
# create trigger, linking trigger-event UID to the pipeline UID
codefresh create trigger "cron:codefresh:codefresh:0 */20 * * * *:hello-once-in-20-min:107e9db97062" 7a5622e4b1ad5ba0018a3c9c

# create another trigger, linking the same trigger-event to another pipeline
codefresh create trigger "cron:codefresh:codefresh:0 */20 * * * *:hello-once-in-20-min:107e9db97062" 4a5634e4b2cd6baf021a3c0a
From now on, Codefresh will trigger a pipeline execution for two pipelines linked to the previously specified cron trigger-event, every 20 minutes (once in 20 minutes).
Cron event payload
The following variables are available to any Codefresh pipeline linked to a Cron trigger event:
EVENT_MESSAGE: Free-text message (specified during creation)EVENT_TIMESTAMP: Event timestamp in RFC 3339 format
Related articles
Triggers in pipelines
Cron trigger specifications
Variables in pipelines
Creating pipelines
