Kubernetes pipeline integration
How Codefresh supports Kubernetes clusters
Codefresh is one of the few CI/CD solutions that has native support for Kubernetes clusters, not only for deploying applications to Kubernetes, but also for running pipelines on Kubernetes.
Codefresh has native support for Kubernetes in the following areas:
- Connecting a cluster globally
- Viewing the cluster status
- Viewing the environment dashboard
- Deploying to a cluster with the GUI
- Deploying to a cluster with a pipeline
- Running pipelines on a cluster
Codefresh offers its own Kubernetes dashboard that allows you to inspect the services and namespaces in your cluster. To activate this dashboard, you need to connect your cluster to your Codefresh account first.
IMPORTANT
The name assigned to the integration must be unique within the account. Using the same name for other integrations or Shared Configuration contexts within pipelines will result in conflicts.
For troubleshooting, see Error: context already exists.
Connect a Kubernetes cluster
Prerequisites
Codefresh SaaS needs network connectivity to connect to your cluster.
If your cluster is behind a firewall, make sure that you allow access to the required IPs.
For on-premises and hybrid installations with Runner, there is no need to tweak your firewall.
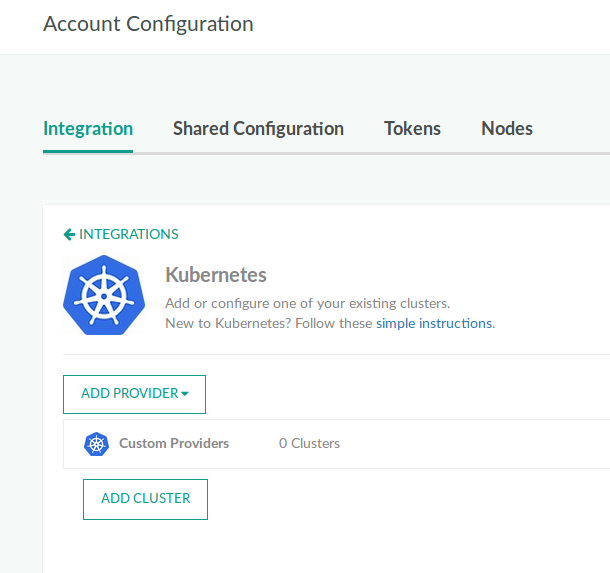
Set up Kubernetes integration
- In the Codefresh UI, on the toolbar, click the Settings icon, and then from the sidebar, select Pipeline Integrations.
- Select Kubernetes and then click Configure.
- From the Add Provider list, select the Kubernetes provider.
Adding a GKE Cluster
Adding a cluster in GKE can be done by clicking the Add cluster button under Google Cloud Provider and selecting the desired project and cluster.
If this is your first time, you’ll be prompted to authenticate using your Google credentials, make sure you’re doing so with a user that have access to your GKE projects.
For GKE cluster versions >=1.19 basic authentication is deprecated. You can add the GKE cluster manually by using the custom Kubernetes integration option instead.
Adding an AKS cluster
To add an Azure cluster, select Azure AKS from the drop-down menu instead of Azure AKS SP. Click the Authenticate button and enter your Azure credentials. You will see a description of all permissions that Codefresh needs in order to access your cluster. Accept them and Codefresh will connect to Azure to get the cluster information.
NOTE
If you experience difficulties at this point try logging into Azure first in your browser before clicking the authenticate button.
Also make sure that you are using an organizational/company Azure account and not a personal one. We are currently working with Microsoft to improve this integration.
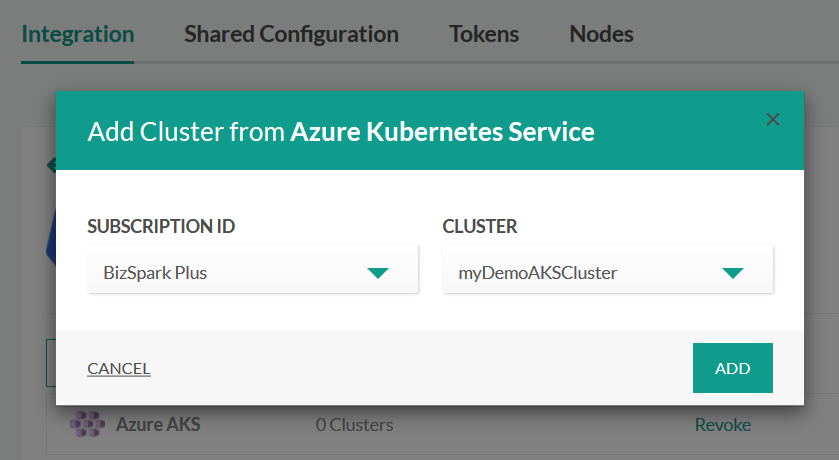
If everything is ready you will see a dialog that allows you to select your Azure subscription and the cluster name that you wish to use.
Codefresh will query the cluster and show its nodes. You are now ready to deploy to Azure kubernetes.
TIP
If you wish for any reason to revoke the granted access from the Azure side, visit https://account.activedirectory.windowsazure.com/r#/applications and remove “Codefresh” from the list.
Adding an AKS cluster with a service principal
An alternative method of adding an Azure cluster is by using a service principal (Azure AKS SP).
Before you begin
How to
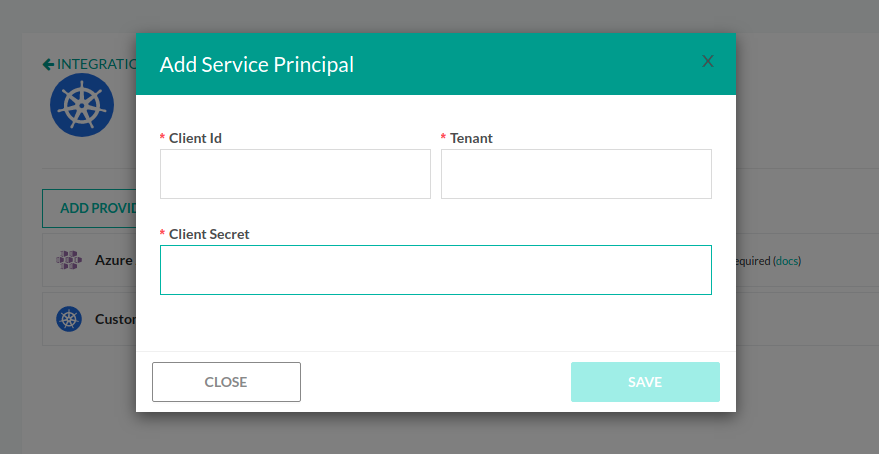
- From the Add Provider list, select the Azure AKS SP.
- Click the arrow on the right, and then click Add Cluster.
- Enter the following:
Client IDTenantClient secret
- Click Authenticate.
Codefresh will query the cluster and show its nodes. You are now ready to deploy to Azure kubernetes.
Adding EKS Cluster
To add an Amazon EKS cluster, you must first obtain kubectl access to it. Follow the instructions for using the
AWS CLI in order to obtain your kubeconfig locally.
aws eks --region region update-kubeconfig --name cluster_name
Once you have access via kubectl, then follow the instructions to obtain all the cluster details.
To add the Amazon cluster, select Amazon AWS from the ADD PROVIDER drop-down menu and enter all details in the respective field in the Codefresh UI.
Adding a DigitalOcean cluster
DigitalOcean also offers a hosted solution for Kubernetes.
To add a DO cluster select DigitalOcean from the Add provider menu in your integration settings. Click the authenticate button and enter your DO account credentials:
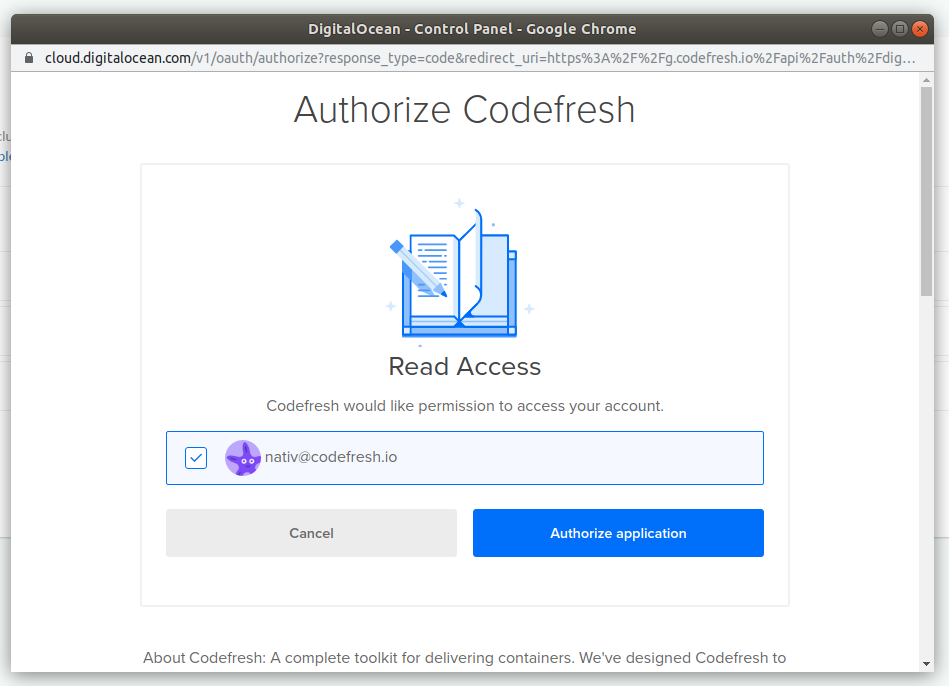
Click on the checkbox next to your account name and select the Authorize application button. Codefresh has now access to your DigitalOcean cluster. You need to authenticate only once.
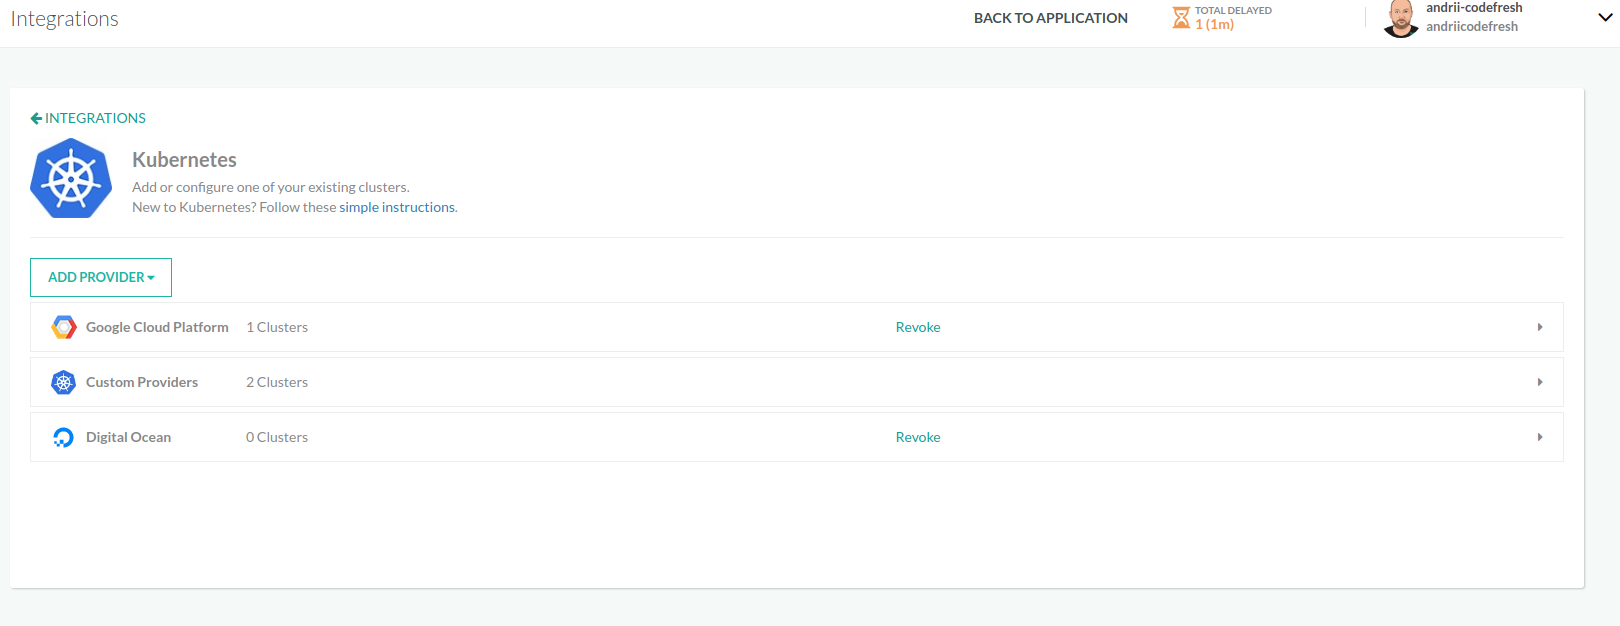
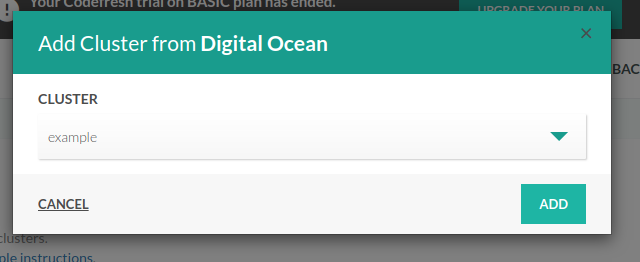
Next, expand the DigitalOcean row from the triangle icon on the right and click on the Add cluster button. The drop-down menu should contain all your DigitalOcean Kubernetes clusters. Select the one that you want to connect into Codefresh and click the Add button.
Your cluster is now connected. You should be able to see it your Kubernetes dashboard, and start deploying to it.
Note that you can also add a DigitalOcean cluster as a generic cluster as well (explained below).
Adding any other cluster type (not dependent on any provider)
- To add any other type of cluster, outside of GKE, from the Add Provider list, select the Custom Providers.
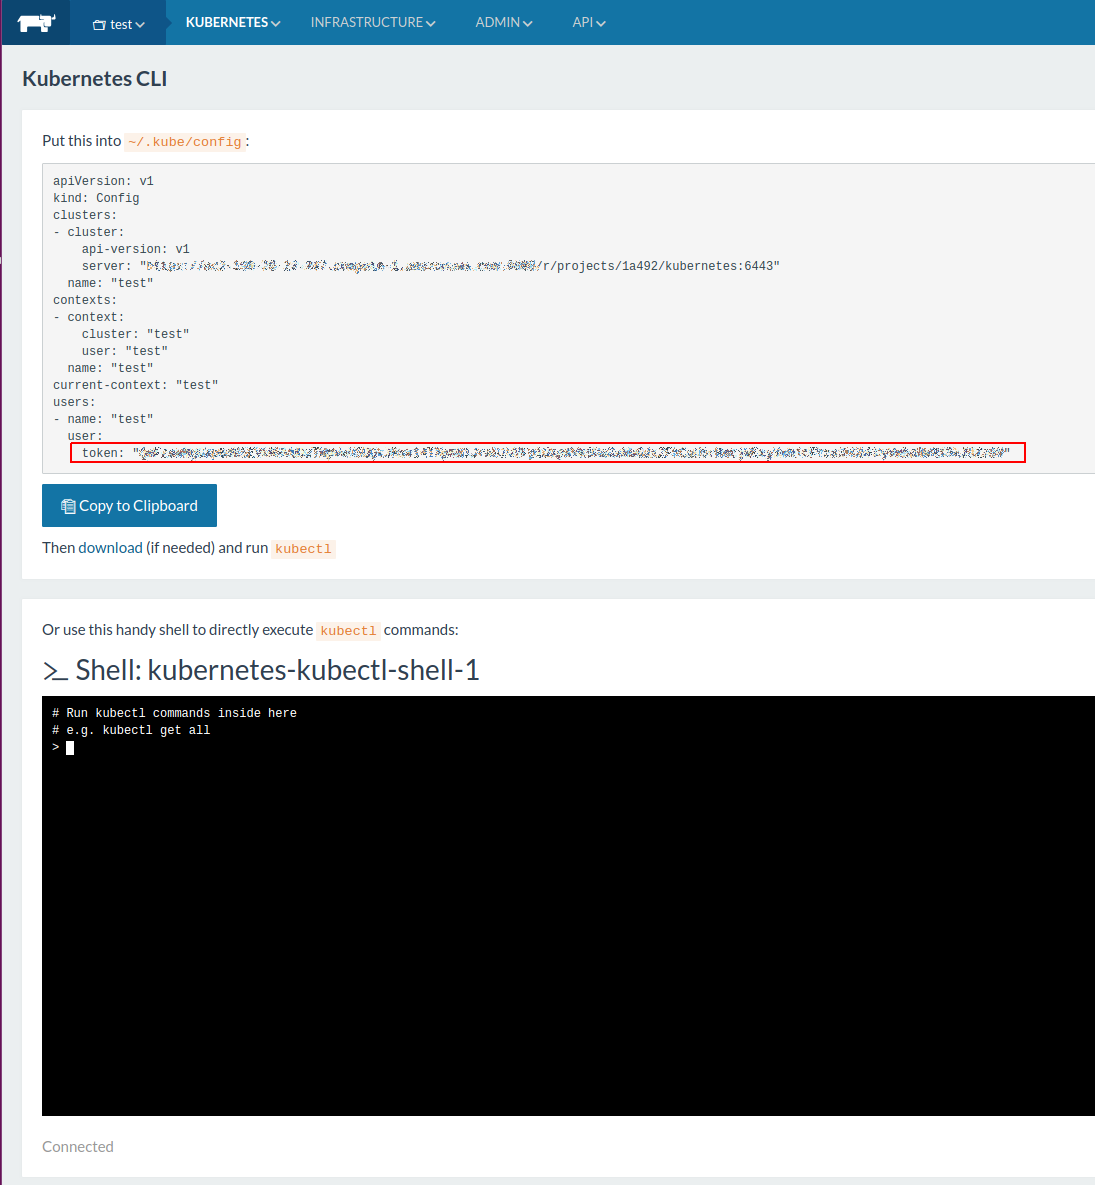
The integration between Codefresh and your Kubernetes cluster is API based, and relies on a Kubernetes service account of your choosing that will be used to manage the integration.
The configurations you’ll be required to add are:
- Name: Any name of your choosing, that will represent your cluster context in Codefresh. Do not use spaces, dots or other strange characters in the name.
- Host: The full URL of the Kubernetes API endpoints including protocol and port.
- Certificate: The Kubernetes service account certificate used for the integration with Codefresh (base64 encoded).
- Token: The Kubernetes service account token used for the integration with Codefresh (base64 encoded)
- (Optional) Namespace: Restrict Codefresh access to a specific namespace
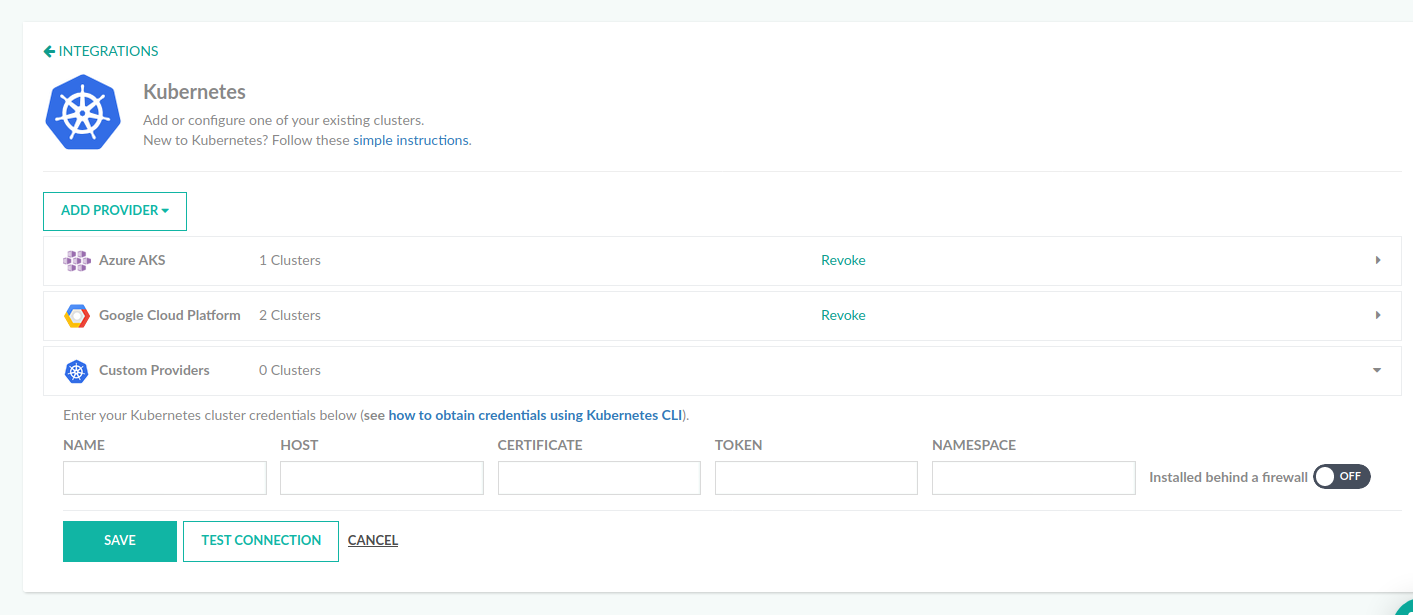
There is also a toggle for private clusters behind a firewall.
In the section below, we’ll provide you with easy instructions how to get all your cluster configurations in order to add it to Codefresh.
Get cluster configuration manually
Codefresh accesses any custom cluster using a service account. You can define the privileges Codefresh has on your cluster using the standard authorization methods (i.e. RBAC) supported by your Kubernetes infrastructure.
You need a terminal with kubectl access on your cluster. You can even use the “cloud shell” of your
cloud provider for this purpose.
The easy and insecure way
If you are evaluating Codefresh and want to connect your cluster as fast as possible with no issues follow these steps:
NOTE
This method is only suggested for non-production clusters, and quick demos. See the next section for the proper way to use Codefresh in production environments.
First make sure that you are giving commands to the appropriate cluster if you have more than one:
Choose cluster
kubectl config use-context <my-cluster-name>Then give full admin privileges to the default account.
Make default account cluster administrator
kubectl create clusterrolebinding default-admin --clusterrole cluster-admin --serviceaccount=default:default -n defaultFinally run the following commands and copy-paste the result to each Codefresh field in the UI:
Host IP
export CURRENT_CONTEXT=$(kubectl config current-context) && export CURRENT_CLUSTER=$(kubectl config view -o go-template="{{\$curr_context := \"$CURRENT_CONTEXT\" }}{{range .contexts}}{{if eq .name \$curr_context}}{{.context.cluster}}{{end}}{{end}}") && echo $(kubectl config view -o go-template="{{\$cluster_context := \"$CURRENT_CLUSTER\"}}{{range .clusters}}{{if eq .name \$cluster_context}}{{.cluster.server}}{{end}}{{end}}")Certificate
echo $(kubectl get secret -o go-template='{{index .data "ca.crt" }}' $(kubectl get sa default -o go-template="{{range .secrets}}{{.name}}{{end}}"))Token
echo $(kubectl get secret -o go-template='{{index .data "token" }}' $(kubectl get sa default -o go-template="{{range .secrets}}{{.name}}{{end}}"))Once the cluster been added successfully you can go to the Kubernetes tab to start working with the services of your cluster.
The proper/secure way for Kubernetes Cluster 1.24+
For production environments, create a service account and/or role for Codefresh access.
Codefresh needs these minimum permissions to work with the cluster:
codefresh-role.yml
kind: ClusterRole
apiVersion: rbac.authorization.k8s.io/v1
metadata:
  name: codefresh-role
rules:
  - apiGroups: [""]
    resources: ["*"]
    verbs: ["list", "watch", "get"]
Note that these permissions will only allow Codefresh to read the cluster resources and populate the respective dashboards. You need to give more privileges for actual deployments. For more information see the Kubernetes RBAC documentation page.
Here is an example with role + service account + binding.
codefresh-role-sa-bind.yml
kind: ClusterRole
apiVersion: rbac.authorization.k8s.io/v1
metadata:
  name: codefresh-role
rules:
  - apiGroups: [ "*"]
    resources: ["*"]
    verbs: ["get", "list", "watch", "create", "update", "patch", "delete"]
---
apiVersion: v1
kind: ServiceAccount
metadata:
  name: codefresh-user
  namespace: kube-system
---
apiVersion: rbac.authorization.k8s.io/v1
kind: ClusterRoleBinding
metadata:
  name: codefresh-user
roleRef:
  apiGroup: rbac.authorization.k8s.io
  kind: ClusterRole
  name: codefresh-role
subjects:
- kind: ServiceAccount
  name: codefresh-user
  namespace: kube-system
---
apiVersion: v1
kind: Secret
type: kubernetes.io/service-account-token
metadata:
  name: codefresh-user-token
  namespace: kube-system
  annotations:
kubernetes.io/service-account.name: "codefresh-user"- Select the appropriate cluster if you have more than one:
Choose cluster
kubectl config use-context <my-cluster-name>- Create the Codefresh user/role:
Apply Codefresh access rules
kubectl apply -f codefresh-role-sa-bind.yml- Finally run the following commands, and copy-paste the results to the respective Codefresh field in the UI:
Host IP
export CURRENT_CONTEXT=$(kubectl config current-context) && export CURRENT_CLUSTER=$(kubectl config view -o go-template="{{\$curr_context := \"$CURRENT_CONTEXT\" }}{{range .contexts}}{{if eq .name \$curr_context}}{{.context.cluster}}{{end}}{{end}}") && echo $(kubectl config view -o go-template="{{\$cluster_context := \"$CURRENT_CLUSTER\"}}{{range .clusters}}{{if eq .name \$cluster_context}}{{.cluster.server}}{{end}}{{end}}")Certificate
echo $(kubectl get secret -n kube-system -o go-template='{{index .data "ca.crt" }}' codefresh-user-token)Token
echo $(kubectl get secret -n kube-system -o go-template='{{index .data "token" }}' codefresh-user-token)The proper/secure way Kubernetes 1.23 and older
For production environments you should create a service account and/or role for Codefresh access. The minimum permissions Codefresh needs to work with the cluster are the following:
codefresh-role.yml
kind: ClusterRole
apiVersion: rbac.authorization.k8s.io/v1
metadata:
  name: codefresh-role
rules:
  - apiGroups: [""]
    resources: ["*"]
    verbs: ["list", "watch", "get"]
Note that these permissions will only allow Codefresh to read the cluster resources and populate the respective dashboards. You need to give more privileges for actual deployments. For more information see the Kubernetes RBAC documentation page.
Here is an example with role + service account + binding.
codefresh-role-sa-bind.yml
kind: ClusterRole
apiVersion: rbac.authorization.k8s.io/v1
metadata:
  name: codefresh-role
rules:
  - apiGroups: [ "*"]
    resources: ["*"]
    verbs: ["get", "list", "watch", "create", "update", "patch", "delete"]
---
apiVersion: v1
kind: ServiceAccount
metadata:
  name: codefresh-user
  namespace: kube-system
---
apiVersion: rbac.authorization.k8s.io/v1
kind: ClusterRoleBinding
metadata:
  name: codefresh-user
roleRef:
  apiGroup: rbac.authorization.k8s.io
  kind: ClusterRole
  name: codefresh-role
subjects:
- kind: ServiceAccount
  name: codefresh-user
  namespace: kube-system
Select the appropriate cluster if you have more than one:
Choose cluster
kubectl config use-context <my-cluster-name>Create the Codefresh user/role:
Apply Codefresh access rules
kubectl apply -f codefresh-role-sa-bind.ymlFinally run the following commands and copy-paste the result to each Codefresh field in the UI:
Host IP
export CURRENT_CONTEXT=$(kubectl config current-context) && export CURRENT_CLUSTER=$(kubectl config view -o go-template="{{\$curr_context := \"$CURRENT_CONTEXT\" }}{{range .contexts}}{{if eq .name \$curr_context}}{{.context.cluster}}{{end}}{{end}}") && echo $(kubectl config view -o go-template="{{\$cluster_context := \"$CURRENT_CLUSTER\"}}{{range .clusters}}{{if eq .name \$cluster_context}}{{.cluster.server}}{{end}}{{end}}")Certificate
echo $(kubectl get secret -n kube-system -o go-template='{{index .data "ca.crt" }}' $(kubectl get sa codefresh-user -n kube-system -o go-template="{{range .secrets}}{{.name}}{{end}}"))Token
echo $(kubectl get secret -n kube-system -o go-template='{{index .data "token" }}' $(kubectl get sa codefresh-user -n kube-system -o go-template="{{range .secrets}}{{.name}}{{end}}"))Restrict Codefresh access to a specific namespace
In most cases, you want to allow Codefresh to access all namespaces inside the cluster. This is the most convenient option as it will make the services dashboard (and other GUI dashboards) the central way to manage your clusters.
You can also restrict Codefresh only to an specific namespace of your choosing. To achieve this, use the details of service account in the previous section that has access only to that specific namespace, and also fill the namespace field in the cluster details form.

Notice that if you follow this approach several built-in Codefresh capabilities will be disabled (e.g. creating new namespaces from the GUI).
Adding a Rancher cluster
Rancher clusters are currently supported as generic clusters. Rancher clusters have a specific authentication configuration, as described for Rancher 1.x, and Rancher 2.x.
Authentication using a token of a Kubernetes Service Account, which is usually used by Codefresh, doesn’t work with Rancher clusters. Also, Rancher doesn’t do proper TLS termination out-of-the-box for Kubernetes clusters hosted on it, so one needs to configure a load balancer for that purpose.
In summary, the following conditions should be met in order to add the cluster, hosted on Rancher to Codefresh:
For Rancher version 1.x
- The token should be taken from the kubeconfig provided by Rancher and it has to be encoded with base64 before putting it into Codefresh. Be careful with the ‘\n’ characters when encoding. The command for Linux is:
echo <rancher_token> | tr -d '\n' | base64 | tr -d '\n'. - The CA certificate should be the CA of the Load Balancer standing in front of Rancher.
- The hostname and port should be corresponding to your Load Balancer.
For Rancher version 2.x
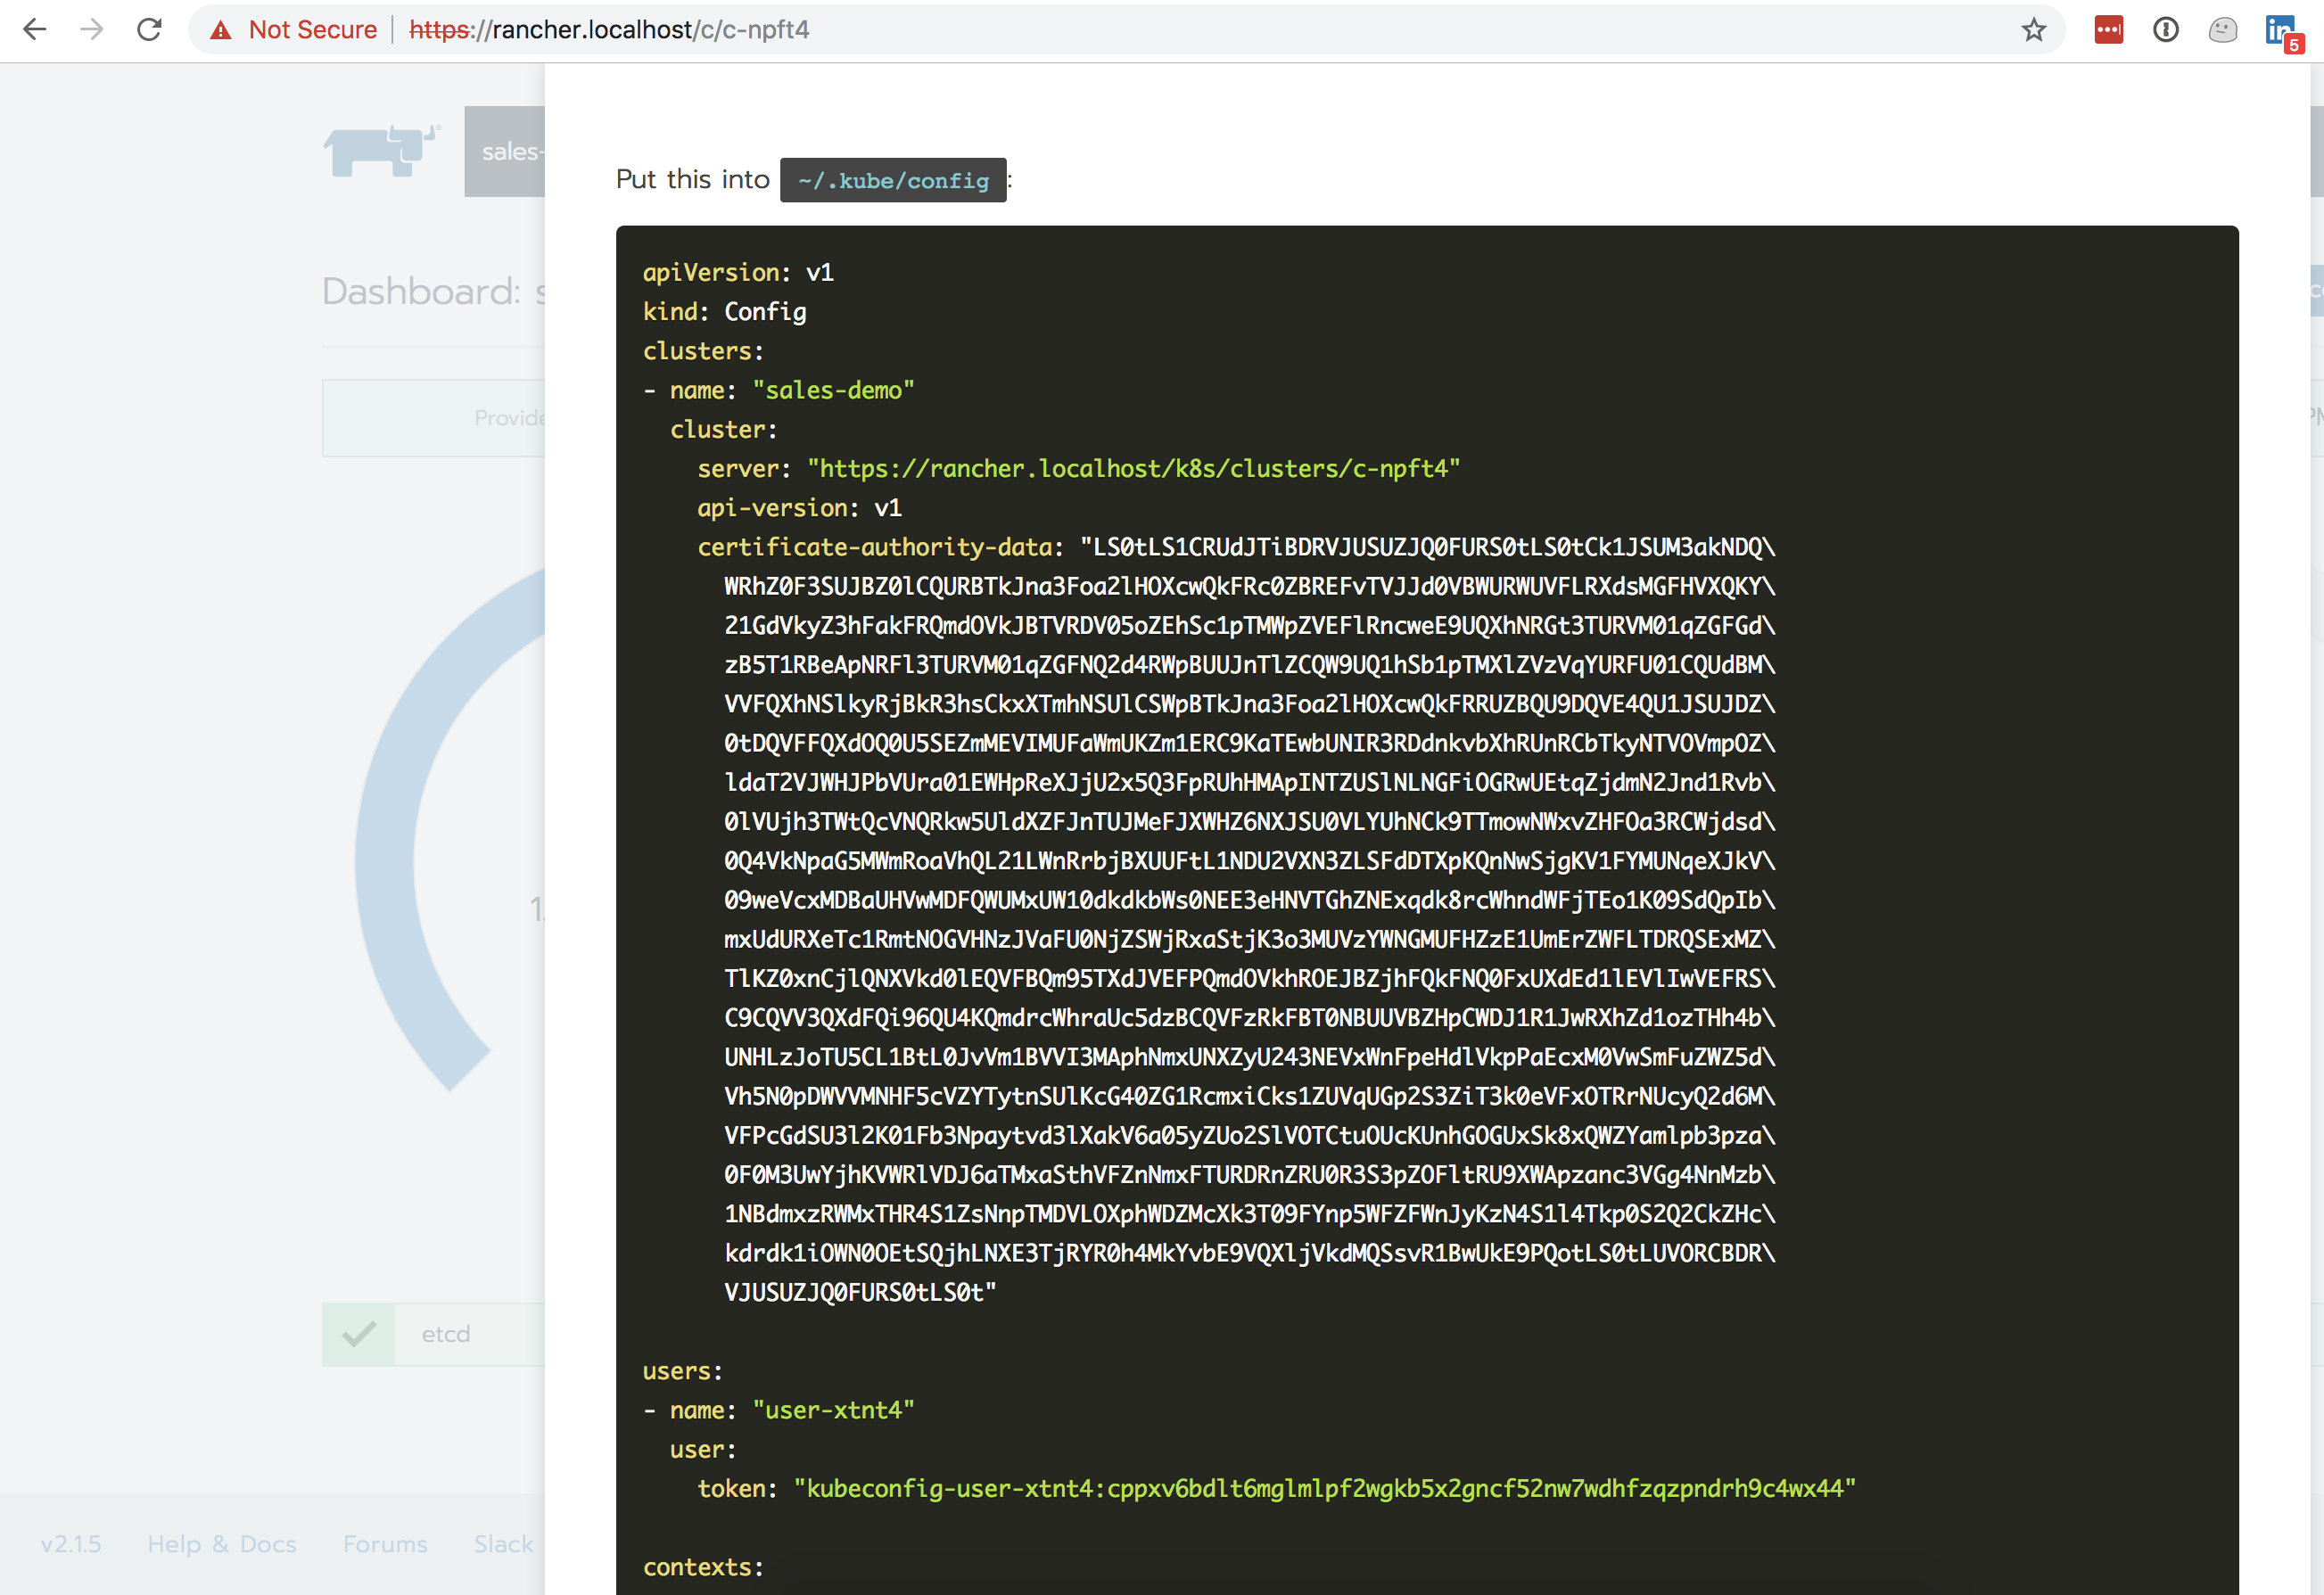
- Kubernetes HOST is in the kubeconfig provided by Rancher for the Kubernetes cluster based on the domain name of Rancher + the Kubernetes cluster endpoint exposed through Rancher in cluster -> server. Example:
https://rancher.localhost/k8s/clusters/c-npft4. - The token should be taken from the kubeconfig provided by Rancher under user -> token section of YAML and it has to be encoded with base64 before putting it into Codefresh. Be careful with the ‘\n’ characters when encoding, do not wrap token in quotes when running echo command. The command for Linux is:
echo <rancher_token> | tr -d '\n' | base64 | tr -d '\n'Example:kubeconfig-user-xtnt4:cppxv6db…. - The CA certificate should be the CA of the Load Balancer standing in front of Rancher base64 encoded
openssl base64 -in cert -out b64. And then run this command on the file to remove any white space.cat b64 | tr -d '\040\011\012\015' > b64_certthen copy and paste this base64 encoded value into Codefresh UI Cert field. - The hostname and port should be corresponding to your Load Balancer.
Once you have all the information follow the instructions for adding a generic Kubernetes cluster in Codefresh as described in the previous section.
Troubleshooting cluster addition
After adding your cluster configurations and in case the test fails, click “Save” to get the error message back.

Error: Cannot list namespaces
Add Cluster Error
Failed to add cluster: namespaces is forbidden: User "system:serviceaccount:default:default" cannot list namespaces at the cluster scopeThe service account used for the integration doesn’t have the minimal permissions required. To fix this add a service account that have the required permissions.
The easiest way to do this is to create a cluster binding role between the default service account and cluster-admin role:
Create cluster binding with admin permissions
kubectl create clusterrolebinding default-admin --clusterrole cluster-admin --serviceaccount=default:defaultKubernetes cluster - using an external reverse proxy (edge case)
If you are using an external reverse proxy to manage inbound traffic to your Kubernetes API, for correct certificate setup, see this article.
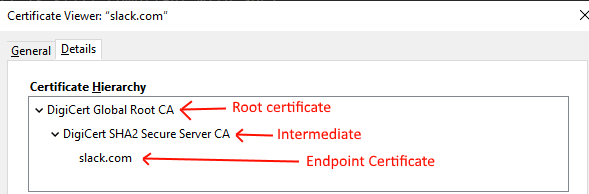
Multiple CAs in certificate chain
Ideally your Kubernetes cluster will have a single certificate which is used directly on the API endpoint. Some organizations place clusters behind a load balancer or other proxy mechanism that uses a chain or certificates.
When that happens and you have more than one CA in your certification chain, you need to provide Codefresh with a Certificate bundle (a file that contains the intermediate CAs as well).
You will know when this is the case as this error will appear when you try to connect your cluster:
{"status":400,"code":"1004","name":"BAD_REQUEST_ERROR","message":"Failed to add cluster: unable to get local issuer certificate","context":{}}
To get the whole certificate open the URL of your Kubernetes in Chrome or Firefox and export all individual certificates as files
The steps needed are:
- Connect all certificates (apart from the API/endpoint one) to a bundle:
cat rootCA.crt intermediateCA.crt > ca_bundle_cert. - Run the following to check the validity of the certificate:
openssl verify -verbose -CAfile ca_bundle_cert k8_server_cert. - If the check above passes fine, go on and run the following on your CA bundle file:
base64 ca_bundle_cert | tr -d '\n'. - Copy the output string (be careful when copying) and check whether you have copied it correctly:
openssl x509 -text -in <(echo <copied_string> | base64 -d)- you should see the contents of your CA bundle file. - Put the copied string into the Codefresh Kubernetes integration form and test the connection.
Please make sure the certs are in order Root -> Intermediate -> Server.
Once you connect a cluster it gets a unique name inside your account that is important when it comes to using this cluster inside a pipeline. From the same screen you can also connect internal clusters that are behind your firewall. .
Viewing the Codefresh cluster dashboard
After you connect a cluster, several graphical dashboards are automatically populated. The first one is the Codefresh Kubernetes dashboard.
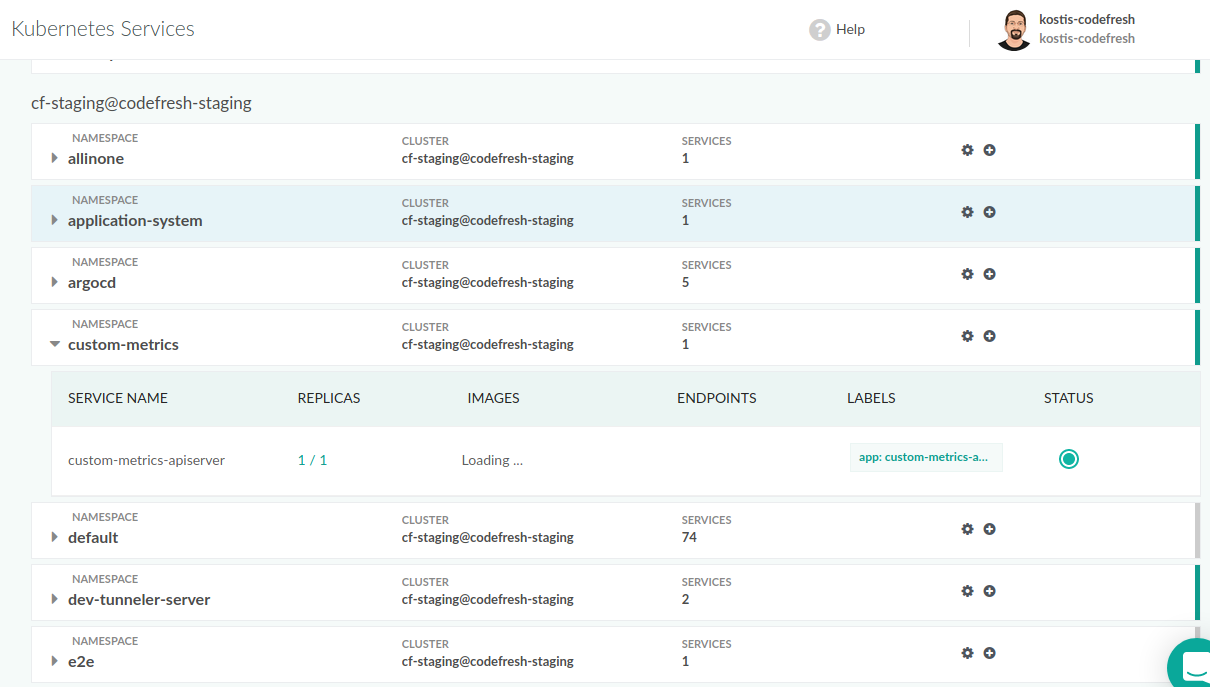
You can use this Dashboard to get basic information for your cluster such as services, pods, deployments etc.
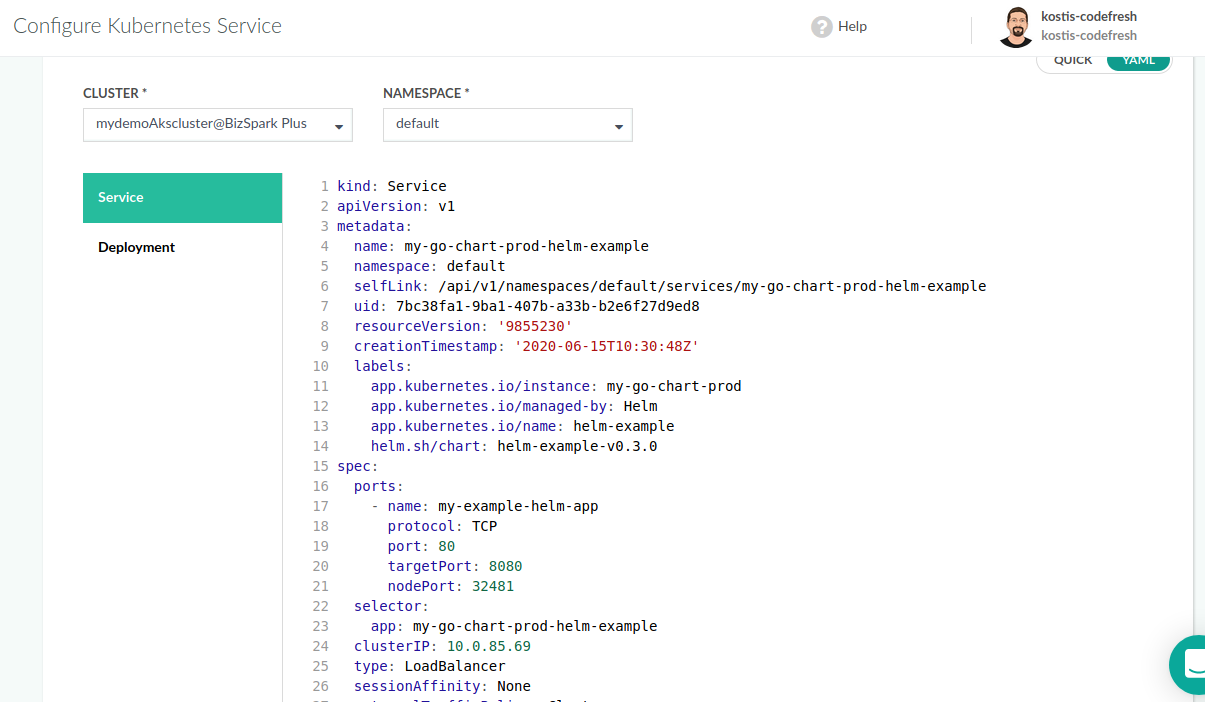
From the same dashboard you can also add/change configmaps and even edit directly the manifest of a resource.
Viewing the environment dashboard
The second dashboard that is enabled after you connect a cluster (but not automatically populated), is the environment dashboard.
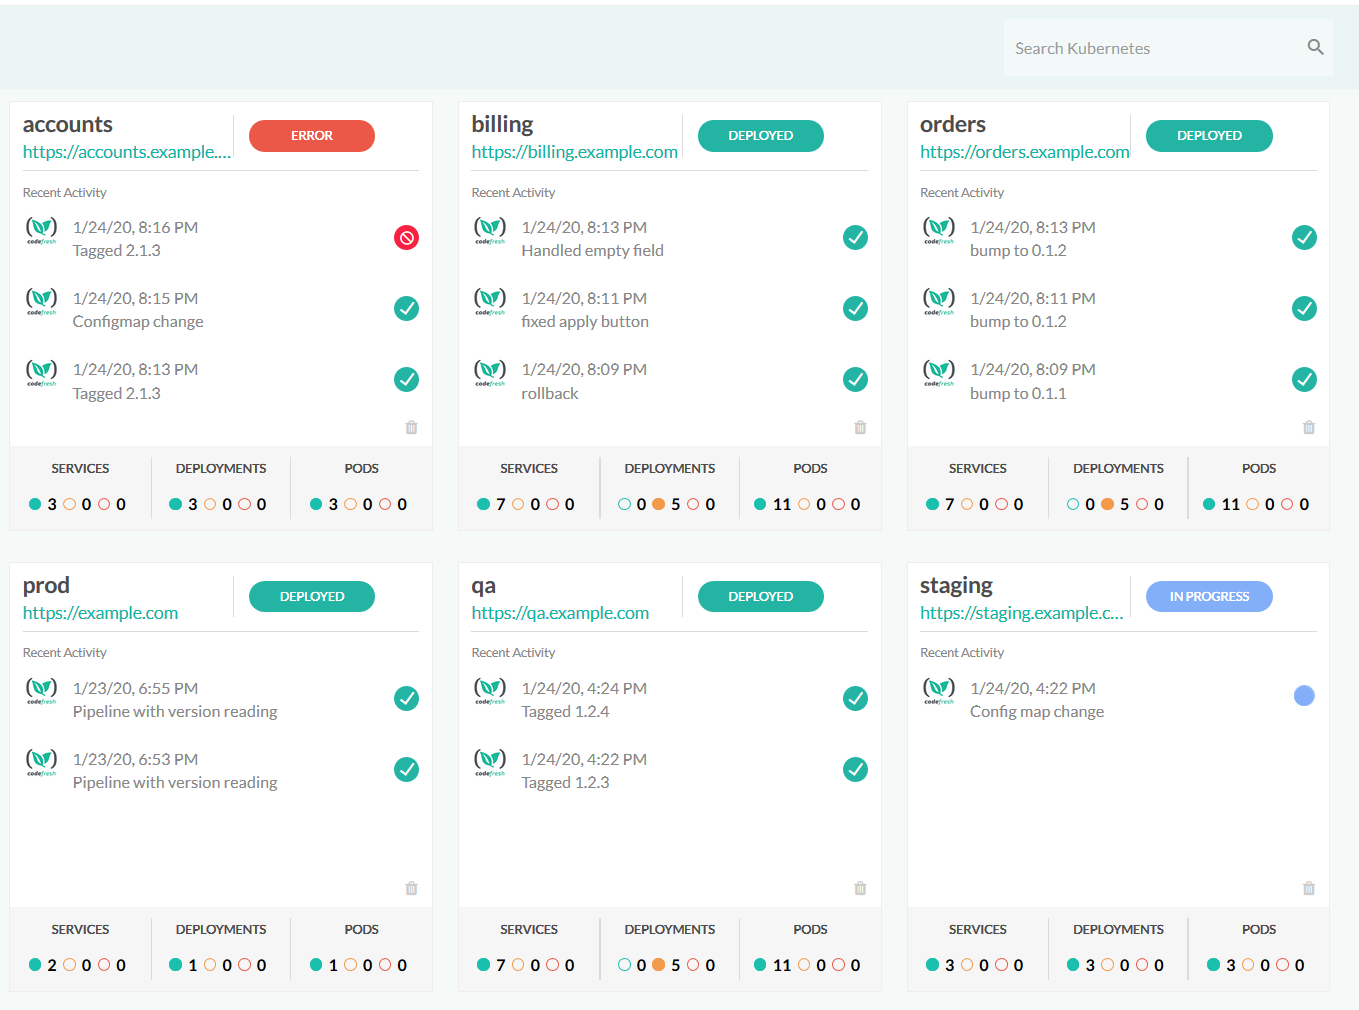
This dashboard shows a live view of a Kubernetes application along with the status of the latest builds that affected this environment. You can define such environments either directly from the GUI or programmatically in a pipeline.
Ad-hoc deployments with the Codefresh UI
One of the easiest ways to deploy to Kubernetes is to use the Codefresh UI and manually deploy a docker image:
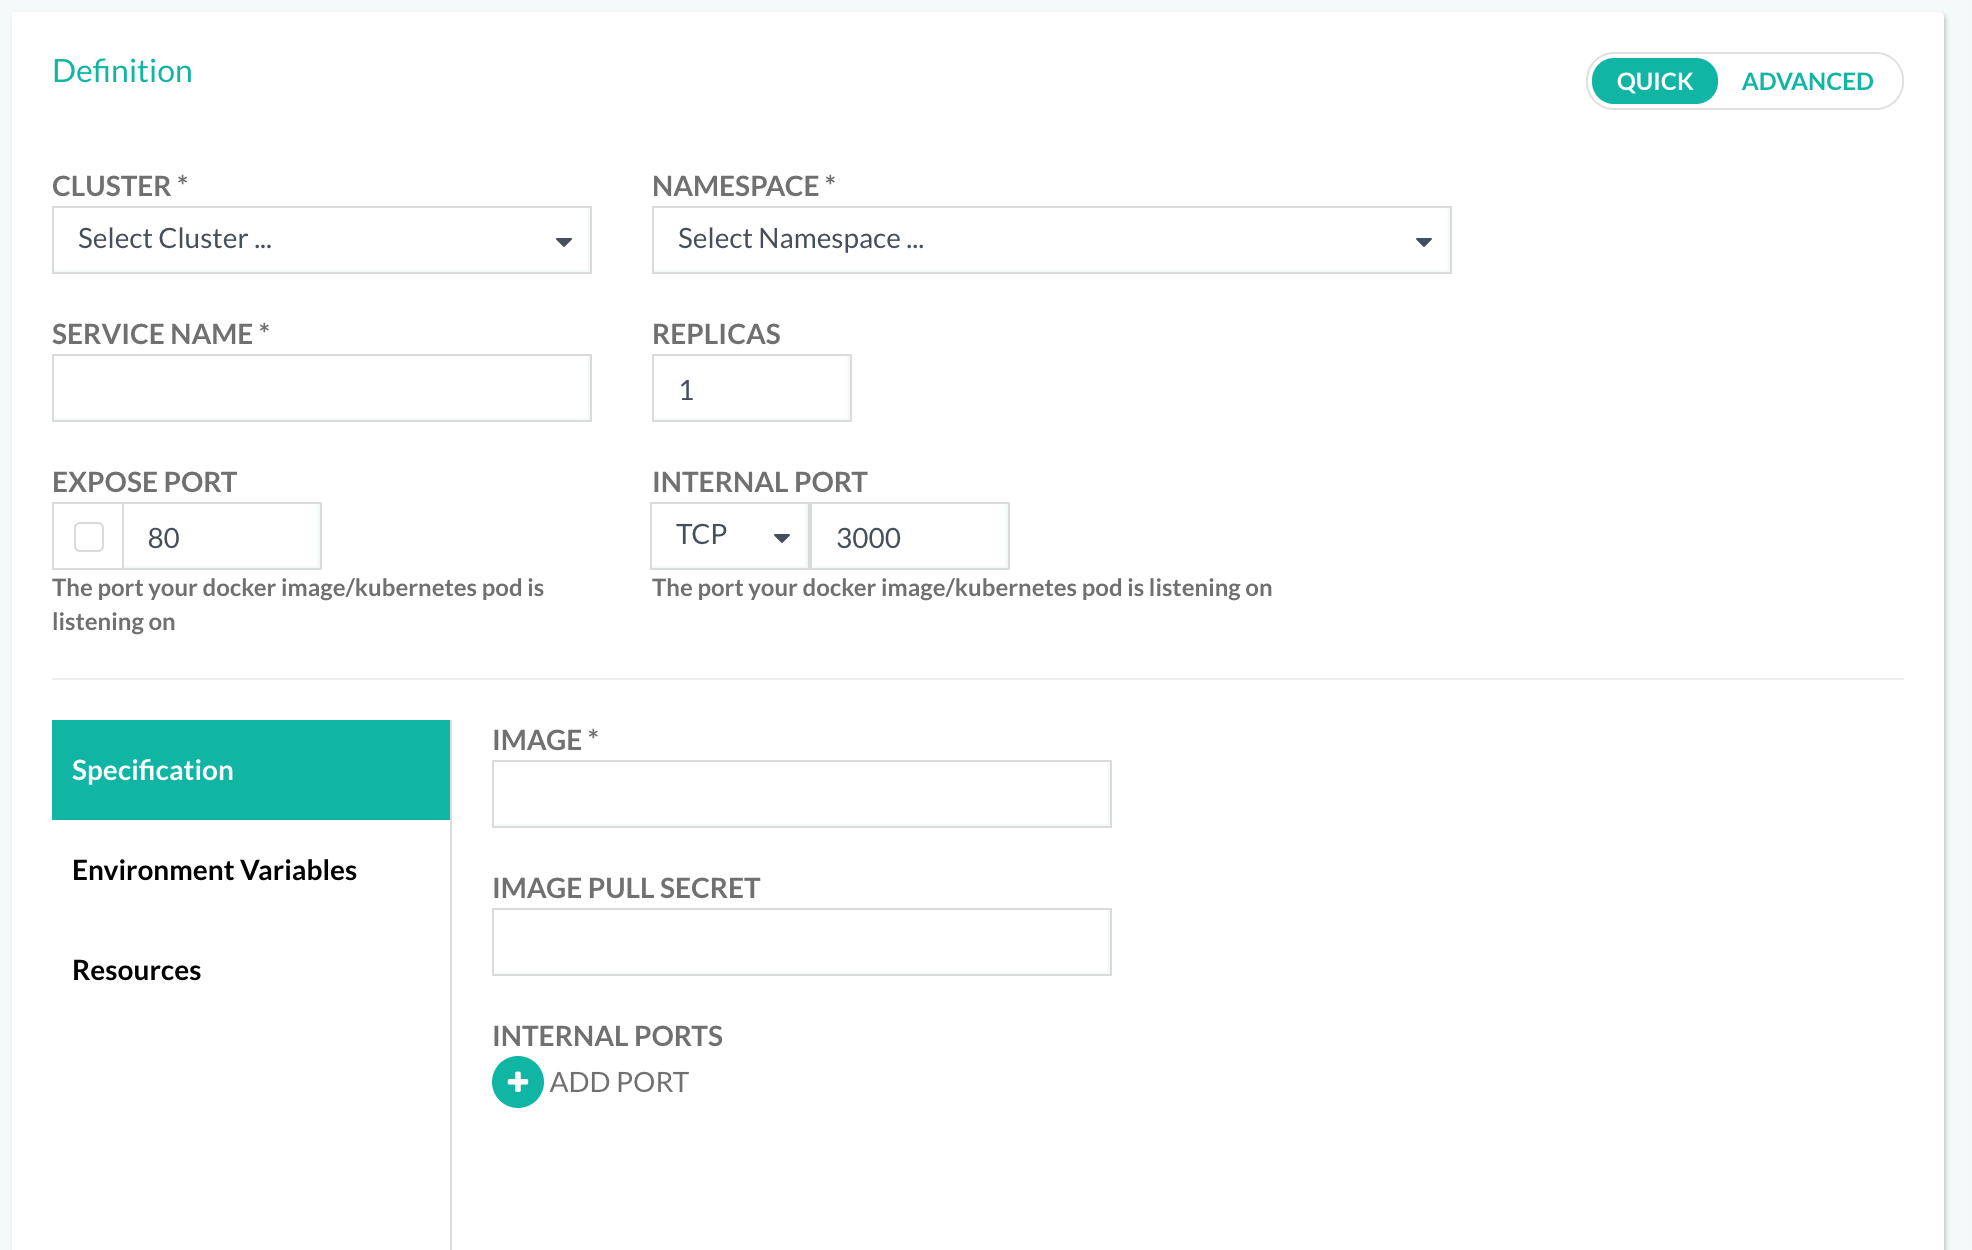
You can also create a pull Secret from the GUI.
Automated deployments with Codefresh pipelines
You can also deploy to a cluster in a pipeline. Codefresh offers several ways for Kubernetes deployments. The important point here is that all connected clusters are automatically available to all pipelines with their unique name as a kubectl context.
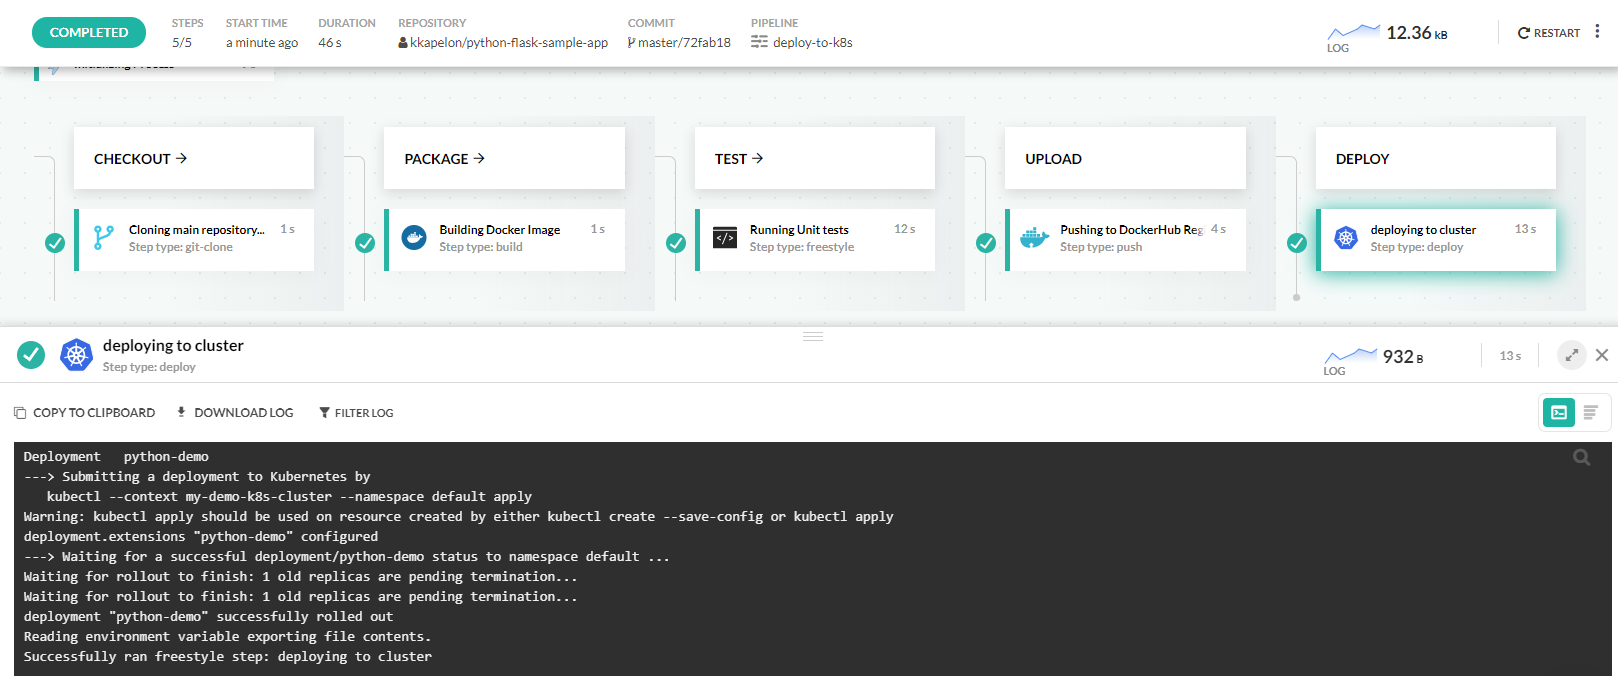
You can use the integrated Codefresh deployment methods or even run custom kubectl commands directly on your cluster.
Codefresh also offers a simple solution for templating but you can use another templating methods such as kustomize.
Using a cluster for running CI/CD pipelines
Finally you can also use the Codefresh Runner to run pipelines in your cluster.