Codefresh on-premises platform account & user setup
Set up accounts and users in Codefresh after installing the on-premises platform
After installing Codefresh on-premises successfully, before users can work magic with Codefresh pipelines, as the Codefresh account administrator you need to complete the setup tasks described in this article.
The Codefresh Admin Management panel provides all the options you need to set up accounts and users.
Review the options available in Admin Management and Account management
OR
Continue with the steps below to complete the setup for Codefresh on-premises for your organization:
- Sign in to Codefresh
- Add a Codefresh account
- Invite a user to the Codefresh account
- Enable features for the Codefresh account
- Set login options for Codefresh account
- Set the system type for Codefresh account
On-premises account setup
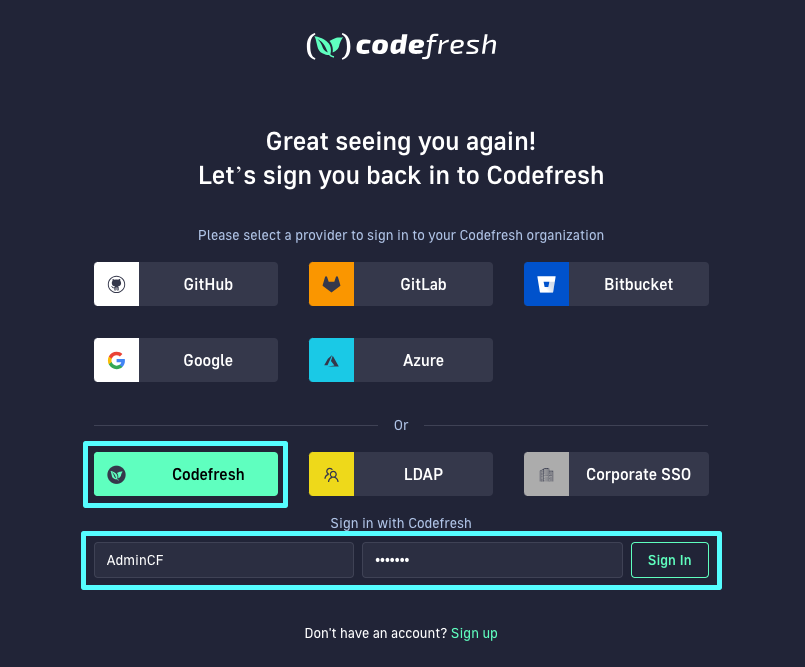
Step 1: Sign in to Codefresh
Sign in to Codefresh for the first time after on-premises platform installation with the default username and password.
- In the Sign In page, click Codefresh.
- Enter the default Username and Password.
- Click Sign In.
- Continue with Step 2: Add a Codefresh account.
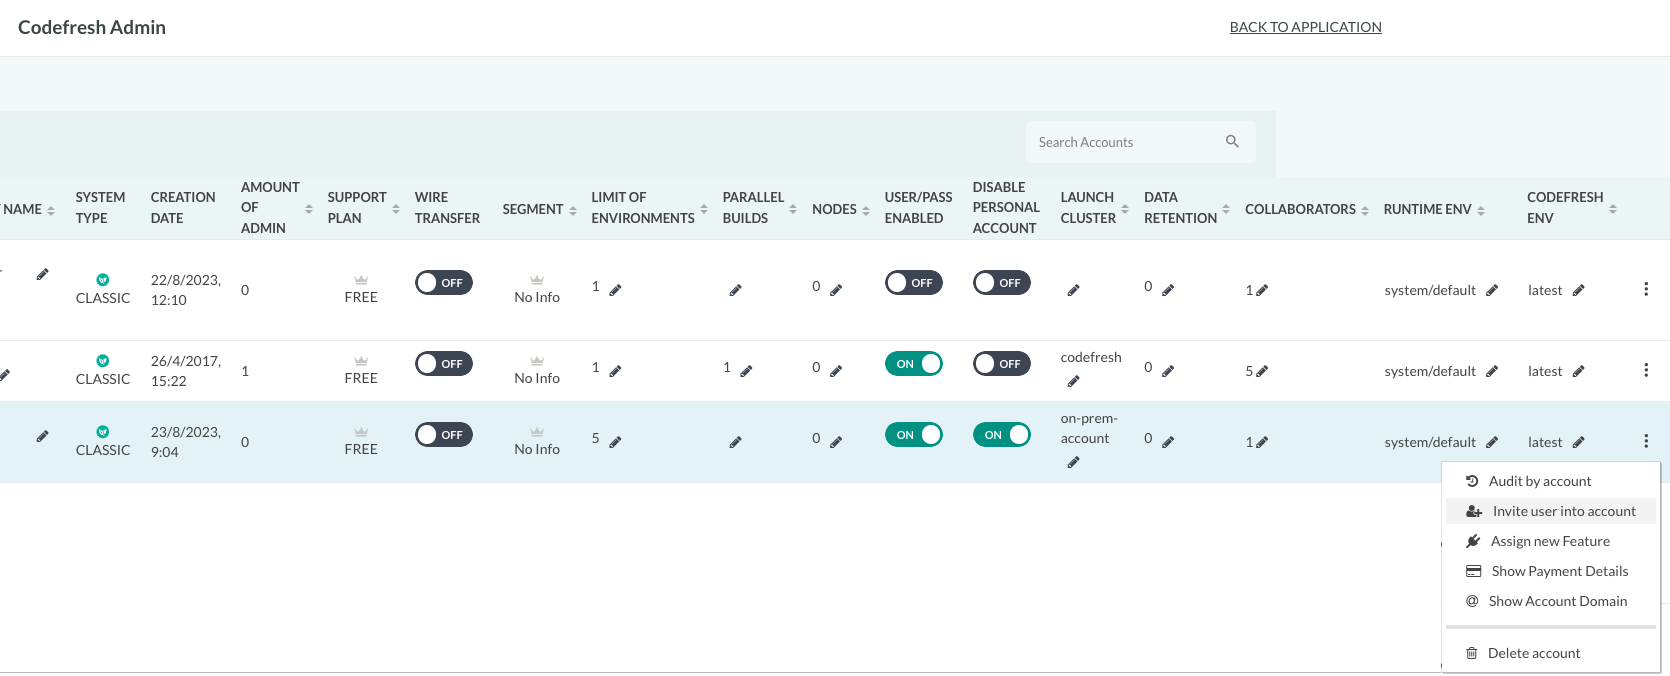
Step 2: Add a Codefresh account
Before creating projects and pipelines, add Codefresh accounts for your organization.
Only those settings required for initial set up are described here.
For a description of all settings available for a Codefresh account, see Quick reference: Account settings in this article.
- From your avatar dropdown, select Admin Management.

- From the sidebar, select Accounts.
The Accounts page displays two default accounts, thecodefresh-system-accountand theadmin-cf account.

- In the toolbar on the right, click the + icon.
- In Create New Account, enter the account name and click Create.
The new account is displayed in the list of Accounts. - Click the System Type column, and do the following:
- Select the System Type for the account:
- Classic: Codefresh pipelines only.
- GitOps: GitOps applications integrated with ArgoCD.
- Project One: The New Codefresh Experience with Classic Pipelines and GitOps as a single module with a unified sidebar menu and shared administration and configuration.
- GitOps + Classic: Available as two different modules, with one of them active at any one time. You can toggle between the modules.
- Click Save.
- Select the System Type for the account:
- Set the number of Runtime Environments for this account.
- Set the number of Parallel Builds.
- In the Collaborators column, click the Edit icon and increase the count to equal the number of users you plan on inviting to the account, and then click the Save icon. You can always change this later.
- If you have a Windows environment, set the number of Nodes.
- To enable username-password login for the users in this account, set User/Pass Enabled to ON.
- To disable users in this account from creating personal accounts after signing in to Codefresh, set Disable Personal Account to ON.
- For Windows environments, set the Codefresh Env to use.
- Continue with Step 3: Invite a user to a Codefresh account.
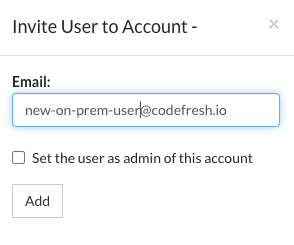
Step 3: Invite a user to a Codefresh account
Invite one or more to the Codefresh account you created.
The maximum number of users you can invite to your account depends on the number of Collaborators defined for the account. A Collaborator is a Codefresh user who can access the UI and perform different actions.
Once users are invited, their statuses remain as Pending until they accept the invitations.
- From the account’s context menu, select Invite user into account.
- Enter the user’s email address and click Add.
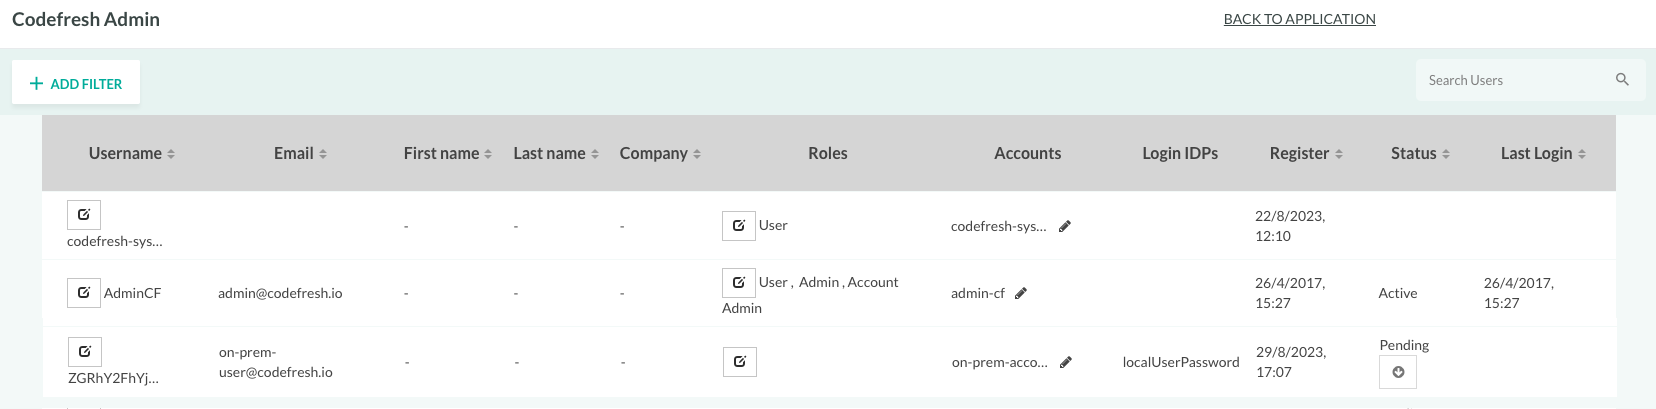
The Users list displays the predefined codefresh-system and the AdminCF users, and the user you invited.
- The username is automatically generated by Codefresh.
- The Email column shows the email address.
- The Status column shows Pending.
- Optional. To enable username-password login for the user, complete these additional steps:
- Click the icon to the left of the username, and select Show Invite Link.
- Copy the link from the popup that appears and click OK.
- Send the link to the user, requesting the user to sign in to Codefresh with the link for the first time.
- Continue with Step 4: Enable features for the account.
Step 4: Enable features for the account
Enable features to open them for Codefresh accounts in your organization.
This step describes how to enable features for a single account at a time.
NOTE
To enable features selectively for specific accounts, or for all accounts in the organization, see Codefresh on-premises feature management.
Enable/disable features for a specific account
Before you begin
- Review feature descriptions
How to
- Make sure you are in Admin Management.
- From the sidebar, select Accounts.
- To filter the feature list, from the All dropdown list, select the category you want to see.
- To enable a feature for the account, below Enable, toggle the required feature to ON.
Enable System Features
System Features are generally for internal use.
For convenience and ease of set up, turn on ONLY the System Features listed in this section.
When you enable System Features, the behavior for a specific System Feature is identical to that of the other Feature Flags: you can enable/disable it for a single, for specific, or for all accounts.
IMPORTANT
Codefresh strongly recommends against enabling the System Features not explicitly mentioned here, unless you are familiar with the implications of turning on each of the features.
If you need to turn on a feature, we recommend to first contact Codefresh support.
- Make sure you are in Admin Management.
- From the sidebar, click Feature Management.
- Toggle System Features on the top right to ON.
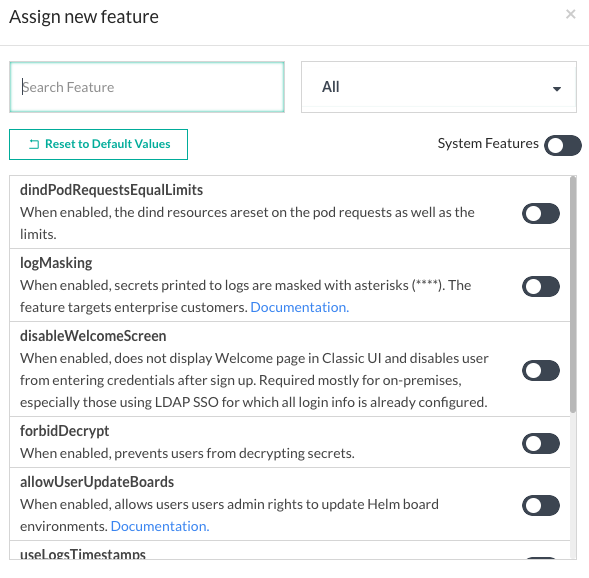
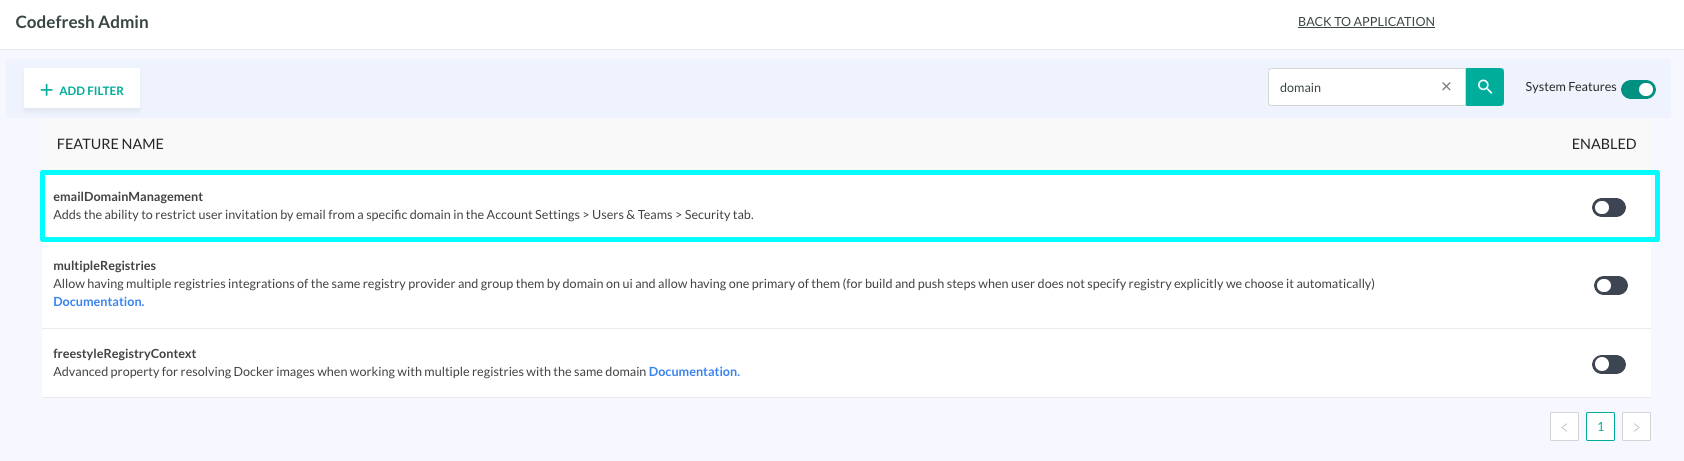
- In the Search Features field, search for the following features in turn, and then toggle Enabled to ON for each of them:
ssoManagement: Enables user login with SSO provider integrations set up in Codefresh.teamsManagement: Enables the account administrator to create teams, and assign users in an account to one or more teams.emailDomainManagement: Enables restricting user invitations to the domains defined.
You have now created a Codefresh account, added one or more users the account, and enabled or disabled features for the account. Review What to do next for tips on how to proceed.
What to do next
- Set the options to display in the Sign-In page
- Depending on the System Type activated, you are now ready to create:
- Projects and pipelines
- Pipeline integrations for Git providers, Docker registries and more
- GitOps integrations for image enrichment
- GitOps applications
See our quick starts for CI/CD and GitOps.
Quick reference: Admin Management settings
The Admin Management panel is your one-stop location to set up Codefresh according to your requirements.
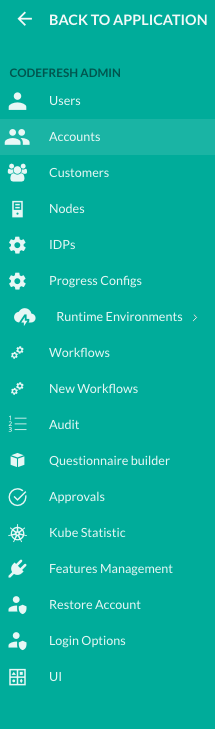
The table describes the options in Admin Management relevant for Codefresh account administrators.
| Account Setting | Description |
|---|---|
| Users | The list of users added to the account. In addition to the personal and login information, you can see the roles assigned to the user, the accounts they belong to, their current status and most recent login. |
| Accounts | The configuration settings defined for the account. See Quick reference: Account settings. |
| Nodes | Applicable only to Windows on-premises environments. The Docker nodes created for the account. |
| IDPs | The SSO integrations set up in Codefresh. |
| Runtime Environments | The predefined and user-defined Runtime Environments.
|
| Audit | The actions audited by Codefresh across all accounts in your organization, based on the API calls made to Codefresh. You can filter by Account, the type of Entity or Action, and Status. |
| Approvals | The Codefresh accounts deleted after approval of the delete request. You can restore a deleted account through the Restore Account option. |
| Features Management | The features to enable/disable for all or specific accounts in your organization. See On-premises feature list. |
| Restore Account | The list of deleted accounts for your organization, and the option to restore them by clicking Restore Account in the Actions column. |
Quick reference: Account settings
Here’s an example of the Account settings page in Admin Management.
The table describes the settings for available Codefresh accounts.
NOTE
Settings that are not described in this table are not applicable to on-premises environments and can be ignored.
| Account Setting | Description |
|---|---|
| Activated/Suspended/Increased attention | Automatically set and managed by Codefresh. |
| Account name | The name of the account. To change, click the Edit icon. |
| System type | The Codefresh module to activate for this account. Selecting a System Type switches the account to one of the following:
|
| Creation date | The date the account was created. |
| Amount of admins | The number of users with administrator roles for this account. |
| Limit of environments | Leave as is. |
| Parallel builds | The number of parallel Runner builds for pipelines. Generally unlimited for on-premises. |
| Nodes | Relevant for when Codefresh on-premises is installed on Windows. The number of console nodes you can connect to. |
| User/pass enabled | Enable username-password combination as a login mechanism for users in this account. When enabled, the Sign-In page displays Codefresh as a login option, and users can supply the username and password as login credentials. |
| Disable personal account | When enabled (recommended), prevents users from creating personal accounts after signing in to Codefresh for the first time on receiving invitations. |
| Data retention | The length of time in weeks for which to retain builds and logs for Codefresh pipelines. The retention period can be set through the slider, or through environment variables. See Retention policy for builds and logs in ArtifactHub, and select the one according to the on-premises version you have installed. |
| Collaborators | The number of users permitted for this account. A Collaborator is a Codefresh user who can access the UI. If you keep the count as one, Codefresh displays an error that you have reached the user limit and prevents you from inviting additional users. |
| Runtime environments | Optional. The System Runtime Environments to select for this account. The System Runtime Environments are global Runtime Environments predefined by Codefresh. |
| Codefresh environments | Optional. For Windows environments, the Codefresh environment to select for the Windows nodes. |
| Actions | The actions available for the account, displayed by clicking the context menu to the right of the account:
|
Related articles
On-premises feature management
Codefresh on-premises upgrade