Managing Argo CD applications
Explore options and actions to manage applications
Managing Argo CD applications
Application creation and deployment is one part of the continuous deployment/delivery process. An equally important part is tracking, optimizing, and managing applications after deployment.
There are two aspects to managing Argo CD applications in Codefresh GitOps:
- Optimizing deployments through environments and products
- Managing individual applications
Optimizing application deployments
-
Environments
Environments provide visibility into Argo CD applications in the context of their software lifecycle helping you track promotions from development to production. -
Products
Products group applications into logical units, showing version history, Git metadata, and feature tracking for improved organization and scalability.
Managing individual applications
NOTE
Available actions depend on your assigned permissions.
-
Edit Argo CD applications
Modify application configurations or update settings to align with deployment needs. -
Manage Application Groups
Add to and remove applications from Application Groups. -
Sync Argo CD applications
Sync applications on-demand by manually applying sync options or by manually selecting the resources to sync. -
Configure sync timeout for Argo CD applications
Configure the sync timeout through an annotation to be notified of long sync operations. -
Terminate sync for Argo CD applications
With a single-click, terminate on-going sync process when needed. -
Refresh Argo CD applications
Force a refresh to fetch the latest application state without triggering a sync. -
Rollback Argo CD applications
Rollback applications to previous deployment versions. -
Manage rollouts for deployments
Control ongoing rollouts by resuming indefinitely paused steps, promoting rollouts, aborting, restarting and retrying rollouts. -
Rename an ApplicationSet
Change the name of an existing ApplicationSet and point all its applications to the new ApplicationSet. -
Enable precise sync detection for monorepo apps
Enable the ACR Controller in GitOps Runtimes to precisely detect sync operations that triggered deployments for applications in monorepo setups. -
Delete Argo CD applications
Delete unused or legacy applications to avoid clutter and remove unnecessary resources.To delete specific resources within an application, see Delete application resources.
Environments & Argo CD applications
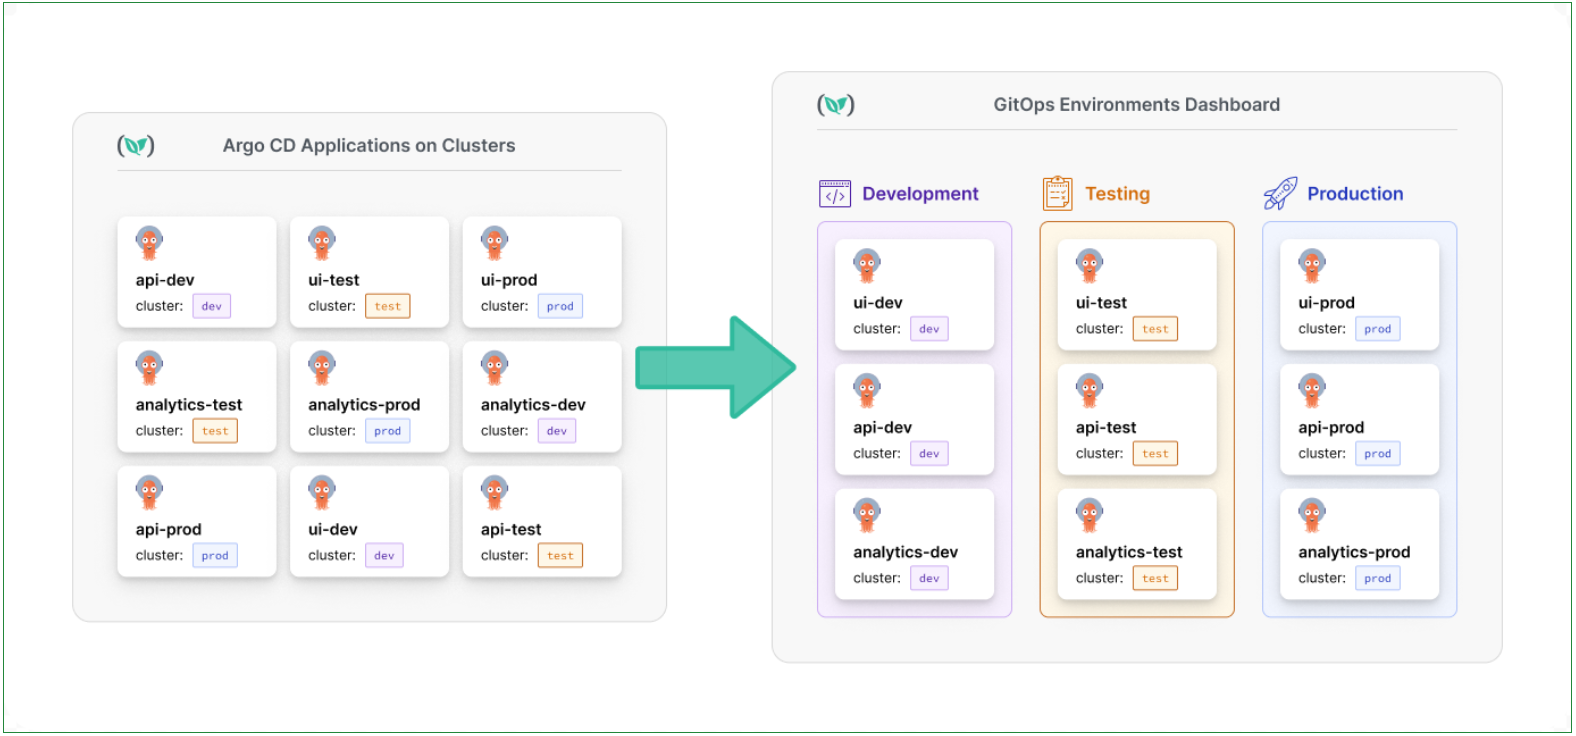
Tracking and managing deployments at scale requires clear visibility into applications at every stage. Codefresh GitOps provides this visibility through environments.
When you define an environment by specifying one or more cluster-namespace pairs, Codefresh automatically detects and displays the applications deployed to those locations.
Use environments to:
- Promote applications
- Track promotions
- Monitor application versions
- View recent commits that introduced changes
Here’s a visualization of the Environments dashboard with Argo CD applications.
For detailed information, see environments and Environments dashboard.
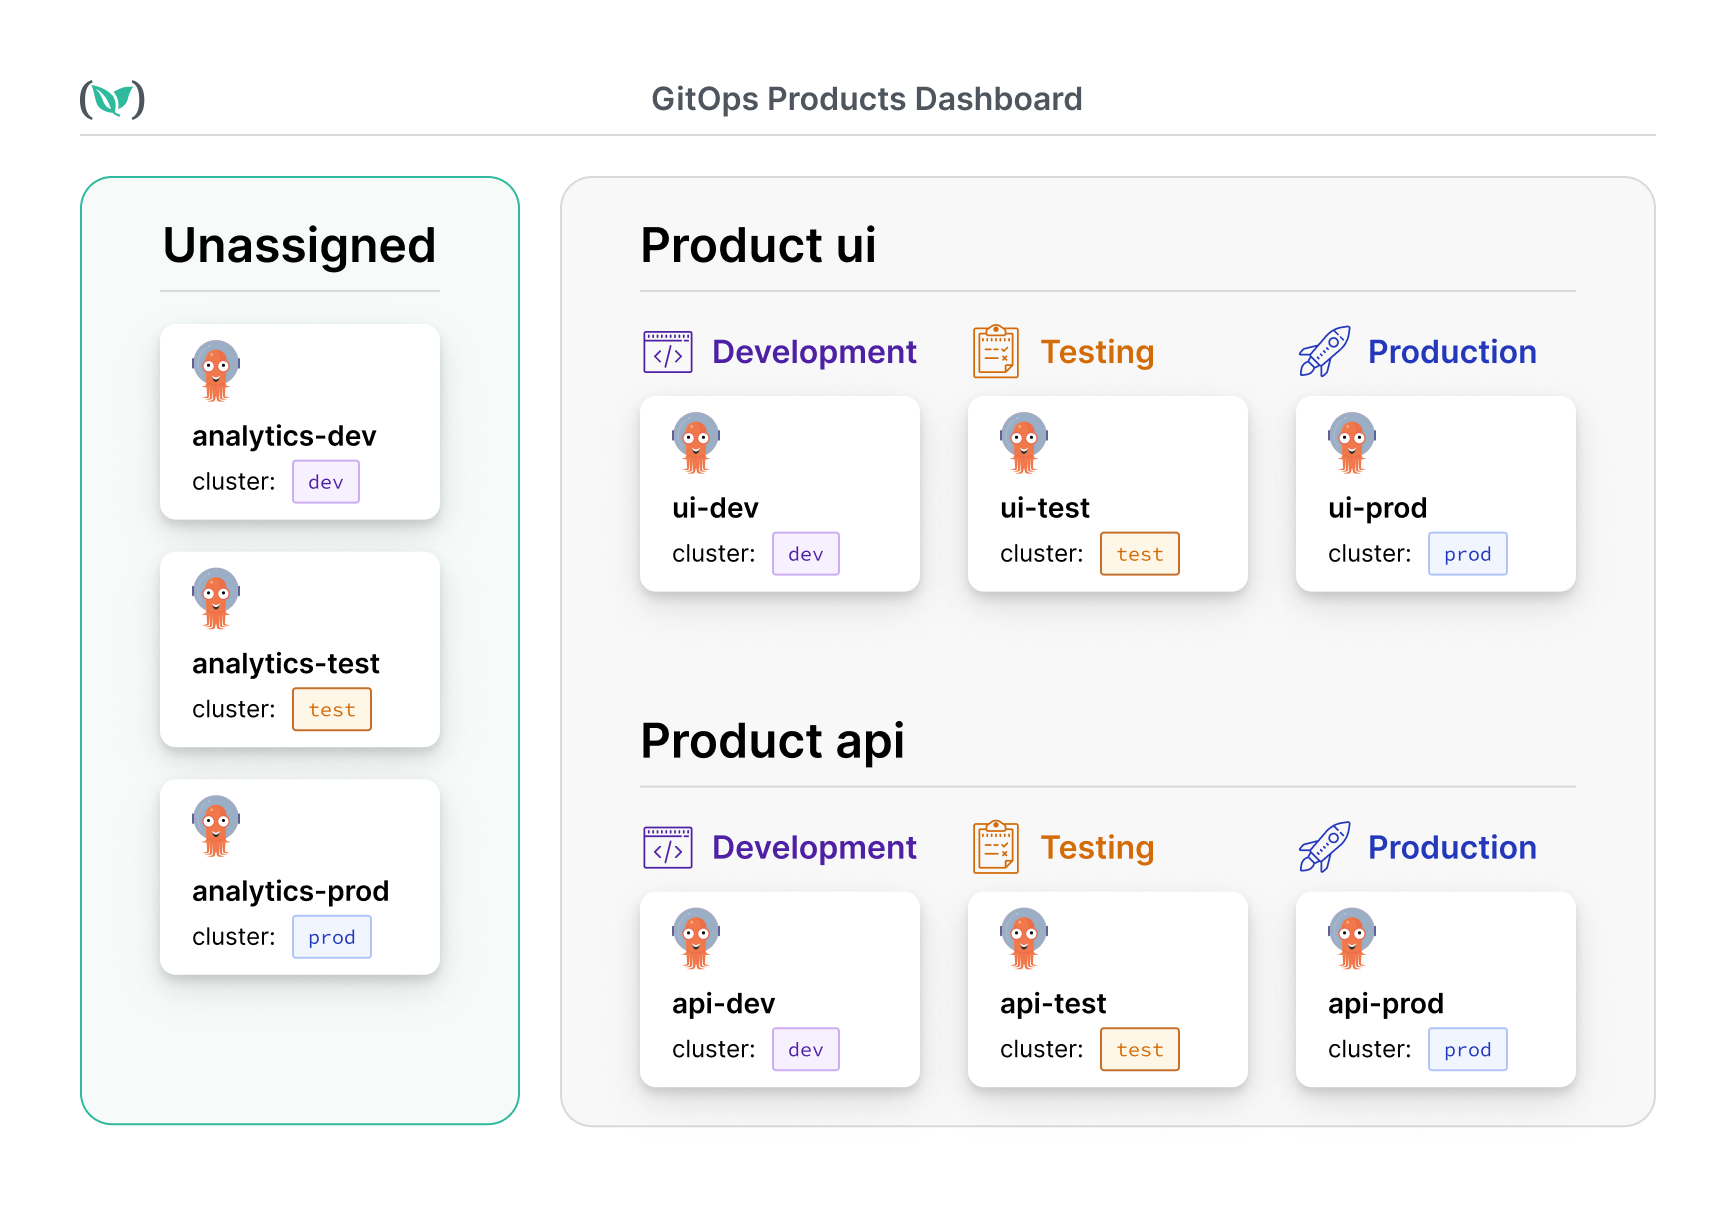
Products & Argo CD applications
As applications and teams scale, tracking deployments across multiple environments can become challenging. Products in Codefresh GitOps provide a structured way to manage and track related applications across teams and environments.
Unlike environments, which focus on deployment tracking, products offer a broader view of multiple applications, simplifying organization and management.
Here’s a visualization of Argo CD applications grouped by products in the Products dashboard.
For detailed information, see products GitOps Products dashboard.
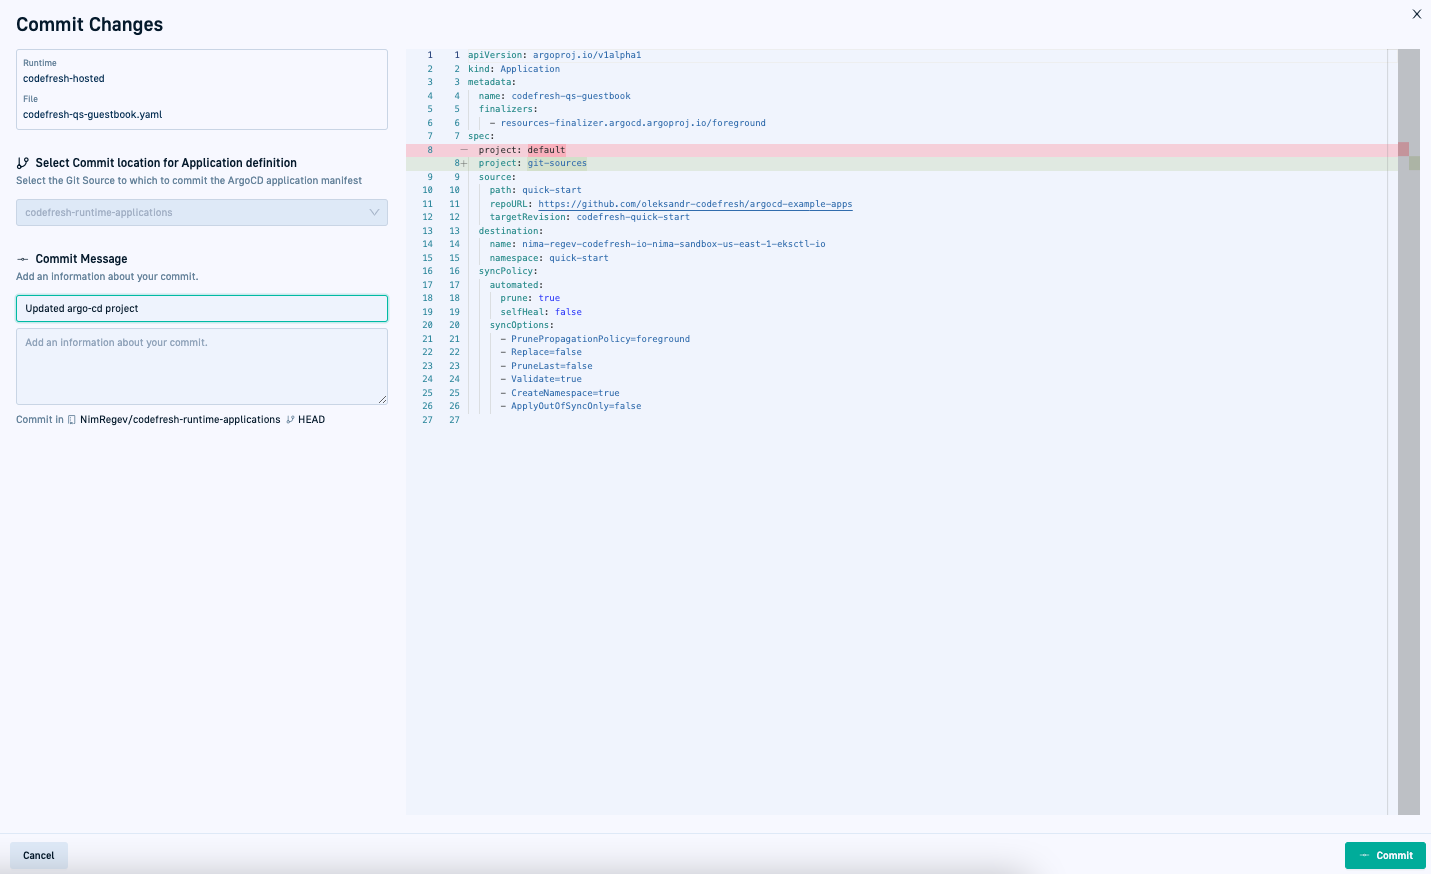
Edit Argo CD application definitions
Update General or Advanced configuration settings for a deployed Argo CD application through the Configuration tab. Once the application is deployed to the cluster, the Configuration tab is available on selecting the application in the GitOps Apps dashboard.
NOTE
You cannot change application definitions (the application name and the selected runtime), and the Git Source selected for the application.
How to
- In the Codefresh UI, from the sidebar, select GitOps Apps.
- Do one of the following:
- Select the application to update, and then from the context menu on the right, select Edit.
- Click the application and then select the Configuration tab.
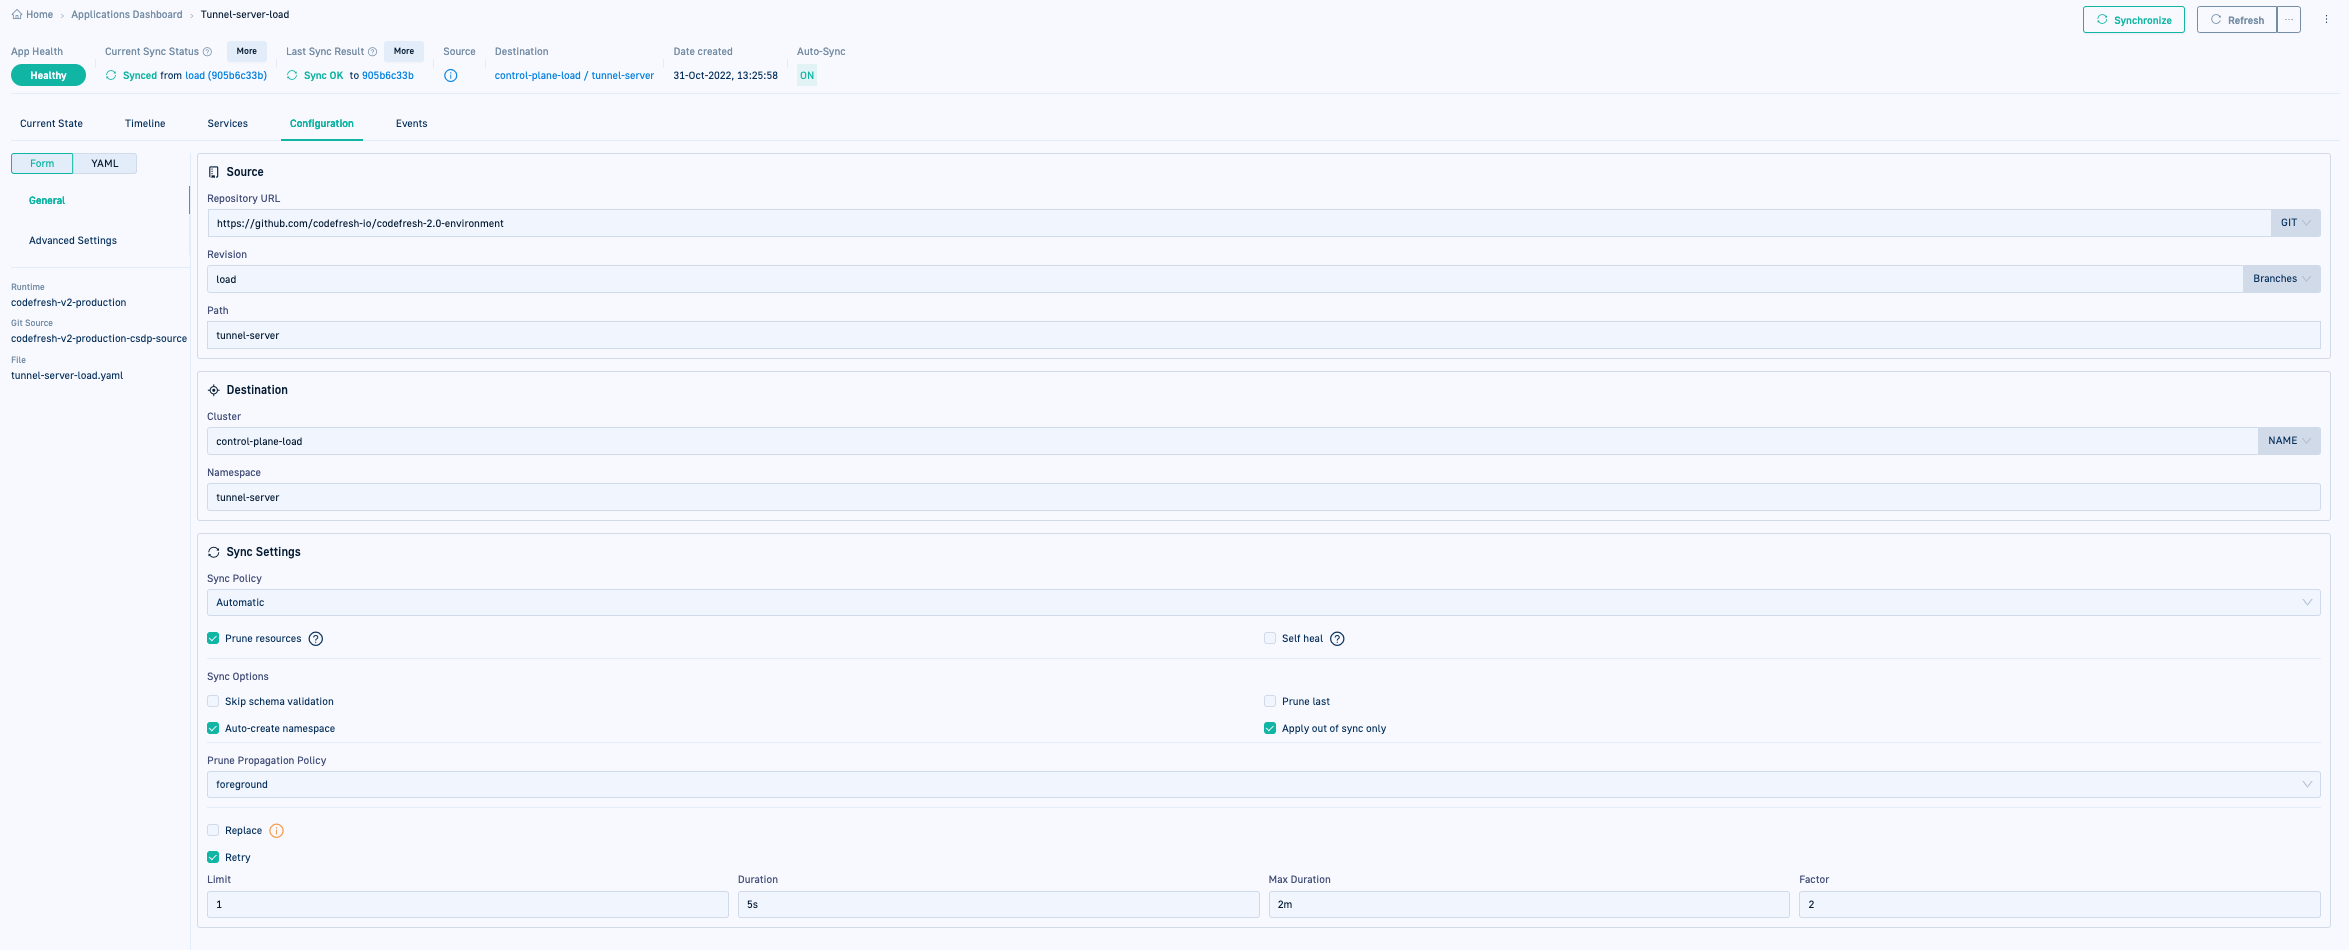
- Update the General or Advanced configuration settings as needed:
General configuration
Advanced configuration
When you change a setting, the Commit and Discard Changes buttons are displayed.
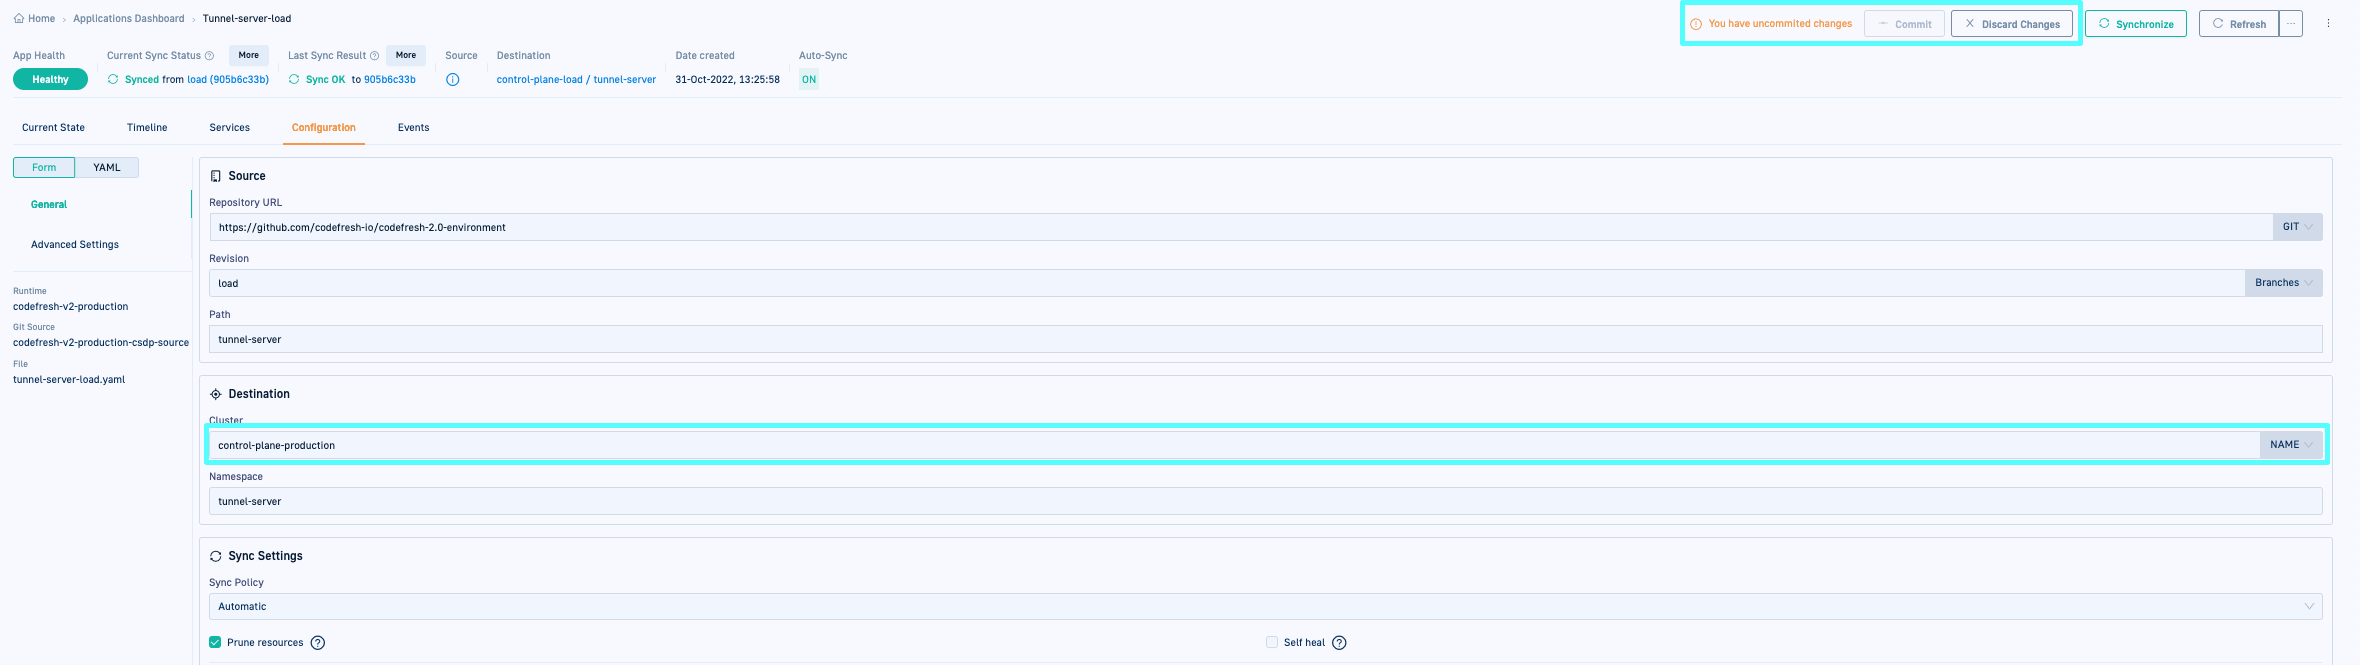
- Do one of the following:
- To commit all changes, click Commit. This final commit screen is displayed with a diff view of the changes.
-
To undo all changes and return to the previous settings, click Discard Changes. This action removes all the changes you have made so far and returns you to the GitOps Apps dashboard.
TIP
If you change settings and then restore existing values for the same, Codefresh automatically removes the Commit and Discard Changes buttons as there are no new changes to commit or discard.
- To confirm all changes, at the bottom-left, click Commit. The changes are committed to Git, and in a few moments also synced to the cluster.
Manage Application Groups
Clicking on an Application Group in the Group tab navigates to the list of applications in the Group. You can see the collective timelines for all applications within the group, instead of the individual source, health, or target information for each application.
Once you assign an application to a group, you can add it to or remove it from different Application Groups through the application’s Configuration settings. See also Application Groups for Argo CD applications.
- In the Codefresh UI, from the sidebar, select GitOps Apps.
- Select the application and then click the Configuration tab.
- From Groups, do one of the following:
- To add the application to one or more groups, select the group or groups.
- To remove the application from a group, click the remove button for the group.
Manually sync an Argo CD application
Manually sync an application to expedite Git-to-cluster sync. The sync options selected for manual sync override the sync options defined for the application.
The sync options, grouped into Revision and Additional Settings, are identical to the Sync options in the General settings when you created the application.
TIP
You can also sync application resources with sync statuses such as Service, AnalysisTemplate, and Rollouts resources for example, in the Current State tab. Select the Sync option from resource’s context menu.
Before you begin
- Review:
Revision settings for application sync
Additional Options for application sync
Sync application resources
How to
- In the Codefresh UI, from the sidebar, select GitOps Apps.
- To sync an application, select the application to sync, and do one of the following:
- From the context menu on the right, select Synchronize.
- On the top-right, click Synchronize.
- To sync a resource:
- Click the application with the resource to sync.
- In the Current State tab, open the context menu of the resource, and then select Sync.
- Select the Revision and Additional Options for the manual sync.
Review - Click Next.
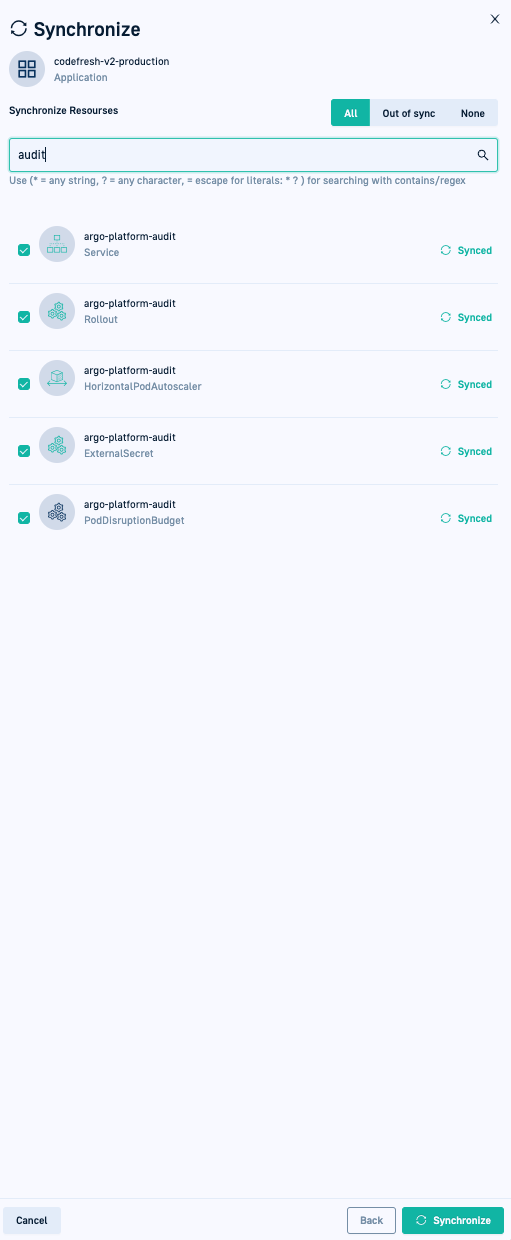
- In the Synchronize Resources form, select the scope of the manual sync:
- To sync only specific resources, search for the resources by any part of their names, or define a Regex to filter by the required resources.
- All: Sync all resources regardless of their sync state.
- Out of sync: Sync only resources that are
Out of sync.
Revision settings for application sync
Revision settings determine the behavior for the branch you select.
Revision The branch in Git to sync with the cluster.
Prune When selected, removes legacy resources from the cluster that do not exist currently in the Git branch.
Apply only
When selected, syncs only those resources in the application that have been changed and are OutOfSync, instead of syncing every resource regardless of their state. This option is useful to reduce load and save time when you have thousands of resources in an application. See Selective Sync.
Dry run When selected, allows you to preview the application before changes are made to the cluster.
Force
When selected, orphans the dependents of a deleted resource during the sync operation. This option is useful to prevent
Additional Options for application sync
Sync Options
- Skip schema validation
When selected, bypasses validating the YAML schema. - Auto-create namespace
When selected, automatically creates the namespace if the specified namespace does not exist in the cluster. If the namespace already exists, this setting is ignored. - Prune last
When selected, removes those resources that do not exist in the currently deployed version during the final wave of the sync operation. See Prune last. - Apply out of sync only
When selected, syncs only those resources in the application that have been changed and are
OutOfSync, instead of syncing every resource regardless of their state. This option is useful to reduce load and save time when you have thousands of resources in an application. See Selective Sync. - Respect ignore differences
When selected, Argo CD omits resources defined for thespec.ignoreDifferencesattribute from the sync. Otherwise, Argo CD implements the desired state ad-hoc during the sync operation. See Respect ignore difference configs.
Prune propagation policy
Defines how resources are pruned, applying Kubernetes cascading deletion prune policies. Read more at Kubernetes - Cascading deletion.
- Foreground: The default prune propagation policy used by Argo CD. With this policy, Kubernetes changes the state of the owner resource to `deletion in progress`, until the controller deletes the dependent resources and finally the owner resource itself.
- Background: When selected, Kubernetes deletes the owner resource immediately, and then deletes the dependent resources in the background.
- Orphan: When selected, Kubernetes deletes the dependent resources that remain orphaned after the owner resource is deleted.
Replace: When selected, Argo CD executes kubectl replace or kubectl create, instead of the default kubectl apply to enforce the changes in Git. This action will potentially recreate resources and should be used with care. See Replace Resource Instead Of Applying Change.
Retry: When selected, retries a failed sync operation, based on the retry settings configured:
- Maximum number of sync retries (Limit)
- Duration of each retry attempt in seconds, minutes, or hours (Duration)
- Maximum duration permitted for each retry (Max Duration)
- Factor by which to multiply the Duration in the event of a failed retry (Factor). A factor of 2 for example, attempts the second retry in 2 X 2 seconds, where 2 seconds is the Duration.
Sync application resources
Synchronize Resource options allow you to selectively sync application resources. You can bypass sync settings at the application level, and directly select the resources you want to sync, by state or otherwise.
- All resources regardless of their sync states
- Only out-of-sync resources
- Only selected resources
By default, Synchronize Resources displays and selects all resources in the application.
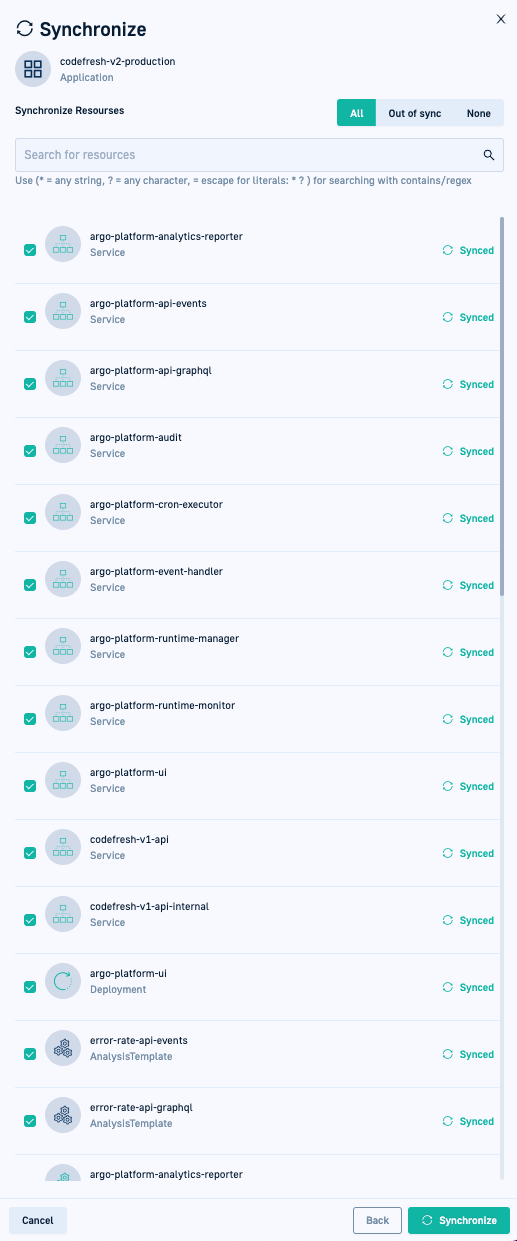
You can search/filter resources using part of the resource names or regex strings, and then select the resources you want to sync.
For example, if you made changes to api resources or audit resources, type api or audit to locate the resources and then selectively sync those resources.
Configure sync timeout for Argo CD applications
Configure a custom sync timeout for Argo CD applications and get notified when an ongoing sync exceeds the defined timeout. Instead of waiting indefinitely for syncs to complete and then navigating through the GitOps Apps dashboard, get timely warnings from Codefresh.
Add an annotation with the timeout threshold you need for the application. Codefresh uses Argo CD’s default duration of 30 minutes which you can customize as needed.
- Add the following annotation to the application’s YAML with the timeout you need:
annotation:
codefresh.io/app-sync-warning-threshold: "35"
Codefresh displays a warning in the Warnings/Errors button at the top right of the Applications tab in the GitOps Apps dashboard, when the sync duration exceeds the timeout specified.

You can view more details on the sync or terminate it.
Terminate on-going sync for Argo CD applications
Manually terminate an on-going synchronization process for the application. You may need to terminate an on-going sync that remains indefinitely as Syncing, or because you have detected problems in the current deployment Terminating a sync operation reverts the deployment to the previously deployed version or image.
- In the Codefresh UI, from the sidebar, select GitOps Apps.
- If needed, filter by Status Syncing to view applications with active sync operations.
- Select the application and then from the application header, click Terminate Sync.

Refresh/hard refresh Argo CD applications
As an alternative to manually syncing an application, either refresh or hard refresh the application. Both options are always available in the application toolbar.
- In the Codefresh UI, from the sidebar, select GitOps Apps.
- Select the application, and then from the top-right, select the required action:
- Refresh: Retrieve desired (Git) state, compare with the live (cluster) state, and refresh the application to sync with the desired state.
- Hard Refresh: Refresh the application to sync with the Git state, while removing the cache.

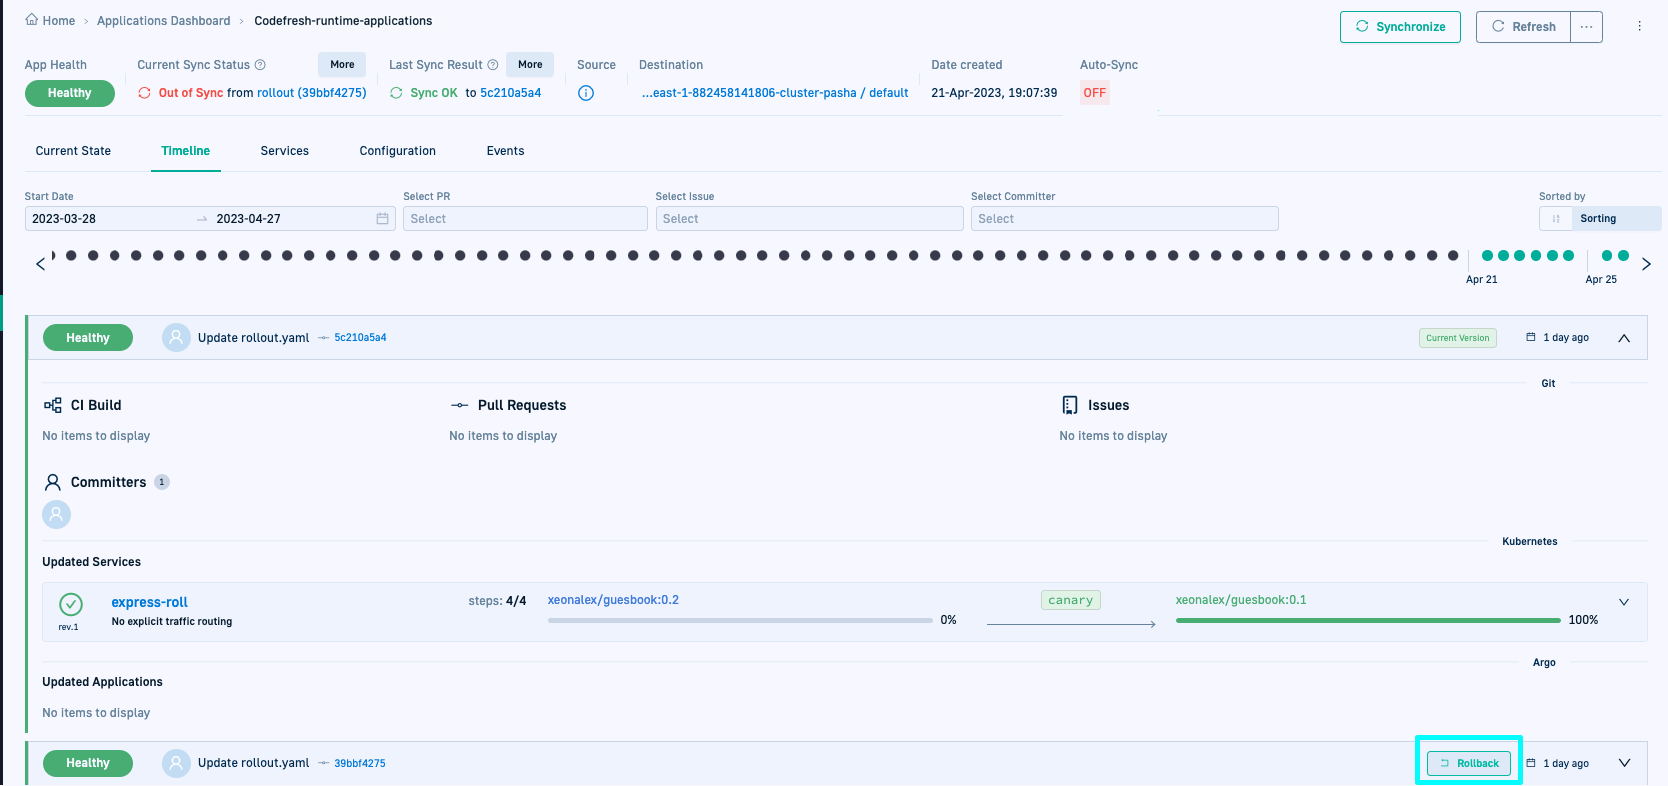
Rollback Argo CD applications
Rollback to a previously deployed version of active Argo CD applications. You may want to roll back a newly deployed version due to errors in your code or misconfigurations, etc.
Prerequisites for rollback
Rollback can be disabled for the following reasons:
-
Auto-sync ON for applications
If auto-sync isON, the default behavior for GitOps is to sync the cluster with the desired state in Git. The Rollback button is disabled with a tooltip.For application rollback, auto-sync must be
OFF. The quickest and easiest way to identify auto-sync status is through the Application Header.
To change the setting, edit the application’s General configuration settings.

-
Deployment version for rollback older than history limit
By default, you can roll back to any the previous ten deployments (same as Argo CD). If you try to roll back to a deployment older than ten of the most recent deployments, the Rollback option is disabled with a tooltip, that the ‘Release is not in history’.TIP
To configure a different number, edit the application manifest and addRevisionHistoryLimitset to the number of previous deployments you need in thespecsection. -
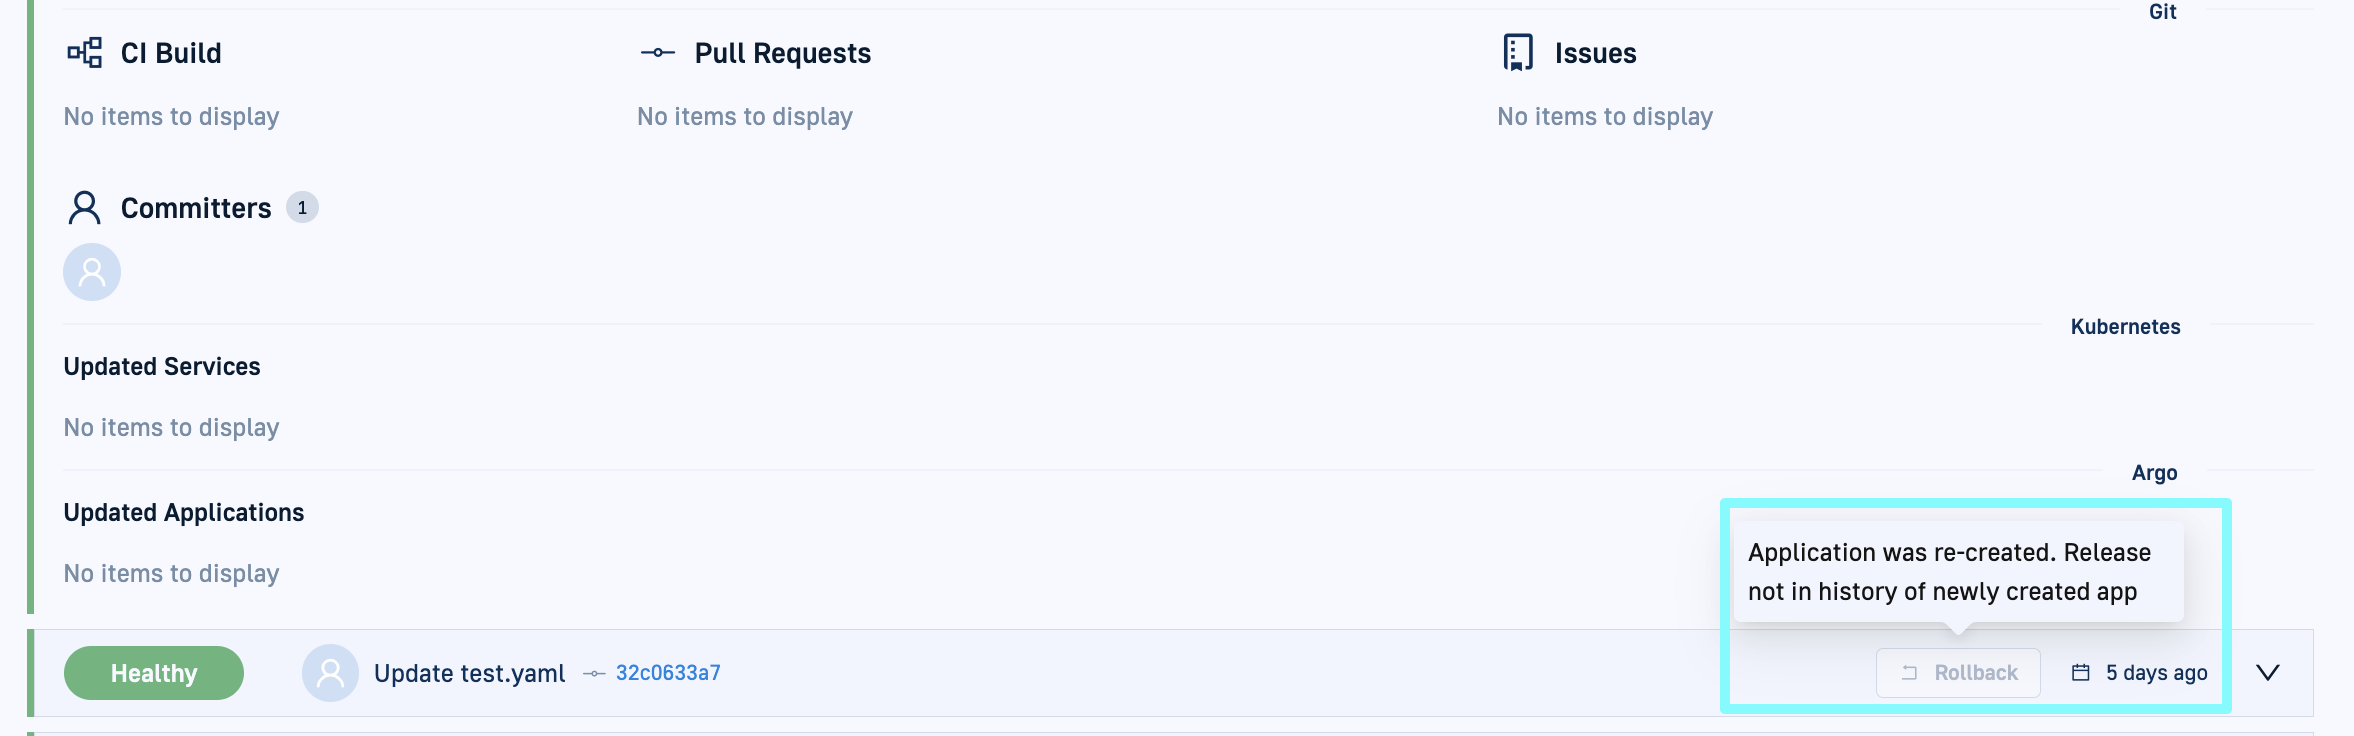
Deleted version of application
You can activate rollback only for new and currently active application versions that are deployed.
If you deleted an application and then recreated it with the same name, you cannot rollback to the deleted version or to any version prior to the deletion. The Rollback button is disabled with a tooltip.
How to rollback an application
- In the Codefresh UI, from Ops in the sidebar, select GitOps Apps.
- Select the application to rollback and then click the Timeline tab.
- In the Application Header, verify that Auto-sync is
OFFfor the application. - Mouse over the deployment version to rollback to view the Rollback option.
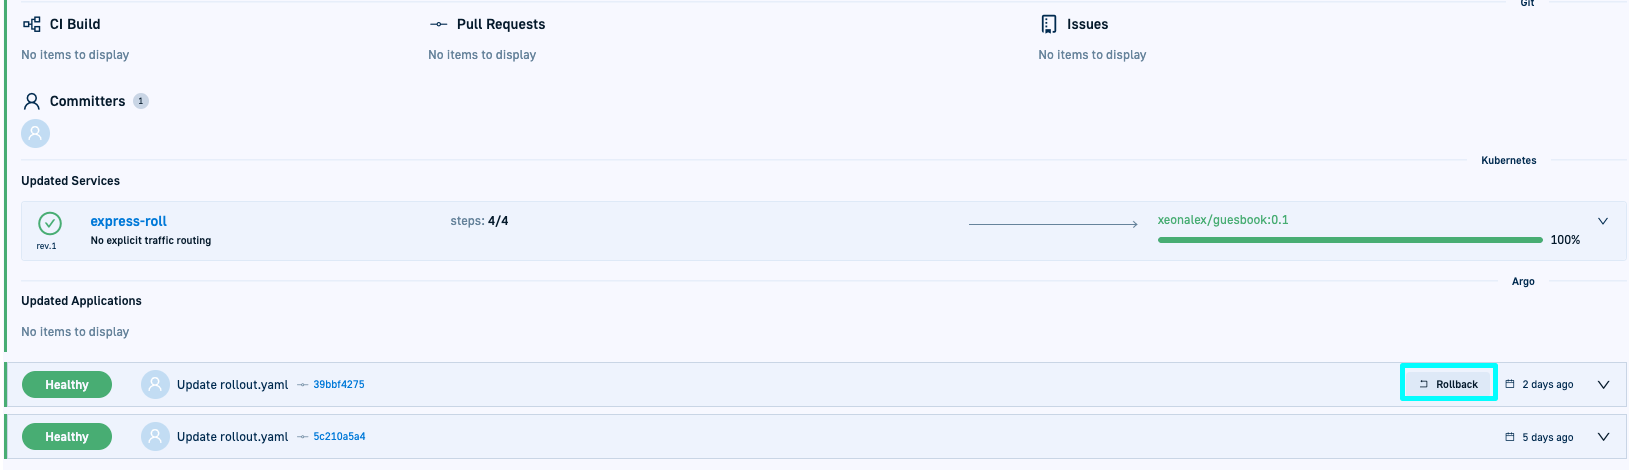
- To start, click Rollback and confirm.
- The ‘Rollout process started’ notification is displayed.
- The application’s Health status changes to
Progressingand the Sync status changes toout-of-sync. - A deployment record is created for the rollout with
Progressing.
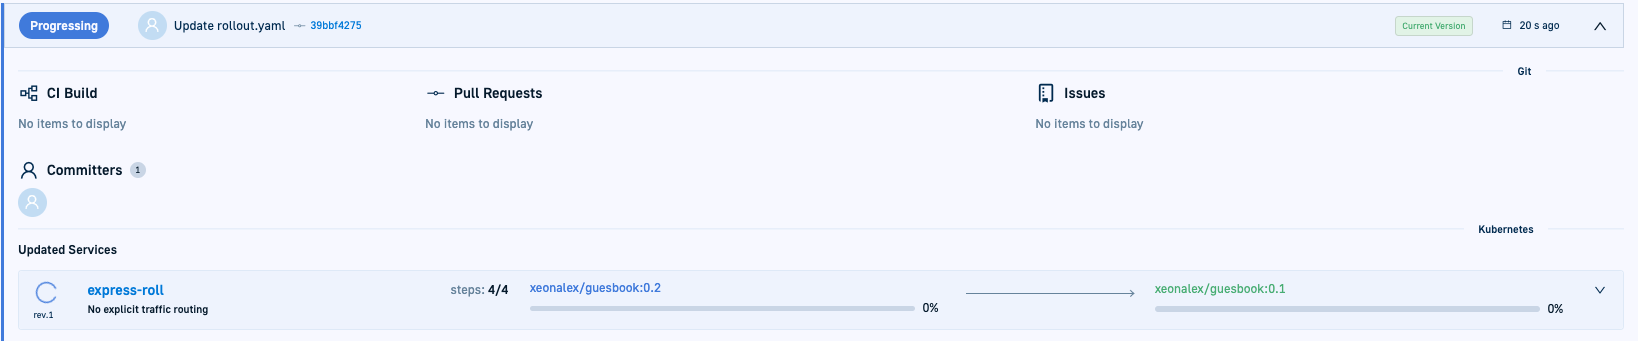
Once completed, the application’s statuses are updated.
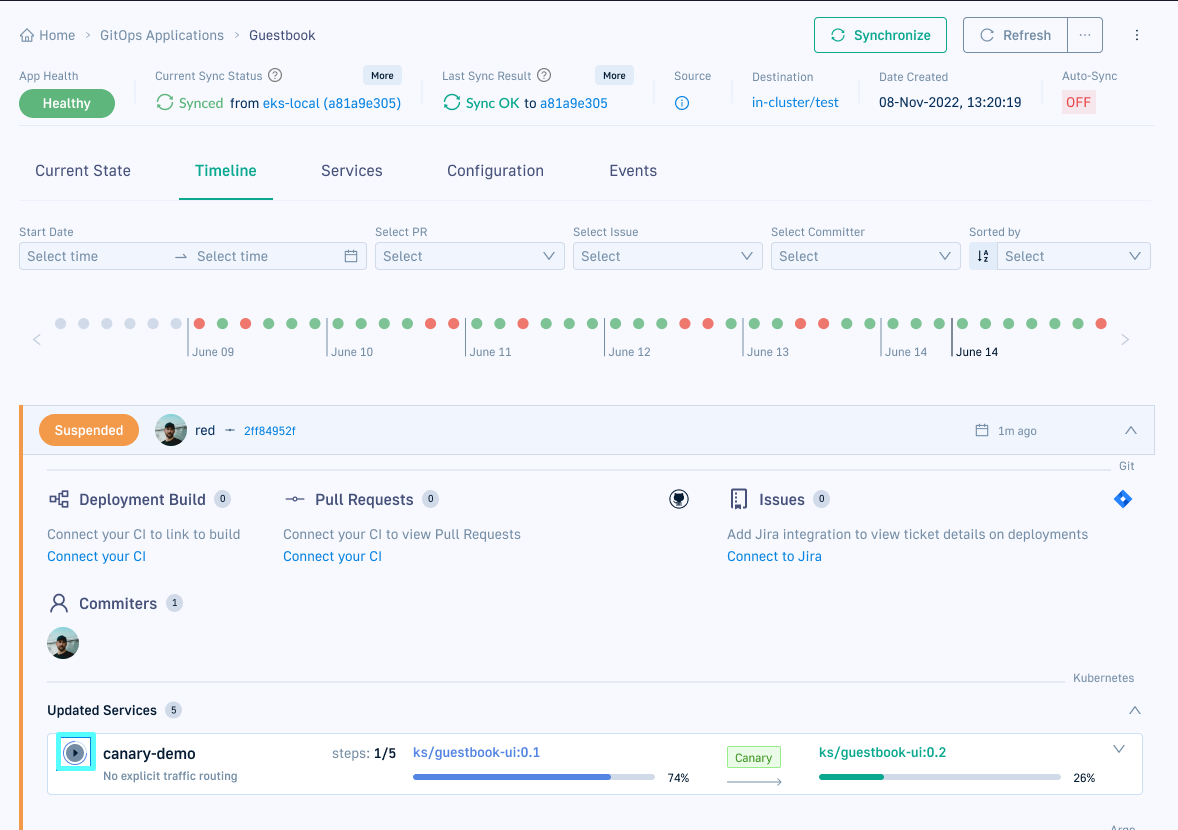
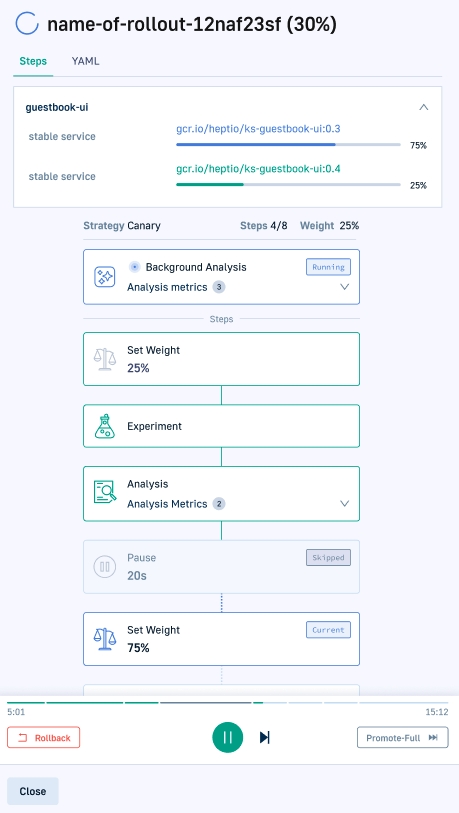
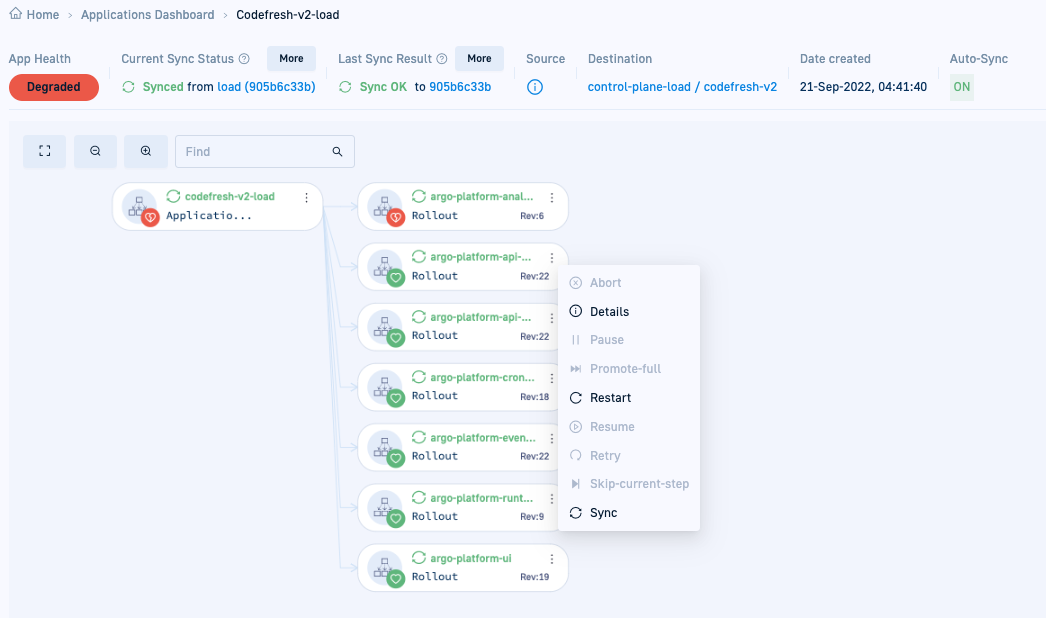
Manage rollouts for Argo CD application deployments
A rollout represents the progressive deployment of a new version of an application, allowing controlled updates with rollback capabilities.
Rollout controls
View rollout progress in the Timeline tab, and manage rollouts through multiple controls:
- Timeline tab: Pause and resume ongoing rollouts.
- Rollout Player: Offers additional controls, including custom actions such as skipping steps during rollouts.
- Rollout resources in Current State tab: Offers the same controls as the Rollout Player.
Custom action configuration
For GitOps Runtimes with existing Argo CD instances, to enable actions in the Rollout Player and in the Current State tab for the Rollout entity, you must configure custom actions in the Argo CD config map (argocd-cm).
See Argo CD’s official documentation on resource actions.
Controls for ongoing rollouts
The table describes the controls available to manage rollouts.
| Rollout control | Description | Available in |
|---|---|---|
| Rollback | Rolls back to the previous deployment. See also Prerequisites for rollback. |
|
| Abort | Terminate the current rollout. |
|
| Pause | Pause the rollout. If the rollout is already automatically paused as the result of a step definition, clicking Pause continues pausing the rollout also after the pause duration configured. |
|
| Resume | Resume a rollout that was paused either manually by clicking Pause, or automatically through the step’s definition. |
|
| Retry | Retry a rollout that has been aborted. Restarts the rollout from the beginning. Available only when a rollout has been aborted. |
|
| Skip step | Skip execution of current step. Such steps are marked as Skipped in the rollout visualization. |
|
| Promote full | Skip all remaining steps, and deploy the current image. |
|
Configure custom actions for Rollout entities
For Runtime installations with existing Argo CD instances, configure custom rollout actions in Argo CD’s config map. Otherwise, rollout controls such as Pause and Skip Current Step are disabled in the Rollout Player and in the Current State tab.
Argo CD warning
By default, defining a resource action customization will override any built-in action for this resource kind. As of Argo CD version 2.13.0, if you want to retain the built-in actions, you can set the mergeBuiltinActions key to true. Your custom actions will have precedence over the built-in actions.
- Add the following to the
argocd-cm:
resource.customizations.actions.argoproj.io_Rollout: |
  mergeBuiltinActions: true
  discovery.lua: |
    actions = {}
    local fullyPromoted = obj.status.currentPodHash == obj.status.stableRS
    actions["pause"] = {["disabled"] = fullyPromoted or obj.spec.paused == true}
    actions["skip-current-step"] = {["disabled"] = obj.spec.strategy.canary == nil or obj.spec.strategy.canary.steps == nil or obj.status.currentStepIndex == table.getn(obj.spec.strategy.canary.steps)}
    return actions
  definitions:
  - name: pause
    action.lua: |
      obj.spec.paused = true
      return obj
  - name: skip-current-step
    action.lua: |
      if obj.status ~= nil then
          if obj.spec.strategy.canary ~= nil and obj.spec.strategy.canary.steps ~= nil and obj.status.currentStepIndex < table.getn(obj.spec.strategy.canary.steps) then
              if obj.status.pauseConditions ~= nil and table.getn(obj.status.pauseConditions) > 0 then
                  obj.status.pauseConditions = nil
              end
              obj.status.currentStepIndex = obj.status.currentStepIndex + 1
          end
      end
      return obj
Accessing rollout controls
Manage rollouts from different locations in the GitOps Apps dashboard.
Timeline tab
- Where:
GitOps Apps > Selected application > Timelines > Deployment record > Updated Services
Rollout Player
- Where:
GitOps Apps > Selected application > Timelines > Deployment record > Rollout name
Current State tab
- Where:
GitOps Apps > Selected application > Current State > Rollout resource’s context menu
Manually rollback completed rollout to previous revision
Manually rollback a completed rollout to a previous revision when and if needed. If after a successful analysis run and rollout, your application is not functioning as it should, you can rollback to a prior revision from the Rollout’s revision history.
The revision depth is determined by the spec.revisionHistoryLimit parameter in the Rollout Specification.
Manual rollback changes the live state of the rollout resource to the state in the previous commit that you select.
- In the Codefresh UI, from the sidebar, select GitOps Apps.
- Select the application and select the Timeline tab.
- Click the name of the rollout to rollback.
- From the Choose version to Rollback dropdown, select the revision to rollback to.
- Review the changes in the revision.
- In the Rollout Player, click Rollback to.
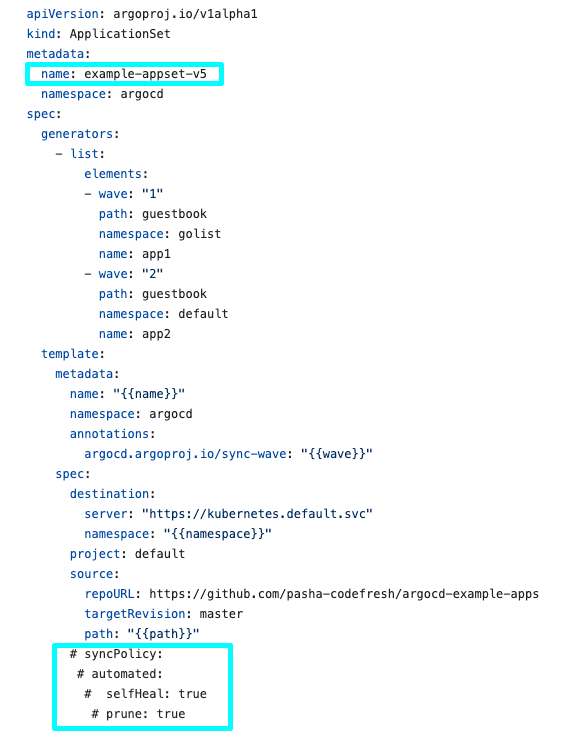
Rename an Application Set
Rename an Application Set and point all existing applications to the renamed Application Set.
- In the Codefresh UI, from the sidebar, select GitOps Apps.
- Click the Git Source application with the Application Set.
- From the Application Header, click the link in Source to go the repo in your Shared Configuration Repository.
- In Git, open the
appset.yaml, click Edit, and do the following:- Rename the ApplicationSet as needed.
- Disable auto-sync by commenting out the lines with sync options.
- Commit the changes.
- Go back to the GitOps Apps dashboard in the Codefresh UI, and verify that the Current State tab displays the renamed ApplicationSet.
As you can see in the picture below, the Current State tab displays the new ApplicationSet, but the applications still point to the old ApplicationSet.
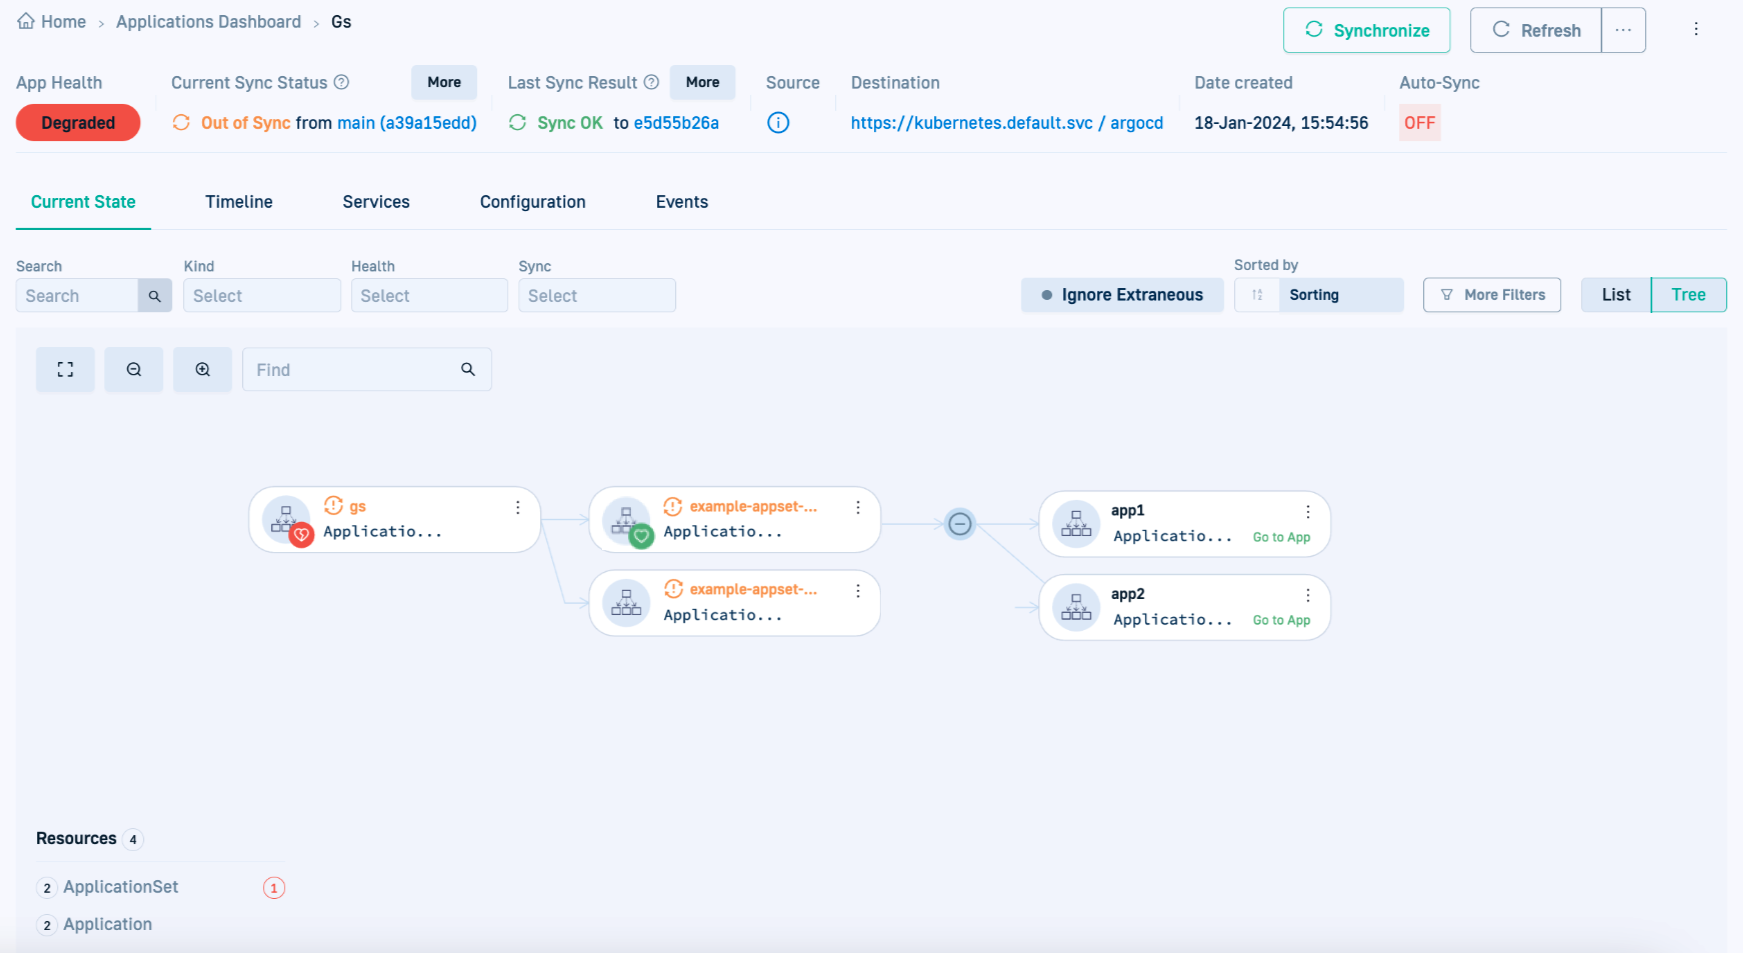
- Go to the cluster with the applications, and change Owner Reference of the existing applications to point them to the new ApplicationSet by running:
kubectl get applications -o=json -n <namespace> | jq -r '.items[] | select(.metadata.ownerReferences[0].name == "<orginal-appset-name>") | .metadata.name' | xargs -I {} kubectl patch application {} --type="json" -p='[{"op": "replace", "path": "/metadata/ownerReferences/0/name", "value": "<new-appset-name>"}]' -n <namespace>where:
<namespace>is the namespace on the cluster where the applications are deployed, for example,argocd.<orginal-appset-name>is the old name of the ApplicationSet, for example,"example-appset-v4".<new-appset-name>is the new name of the renamed ApplicationSet, for example,"example-appset-v5".
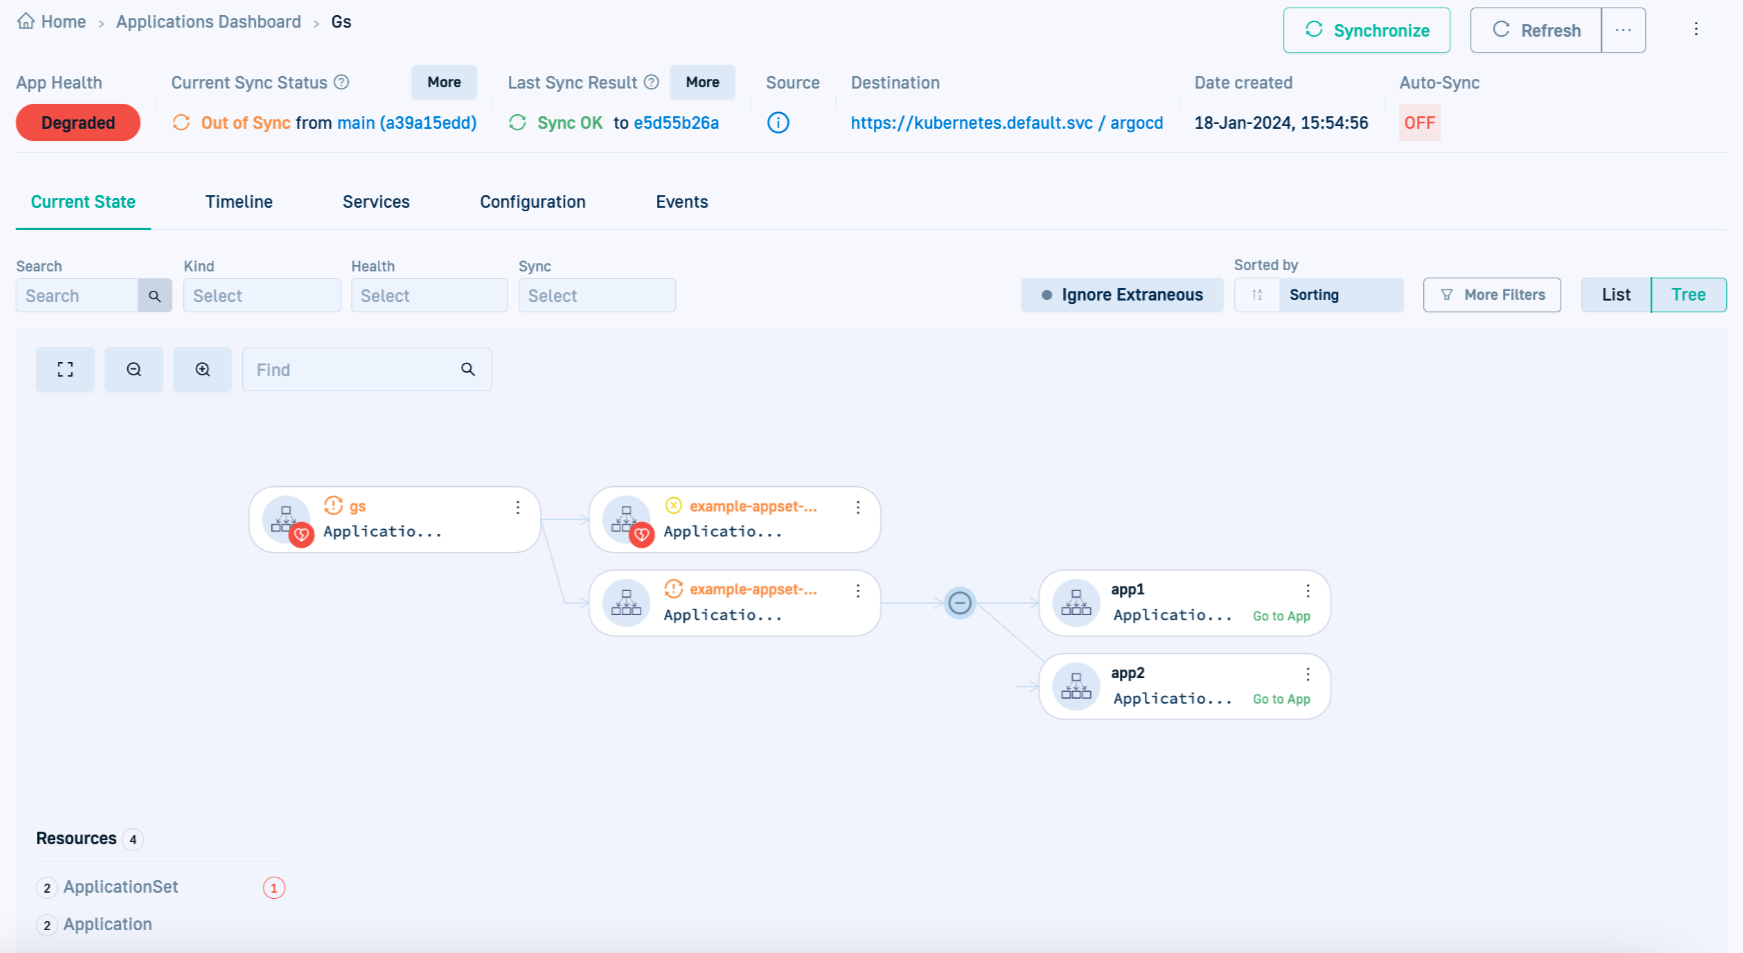
- Go back to the GitOps dashboard in the Codefresh UI, and in the Current State tab make sure that the applications are now linked to the renamed (new) ApplicationSet.
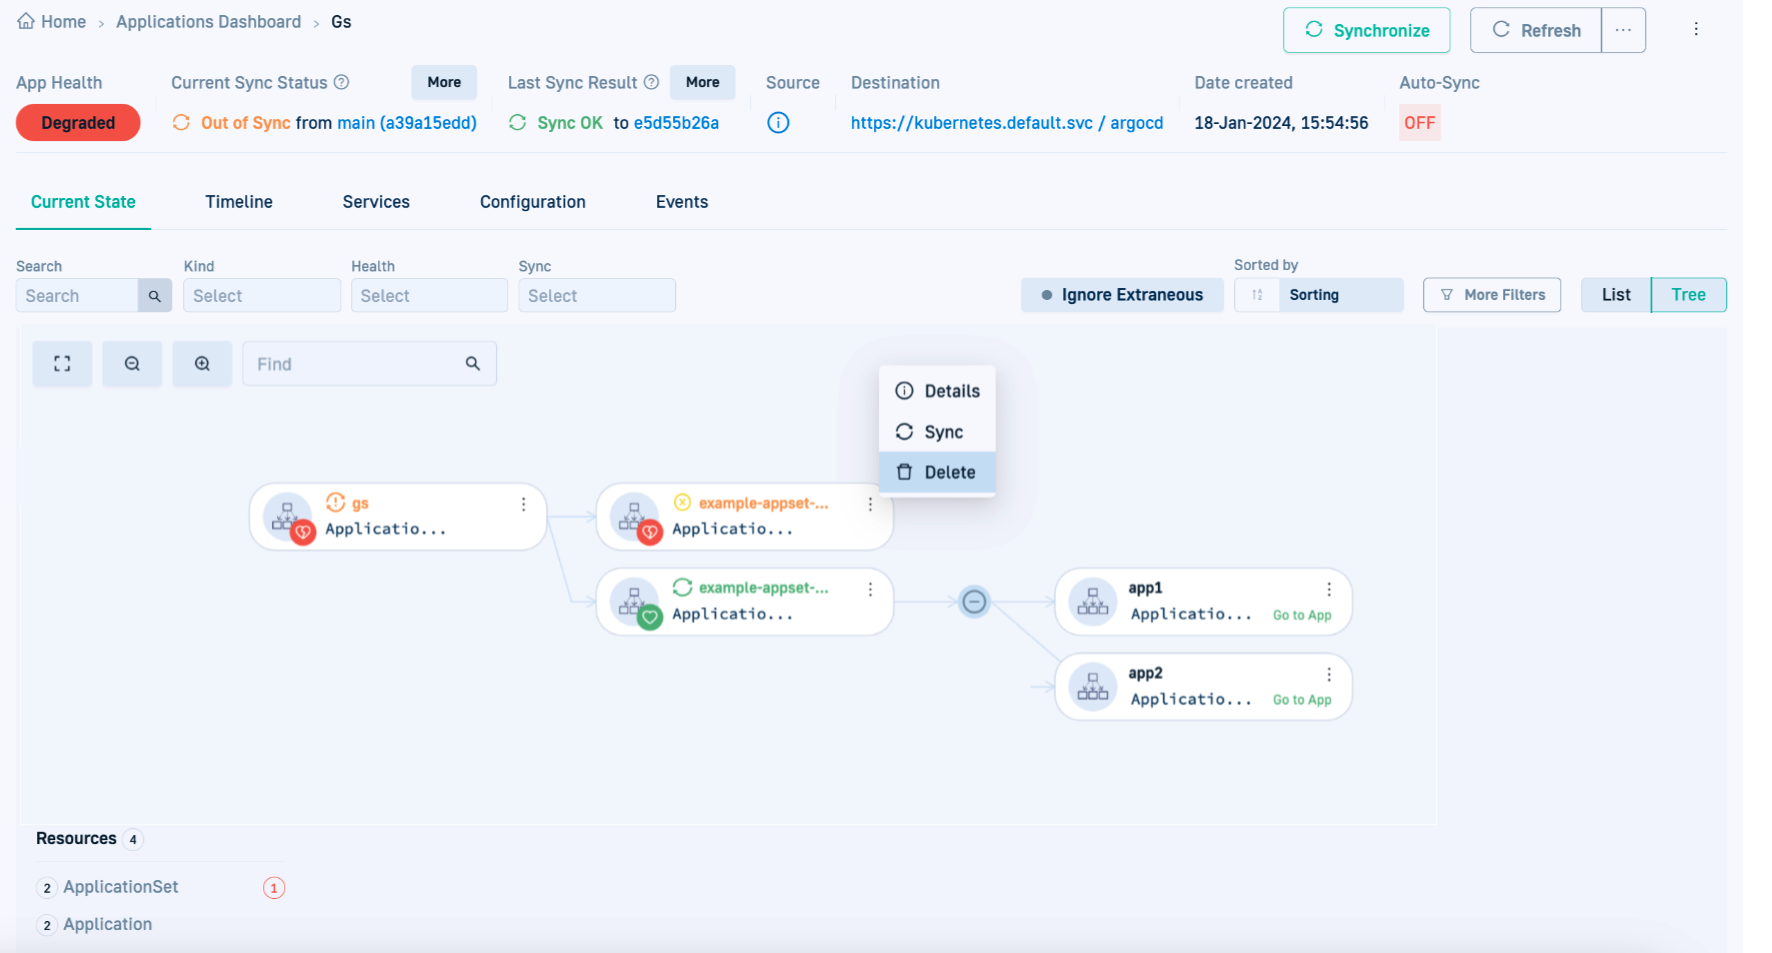
- Click Synchronize and wait for the synchronization to complete.
- Delete the old ApplicationSet, as described in Delete Argo CD applications in this article.
Enable precise sync detection for monorepo apps
Enable the ACR (Application Change Revision) Controller in GitOps Runtimes to precisely detect sync operations that triggered deployments for applications in monorepo setups.
NOTE
Not supported for GitOps Runtime installations with existing Argo CD.
ACR Controller When enabled, the ACR Controller:
- Identifies and tracks application-specific changes by analyzing the application’s source path.
- Compares revisions to identify the specific sync operation that triggered the promotion or deployment.
- Automatically adds the
.app.status.operationState.operation.sync.changeRevisionto application manifests.
To trigger and customize notifications for the identified revision, update the notification controller and configure the notification template accordingly.
How to
- If needed, upgrade your Runtime to version 0.13.0 or higher.
- In the Runtime's
values.yaml, enable the ACR controller by adding the following to theargo-cdsection:argo-cd: acrController: enabled: true - In the notification controller, switch the revision being used to
.app.status.operationState.operation.sync.changeRevision.
Here's an example with the new notification trigger:
trigger.on-deployed: | - description: Application is synced and healthy. Triggered once per commit. when: app.status.health.status == 'Healthy' and app.status.operationState != nil and app.status.operationState.operation.sync.changeRevision != nil and app.status.operationState.phase in ['Succeeded'] oncePer: app.status.operationState.operation.sync.changeRevision send: - app-deployed -
Configure the notification template to report the
changeRevision, as in the example below:message: "Author: {{(call .repo.GetCommitMetadata .app.status.operationState.operation.sync.changeRevision).Author}}, message: {{(call .repo.GetCommitMetadata .app.status.operationState.operation.sync.changeRevision).Message}}" - If you don't receive notifications, see Not receiving application-scoped sync notifications with ACR Controller.
Delete Argo CD applications
Delete an Argo CD application from Codefresh. Deleting an application deletes the manifest from the Git repository, and then from the cluster where it is deployed. When deleted from the cluster, the application is removed from the GitOps Apps dashboard in Codefresh.
WARNING
Prune resources in the application’s General settings determines the scope of the delete action.
When selected, both the application and its resources are deleted. When cleared, only the application is deleted. For more information, review Sync settings.
Codefresh warns you of the implication of deleting the selected application in the Delete form.
- In the Codefresh UI, from the sidebar, select GitOps Apps.
- Select the application to delete.
- Click the three dots for additional actions, and select Delete.

Pay attention to the impact of the delete action for the selected application that Codefresh displays.
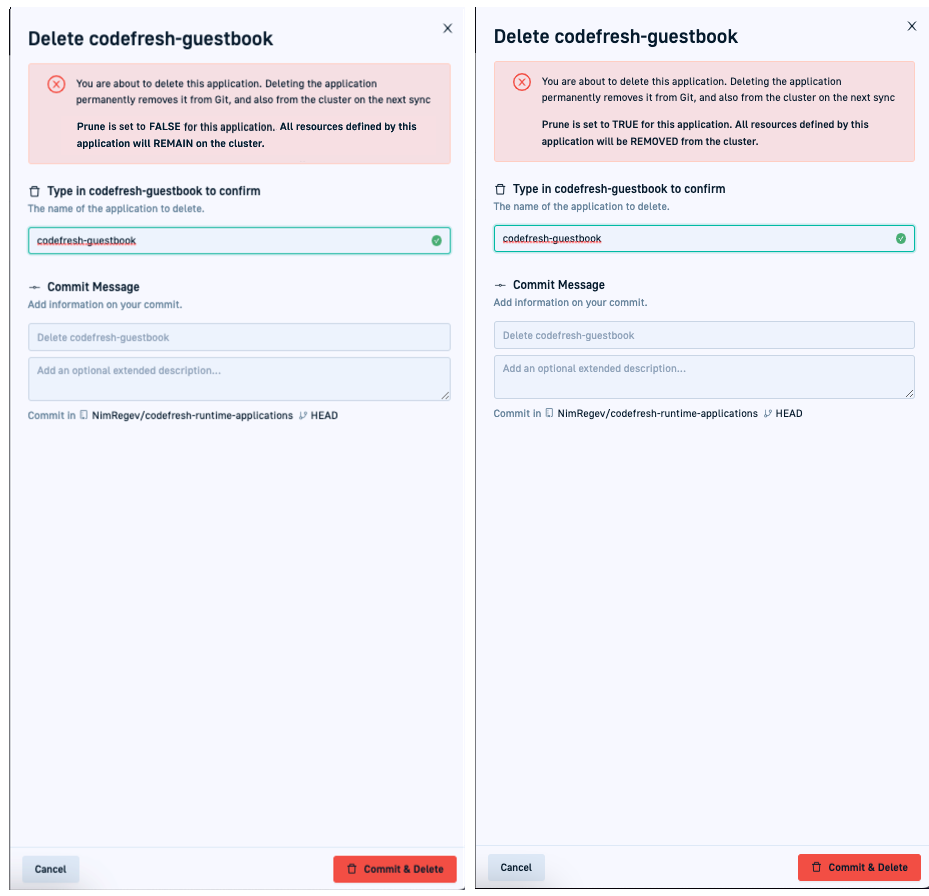
- To confirm, click Commit & Delete.
Add external links to application resources
Add external links to application resources through annotations to view and access them directly from the Current State’s Tree view.
External links include links to dashboards such as monitoring dashboards, documentation, or any other external resource you think is relevant to the resource.
See Argo CD’s documentation on Adding external URL.
- From the sidebar, select GitOps Apps, and then select the application for which to add external links.
- Add the following annotation:
...
metadata:
  annotations:
    link.argocd.argoproj.io/external-link: <external-link. # http://my-grafana.example.com/pre-generated-link
...
- Click the icon is displayed next to the resource in the Tree view to access the external link.
Related articles
Creating Argo CD applications
Monitoring Argo CD applications
Troubleshooting Argo CD applications
GitOps Apps dashboard
Environments dashboard
Products dashboard
DORA metrics