OIDC in pipelines
Set up short-lived token authentication with OpenID Connect in Codefresh pipelines
Codefresh pipelines frequently interact with different cloud providers to access their services, resources, and execute tasks. Access to these cloud providers is generally controlled through long-lived secrets, defined, stored, and managed in Codefresh.
With OpenID Connect (OIDC), you can take a different approach by configuring your pipeline to request a short-lived access token directly from the cloud provider with OIDC support. Providers who currently support OIDC include among others, Amazon Web Services, Azure, Google Cloud Platform, and HashiCorp Vault.
Whether you are a SaaS user or running Codefresh on-premises, you can obtain these ID tokens from the Codefresh OIDC provider (trusted by the cloud provider), and use them in your pipelines to perform the actions you need.
What are the benefits of OIDC ID tokens?
In Codefresh, cloud provider credentials are defined and stored as static credentials when setting up the integration with the provider, and then referenced in the pipeline through the integration name.
With OIDC, Codefresh pipelines can utilize short-lived ID tokens for authentication during execution, instead of long-lived static credentials. These ID tokens do not need to be stored and managed in Codefresh. See OIDC ID tokens, standard & custom claims.
How do you set up OIDC for Codefresh pipelines?
The bulk of the process to set up the OIDC ID token in Codefresh pipelines is on the cloud provider’s platform.
The setup requires configuring Codefresh as an OIDC provider, establishing the trust relationship, and defining the OIDC claims to enable secure authentication for the actions performed by the pipeline.
The specific steps vary depending on the cloud provider. Codefresh is cloud-provider agnostic, with the only requirement being that the cloud provider supports OIDC. For detailed instructions, please refer to the documentation of your preferred cloud provider.
After setup, to use the ID token, on the Codefresh side, we have a dedicated Marketplace step. The step when added to the pipeline, obtains the ID token without any action required from you.
Review the generic setup for OIDC, or follow the instructions in our example for OIDC with AWS (Amazon Web Services).
Creating artifacts signed with Codefresh OIDC and keyless signing
Once you have set up Codefresh as an OIDC provider, you can sign container images created by Codefresh pipelines with the keyless signing method introduced by sigstore. See Securing container images with OIDC and keyless signing.
Any organization can then verify artifacts created and signed by Codefresh pipelines. See Verifying artifacts signed with Codefresh pipelines.
OIDC ID tokens, standard & custom claims
The ID token is a JSON Web Token (JWT) which contains claims on the authentication and authorization of the user or resource. The claim is a piece of information included in the ID token providing details about the identity, attributes, and other information for the cloud provider to authorize the access request.
Claims & conditions
One of the key strengths of integrating OIDC into your Codefresh pipelines lies in the power of conditions defined through claims. Claims, which provide essential user information, offer far more than just identity verification. They allow you to introduce fine-grained access control based on entity attributes such as account and pipeline IDs, Git repositories and branches, and more.
By defining conditions through claims, you can ensure that only authorized resources within your organization have access. An example of a simple condition would be to allow access to all pipelines by account ID.
To enforce secure access, you must configure at least one condition on the subject claim, and additional claims as needed. As cloud providers do not enforce conditions by default, without conditions in place, anyone can request an ID token and potentially perform actions.
Standard OIDC claims
OIDC provides a list of common claims, as described in standard Claims.
Codefresh supports a subset of standard claims which are listed below. Generally, both the audience (aud) and the subject (sub) claims are used to authorize access.
- audience (
aud) claim
Theaudclaim is the Client ID, which is the URL of the Codefresh platform instance. - subject (
sub) claim
Thesubclaim is a string value concatenated from the different claims representing the precise authentication and authorization required for access. - issuer (
iss) claim The OIDC provider that issued the token, and is alwayshttps://oidc.codefresh.io. - issued at (
iat) claim
The time when the ID token was issued. - exp (
exp) claim
The time when the ID token is set to expire.
The cloud provider verifies that the claims in the request token matches the claims defined in aud and the sub claims before issuing the ID token.
Custom Codefresh claims
Codefresh provides custom claims as listed in the table below. The specific claims you would use are determined by the pipeline’s trigger type, and change according to the workflow.
Git triggers include several custom Source Code Management (SCM) claims to filter by repository, branch, and more. Use these claims to create conditions, as simple or as complex as you need to, for granular access control.
| Custom Codefresh Claim | Description |
|---|---|
account_id |
The ID of the account authorized in the claim. For example, 5f30ebd30312313ae7008. Specifying the account ID restricts access to pipelines at the account-level. |
account_name |
The name of the account authorized in the claim. For example, dev-ops. Specifying the account name, similar to account_id, restricts access to pipelines at the account-level. |
pipeline_id |
The ID of the pipeline authorized in the claim. For example, 64f0c40800aafd1455566. Specifying the pipeline ID, restricts access to only builds from the pipeline with that ID. |
pipeline_name |
The name of the pipeline authorized in the claim. For example, oidc/git-run. Specifying the pipeline name, restricts access to only builds from the pipeline with that name. |
workflow_id |
The ID of the specific workflow authorized in the claim. For example, 64f447c02199f903000gh20. Specifying the workflow ID restricts access to a single build with that ID. |
initiator |
Applies to manual trigger types, and is the username of the user manually triggered the pipeline, by clicking Run from the Codefresh UI, or from the CLI. For example, codefresh-user. |
scm_repo_url |
Applies to Git push, PR, and manual Git trigger types. The SCM URL specifying the Git repository’s location. For example, https://github.com/codefresh-user/oidc-test. |
scm_user_name |
Applies to Git push, PR, and manual Git trigger types. The SCM name of the user who initiated the Git action. For example, codefresh-user. |
scm_ref |
Applies to Git push, PR, and manual Git trigger types. The SCM name of the branch or tag within the Git repository for which the workflow should execute. For example, main or v1.0.0. |
scm_pull_request_target_branch |
Applies to Git PR trigger types. The SCM target branch the pull request should merge into. For example, production. |
Codefresh trigger types for Subject claims
The table below lists the different types of Codefresh triggers, and the corresponding syntax for each part of the sub claim.
| Trigger type | Subject claim syntax | Example |
|---|---|---|
| Cron | account:{accountId}:pipeline:{pipelineId} |
account:5f30ebd30312313ae7f17948:pipeline:64de5cd47626b3ca134e7 |
| Manual trigger (when user runs pipeline manually) |
account:{accountId}:pipeline:{pipelineId}:initiator{user} |
account:5f30ebd30312313ae7f17948:pipeline:64de5cd47626b3ca134e760a:codefresh-user |
| Git push trigger | account:{accountId}:pipeline:{pipelineId}:scm_repo_url:{scmRepoUrl}:scm_user_name:{scmUserName}:scm_ref:{scmRefSuchAsBranchOrTag} |
account:5f30ebd30312313ae7f17948:pipeline:64de5cd47626b3ca134e760a:*:scm_repo_url:https://github.com/codefresh-io/production/:scm_user_name:codefresh-user:scm_ref:oidc/staging |
| Git pull request (PR) trigger | account:{accountId}:pipeline:{pipelineId}:scm_repo_url:{scmRepoUrl}:scm_user_name:{scmUserName}:scm_ref:{scmRefSuchAsBranchOrTag}:scm_pull_request_target_branch:{scmPullRequestTargetBranch} |
account:5f30ebd30312313ae7f17948:pipeline:64de5cd47626b3ca134e760a:*:scm_repo_url:https://github.com/codefresh-io/production/:scm_user_name:codefresh-user:scm_ref:oidc/staging:scm_pull_request_target_branch:oidc/production |
| Manual Git push trigger (when user runs pipeline manually to mimic a Git trigger) |
account:{accountId}:pipeline:{pipelineId}:initiator:{initiatorUserName}:scm_repo_url:{scmRepoUrl}:scm_user_name:{scmUserName}:scm_ref:{scmRefSuchAsBranchOrTag} |
account:5f30ebd30312313ae7f17948:pipeline:64de5cd47626b3ca134e760a:*:scm_repo_url:https://github.com/codefresh-io/production/:scm_user_name:codefresh-user:scm_ref:oidc/staging |
Examples of ID token payload
Here is an example of the payload of an ID token issued by Codefresh as the OIDC provider with a combination of standard and custom claims.
As you can see, the sub claim concatenates several of the custom claims for the Git trigger in this example.
{
  "sub": "account:5f30ebd30312313ae7008:pipeline:64f0c40800aafd1455566:scm_repo_url:https://github.com/codefresh-user/oidc-test:scm_user_name:codefresh-user:scm_ref:codefresh-patch-3",
  "account_id": "5f30ebd30312313ae7008",
  "account_name": "codefresh-user",
  "pipeline_id": "64f0c40800aafd1455566",
  "pipeline_name": "oidc/git-run",
  "workflow_id": "64f447c02199f903000gh20",
  "scm_user_name": "codefresh-user",
  "scm_repo_url": "https://github.com/codefresh-user/oidc-test",
  "scm_ref": "codefresh-patch-3",
  "aud": "https://g.codefresh.io",
  "exp": 1693731108,
  "iat": 1693730808,
  "iss": "https://oidc.codefresh.io"
}
The standard claims include sub aud, exp, iat, and iss.
The custom claims are specific to the type of Git trigger, and can include account_id, account_name, pipeline_id, pipeline_name, workflow_id, scm_user_name, scm_repo_url and scm_ref. The same claims can also be included in the sub claim.
OIDC setup for Codefresh pipelines
Here are the steps required for OIDC ID token usage in Codefresh pipelines:

- Add Codefresh as an OIDC provider in the cloud provider platform
- Create the trust relationship between Codefresh OIDC and the cloud provider
- Use Codefresh’s dedicated Marketplace step to obtain the ID token from Codefresh OIDC
- Define the actions to be performed against the cloud provider
Step 1: Add Codefresh as OIDC identity provider
The first step is to integrate Codefresh as an OIDC identity provider in the cloud provider platform.
Make sure you define the following settings:
- Provider type: OIDC
- Provider URL: The URL of the OIDC provider’s authorization server, which is the Codefresh OIDC domain,
https//oidc.codefresh.io. - Client ID: The URL of the Codefresh platform. For SaaS,
https://g.codefresh.io.
For on-premises, this is the URL of your Codefresh instance, for example,https://<my.company.com>/codefresh.io.
Step 2: Create trust and configure claims for Codefresh OIDC identity provider
Once you’ve added Codefresh as an OIDC provider, the next step is to establish trust between your cloud provider and the OIDC provider, Codefresh in our case.
To create trust, define the claims, and configure the conditions for each claim.
- For Codefresh pipelines, the claims depend on the type of trigger.
- The syntax to create the
subclaim is similar for all identity providers, and is a concatenation of different claims, separated by colons. These generally include the account, pipeline, initiator, and for Git triggers, SCM (Source Code Management) data such as the repo URL or branch, and for PRs, the target branch to merge to.
See Custom Codefresh claims and Codefresh trigger types for Subject claims in this article.
WARNING
It is essential that you configure at least one condition to enforce secure access.
As the cloud providers themselves do not enforce conditions by default, without conditions in place, anyone can request an ID token and potentially perform actions.
This completes the OIDC setup for Codefresh pipelines in the cloud provider.
You can move on to the Codefresh platform to obtain and use the OIDC ID token in the pipeline workflow, as described in the steps that follow.
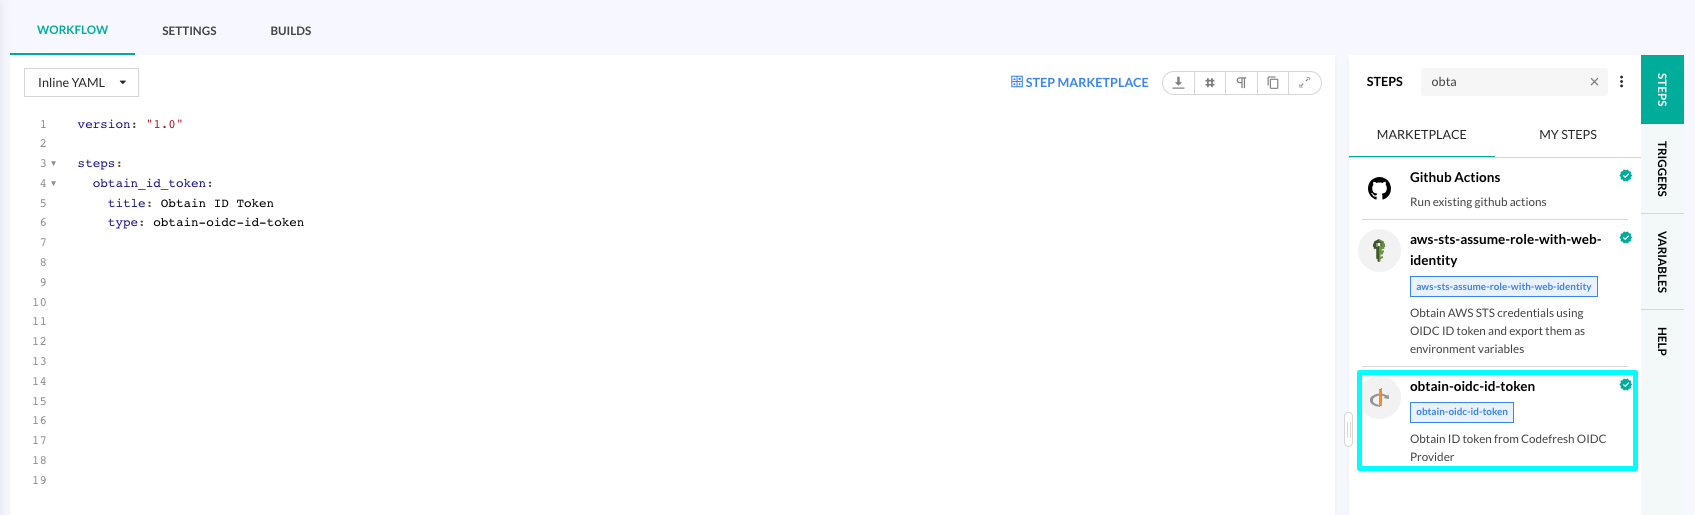
Step 3: Obtain OIDC ID token from OIDC provider
Obtain the ID token from the Codefresh OIDC provider to authenticate and authorize pipeline actions. Codefresh makes this simple by offering a dedicated Marketplace step, the obtain-oidc-id-token step, which you can seamlessly add to your pipeline, without the need for additional configuration or parameters on your part.
What does the obtain-oidc-id-token Marketplace step do?
The step:
- Makes an API call to the Codefresh OIDC provider passing the
CF_OIDC_REQUEST_TOKENand theCF_OIDC_REQUEST_URLvariables.
NOTE
Codefresh injects these two variables for every pipeline build, ensuring their availability for use, regardless of the cloud provider’s authentication mechanism, whether it’s OIDC ID tokens or static credentials.
Example:
curl -H "Authorization: $CF_OIDC_REQUEST_TOKEN" "$CF_OIDC_REQUEST_URL"
where:
* CF_OIDC_REQUEST_TOKEN is an access token used to request the OIDC ID token for the OIDC provider.
* CF_OIDC_REQUEST_URL is the URL from which to request the ID token.
You can also insert the curl command as an API call in a freestyle step to get the same result.
- Sets the ID token in the
ID_TOKENenvironment variable.
You can use this environment variable in subsequent steps within the same pipeline.
Requesting new OIDC ID tokens during build
-
OIDC ID tokens expire after five minutes. If needed, you can request new OIDC ID tokens multiple times within the same pipeline, through the
obtain-oidc-id-tokenstep, or within afreestylestep with an API call. -
The
CF_OIDC_REQUEST_TOKENvariable with the request token remains valid for the duration of the pipeline build. This restriction maintains security as requests for new OIDC tokens are limited to the build’s lifecycle.
How to
- Add the step to your Codefresh pipeline’s workflow.
version: '1.0'
steps:
obtain_id_token:
  title: Obtain ID Token
  type: obtain-oidc-id-token
Step 4: Add steps to perform actions in the cloud provider
Add steps to the pipeline YAML to perform the required actions in the cloud provider. The specific steps required depend on the cloud provider you choose.
For AWS, for example, you need a step to assume the required role and another step with the desired action to perform.
Codefresh OIDC for AWS
This section walks you through setting up OIDC for Codefresh pipelines on AWS as an example. For more information, see AWS documentation on Creating OpenID Connect (OIDC) identity providers and Creating a role for web identity or OpenID Connect Federation (console).
Step 1 for AWS: Add Codefresh as an OIDC provider
- Log in to AWS.
- Search for IAM and go to the IAM dashboard.
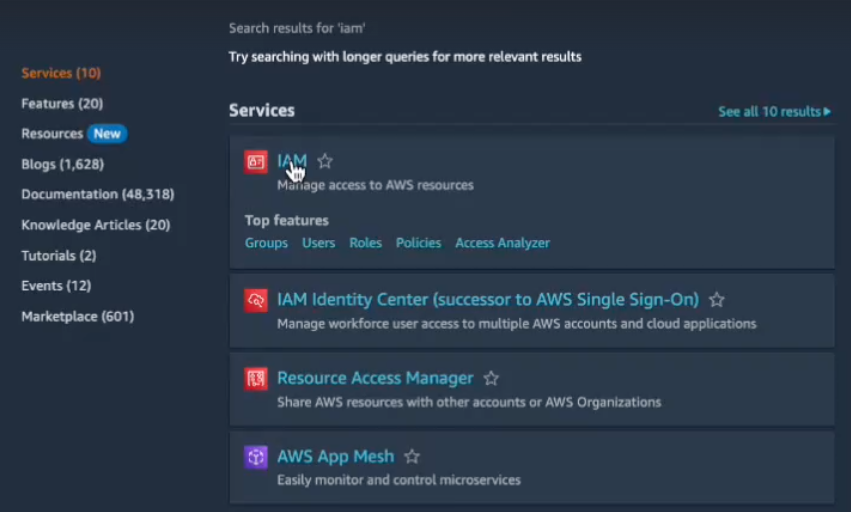
- From the sidebar, select Identity providers, and then click Add provider.
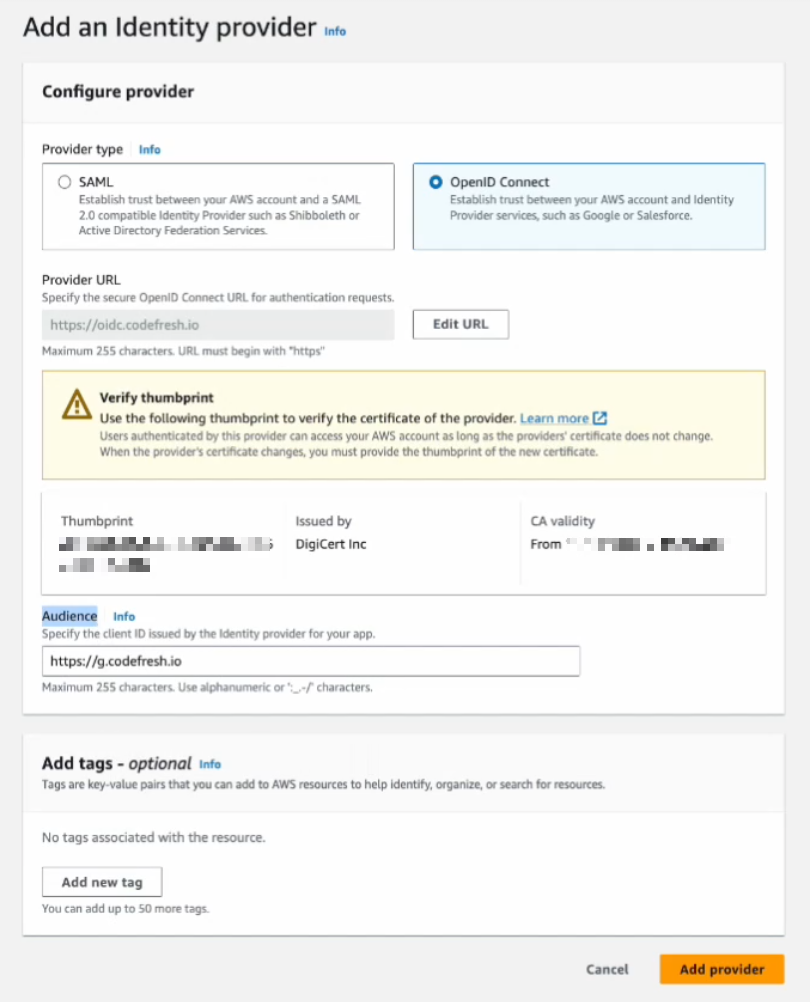
- In the Add an Identity Provider form, do the following:
- Select Provider type as OpenID Connect.
- Enter a meaningful name for the Provider.
- In the Audience field, enter the client ID for Codefresh:
For SaaS customers, this is
https://g.codefresh.io.
For on-premises, this is the URL of their codefresh instance. - Click Add provider.
- Continue with Step 2 for AWS: Create a role to establish trust.
Step 2 for AWS: Create a role to establish trust
Establish the trust relationship between Codefresh OIDC and AWS by defining a role and its permissions.
For Codefresh, select the Custom trust policy. Custom trust policies are more flexible than other trust policies, as they allow you to configure complex conditions in the subject claim of the ID token allowed to assume the role. For example, you can specify both account and the pipeline IDs to restrict the claim to a specific account and to a specific pipeline.
Selecting Web identity as your trust policy, while allowing you to specify the identity providers from which to accept ID tokens, prevents you from configuring more granular control. You cannot restrict the claim to a specific account for example as with the Custom trusted entity.
Before you begin
- Familiarize yourself with Claims & conditions
How to
- Make sure you are still in Identity providers.
- Click View provider.
The information for Codefresh OIDC provider you added is displayed, including:- ARN (Amazon Resource Name) associated with an identity provider
- Audience which is the URL of the Codefresh platform instance

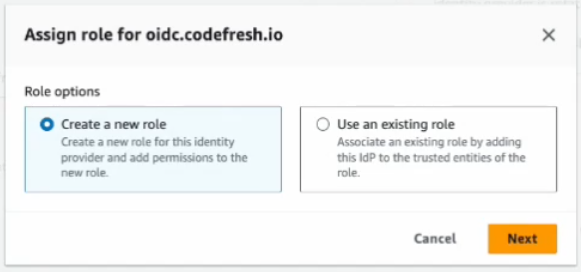
- Click Assign role, select Create a new role, and then click Next.
- From the Trusted entity types displayed, select Custom trust policy. The default custom trust policy is displayed.
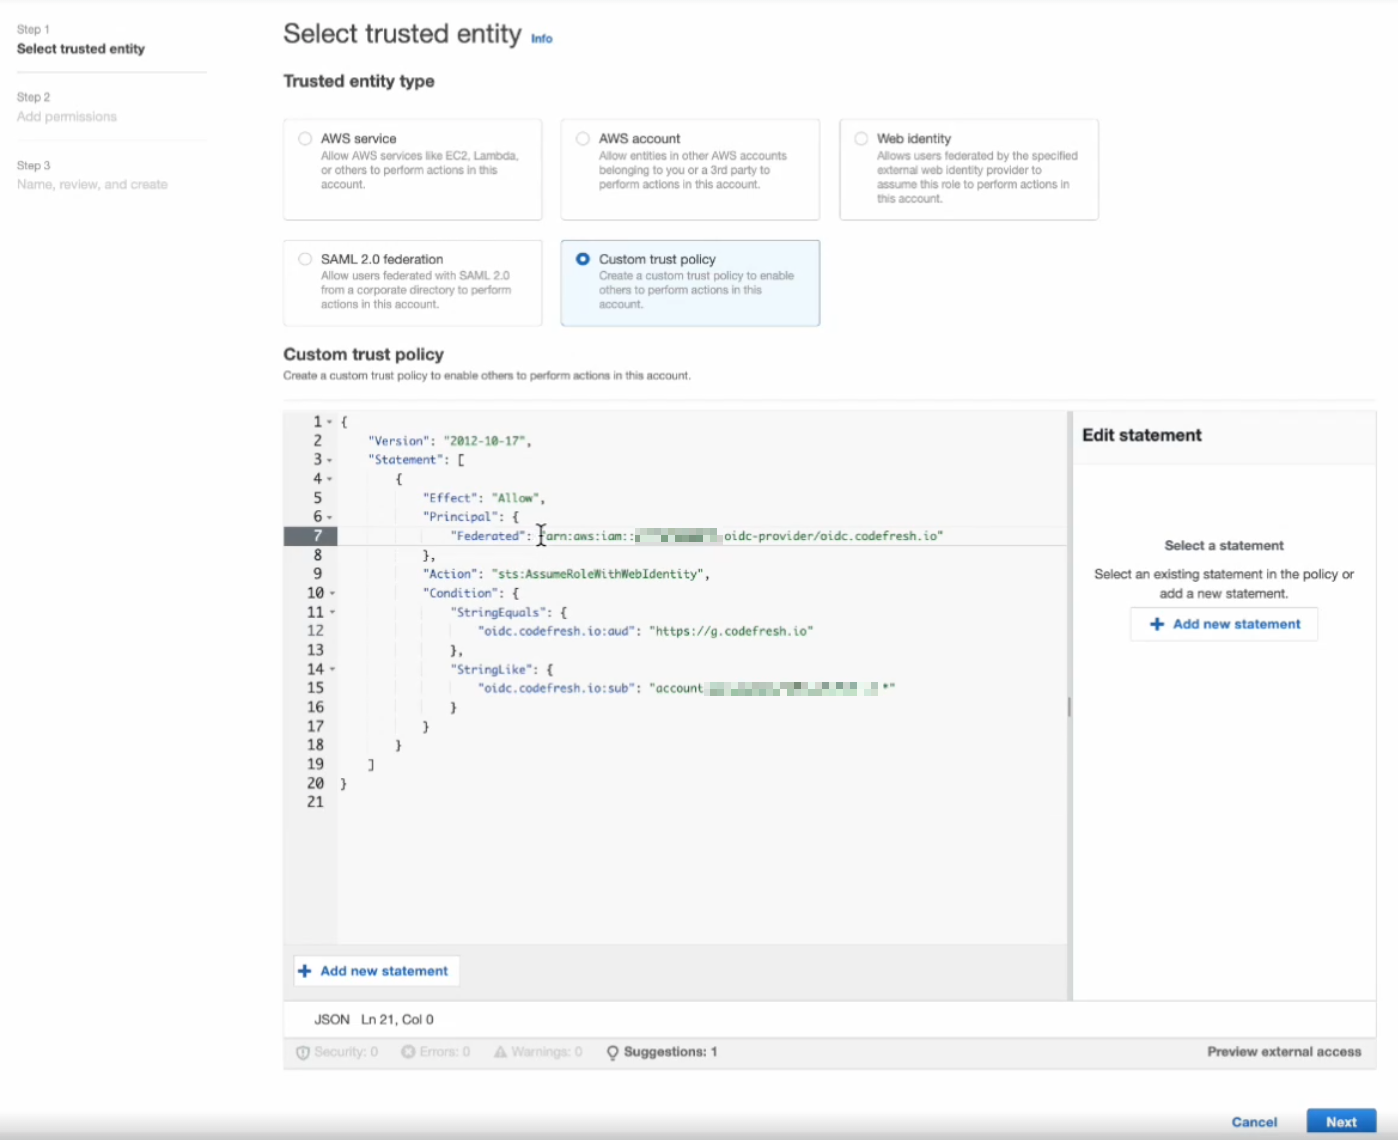
- Replace the
subclaims with the conditions you need for the specificsubclaim according to the Codefresh trigger type. If there is more than one condition, separate them with colons.
See Codefresh trigger types for Subject claims.
In the example below, only ID tokens issued for account ID5f30eb00t788899and pipeline ID64de5cd47626b3ca134e760awill be allowed to assume the role.{ "Version": "2012-10-17", "Statement": [ { "Effect": "Allow", "Principal": { "Federated": "arn:aws:iam::09550002000:oidc-provider/oidc.codefresh.io" # role created }, "Action": "sts:AssumeRoleWithWebIdentity", "Condition": { "StringEquals": { "oidc.codefresh.io:aud": "https://g.codefresh.io" # stay }, "StringLike": { "oidc.codefresh.io:sub": "account:5f30eb00t788899:pipeline:64de5cd47626b3a:*" ## change according to the trigger type } } } ] }
- Click Next, and then in the Add Permission page, click Next once again.
- In the Role details page, enter a meaningful Role name to identify the role.
- Click Create role.
- Continue with Step 3 for AWS: Specify permissions for the role to create a policy.
Step 3 for AWS: Specify permissions for the role to create a policy
Permissions define the actions permitted for this role with the cloud provider. Permissions differ according to the action needed.
- From the sidebar, select Roles.
- Search for the role you created.
- In the Permissions tab, click Add permissions, and then select Create inline policy.
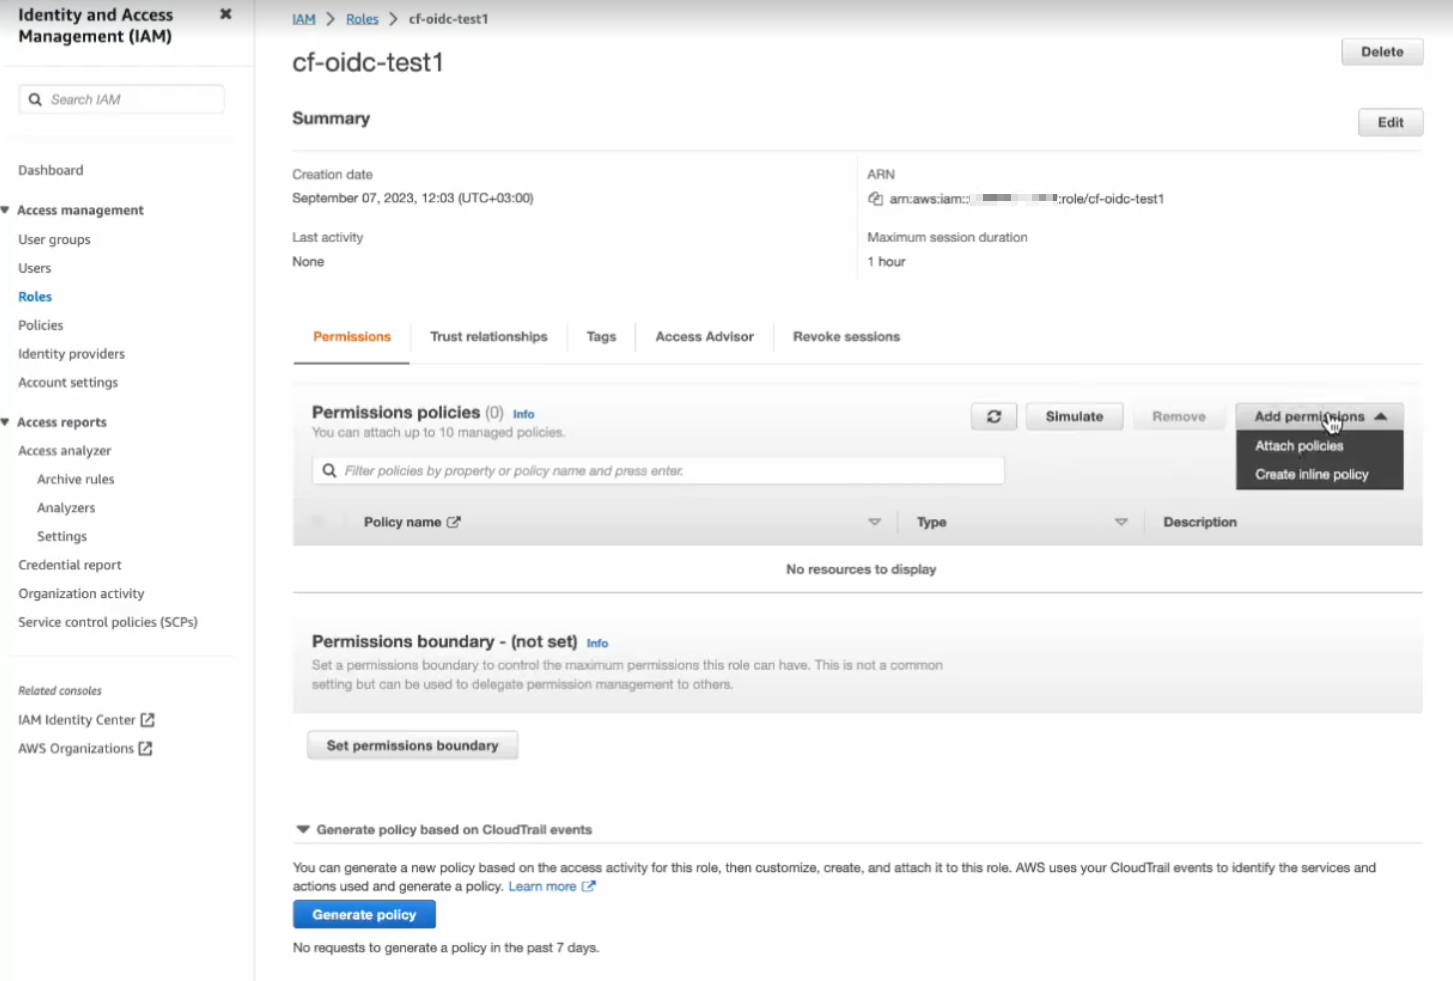
- In the Specify permissions page, do the following:
- Click JSON.
- Click Add new statement, and select the permissions from those available.
In the example, for S3 services, you would select S3 from the list of services, and to allow these actions such as adding and listing objects, you would add these statements to the Policy EditorAllowReadWriteAccessandAllowListAccess. - Click Next.
- In Policy details, enter a meaningful Policy name to identify the policy with the required permissions, and click Create policy
- Copy the ARN string for the role.
This step completes the setup for Codefresh as an OIDC provider for Amazon Web Services. The next steps are within Codefresh, to obtain the ID token and use it to perform actions in a Codefresh pipeline. - Continue with Step 4 for AWS: Add obtain ID token step to pipeline workflow.
Step 4 for AWS: Add obtain ID token step to pipeline workflow
The step obtains the ID token from Codefresh OIDC provider. Codefresh makes this easy with our dedicated Marketplace step, the obtain-oidc-id-token step.
- Sign in to Codefresh.
- Go to the pipeline with the workflow.
- Add the step to your Codefresh pipeline’s workflow.
The step makes an API call to the Codefresh OIDC provider and gets an ID token from the same. The token is passed in theID_TOKENenvironment variable.
version: '1.0'
steps:
  obtain_id_token:
    title: Obtain ID Token
    type: obtain-oidc-id-token
- Continue with Step 5 for AWS: Add actions to the pipeline workflow.
Step 5 for AWS: Add actions to the pipeline workflow
This step illustrates how to use the ID token obtained in step 4 to assume the role and perform actions on AWS.
Add two steps to the pipeline:
assume_rolestep in which specify the ARN role and the session name through two variables that you’ll add to the pipeline.s3_list_objectsfreestyl step which is the action you’ll perform using the role from the previous step 4 for AWS.
How to
- Paste the following into the pipeline editor, below the
obtain_id_tokenstep.
assume_role:
    title: Assume Role
    type: aws-sts-assume-role-with-web-identity
    arguments:
      ROLE_ARN: arn:aws:iam::095585280052:role/cf-oidc-test1 #example; syntax arn:aws:iam::<role-name>
      ROLE_SESSION_NAME: oidc-session #example

  s3_list_objects:
    title: s3_list_objects
    image: amazon/aws-cli
    commands:
      - aws s3 ls "s3://$BUCKET_NAME/"
NOTE
The cloud provider uses the ID token to authenticate the request to assume the role, after which the pipeline’s build performs the permitted action for the role, such as listing the objects in the S3 bucket.
Related articles
Steps in pipelines
Triggers in pipelines
Variables in pipelines
Codefresh YAML for pipeline definitions