Jira pipeline integration
Codefresh integrates with Jira in several ways, both to pull information from Jira to Codefresh and to push information from Codefresh to Jira for notifications.
Set up a Jira integration for pipelines, and then reference the integration in your pipeline through a custom or the jira-issue-extractor Marketplace step to extract the Jira issue. See Set up the integration with Jira for CI pipelines and Example of Jira integration in pipelines.
Optionally, a GitOps-based Jira integration allows you to enrich images with Jira information through a different Marketplace step.
For information on Jira integration for notifications, see Jira notification integrations for pipelines.
Authentication for Jira integrations
When set up, you can reference the specific Jira integration in the pipeline by name for Codefresh to automatically retrieve the integration credentials for authentication. This functionality avoids the need to repeatedly define authentication credentials.
When you add a new Jira integration in Codefresh, you can authenticate using either the:
-
Jira Marketplace App
Authentication through the Jira Marketplace App requires you to get the Client Key for the Codefresh application in Atlassian Jira. Codefresh currently has to provide you with access to use the Jira Marketplace App. Please get in touch for more information. -
Jira account Provide the username and password credentials for your Jira account.
Set up Jira integration for pipelines in Codefresh
IMPORTANT
The name assigned to the integration must be unique within the account. Using the same name for other integrations or Shared Configuration contexts within pipelines will result in conflicts.
For troubleshooting, see Error: context already exists.
Before you begin
To authenticate through the:
- Marketplace App: Make sure you have the Client Key for the Codefresh App from Jira
- Jira account: Make sure you have username and password for your Jira account
How to
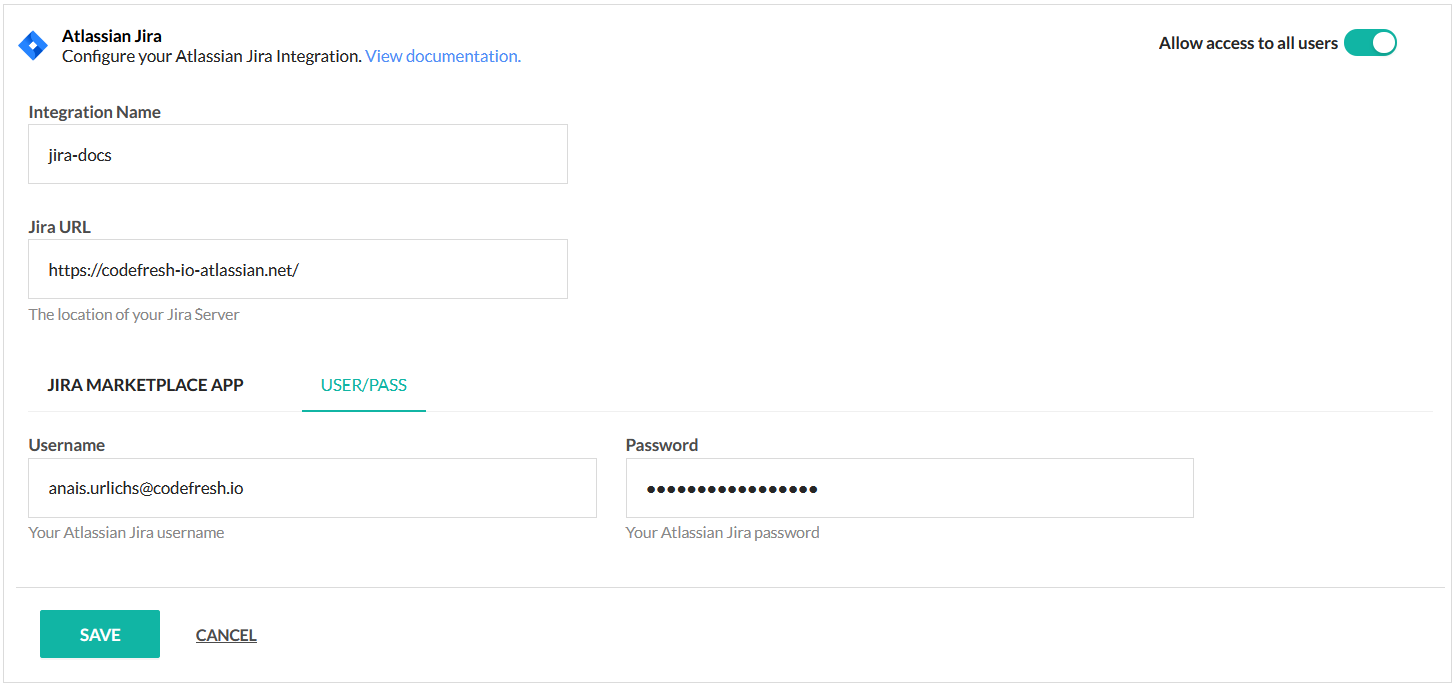
- In the Codefresh UI, on the toolbar, click the Settings icon, and then from the sidebar, select Pipeline Integrations.
- Select Atlassian Jira and then click Configure.
- Click Add Jira.
- In the Integration Name field, enter a name for the integration which will be used to reference it in
codefresh.yaml. - To restrict access to only Codefresh admins, toggle Allow access to all users to OFF.
- To authenticate through the Codefresh Marketplace App:
- Click Jira Marketplace App.
- Paste the Client Key you generated for the Codefresh App in Jira.
- To authenticate with your Jira account details:
- Select User/Pass, and define the following:
- Jira URL: The URL of your organization, for example,
https://company-name.atlassian.net. - Username: The username of your Jira account, usually the e-mail with which you are logged in to Jira.
- Password: The Jira password/token of your Jira account.
- For integration through Jira Marketplace App authentication, to verify the connection details, click Test Connection.
- To apply the changes, click Save.
You can now use the Jira integration in your pipelines.
Configure Codefresh app in Atlassian Jira
You need to generate the Organization URL and Client Key for the Codefresh application in Atlassian Jira.
NOTE
Currently Codefresh must provide you with access to use the Codefresh app in the Atlassian Marketplace App. Please get in touch for more information.
Before you begin
- Get access to the Codefresh application in the Atlassian Marketplace
How to
- In the Atlassian Marketplace, go to the Codefresh Application.
- To install the application, click Get it now. When prompted, confirm the installation.
- When the installation has completed, log in to your organization’s Jira account.
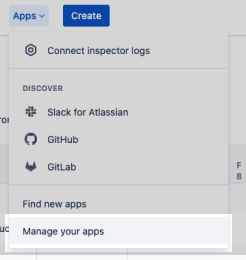
- From the Apps dropdown, select Explore more apps.
- In User-installed apps, locate the Codefresh CI/CD platform integration.
- Click Configure. This action will provide you with your Organization URL and the Client Key.
- Copy the Client Key. You will need these to set up Jira integration for pipelines in Codefresh with the Jira Marketplace App.
Example of Jira integration usage in Codefresh pipeline
Here’s an example of a pipeline with the jira-issue-extractor step that extracts the Jira issue matching the project prefix defined.
YAML
...
stages:
  - "build"
  - "test"
  - "metadata"
  - "deploy"

steps:
  extract_issue:
    title: Add Jira issue to docker image
    type: jira-issue-extractor
    stage: enrich image
    arguments:
      IMAGE: docker.io/codefresh/${{CF_REPO_NAME}}:${{CF_REVISION}}
      JIRA_PROJECT_PREFIX: SA
      MESSAGE: ${{CF_BRANCH_VERSION_NORMALIZED}}
      JIRA_CONTEXT: jira-p
GitOps-based Jira integration for image enrichment
Codefresh also supports Jira integration for GitOps.
GitOps-based Jira integration, combined with a registry integration, also GitOps-based, allows you to connect your CI pipeline with the integration to enrich the built image, and report the enriched image to Codefresh.
Here’s how you would do it:
- Set up Jira and registry integrations for GitOps
You need to connect Jira and your container registry to Codefresh. These integrations are specific to GitOps, and differ from the Jira and registry integrations that you may have already set up for your CI pipelines.
Once you set up the GitOps-based integrations, you can reference them in the CI pipeline through the report image step for Codefresh to retrieve the necessary information. - Create your Codefresh pipeline as you usually do.
- Place the final action in the pipeline as the report image action. See the example in the following section.
- When the pipeline completes execution, Codefresh retrieves the information on the image that was built and its metadata through the integration names specified.
- View the enriched image in Codefresh’s Images dashboard, and in any application in which it is used.
Example CI pipeline with image enrichment step
Below is an example of a CI pipeline using the Jira and registry integrations for GitOps.
The codefresh-report-image step, the last step in the pipeline, reports Jira and registry information to Codefresh. The values of the Git variables are populated from those you defined in the respective GitOps integrations.
When the build completes execution, you can see the associated metadata in the Images dashboard.
codefresh.yml
version: "1.0"
stages:
  - "clone"
  - "build"
  - "report"

steps:
  clone:
    title: "Cloning repository"
    type: "git-clone"
    repo: "${{CF_REPO_OWNER}}/${{CF_REPO_NAME}}"
    revision: "${{CF_BRANCH}}"
    stage: "clone"

  build:
    title: "Building Docker image"
    type: "build"
    image_name: "${{CF_REPO_OWNER}}/color"
    working_directory: "${{clone}}"
    tag: "${{CF_SHORT_REVISION}}"
    dockerfile: "Dockerfile"
    registry: docker-lr
    stage: "build"

  ReportImageMetadataAll:
    title: Report image to Codefresh CD
    type: codefresh-report-image
    working_directory: /code
    stage: "report"
    arguments:
      CF_API_KEY: '${{CF_API_KEY}}'
      CF_IMAGE: 'docker.io/${{CF_REPO_OWNER}}/color:${{CF_SHORT_REVISION}}'
      CF_CONTAINER_REGISTRY_INTEGRATION: docker
      CF_RUNTIME_NAME: "codefresh-hosted"
      CF_GITHUB_TOKEN: '${{GITHUB_TOKEN}}'
      CF_GIT_PROVIDER: github
      CF_GIT_REPO: '${{CF_REPO_OWNER}}/${{CF_REPO_NAME}}'
      CF_GIT_BRANCH: '${{CF_BRANCH}}'
      CF_ISSUE_TRACKING_INTEGRATION: jira
      CF_JIRA_MESSAGE: "${{CF_COMMIT_MESSAGE}}"
      CF_JIRA_PROJECT_PREFIX: CR
More integration options for Jira
Other integration options that Codefresh supports include using:
- Custom step integration
Use the custom step from our step Marketplace to connect your pipelines with Jira. - Jira-cli
Related articles
Examples for Codefresh pipelines
CI/CD guide for GitOps deployments
Example for sending notifications to Jira


