Deploy to Heroku
Deploy your application or image to Heroku
Heroku is a container-based cloud PaaS (Platform as a Service) software that allows you to deploy, run, and manage your applications. Built on top of AWS, it supports Ruby, Node.js, Java, Python, Clojure, Scala, Go and PHP.
This tutorial will cover two examples, depending on your use case. If you are not using containers, your use case is covered using the Codefresh heroku-deployer plugin (Example #1). If you are using containers, you can achieve deployment by using a combination of build, push, and freestyle steps (Example #2).
Example Django Application
You can find the example project on GitHub.
The repository contains a Django starter project with the following commands:
pip install -r requirements.txtto install dependencies.python -m unittest composeexample.utilsruns unit tests.python manage.py runserver 0.0.0.0:8000to start the application locally.
Once launched the application presents the Django starter page at localhost:8000.
Pipeline Example #1: Deploying Source Code to Heroku Using the Codefresh Heroku Plugin
Prerequisites
- A Codefresh account
- A free Heroku account
- A Heroku API token (you can find this under Account Settings and then scrolling down, you will find the API Key)
Create the pipeline
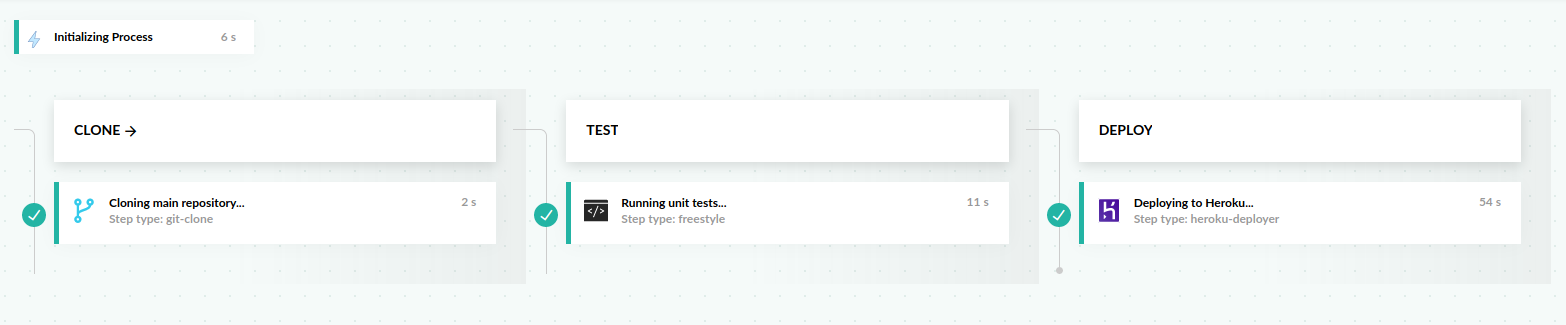
This pipeline has three stages: clone, test, and deploy.
You should be able to copy and paste this YAML in the in-line editor of the Codefresh UI. It will automatically clone the project for you.
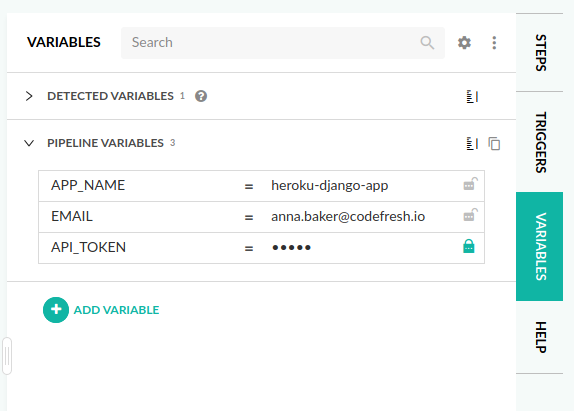
Note that you need to change the environment variables in the deploy stage to your respective values. You can do this through the Codefresh UI. Navigate to the in-line editor, and to the right you will find a tab labeled Variables.
codefresh.yml
version: '1.0'
stages:
 - clone
 - test
 - deploy
steps:
  clone:
    title: "Cloning main repository..."
    stage: "clone"
    type: "git-clone"
    arguments:
      repo: "codefresh-contrib/heroku-python-django-sample-app"
      revision: "master"
      git: "github"
  run_unit_tests:
     title: "Running unit tests..."
     stage: "test"
     type: "freestyle"
     working_directory: "${{clone}}"
     arguments:
       image: "python:3.6-slim"
       commands:
         - "pip install -r requirements.txt --cache-dir=/codefresh/volume/pip-cache"
         - "python -m unittest composeexample.utils"
  deploy_to_heroku:
    title: "Deploying to Heroku..."
    stage: "deploy"
    type: "heroku-deployer:1.0.2"
    arguments:
      APP_NAME: $APP_NAME
      EMAIL: $EMAIL
      API_TOKEN: $API_TOKEN
The above pipeline has the following steps:
- A git-clone step that clones the main repository
- A freestyle step that installs dependencies and runs the unit tests
- A freestyle step that deploys the application to Heroku using the heroku-deployer plugin from the Step Marketplace.
Pipeline Example #2: Deploy a Docker Image to Heroku
This example differs from the plugin usage, as it deploys a built Docker image to Heroku.
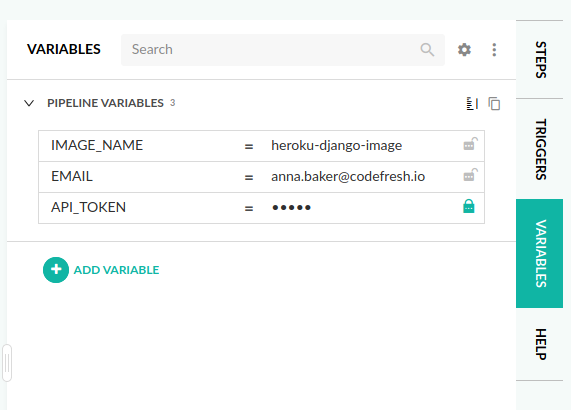
Note that you need to change the environment variables to your respective values. You can do this through the Codefresh UI. Navigate to the in-line editor, and to the right you will find a tab labeled Variables.
Prerequisites
- A Codefresh account
- A free Heroku account
- An empty repository already created in Heroku using the
heroku create <IMAGE_NAME>command - A Heroku registry connected to Codefresh
- A Heroku API token (you can find this under Account Settings and then scrolling down, you will find the API Key)
Create the pipeline
This pipeline has five stages: clone, build, test, push, and release.

You should be able to copy and paste this YAML in the in-line editor of the Codefresh UI. It will automatically clone the project for you.
codefresh-heroku-push-image.yml
version: '1.0'
version: '1.0'
stages:
 - clone
 - build
 - test
 - push
 - release
steps:
  clone:
    title: "Cloning main repository..."
    stage: "clone"
    type: "git-clone"
    arguments:
      repo: "codefresh-contrib/heroku-python-django-sample-app"
      revision: "master"
      git: "github"
  build:
    title: "Building Docker Image..."
    stage: "build"
    type: "build"
    working_directory: "./heroku-python-django-sample-app"
    arguments:
      image_name: "${{IMAGE_NAME}}"
      tag: "master"
      dockerfile: "Dockerfile"
  run_unit_tests:
     title: "Running unit tests..."
     stage: "test"
     type: "freestyle"
     working_directory: "./heroku-python-django-sample-app"
     arguments:
       image: '${{build}}'
       commands:
         - "python -m unittest composeexample.utils"
  push_image:
    title: "Pushing image to Heroku..."
    stage: "push"
    type: "push"
    arguments:
      candidate: '${{build}}'
      image_name: "${{IMAGE_NAME}}/web"
      registry: "heroku"
  release_image:
    title: "Releasing image..."
    stage: "release"
    type: "freestyle"
    arguments:
      image: "nazarcodefresh/heroku-cli:alpine"
      commands:
        - >-
          printf "machine api.heroku.com\n  login $EMAIL\n  password
          $API_TOKEN\nmachine git.heroku.com\n  login $EMAIL\n  password
          $API_TOKEN\n" > ~/.netrc
        - "heroku container:release --app $IMAGE_NAME web"
The pipeline does the following:
- Clones the main repository through the git-clone step.
- Builds our Docker image through a freestyle step.
- Runs unit tests on our Docker image through another freestyle step.
- Pushes to the Heroku registry through a push step.
- Releases the Docker image through another freestyle step.