Deploying to predefined environments
Deploy to different production and staging environments from Codefresh pipelines
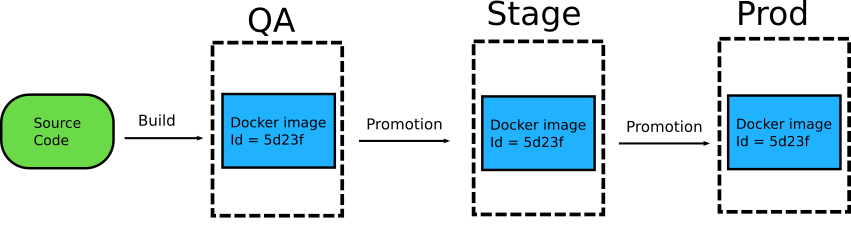
With Codefresh, you can deploy a single application to multiple environments, such as, qa, staging, prod, and manage all of them with single or multiple pipelines. This guide describes how an example application can be deployed with different configurations and various workflows for handling environment deployment.
Prerequisites
Before starting, you will need to:
- Create a Codefresh account
- Get access to a Kubernetes cluster on any cloud provider
- Connect the Kubernetes cluster to your account
- Install kubectl and helm and point them to your cluster
- Have Docker installed locally (optional)
Example application
As a running example, we will use a simple application with a Helm chart. Helm is the package manager for Kubernetes, and has built-in support for passing different configuration settings for each environment.
You can find the example Helm application at https://github.com/codefresh-contrib/helm-promotion-sample-app. If you want to follow along feel free to fork it on your own account.
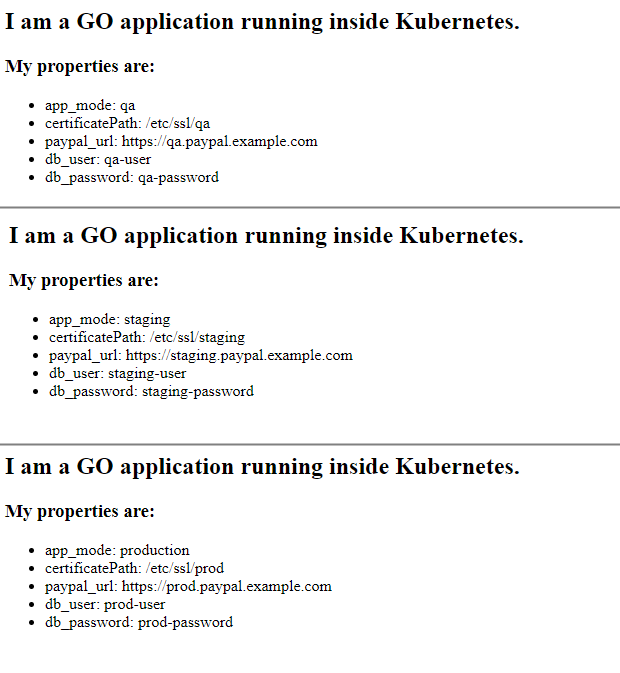
The application is a web page that prints out its own configuration as loaded from /config/settings.ini.
You can run the application locally on your own workstation with:
git clone https://github.com/codefresh-contrib/helm-promotion-sample-app.git
cd helm-promotion-sample-app
docker build . -t my-app
docker run -p 8080:8080 my-app
and then visit http://localhost:8080 in your browser.
In this example, we use a settings file in the INI format, but the same things apply with other configuration methods such as env files, Java properties, YAML/JSON configurations etc.
Different environment configurations
The application includes a Helm chart that contains values for three different environments:
- values-qa.yaml for the “QA” environment
- values-staging.yaml for the “Staging” environment
- values-prod.yaml for the “Production” environment
The values contained in the files are both for the application (e.g. payment service URL), as well as the infrastructure level (number of replicas inside the cluster). Note that the values for the application are dummy values that are not actually used by the application (they are simply shown in the web page). The number of replicas will take real effect on the cluster (the production configuration defines 2 replicas instead of 1).
TIP
For reasons of simplicity, the chart of the application is hosted in the same Git repository as the source code. As an alternative, you could also have a second Git repository with just the chart. Codefresh supports both ways.
Manual deployment to different environments
First let’s run the application manually in all three environments. Later we will automate the whole process with Codefresh pipelines. We wil create each environment as a namespace in the cluster:
kubectl create namespace qa
kubectl create namespace staging
kubectl create namespace production
Then we will install a copy on the application on each environment with the different values
git clone https://github.com/codefresh-contrib/helm-promotion-sample-app.git
cd helm-promotion-sample-app/chart
helm install example-qa sample-app -n qa -f values-qa.yaml
helm install example-staging sample-app -n staging -f values-staging.yaml
helm install example-prod sample-app -n production -f values-prod.yaml
At this point all three copies of the application should be up. You might need to wait some time until all the load balancers are up. You can see the running URLs with:
kubectl get service -A
If you visit the URL of each service in your browser you will see how the application looks in each environment.
Note that the application uses a Load Balancer and this means extra costs on your cloud provider. When you are ready to clean up the application run the following:
helm uninstall example-staging -n staging
helm uninstall example-prod -n production
helm uninstall example-qa -n qa
Note that for this guide, all three environments run on the same cluster. In a real application, you should use a separate cluster for production, and never mix production and non-production workloads. Also notice that the chart refers to the latest tag of the application container which is NOT a recommended practice. In a real application the chart should specify a specific tag that is versioned.
Basic deployment pipeline for different environments
Now that we have seen how manual deployment works, let’s automate the whole process with Codefresh. We will create a pipeline that:
- Deploys all commits to the
masterbranch in the production environment - Deploys all other commits to the staging environment
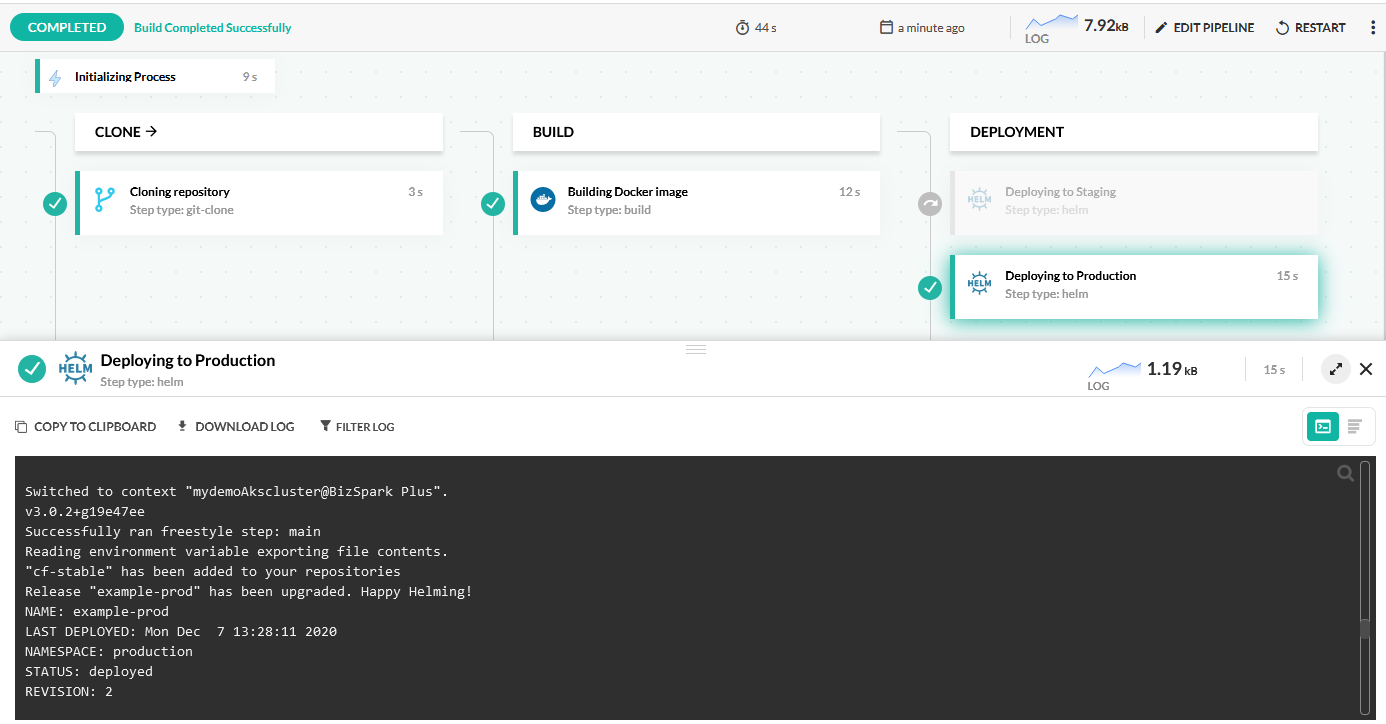
Here is a commit to master looks like:
This is a very simple workflow perfect for small teams that follow Continuous Deployment. You can use the same pattern in other workflows such as trunk based development.
The pipeline has the following steps
- A clone step to get the source code plus the Helm chart
- A build step to create and push the container image to Dockerhub
- A Helm step to perform the deployment. The step has conditions to select which environment will be used.
Here is the full pipeline:
codefresh.yml
version: "1.0"
stages:
  - "clone"
  - "build"
  - "deployment"

steps:
  clone:
    title: "Cloning repository"
    type: "git-clone"
    repo: "codefresh-contrib/helm-promotion-sample-app"
    revision: '${{CF_REVISION}}'
    stage: "clone"

  build:
    title: "Building Docker image"
    type: "build"
    image_name: "kostiscodefresh/helm-promotion-app"
    working_directory: "${{clone}}"
    tags:
    - "latest"
    - '${{CF_SHORT_REVISION}}'
    dockerfile: "Dockerfile"
    stage: "build"
    registry: dockerhub
  deployStaging:
    title: Deploying to Staging
    type: helm:1.1.12
    stage: deployment
    working_directory: ./helm-promotion-sample-app
    arguments:
      action: install
      chart_name: ./chart/sample-app
      release_name: example-staging
      helm_version: 3.0.2
      kube_context: 'mydemoAkscluster@BizSpark Plus'
      namespace: staging
      custom_value_files:
      - ./chart/values-staging.yaml
    when:
      branch:
        ignore:
          - master
  deployProd:
    title: Deploying to Production
    type: helm:1.1.12
    stage: deployment
    working_directory: ./helm-promotion-sample-app
    arguments:
      action: install
      chart_name: ./chart/sample-app
      release_name: example-prod
      helm_version: 3.0.2
      kube_context: 'mydemoAkscluster@BizSpark Plus'
      namespace: production
      custom_value_files:
      - ./chart/values-prod.yaml
    when:
      branch:
        only:
          - master
To test the pipeline and see how it behaves with different environments:
- Fork the Git repository to your own GitHub account
- Commit a dummy change in the
masterbranch, and you will see a deployment to the production namespace - Commit a dummy change to the
stagingbranch or any other branch of your choosing, and you will see a deployment to the staging namespace.
Here is how the pipeline looks when a commit happens to a branch that is not master:
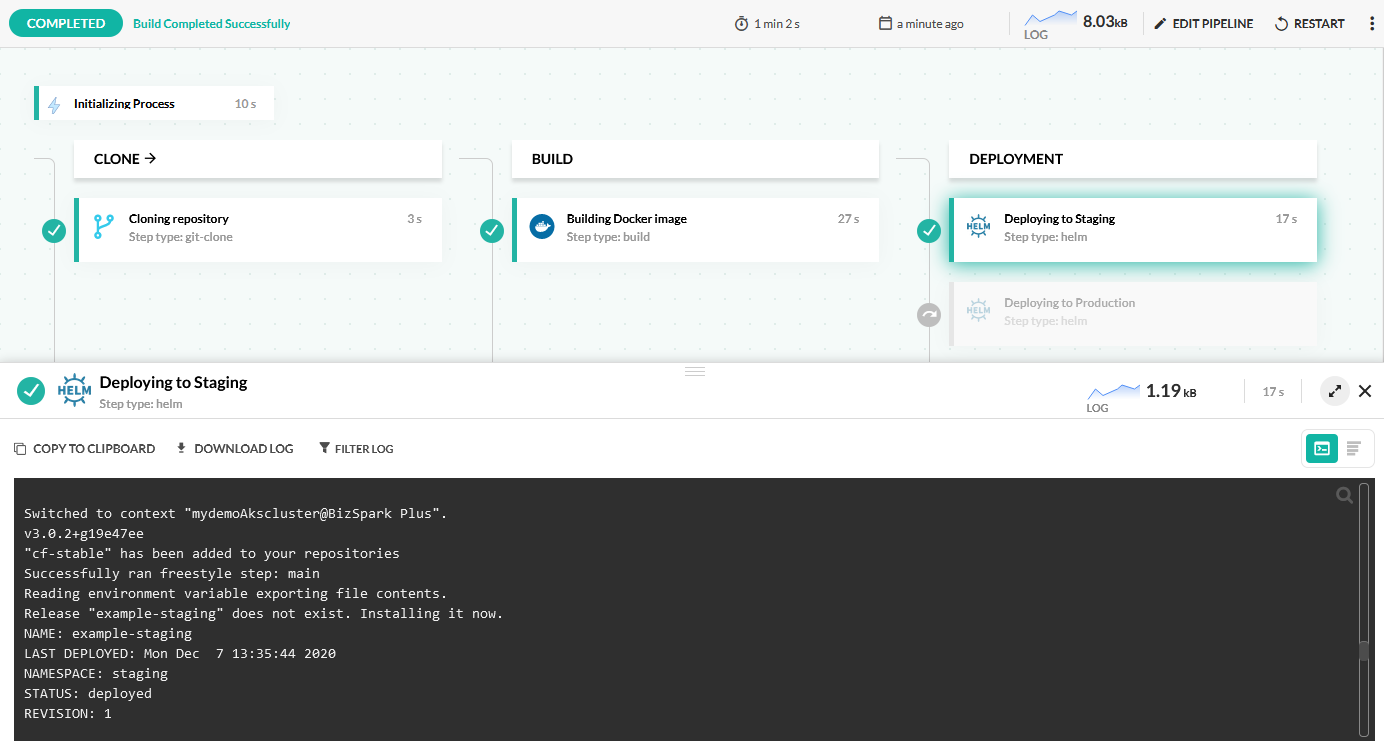
As you can see the step that deploys to production is now skipped, and the step that deploys to staging is enabled.
This is a great starting point for your own workflows. Codefresh can handle more complicated scenarios as you will see in the later sections.
NOTE
For reasons of brevity, the pipeline deploys the Helm chart directly from the Git repo. In an actual pipeline, you should also store the Helm chart in a Helm repository.
For more details on Helm deployments see our dedicated Helm example.
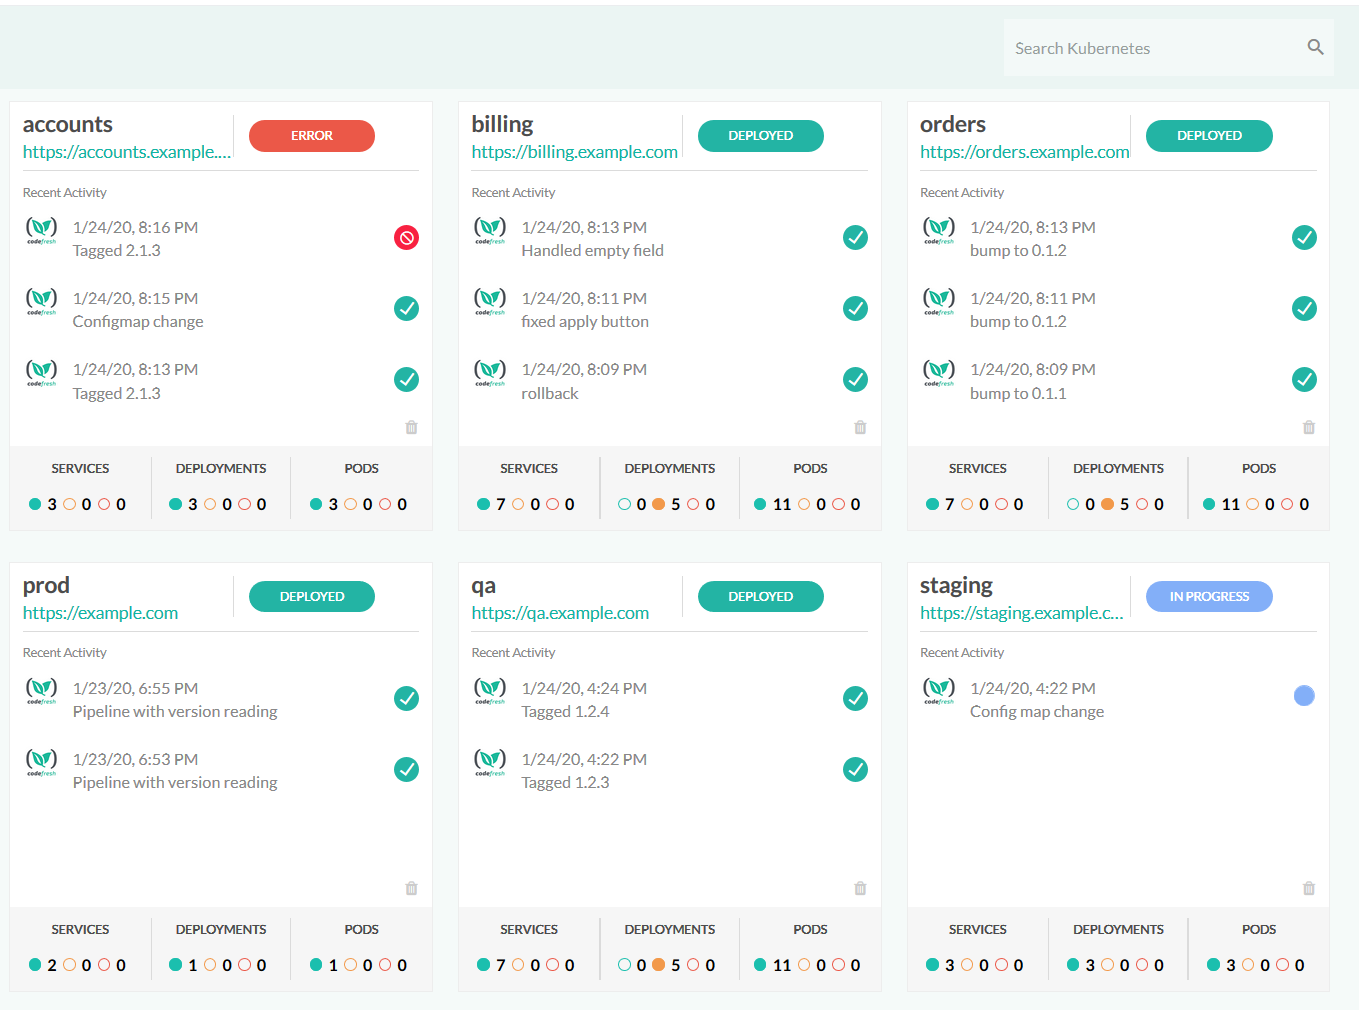
Viewing your Helm Releases
The previous pipeline works great as an automation mechanism. Wouldn’t it be great if you could also visualize your deployments? Codefresh includes a Helm release dashboard to help you understand your deployments.
- In the Codefresh UI, from Ops in the sidebar, select Helm Releases.
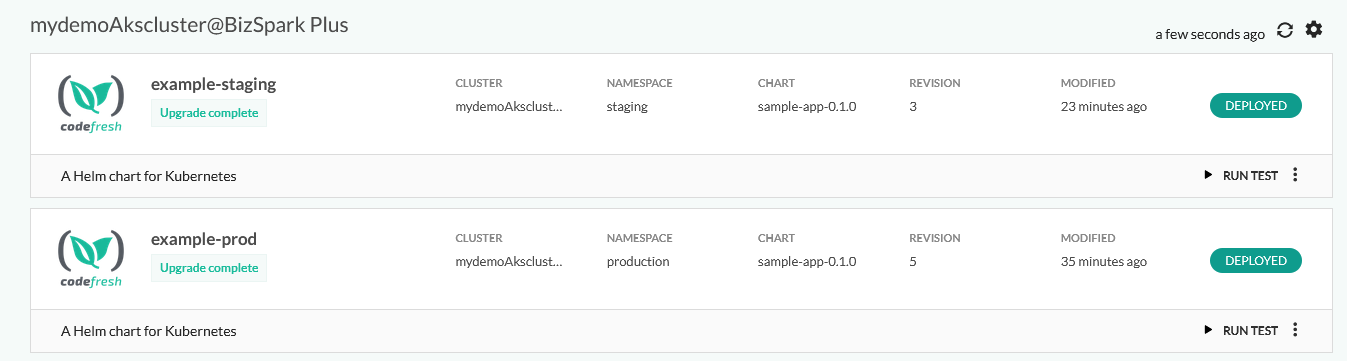
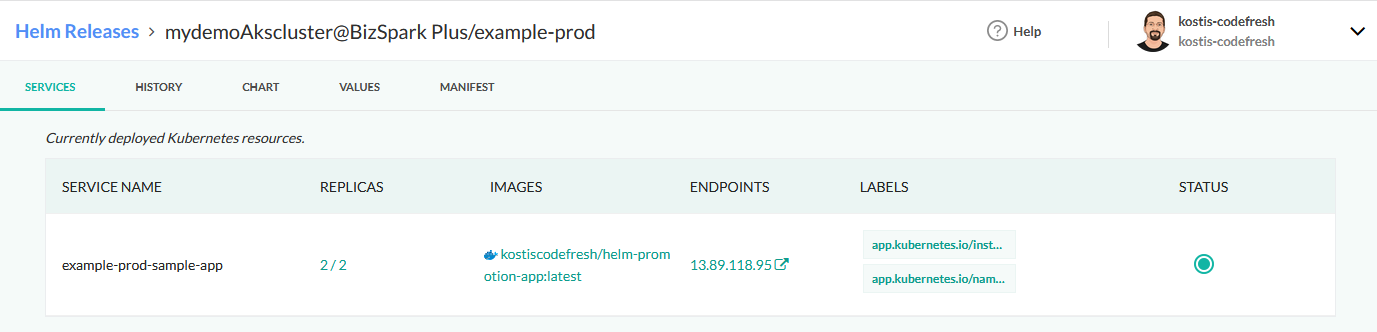
- To get extra information such as the services exposed and active replicas for a release, click on the release.
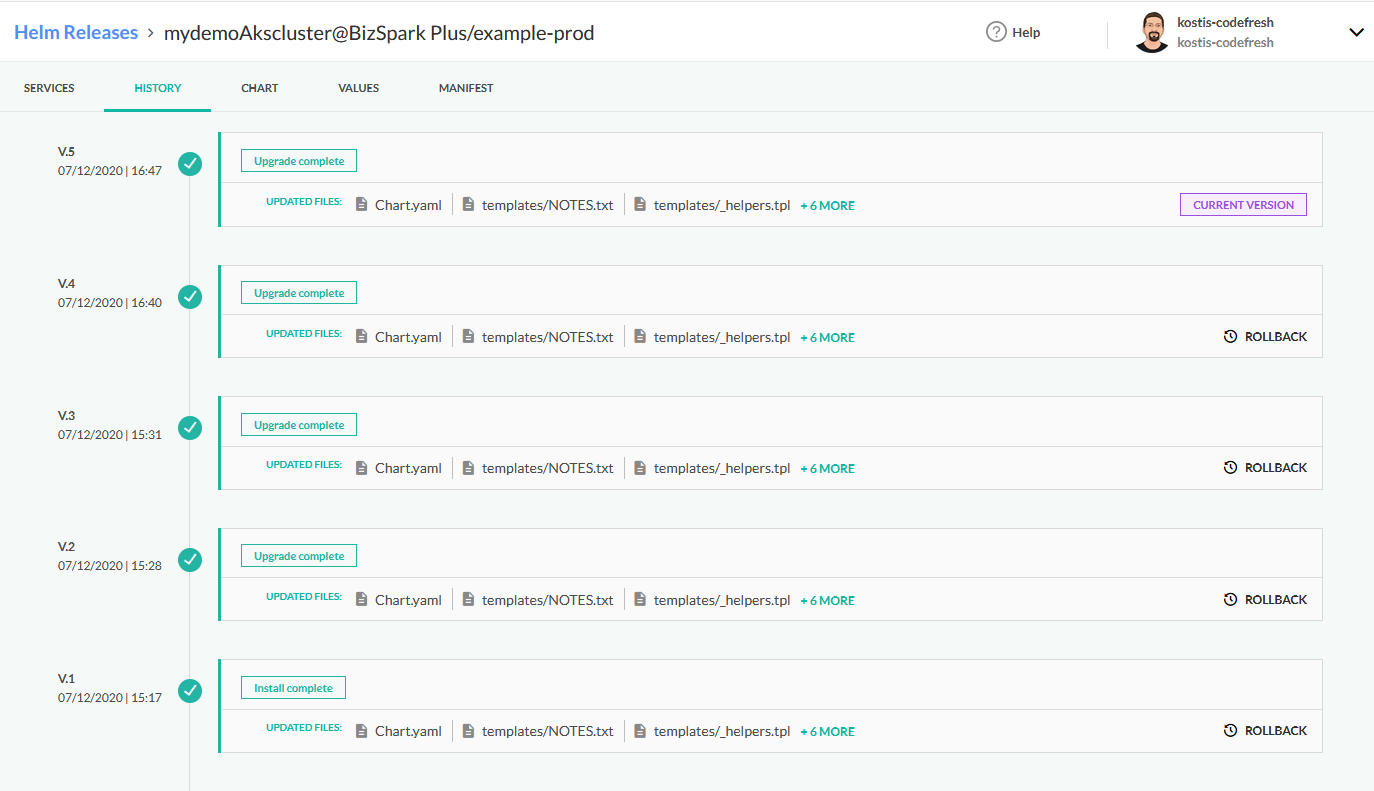
In the History tab, you can view the deployment history, and even rollback to a previous release:
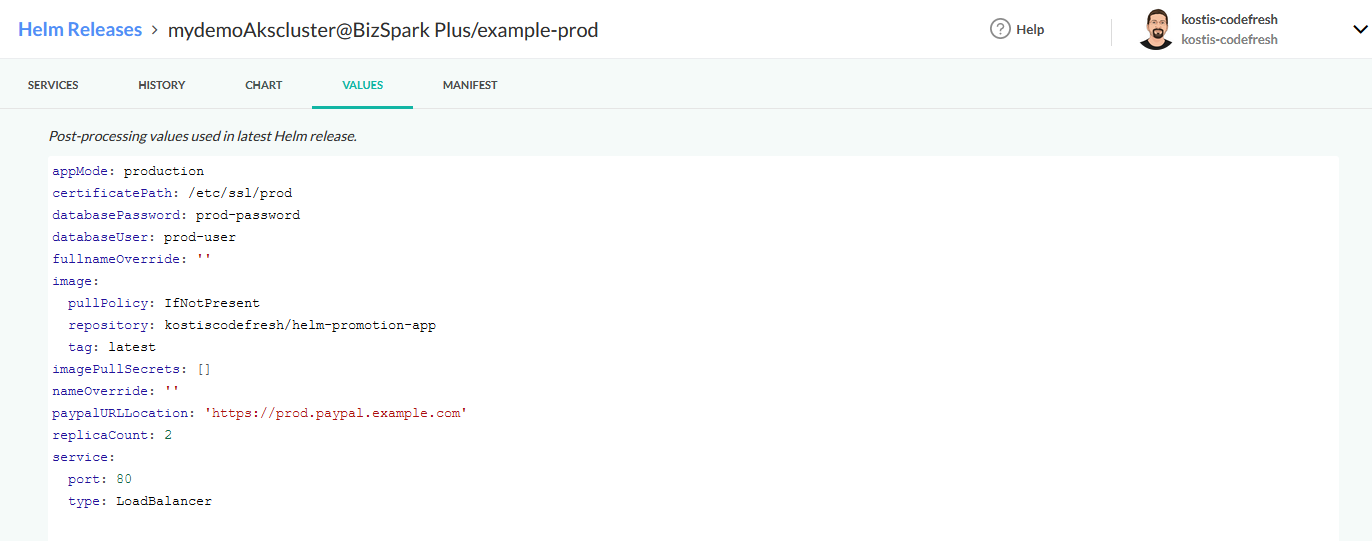
And most importantly in the Values tab, the values applied for each release.
This way you can also verify that the correct values are applied to the respective environment.
Using the Environment dashboard
Codefresh also includes an optional environment dashboard that you can use to track down your environments and their current status. The dashboard is especially helpful if you have a large number of environments.
To activate your environment dashboard you need to add an env block to each of the deployment steps in the pipeline. Here is the whole pipeline:
codefresh.yml
version: "1.0"
stages:
  - "clone"
  - "build"
  - "deployment"

steps:
  clone:
    title: "Cloning repository"
    type: "git-clone"
    repo: "codefresh-contrib/helm-promotion-sample-app"
    revision: '${{CF_REVISION}}'
    stage: "clone"

  build:
    title: "Building Docker image"
    type: "build"
    image_name: "kostiscodefresh/helm-promotion-app"
    working_directory: "${{clone}}"
    tags:
    - "latest"
    - '${{CF_SHORT_REVISION}}'
    dockerfile: "Dockerfile"
    stage: "build"
    registry: dockerhub
  deployStaging:
    title: Deploying to Staging
    type: helm:1.1.12
    stage: deployment
    working_directory: ./helm-promotion-sample-app
    arguments:
      action: install
      chart_name: ./chart/sample-app
      release_name: example-staging
      helm_version: 3.0.2
      kube_context: 'mydemoAkscluster@BizSpark Plus'
      namespace: staging
      custom_value_files:
      - ./chart/values-staging.yaml
    when:
      branch:
        ignore:
          - master
    env:
      name: Acme Staging
      endpoints:
      - name: app
        url: https://staging.example.com
      type: helm-release
      change: ${{CF_COMMIT_MESSAGE}}
      filters:
      - cluster: 'mydemoAkscluster@BizSpark Plus'
        releaseName: example-staging
  deployProd:
    title: Deploying to Production
    type: helm:1.1.12
    stage: deployment
    working_directory: ./helm-promotion-sample-app
    arguments:
      action: install
      chart_name: ./chart/sample-app
      release_name: example-prod
      helm_version: 3.0.2
      kube_context: 'mydemoAkscluster@BizSpark Plus'
      namespace: production
      custom_value_files:
      - ./chart/values-prod.yaml
    when:
      branch:
        only:
          - master
    env:
      name: Acme Production
      endpoints:
      - name: app
        url: https://production.example.com
      type: helm-release
      change: ${{CF_COMMIT_MESSAGE}}
      filters:
      - cluster: 'mydemoAkscluster@BizSpark Plus'
        releaseName: example-prod
Notice that we use the CF_COMMIT_MESSAGE variable to annotate each environment with each build message. After you deploy at least once to each environment, you should see the following in the Codefresh UI’s Environment dashboard.
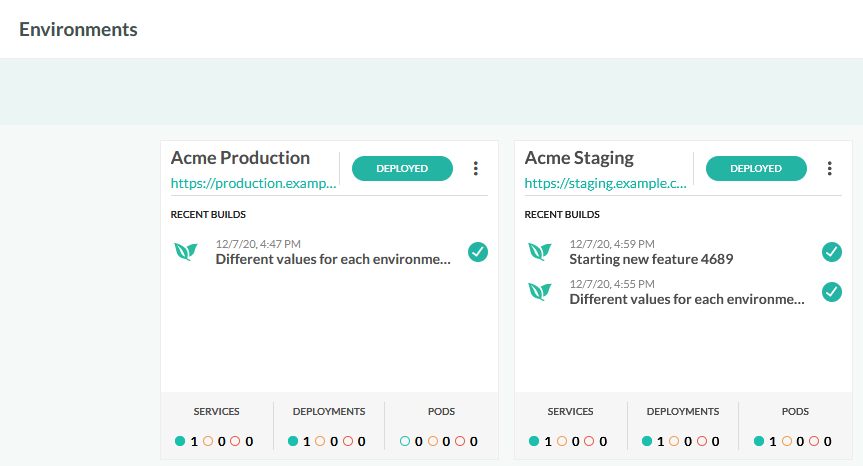
Just by looking at the builds of each environment, it is clear that the staging environment is one commit ahead (for feature 4689). Clicking an environment shows several details such as active services, deployment history, rollback options, manifests rendered etc as in the Helm releases page.
Using Approvals in a pipeline
Deploying straight to production after a commit is a worthy goal, but not all organizations want to work like this. In several cases, a human must approve a production deployment with a manual step.
An alternative pipeline pattern is to have a single pipeline that automatically deploys to the “staging” environment but pauses before releasing to production.
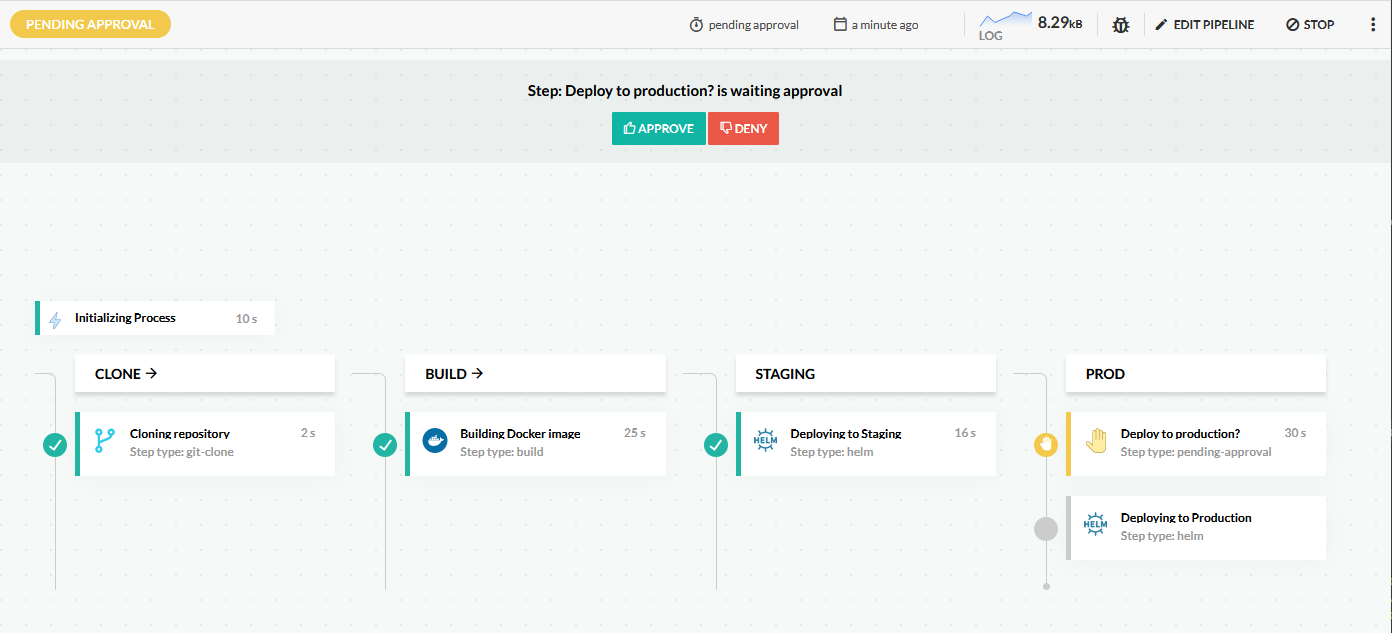
Once the pipeline is paused, all project stakeholders can examine the state of the application in the staging environment (either manually or by running automated tests), and if everything looks good, promote the application to production.
This is easily accomplished through the Codefresh approval step. The pipeline is stopped, and a yes/no button is shown in the UI. The pipeline can continue only if approved by selecting yes.
Here is the whole pipeline:
codefresh.yml
version: "1.0"
stages:
  - "clone"
  - "build"
  - "staging"
  - "prod"

steps:
  clone:
    title: "Cloning repository"
    type: "git-clone"
    repo: "codefresh-contrib/helm-promotion-sample-app"
    revision: '${{CF_REVISION}}'
    stage: "clone"

  build:
    title: "Building Docker image"
    type: "build"
    image_name: "kostiscodefresh/helm-promotion-app"
    working_directory: "${{clone}}"
    tags:
    - "latest"
    - '${{CF_SHORT_REVISION}}'
    dockerfile: "Dockerfile"
    stage: "build"
    registry: dockerhub
  deployStaging:
    title: Deploying to Staging
    type: helm:1.1.12
    stage: staging
    working_directory: ./helm-promotion-sample-app
    arguments:
      action: install
      chart_name: ./chart/sample-app
      release_name: example-staging
      helm_version: 3.0.2
      kube_context: 'mydemoAkscluster@BizSpark Plus'
      namespace: staging
      custom_value_files:
      - ./chart/values-staging.yaml
  askForPermission:
    type: pending-approval
    stage: prod
    title: Deploy to production?
  deployProd:
    title: Deploying to Production
    type: helm:1.1.12
    stage: prod
    working_directory: ./helm-promotion-sample-app
    arguments:
      action: install
      chart_name: ./chart/sample-app
      release_name: example-prod
      helm_version: 3.0.2
      kube_context: 'mydemoAkscluster@BizSpark Plus'
      namespace: production
      custom_value_files:
      - ./chart/values-prod.yaml
The approval step has many more options such as a timeout or even choosing a different flow in the pipeline if the approval is declined.
Using multiple pipelines for deployments
Having a single pipeline that deals with all deployment environments can work great with a small team. As an organization grows, and more steps are added to the pipeline, it becomes very hard to use conditions to enable/disable specific steps in pipelines.
With Codefresh, you can create as many pipelines as you want for a single project. It is therefore very easy to employ different simple pipelines for specific purposes, instead of working with a complex monolithic pipeline.
In our example we will create two pipelines:
- The “staging” pipeline performs linting and security scans in the source code before creating the Docker image
- The “production” pipeline runs integration tests after the creation of the Docker image
Here is how the staging pipeline looks:
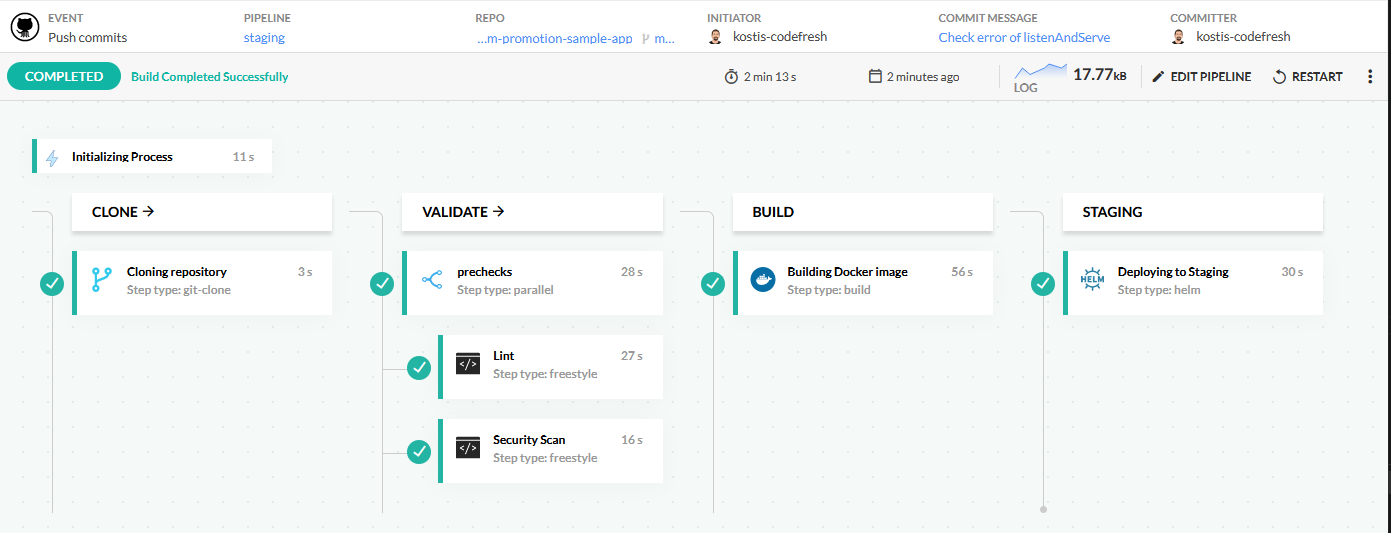
This pipeline uses parallel steps to run linting and security scanning at the same time.
Here is the whole pipeline:
codefresh.yml
version: "1.0"
stages:
  - "clone"
  - "validate"
  - "build"
  - "staging"

steps:
  clone:
    title: "Cloning repository"
    type: "git-clone"
    repo: "codefresh-contrib/helm-promotion-sample-app"
    revision: '${{CF_REVISION}}'
    stage: "clone"
  prechecks:
    type: parallel
    stage: 'validate'
    steps:
      lint:
        title: Lint
        working_directory: "${{clone}}"
        image: golangci/golangci-lint:v1.33.0
        commands:
          - golangci-lint run -v .
      securityAnalysis:
        title: Security Scan
        working_directory: "${{clone}}"
        image: 'securego/gosec:v2.5.0'
        commands:
          - gosec ./...
  build:
    title: "Building Docker image"
    type: "build"
    image_name: "kostiscodefresh/helm-promotion-app"
    working_directory: "${{clone}}"
    tags:
    - "latest"
    - '${{CF_SHORT_REVISION}}'
    dockerfile: "Dockerfile"
    stage: "build"
    registry: dockerhub

  deployStaging:
    title: Deploying to Staging
    type: helm:1.1.12
    stage: staging
    working_directory: ./helm-promotion-sample-app
    arguments:
      action: install
      chart_name: ./chart/sample-app
      release_name: example-staging
      helm_version: 3.0.2
      kube_context: 'mydemoAkscluster@BizSpark Plus'
      namespace: staging
      custom_value_files:
      - ./chart/values-staging.yaml
The production pipeline assumes that the code has been scanned/validated already, and runs some integration tests as a final validation check before deploying the release to production:
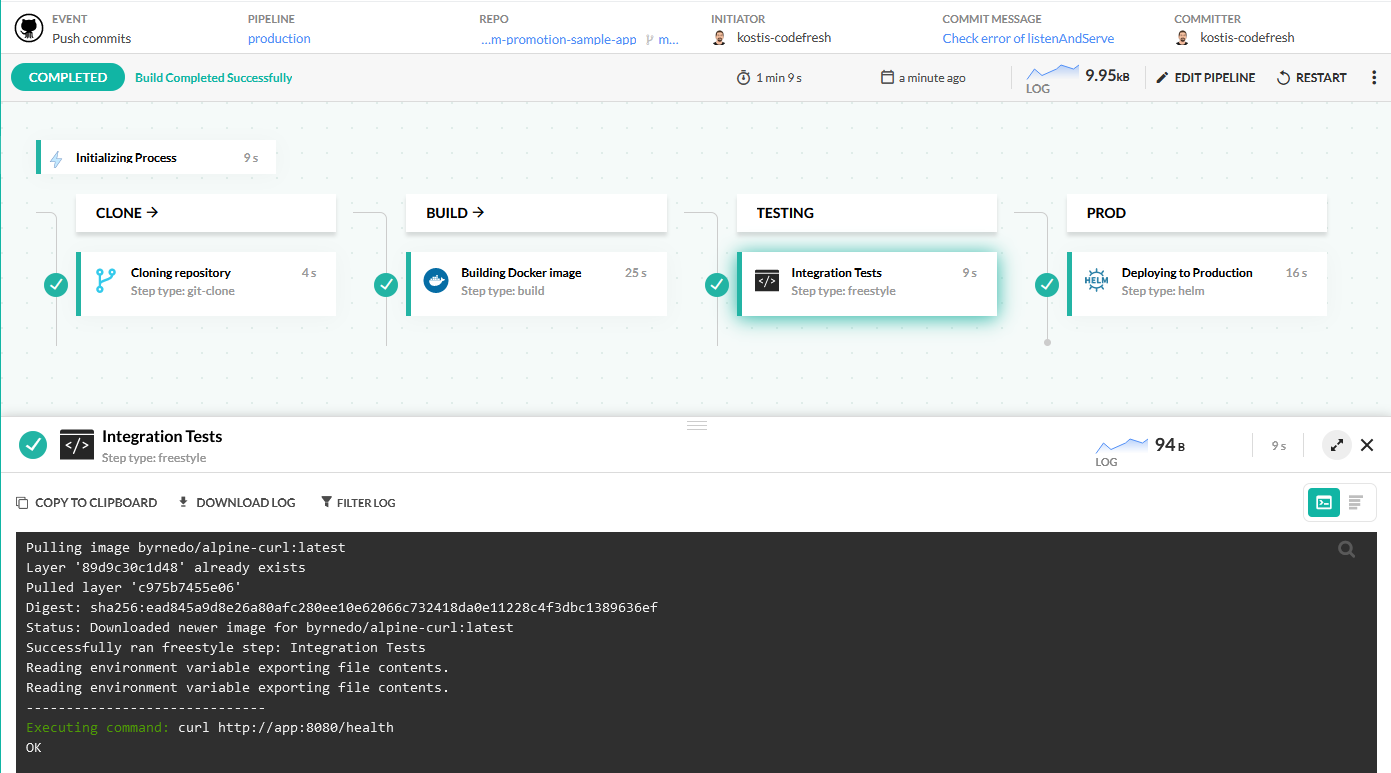
This pipeline uses service containers to run integration tests.
Here is the whole pipeline:
codefresh.yml
version: "1.0"
stages:
  - "clone"
  - "build"
  - "testing"
  - "prod"

steps:
  clone:
    title: "Cloning repository"
    type: "git-clone"
    repo: "codefresh-contrib/helm-promotion-sample-app"
    revision: '${{CF_REVISION}}'
    stage: "clone"
  build_app_image:
    title: "Building Docker image"
    type: "build"
    image_name: "kostiscodefresh/helm-promotion-app"
    working_directory: "${{clone}}"
    tags:
    - "latest"
    - '${{CF_SHORT_REVISION}}'
    dockerfile: "Dockerfile"
    stage: "build"
    registry: dockerhub
  myTests:
    title: Integration Tests
    type: freestyle
    working_directory: "${{clone}}"
    stage: "testing"
    arguments:
      image: 'byrnedo/alpine-curl'
      commands:
        - "curl http://app:8080/health"
    services:
      composition:
        app:
          image: '${{build_app_image}}'
          ports:
            - 8080
  deployProd:
    title: Deploying to Production
    type: helm:1.1.12
    stage: prod
    working_directory: ./helm-promotion-sample-app
    arguments:
      action: install
      chart_name: ./chart/sample-app
      release_name: example-prod
      helm_version: 3.0.2
      kube_context: 'mydemoAkscluster@BizSpark Plus'
      namespace: production
      custom_value_files:
      - ./chart/values-prod.yaml
Now that you have created the pipelines, you have several options on how to trigger them.
Some common workflows are:
- Automate the staging pipeline when a commit lands in
master, and only launch the production pipeline manually. - Automate the staging pipeline when a commit lands in
master, and use an approval step to call the production pipeline as a child pipeline. - Set the trigger of the production pipeline to launch only on
master, and the trigger of the staging pipeline to launch only fornon-masterbranches. - Set the production pipeline to launch only for commits on
master, and the staging pipeline only for pull requests (PRs).
The exact mechanism depends on the workflow of your team. For more information, see the guide on Pull Requests and branches, and trunk based development, as a good starting point.
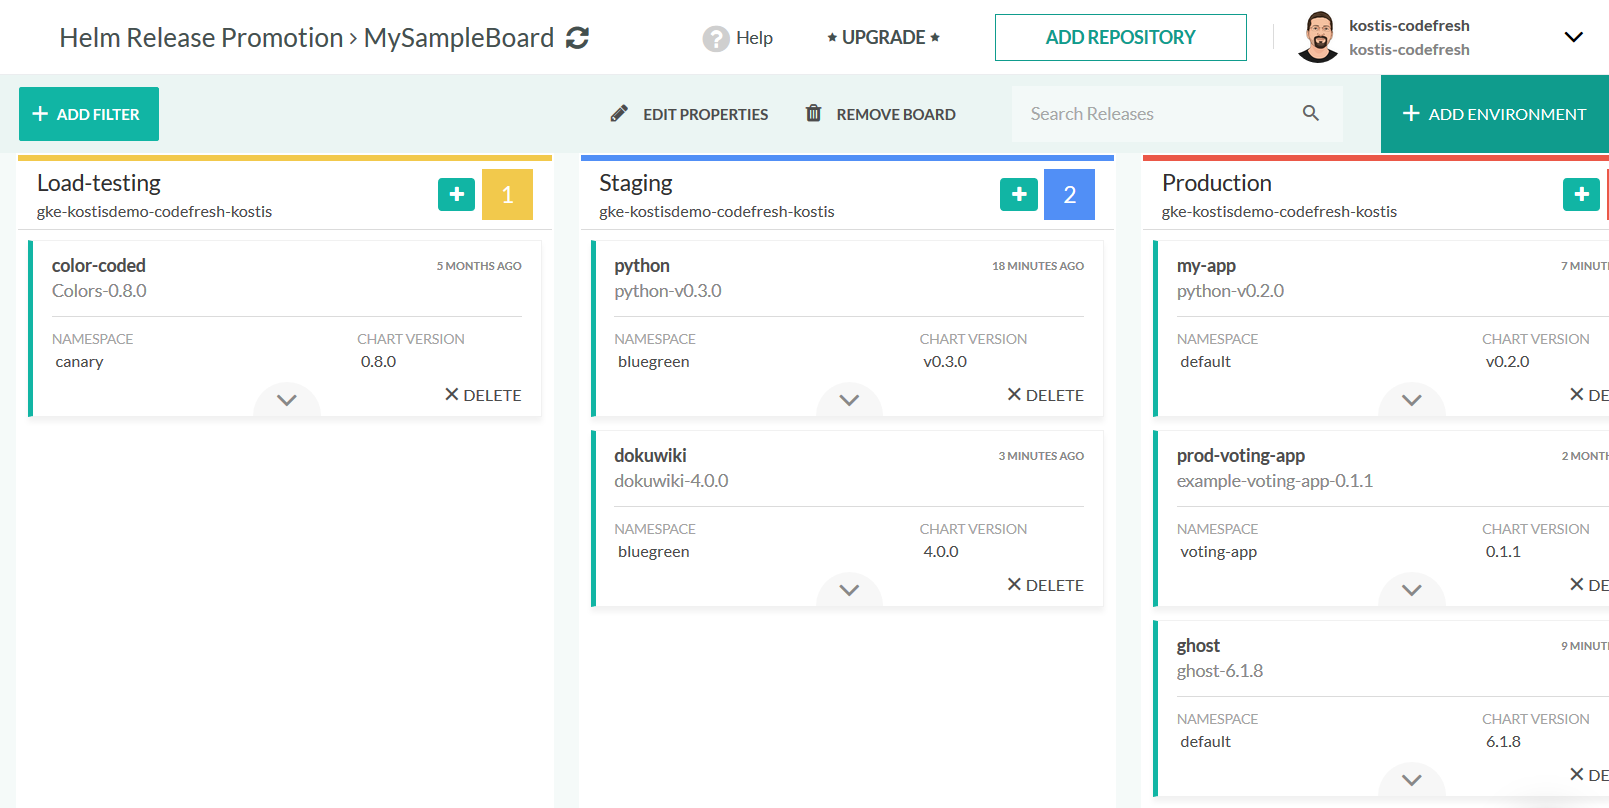
Promoting releases between environments
If you have a large number of environments, we also suggest looking at the Helm promotion board provided by Codefresh.
For more details, see Helm promotion board.
Related articles
Codefresh YAML for pipeline definitions
Environment dashboard