Configure Product Settings
Configure metadata, promotion settings, and flows for product
Product settings
After creating a product, optimize its functionality by configuring different settings for the product, including metadata, promotion settings, and more through Product Settings.
This article describes how to configure the different Product Settings:
-
Declaratively connect applications
Declaratively connect an application to a product with the automatically generated product annotation. -
Manually assign unassigned applications
Assign applications to environments. -
Labels
Add labels to manage access control and permissions. -
Promotion Flows
Select one or more predefined Promotion Flows valid for the product, and customize the trigger conditions for each flow for automated deployments. -
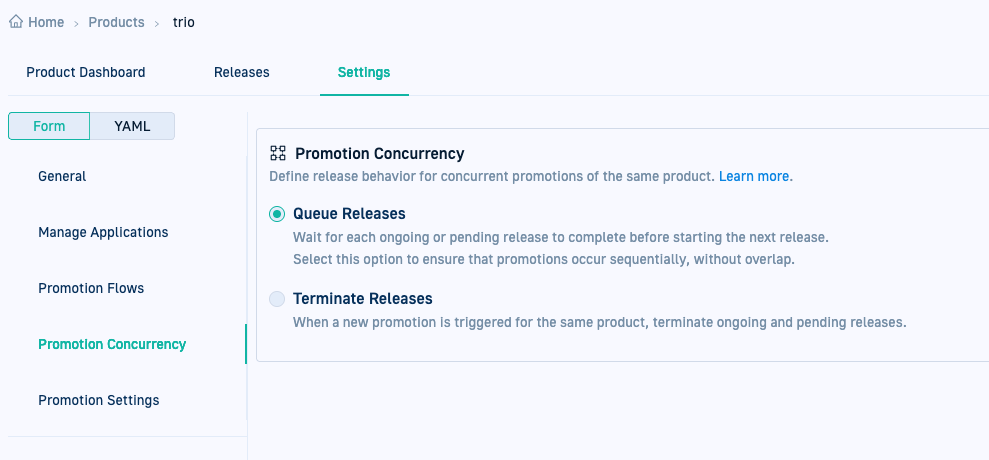
Promotion concurrency
Define the promotion behavior when multiple promotions are triggered for the same product. -
Promotion Settings
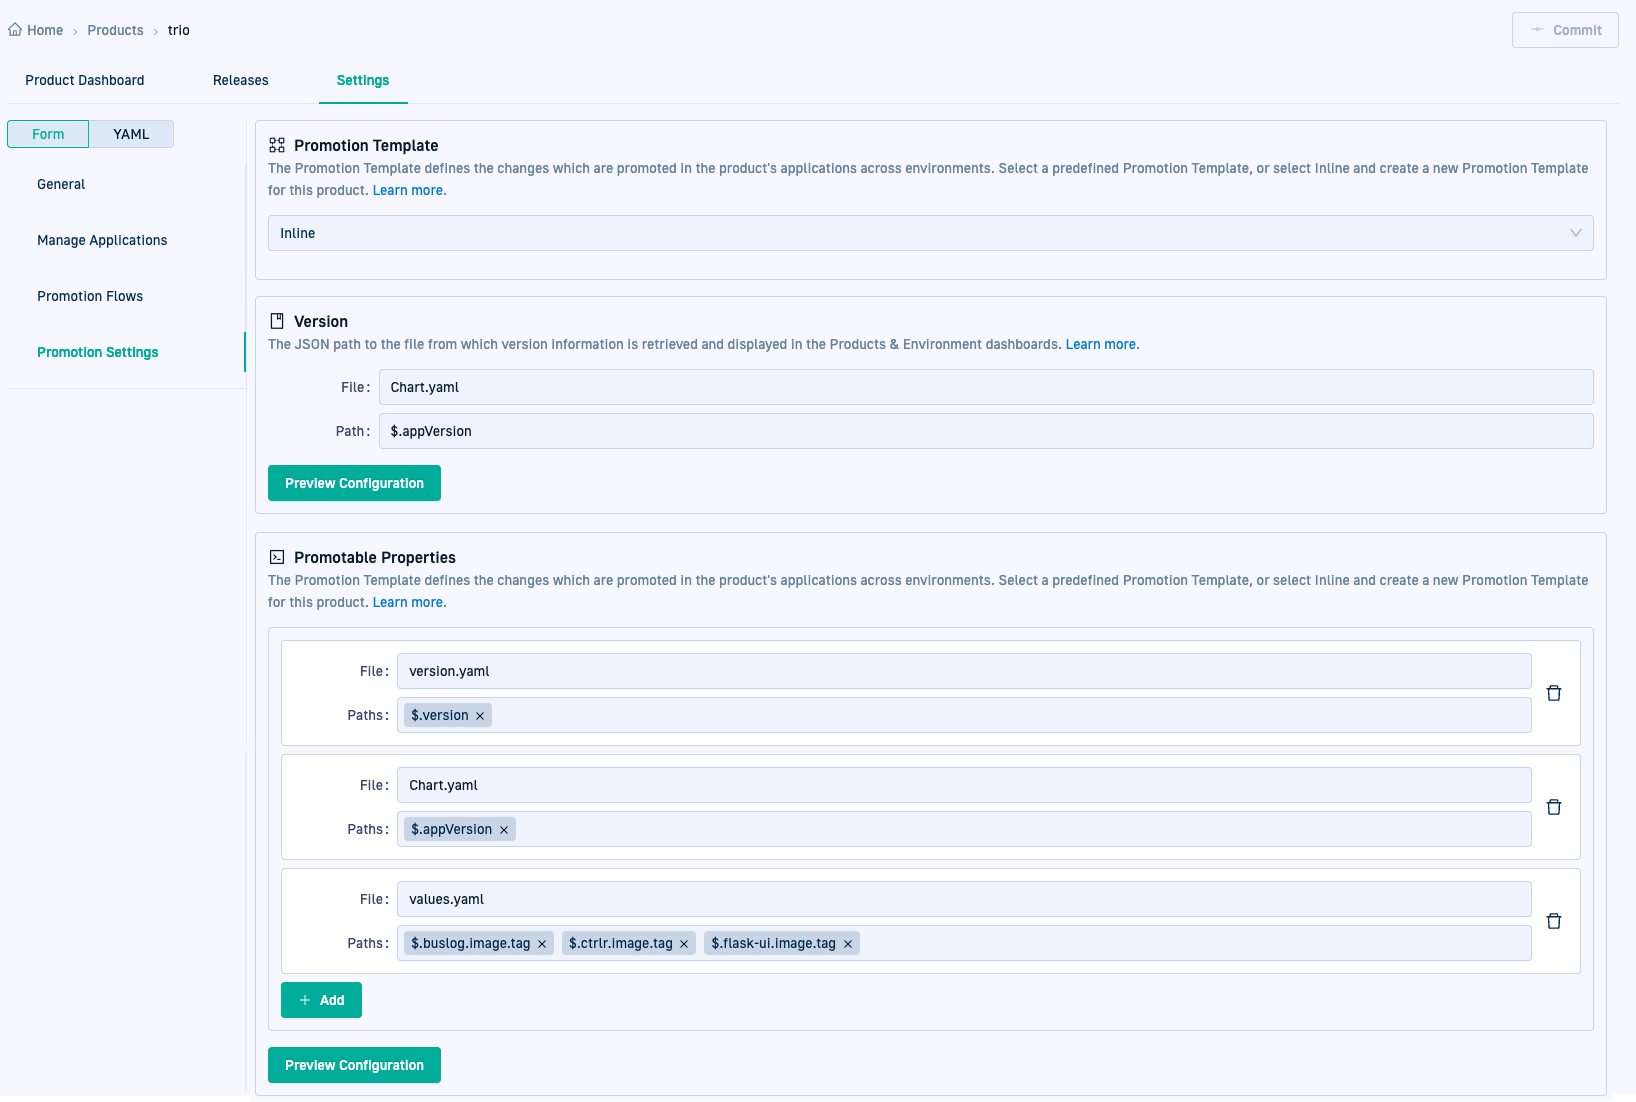
Define the version and properties to promote for the applications in the product either from a predefined promotion template, or by defining new promotion settings.
Form & YAML modes
Configure Product Settings in Form or YAML modes, switching seamlessly between them during configuration.
All settings, except manually assigned applications, are saved as a CRD (Custom Resource Definition) within the Shared Configuration Repository in the GitOps Runtime selected as the Configuration Runtime.
The path in the Shared Configuration Repo is <gitops-runtime>/<shared-configuration-repo>/resources/configurations/products/<product-name>.crd.
See Shared Configuration Repository and Designating Configuration Runtimes.
For the YAML specifications, see Product YAML and Promotion Template YAML.
Open Product Settings
- In the Codefresh UI, from the sidebar, select Products.
- Click the name of the product.
- Click the Settings tab.
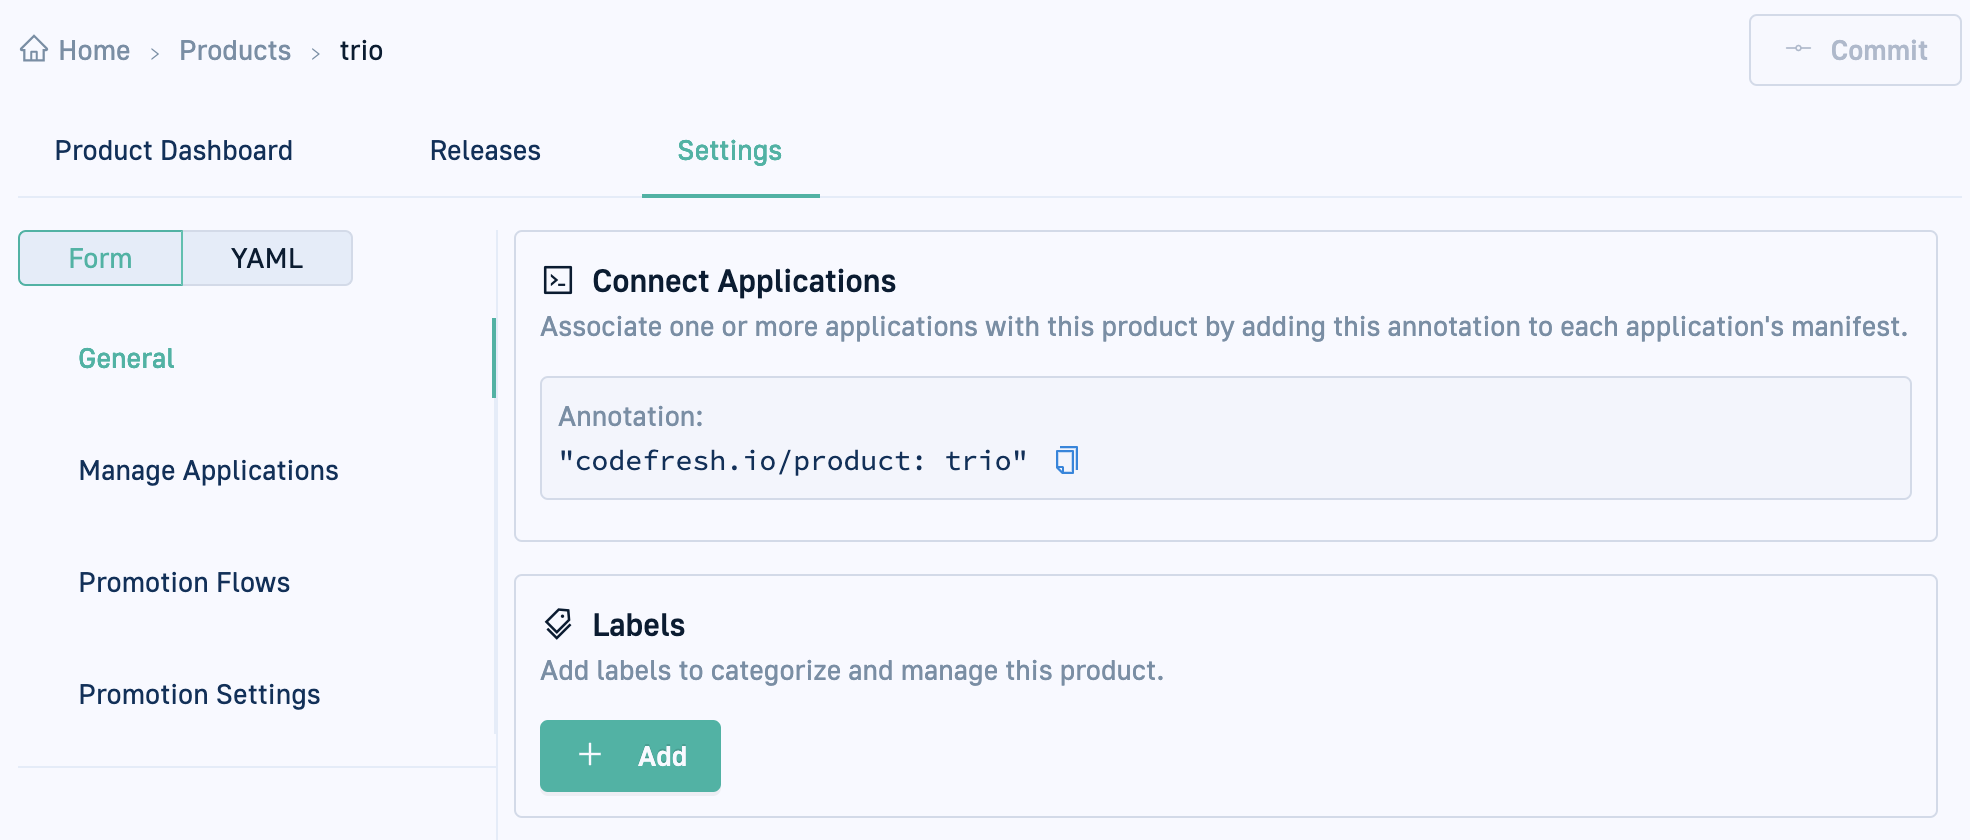
Connect applications to product with annotations
Connect applications to products declaratively by copying the product annotation to the application’s manifest. If the product doesn’t exist, Codefresh automatically creates it for you.
This is the preferred, declarative method of assigning applications to Products. The changes are committed and saved in Git as part of the application definition.
Before you begin
How to
- Open Product Settings.
- Click the General tab, and below Connect Applications copy the annotation to add to the application’s manifest.
- Paste the annotation in the application’s manifest:
- Click Product Dashboard.
- From the context menu of the application, select Application Info > Go to application.
- Click the Configuration tab, and switch to YAML mode.
- Paste below
metadata.annotations.
Unassign applications by removing annotations
To unassign an application assigned declaratively to the product, remove the annotation from the application’s manifest.
- In the Codefresh UI, from the sidebar, select Products.
- Click the product from which to unassign the application, and then click the Product Dashboard tab.
- From the context menu of the application, select Application Info > Go to application.
- Click the Configuration tab, and switch to YAML mode.
- Below
metadata.annotations, remove the product annotation. - Commit to save the changes.
Manually assign unassigned applications
Quickly assign applications through the UI without modifying manifests. This method does not require a commit and is recommended for testing.
Before you begin
How to
- Open Product Settings.
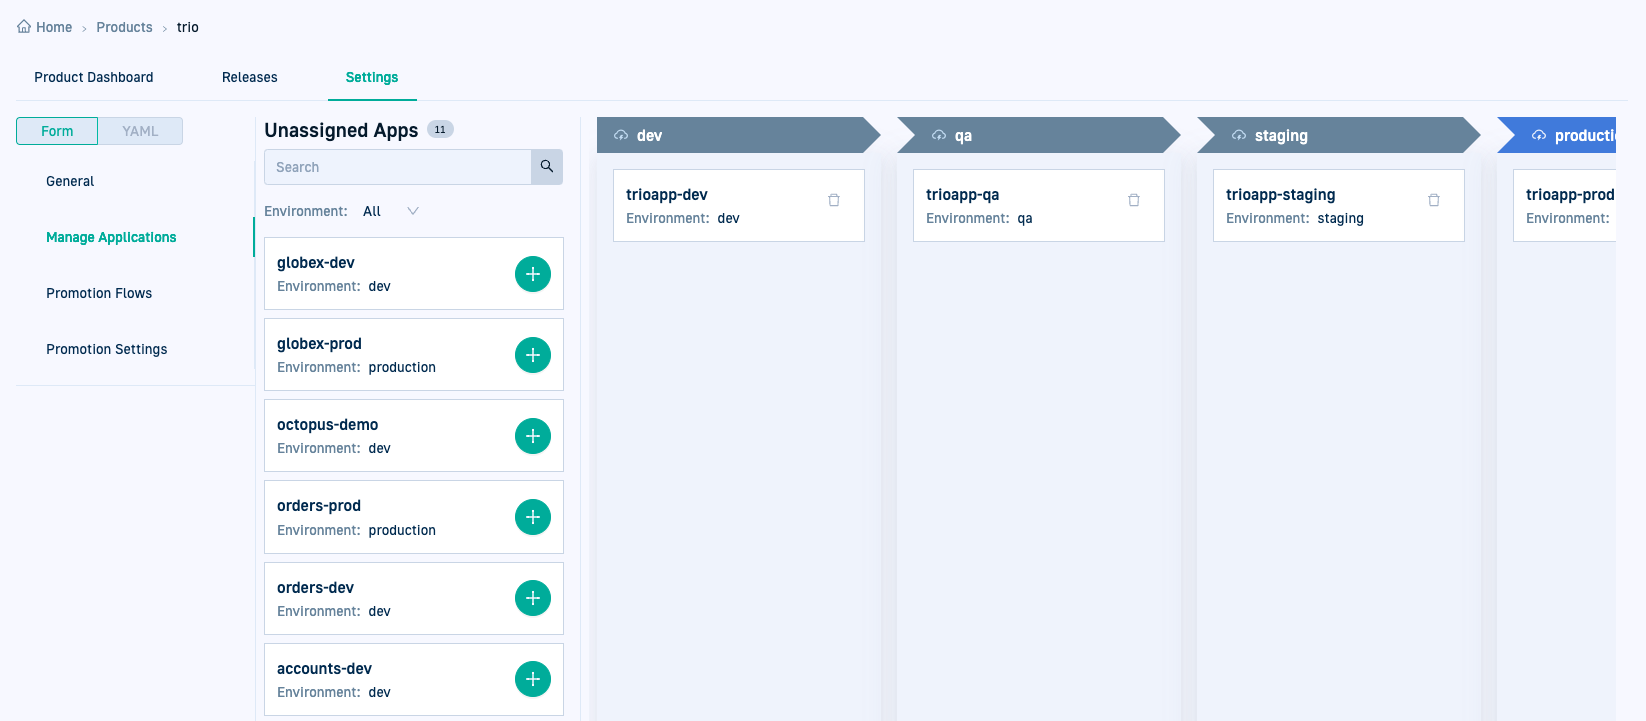
- Click Manage Applications. The list of Unassigned apps is displayed on the left.
- If needed, filter unassigned applications by Environment, or in the search field type a part of the application name.
- To assign an application, click
 .
. - To confirm the assignment, click Save. If you have defined an Environment for the application, Codefresh automatically adds the application to the Environment defined for it.
Unassign manually-assigned applications
Unassign an application manually assigned to a product directly from its settings.
- In the Codefresh UI, from the sidebar, select Products.
- Do one of the following:
- Mouse over the row with the Product from which to unassign the application, and click
 .
. - Click the Product from which to unassign applications. The General section in the Settings tab is displayed.
- Mouse over the row with the Product from which to unassign the application, and click
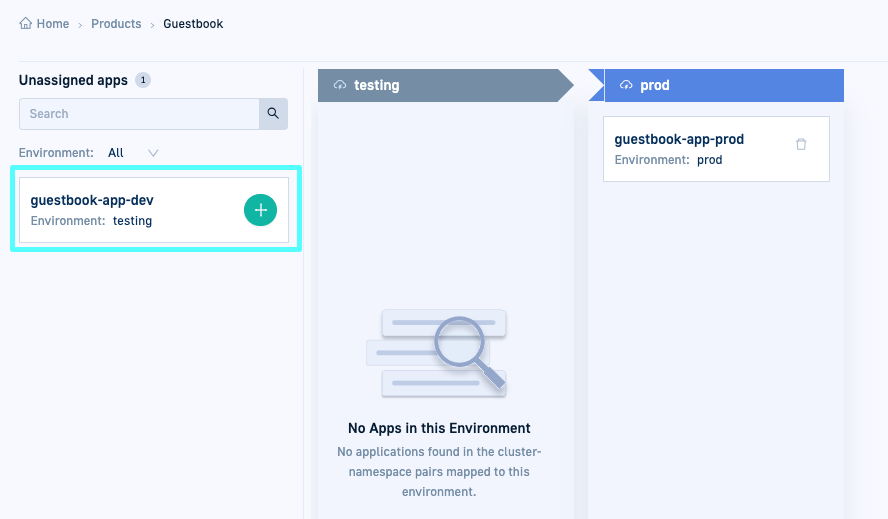
- In the environment with the application to unassign, click
 .
.
You can see that the Unassign icon is disabled for theguestbook-app-prodindicating that it is connected through an annotation.
- To confirm, click Save. The application reappears in the list of Unassigned apps.
Configure labels for Products
Adding labels to a product lets you create access control rules that govern manual promotion triggers and retry permissions for failed releases for product entities.
- Open Product Settings.
- Click the General tab.
- Below Labels, click Add and define key-value pairs following Kubernetes conventions.
Select Promotion Flows for Products
Customize automated promotions for products across different environments by:
- Selecting one or more predefined Promotion Flows valid for the product
- Customizing the conditions to trigger each Promotion Flow
Commit messages for trigger conditions are not restricted to single words. You can specify any commit message to trigger promotions.
For example,update image tag to v1.1would be a valid commit message. - Defining the priority for each Flow when multiple Flows are configured
Before you begin
How to
- Open Product Settings.
- Click the Promotion Flows tab.
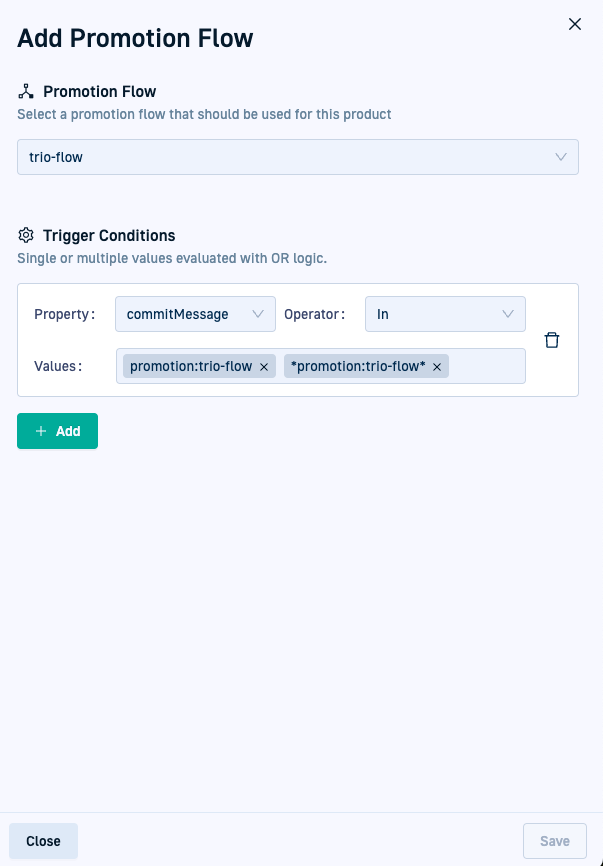
- To add a Promotion Flow for the product, click Add.
- From the list of Promotion Flows, select a predefined Flow for the product.
- Define the conditions to match and trigger the Promotion Flow:
- Property: The property to monitor for changes, based on either the text description associated with the commit message (
commitMessage), or the commit hash generated by Git (gitRevision).
commitMessagecan be a single or multiple words, or phrases with or without wildcards (*). - Operator: The operator to apply when matching the Property, based on inclusion or exclusion, with or without wildcards.
In: Checks if the commit message or Git revision includes the specified value or any value within a set of values. Commit messages can include
NotIn: Checks if the commit message or Git revision does not include the specified value or any value within a set of values. - Values: Single or multiple values used to match or exclude Promotion Flows based on the Property and Operator configured.
- To add more trigger conditions, click Add and repeat steps 4.1 through 4.3.
- Property: The property to monitor for changes, based on either the text description associated with the commit message (
- To confirm, click Add.
- If there is more than one Promotion Flow, click
 and drag to define the priority and order.
- Click Commit.
Configure Promotion Concurrency
Configure the promotion behavior when multiple promotions are triggered for the same product creating multiple releases.
Before you begin
How to
- Open Product Settings.
- Click the Promotion Concurrency tab.
- Select one of the options:
- Queue releases: Start the new release only after the currently active release is completed.
- Terminate release: If the new release is promoting to an environment with an ongoing promotion, terminate the currently active release and start the new release.
- Click Commit.
Configure Promotion Settings
Configure Promotion Settings to define:
- For Helm applications, the source from which to get application’s release version
- The precise changes to promote across multiple files in the applications
Before you begin
How to
- Open Product Settings.
- Click the Promotion Settings tab.
- From the list of Promotion Templates, do one of the following:
- Select a predefined Promotion Template.
The Version and Promotable Properties are populated with the settings already defined in the template. - Select Inline and create a new Promotion Template for this product. Continue from step 4.
- Select a predefined Promotion Template.
- Define the source settings for the application Version:
- File: The name of the file from which to retrieve the version. For example,
chart.yaml. - Path: The JSON path to the attribute with the value.
- To see the result for any application connected to the product, click Preview Configuration and then select an application to see its version.
- File: The name of the file from which to retrieve the version. For example,
- Define the settings for the Promotable Properties:
- File: The name of the file with the attributes to promote. For example,
values.yaml. - Paths: The JSON path or paths to one or more attributes within the file to promote. For example,
$.buslog.image.tag,$.ctrlr.image.tag, and$.flask-ui.image.tag. - To add more files and paths, click Add and define the File and Paths.
- To preview the properties that will be promoted for an application connected to the product, click Preview Configuration and then select an application.
- File: The name of the file with the attributes to promote. For example,
- Click Commit.
Related articles
Tracking Product releases
CreateProducts
Access control for GitOps Products
