Configure Promotion Flows
Orchestrate promotion for products across environment with Promotion Flows
A Promotion Flow is a sequence of automated actions that systematically move code changes through environments, from development to production. This structured approach enhances deployment reliability and efficiency, ensuring changes meet quality standards before reaching end users.
Promotion Flows allow teams to manage their software delivery pipelines with precision, defining conditions, dependencies, and actions for each environment. Whether deploying to staging, production, or custom environments, Promotion Flows provide flexibility and control over your continuous delivery process.
Backed by the power of Argo CD, streamline the process of moving code changes through different stages, minus all the manual work of custom scripting to manage environment-specific requirements.
Review Promotion Flow behavior: Key insights before creating your first Promotion Flow.
Flow Builder vs. YAML
You can create Promotion Flows through the Flow Builder, a graphical interface, or through a YAML Custom Resource Definition (CRD).
The Flow Builder visually guides you through creating any type of Promotion Flow. See Create a Promotion Flow.
Once configured and committed, Promotion Flow settings are saved as a CRD (Custom Resource Definition) within the Shared Configuration Repository in the GitOps Runtime selected as the Configuration Runtime.
The path in the Shared Configuration Repo is <gitops-runtime>/<shared-configuration-repo>/resources/configurations/promotion-flows.
See Shared Configuration Repository and Designating Configuration Runtimes.
Types of Promotion Flows: Sequential, parallel, dependencies
Model your Promotion Flows to suit the unique requirements of any deployment process with sequential or parallel promotions.
Sequential promotions
Sequential promotions follow a linear flow, where changes are promoted step-by-step from one environment to the next in a predefined order. This is the more traditional and common type of Promotion Flow. Typically, the flow begins with a trigger environment, such as the development environment, and progresses through subsequent target environments in succession.
Example: Changes are promoted from development to staging and then to production.
Parallel promotions
Parallel promotions allow changes to be promoted across multiple environments at the same time. This method is well-suited for environments that share a similar structure but are independent of one another, such as regional clusters or environments that do not rely on shared dependencies.
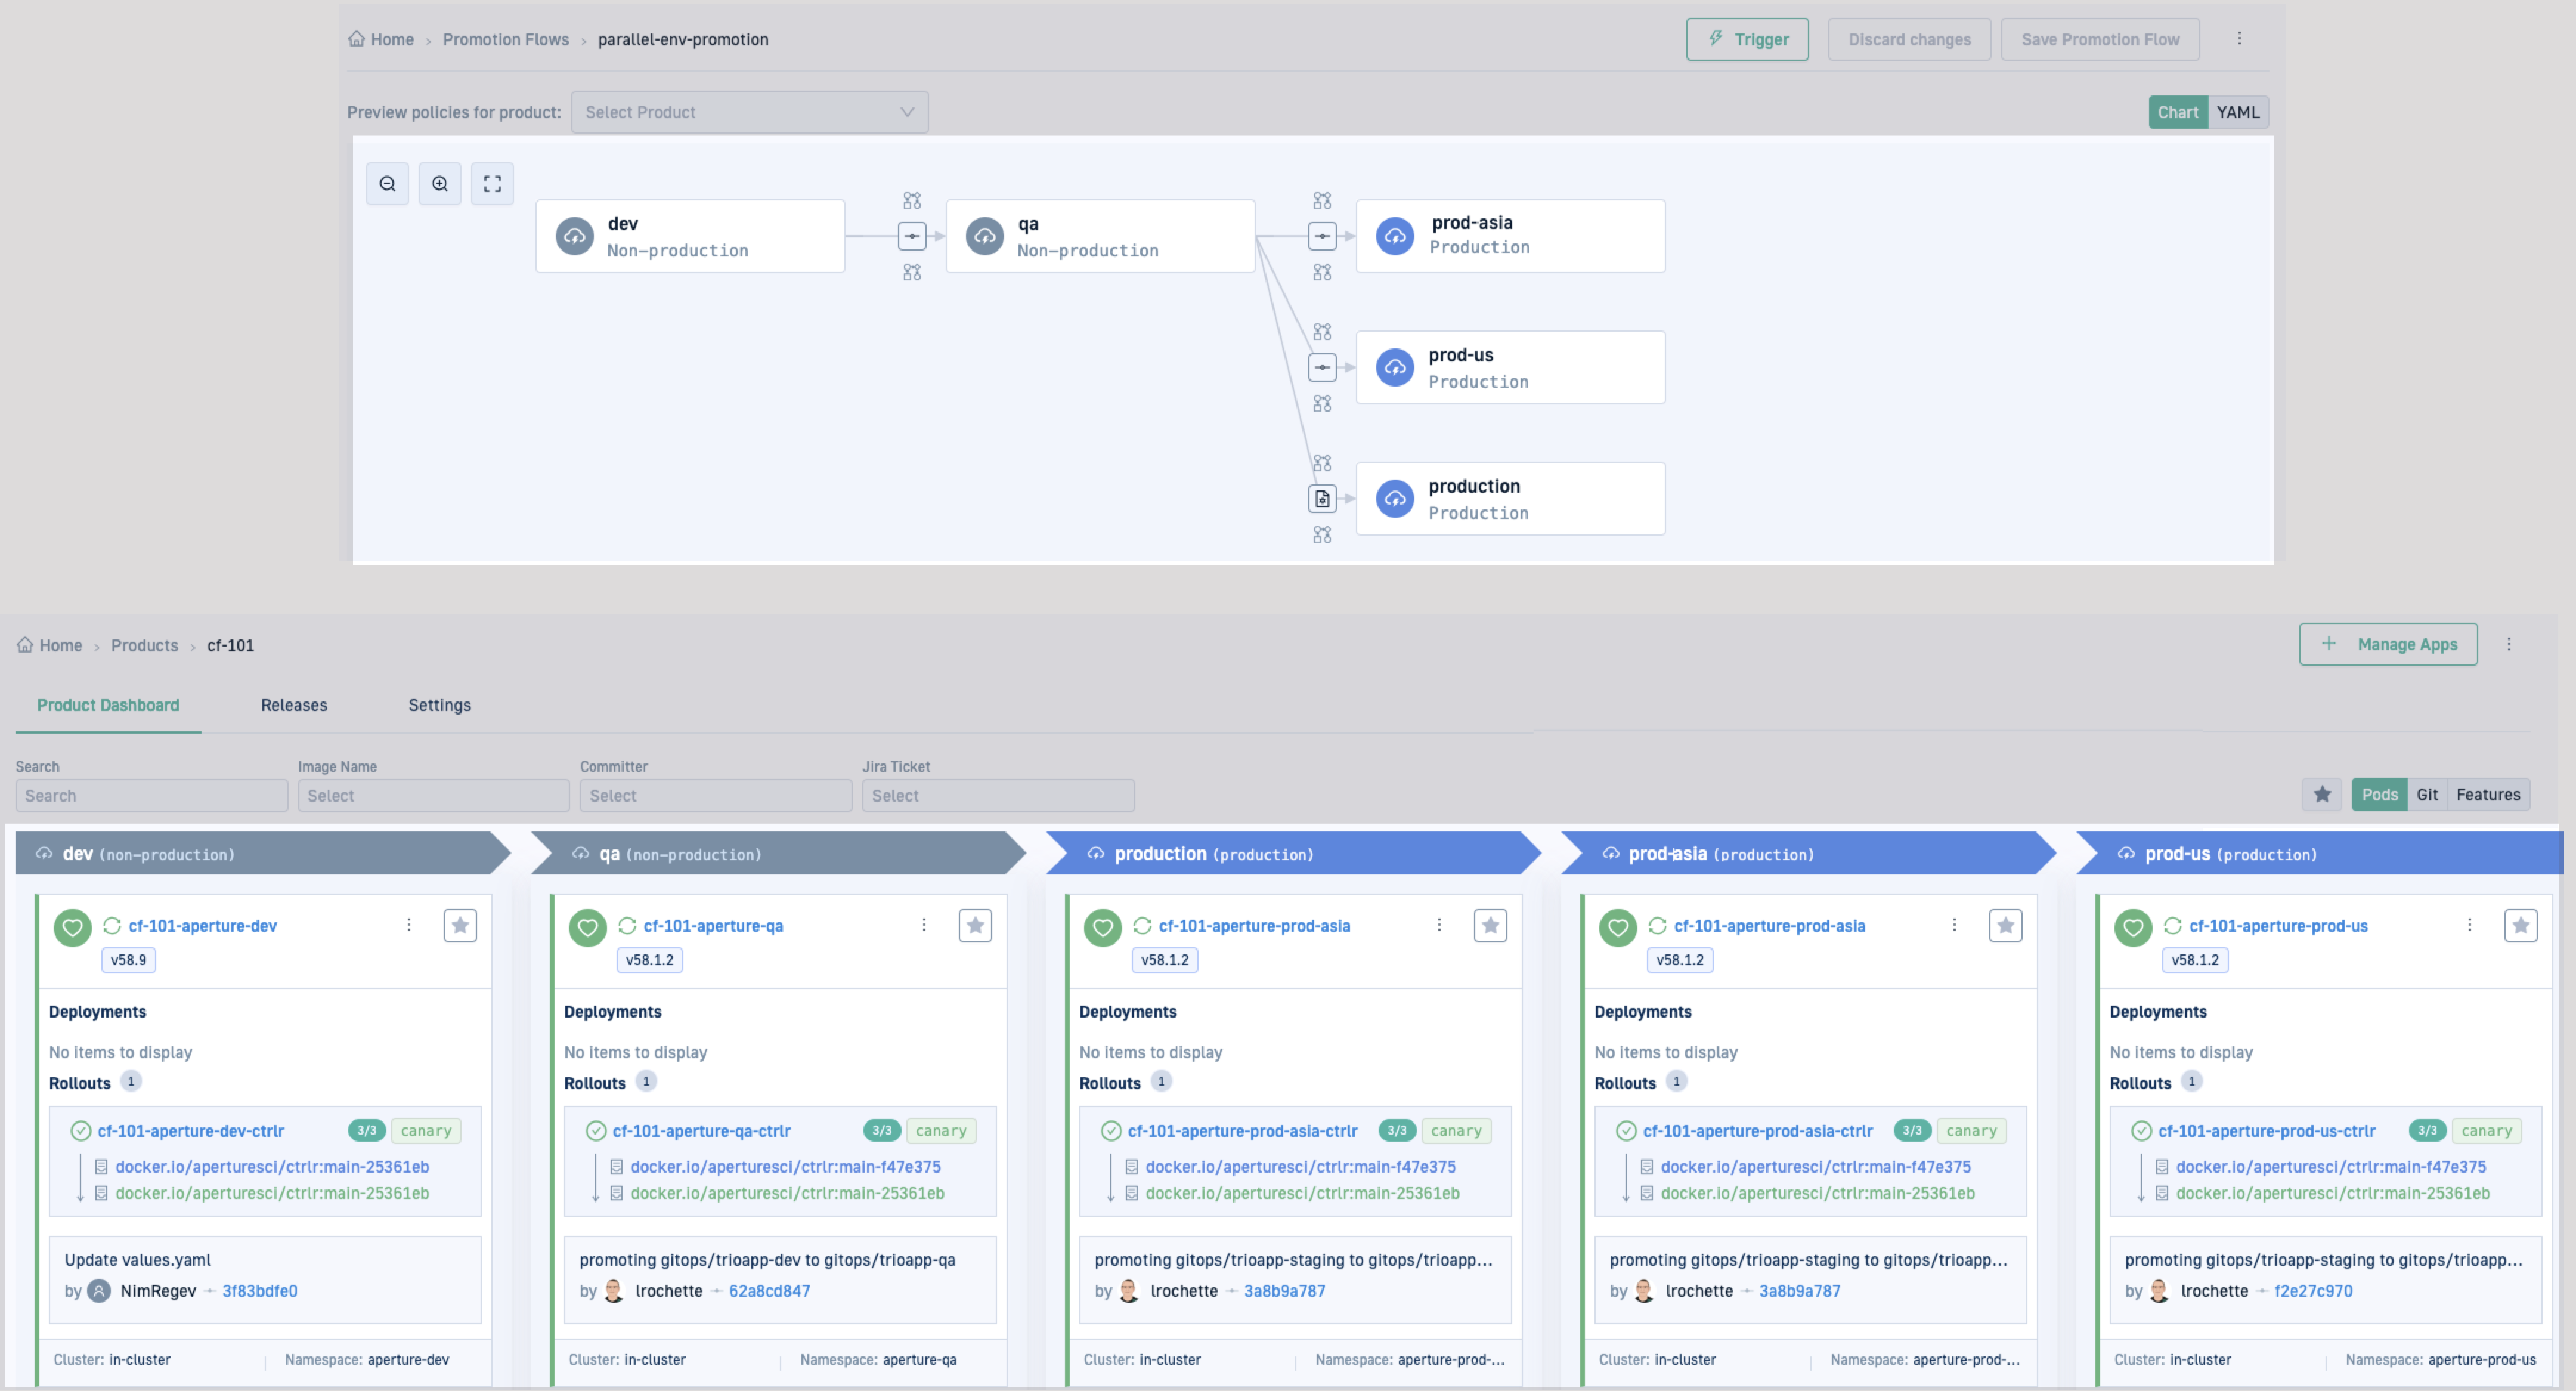
Example: There are multiple production environments differentiated by region, and changes are promoted simultaneously to prod-asia and prod-us, and prod-europe, as these environments can be updated independently, before promoting to prod.
Promotions with dependencies
Dependencies are critical for defining relationships between environments, where the promotion of changes to one environment relies on the successful promotion of another. They are intrinsic to sequential flows, as a dependency is automatically established between the trigger environment and its immediate target environment. You can create Promotion Flows with more complex dependencies where the success of more than one environment is essential for the promotion to the next.
The arrows between the environments in the example below indicate the dependencies between environments.
Here’s an example of a Promotion Flow with multiple dependencies between target environments.
Comparing dependencies and parallel promotions
The key distinction between dependencies and parallel promotions lies in how environments are updated. Dependencies enforce a sequence, ensuring one environment is validated before proceeding to the next, while parallel promotions update environments independently.
Example:
Changes are promoted to production only after staging is promoted successfully (dependency).
Simultaneously, promotions to prod-asia and prod-us occur independently (parallel).
Promotion Flow behavior: Key insights
Here are a few useful factors to be aware of when creating Promotion Flows.
Trigger and target environments
Creating and assigning environments in a Promotion Flow starts with the Trigger Environment, where the change to the application initiates the flow, and continues with one or more target environments to which the changes are promoted. You need at least one target environment in a Promotion Flow.
Adding environments
When adding an environment, you can select from the list of available environments, or create a new one that takes you to the Environments page for defining settings. At this point, the Promotion Flow remains unsaved. A notification alerts you that there are unsaved changes to the Promotion Flow. This notification remains as long as you have unsaved changes in the Promotion Flow.
Removing environments
Removing an environment from the Promotion Flow requires you to reconnect next environments if any, to previous environments.
Reconnecting environments is only relevant when there are one or more environments in the flow following the one being removed. If the environment you’re removing, for example staging is the final environment in the flow, you can remove it directly without needing to reconnect.
See Remove environments from Promotion Flows.
Applications in environments
Applications in Trigger Environment
It is recommended to have a single application for a product in the Trigger Environment. If the product has multiple applications with changes, changes are promoted only for a single application.
Applications per defined environment
To ensure a successful promotion, the product must include an application in each environment defined in the Promotion Flow.
Multiple applications in a target environment
If a target environment, such as staging or production, includes multiple applications for the same product—segmented for example by region, tenant, or other criteria—each application in that environment is updated with changes from the source environment.
Although this behavior may seem intuitive, it’s crucial to recognize that each set of Promotion Policy settings that govern the environment’s promotion, also applies individually to each application.
For example, if there are three applications with Pre-Action Workflows, the Pre-Action Workflow will execute three times—once for each application.
Steps within the Pre-Action Workflow that create resources or perform actions are also executed multiple times.
Consider a step within the Pre-Action Workflow which creates a Jira ticket when initiating promotion, will run three times, creating three separate Jira tickets.
Deleting/adding files in applications
Adding or deleting files from applications in target environments does not impact the success of the Promotion Flow. The promotion mechanism simply retains the added/deleted files as they are in the target environments.
Flow timeouts
When you create a Promotion Flow, you can define a timeout to automatically terminate the flow if it exceeds the allowed time.
If not configured, the Flow inherits the default timeout of 24 hours.
Timeouts are useful in scenarios such as:
- Manual approval delays: Terminates the flow if approval isn’t provided within the defined time frame for PR-driven flows for example.
- Long-running tests: Terminate flows running indefinitely due to misconfigured tests, preventing resource waste and pipeline delays.
Promotion Policy settings
For each environment, you can explicitly set the Promotion Policy that defines governs promotion behavior for the environment through the Promotion Action (required), and the optional Pre- and Post-Action Workflows.
You can also preview Policy settings by product before the flow is triggered.
Inline vs. global Promotion Policy settings
When you create or edit a Promotion Flow, the Flow Builder displays available policy settings.
-
Inline policy settings
If you manually select policy settings for an environment, these inline selections override any global Promotion Policy settings that match the product/environment when the flow is triggered. -
Global Promotion Policy settings If no inline settings are selected, the system applies global Promotion Policy settings based on predefined priorities.
Promotion Workflows
Both Pre- and Post-Action Workflows are optional in a Promotion Flow, unless defined in the Policy.
Previewing Promotion Policies by Product
Instead of waiting for a Promotion Flow to be triggered to see policy settings applied to environments, you can preview which global Promotion Policy settings are applied to a product within the flow. Policy evaluation by product is useful to verify if the environment and product have the desired policies, or to identify environments with missing policies, or required settings such as the Promotion Action.
Create a Promotion Flow
Visually design and create the flow by selecting environments, Promotion Actions, and Workflows, and defining dependencies through the Flow Builder. If needed, create new environments and promotion workflows on-the-fly when doing so.
Before you begin
- Review Promotions: Setup & configuration guidelines
- Make sure you have a Runtime designated as the Configuration Runtime
How to
- In the Codefresh UI, on the toolbar, click the Settings icon, and then from the sidebar, select Promotion Flows.
- Click Add Promotion Flow.
- Define the Flow settings:
- Name: The name of the Flow compatible naming conventions for Kubernetes resources.
- Description: (Optional) More information about the purpose of the Promotion Flow.
- Flow Timeout: The maximum duration allowed for the Promotion Flow to complete execution after being triggered, before it is automatically terminated. If not specified, the default timeout is 1 day (24 hours).
- Version: (Optional) The version of the Promotion Flow. This is manually defined and manually updated, and is useful to indicate changes in the same flow.
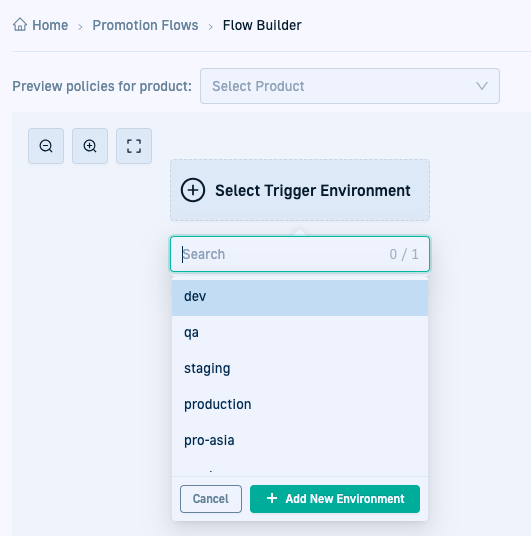
- In Select Trigger Environment, click
 to see the list of available environments:
- Select an existing environment, select it and click Add.
- To create a new environment, click Add New Environment.
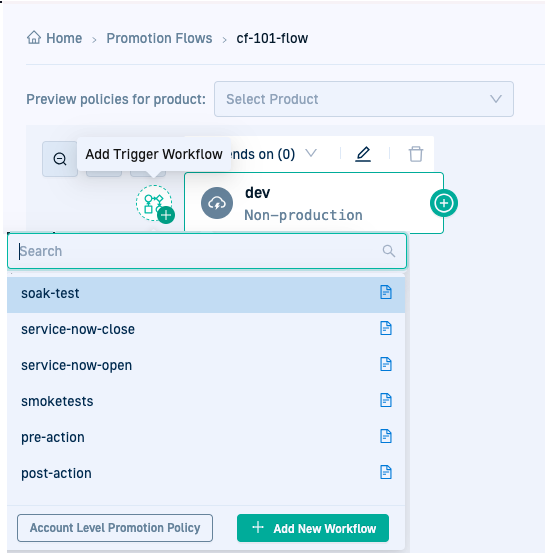
- Optional. To add a trigger workflow to validate the trigger environment after the change and commit action, mouse over the left of the environment node, and click
 , and select a Workflow.
- To apply a trigger workflow from global Promotion Policy settings, click Account-level Promotion Policy.
- To add a new Promotion Workflow as the trigger workflow, click Add New Workflow.
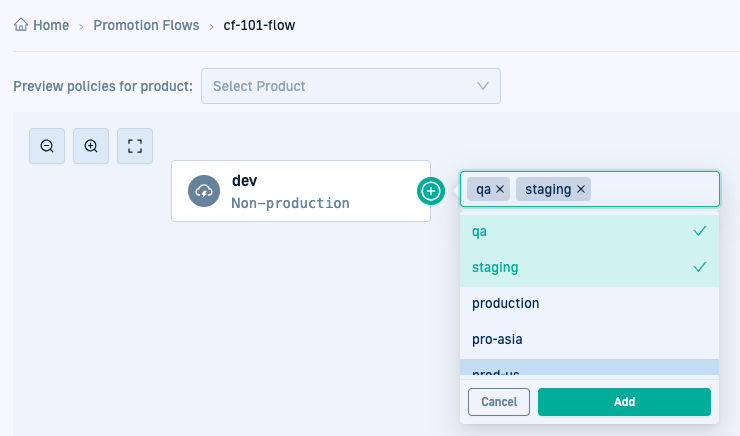
- To add a target environment to promote to, either sequentially or in parallel, mouse over the right of the environment to add to, click
 and then select the environment or environments.
The example below shows two environments,
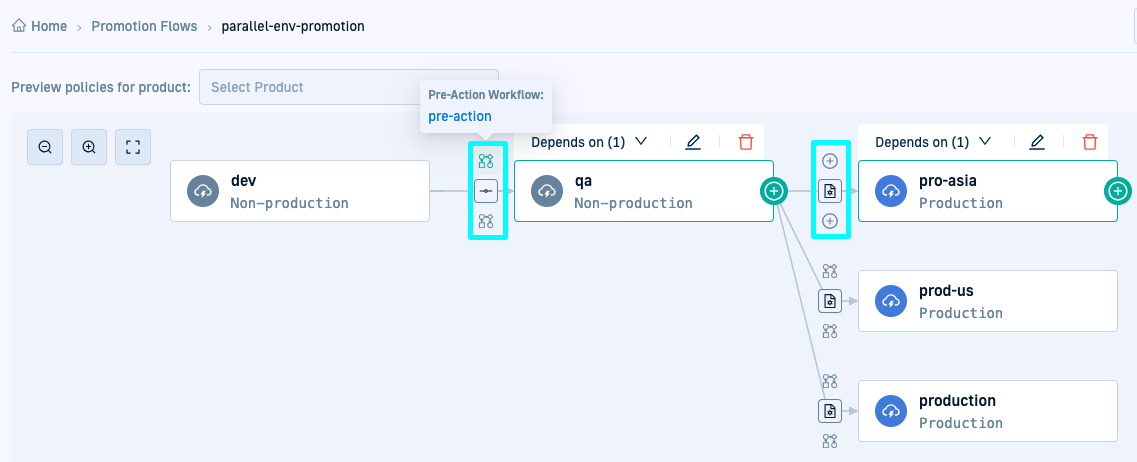
 qaandstagingas parallel environments todev.
- To add a dependency between environments, from the Depends on list in the target environment, select the environment and click Update Dependency. The environment(s) are added, with the arrows indicating the links between the environments. The Depends on counter shows the total number of dependencies.
- To select the Promotion Action for the target environment, do the following:
- Mouse over the left of the target environment and click
 .
. - Select an inline action from the list, or to automatically select an action from the global promotion policies, click Account-level promotion policies.
- Mouse over the left of the target environment and click
- To add a Pre- or Post-Action Promotion for the target environment, mouse over the left of the target environment and click the respective icons.
- To add an inline Workflow, select it and click Add.
- To add a new Workflow, click Add New Workflow.
- To apply an automated Promotion Policy, click Account-level Promotion Policy.
- Click Save Promotion Flow on the top-right. The Name and Description are populated from the Settings. The flow’s YAML version on the right lists the environment sequence.
- To confirm, click Save.
Evaluate global Promotion Policy settings by product
Select a product to evaluate the settings that will be applied from global Promotion Policies to all target environments without inline settings. Global Promotion Policy settings are applied from all Policies that match the product and the environment, according to priority.
TIP
When evaluating policies by product, only policy settings without inline values are populated in the preview.
Previewing policy settings does not affect the actual Promotion Flow when triggered.
- From the list of Products, select the product for which to evaluate or apply Promotion Policy settings. The Promotion Action, Pre- and Post-Action Workflows that match are applied from the global Promotion Policies and displayed for each environment. Mouse over the Pre-Action, Post-Action, and Action icons to see the Workflows and the Promotion Action assigned.
- If you get an error that the component is not defined for the Policy, click the corresponding icon and assign a Workflow or an Action.
Remove environments from Promotion Flows
Remove one or more environments from a Promotion Flow. Removing an environment requires you to reconnect environments linked to the one being removed to prevent orhpaned environments.
Reconnecting environments is only relevant when there are one or more environments in the flow following the one being removed. If the environment you’re removing, for example staging is the final environment in the flow, you can remove it directly without needing to reconnect.
- In the Codefresh UI, on the toolbar, click the Settings icon, and then from the sidebar, select Promotion Flows.
- Select the Promotion Flow with the environment you want to remove.
- Mouse over the environment node and then click
 .
If the environment is linked to another one (not the last environment in the flow), you are prompted to select the reconnect behavior.
- Do one of the following:
- If you have environments in the flow linked to the environment you are removing, from the Reconnect next environments to list, select a preceding environment to reconnect to.
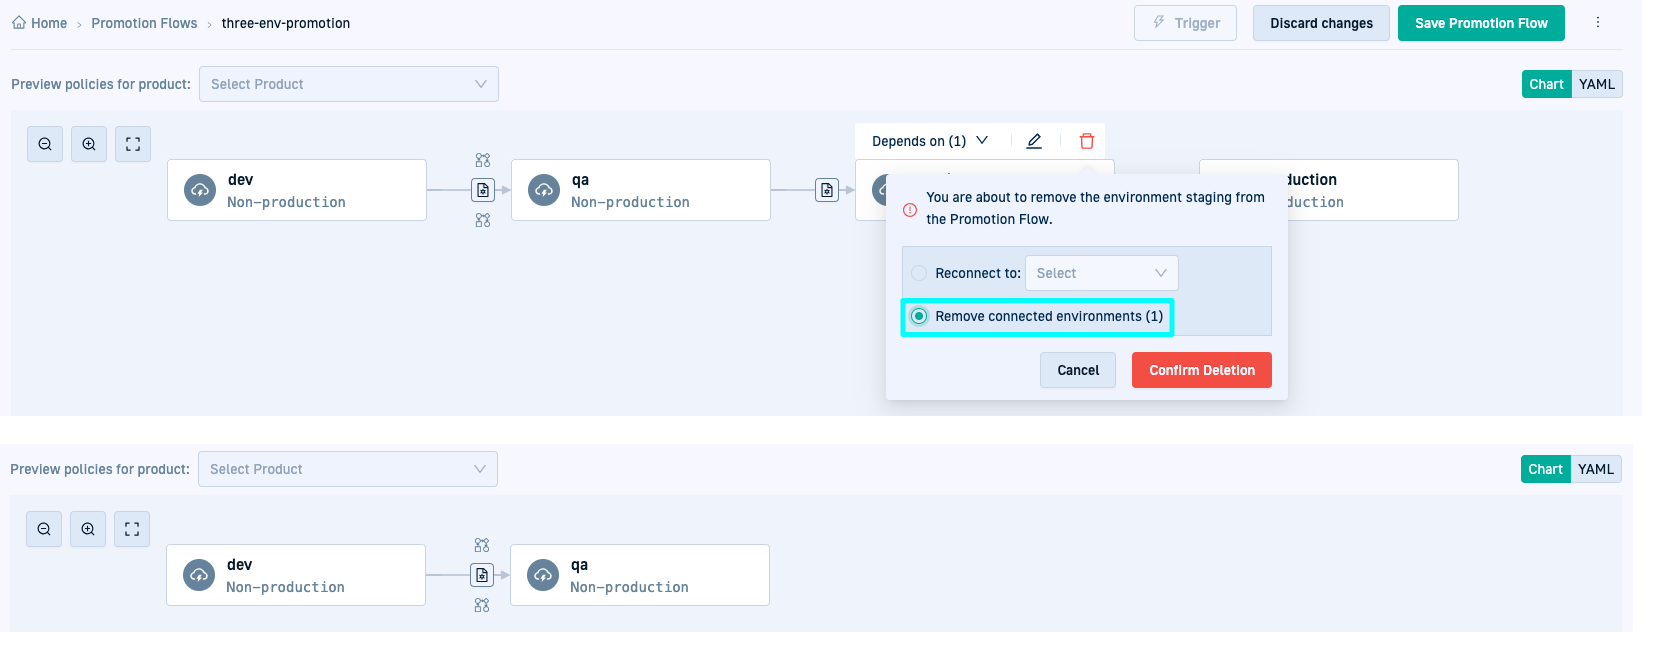
For example, consider a promotion flow withdev,qa,staging, andprodenvironments in that order. When removing thestagingenvironment which is linked toproduction, you need to reconnect to one of the preceding environments,qaselected in the example above. - To remove all connected environments, select Remove all connected environments.
This action removes all environments linked to and succeeding
qa, which arestagingandproductionin the example below.
- If you have environments in the flow linked to the environment you are removing, from the Reconnect next environments to list, select a preceding environment to reconnect to.
Related articles
Trigger promotions
Tracking product promotions through releases
Promotions: Setup & configuration guidelines
About promotions
