Deploy with Kustomize
Deploy your services to Kubernetes using Kustomize
Kustomize is a tool included with kubectl 1.14 that “lets you customize raw, template-free YAML files for multiple purposes, leaving the original YAML untouched and usable as is.”
Kustomize is more of an overlay engine, as opposed to a templating engine. You create a base configuration and overlays. Your overlays contain a kustomization.yaml file, and any variants/changes are applied over top of the base configuration. Kustomize does not use templates at all.
While it is good for simple scenarios, we suggest that you use Helm for managing your Kubernetes applications. Helm is a full package manager for Kubernetes manifests that also provides templating capabilities. See this example for more information.
The example application
You can find the example project on GitHub.
The sample application is a simple Spring Boot web app, that displays an environment variable, MY_MYSQL_DB on the page:
public class HelloController {

	String my_sql_db = System.getenv("MY_MYSQL_DB");

	@RequestMapping("/")
	public String index() {
		return my_sql_db;
	}
The project contains a base and two overlays, one for a staging environment and one for production.
The base manifest holds a dummy variable for MY_MYSQL_DB which will be overlayed once we call the kustomize command in our pipeline.
base/deployment.yaml
...
        env:
        - name: MY_MYSQL_DB
          valueFrom:
            configMapKeyRef:
              name: the-map
              key: mysqlDB
We will overlay on top of the manifests a different value for MY_MYSQL_DB for the staging environment and production environment.
overlays/staging/config-map.yaml
apiVersion: v1
kind: ConfigMap
metadata:
  name: the-map
data:
  mysqlDB: "staging-mysql.example.com:3306"
overlays/production/config-map.yaml
apiVersion: v1
kind: ConfigMap
metadata:
  name: the-map
data:
  mysqlDB: "prod-mysql.example.com:3306"
In addition, for the production environment, the number of replicas will be overlayed to 3 instead of 1 (as defined in the base deployment).
overlays/production/deployment.yaml
apiVersion: apps/v1
kind: Deployment
metadata:
  name: the-deployment
spec:
  replicas: 3
Prerequisites
- A free Codefresh account
- A Kubernetes cluster connected to your Codefresh account
Create the staging environment pipeline
This pipeline will have two stages: clone and deploy.
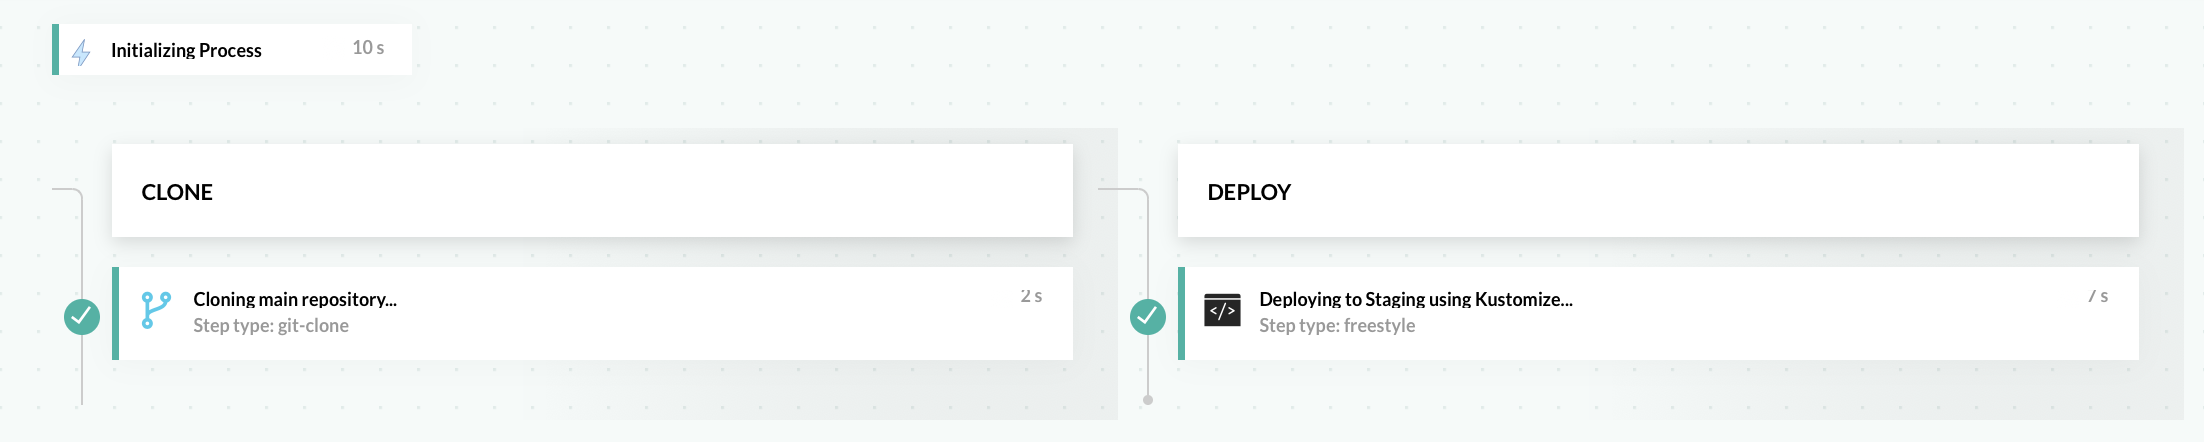
You should be able to copy and paste this YAML in the in-line pipeline editor of the Codefresh UI. However, make sure to replace cluster context for the kubectl command under the arguments section with your own that you integrated with Codefresh. It will automatically clone the project for you and deploy.
staging-codefresh.yml
# More examples of Codefresh YAML can be found at
# https://codefresh.io/docs/docs/example-catalog/

version: "1.0"
# Stages can help you organize your steps in stages

stages:
  - clone
  - deploy

steps:
  clone:
    title: Cloning main repository...
    type: git-clone
    stage: clone
    arguments:
      repo: https://github.com/codefresh-contrib/kustomize-sample-app.git
      git: github
      revision: master

  deploy:
    title: Deploying to Staging using Kustomize...
    type: freestyle
    stage: deploy
    working_directory: ${{clone}}
    arguments:
      image: codefresh/kubectl:1.14.9
      commands:
        - kubectl config use-context anna-sandbox@codefresh-support
        - kubectl apply -k overlays/staging
The above pipeline does the following:
- Clones the main repository through a git-clone step.
- Connects to our Kubernetes cluster we have integrated with Codefresh using
kubectl, and deploys the application as a staging environment with the appropriate value forMY_MYSQL_DBas defined in our configMap using Kustomize (the-kflag), through a freestyle step.
TIP
If you are using kubectl prior to 1.14, you can use the following command to deploy with Kustomize:
kustomize build overlays/production | kubectl apply -f
Create the production environment pipeline
Likewise, this pipeline will have two stages: clone and deploy.

You should be able to copy and paste this YAML in the in-line editor of the Codefresh UI and remember to replace cluster context for the kubectl command again with your own. Click Save and Run and it will automatically clone the project for you.
prod-codefresh.yml
# More examples of Codefresh YAML can be found at
# https://codefresh.io/docs/docs/example-catalog/

version: "1.0"
# Stages can help you organize your steps in stages

stages:
  - clone
  - deploy

steps:
  clone:
    title: Cloning main repository...
    type: git-clone
    stage: clone
    arguments:
      repo: https://github.com/codefresh-contrib/kustomize-sample-app.git
      git: github
      revision: master

  deploy:
    title: Deploying to Production using Kustomize...
    type: freestyle
    stage: deploy
    working_directory: ${{clone}}
    arguments:
      image: codefresh/kubectl:1.14.9
      commands:
        - kubectl config use-context anna-sandbox@codefresh-support
        - kubectl apply -k overlays/production
The above pipeline does the following:
- Clones the main repository through a git-clone step.
- Connects to our Kubernetes cluster we have integrated with Codefresh using
kubectl, and deploys the application as a staging environment with the appropriate value forMY_MYSQL_DBas defined in our configMap using Kustomize (the-kflag), through a freestyle step.
TIP
If you are using kubectl prior to 1.14, you can use the following command to deploy with Kustomize:
kustomize build overlays/production | kubectl apply -f
Verification
After you run these pipelines, your deployments are displayed in the Kubernetes dashboard.
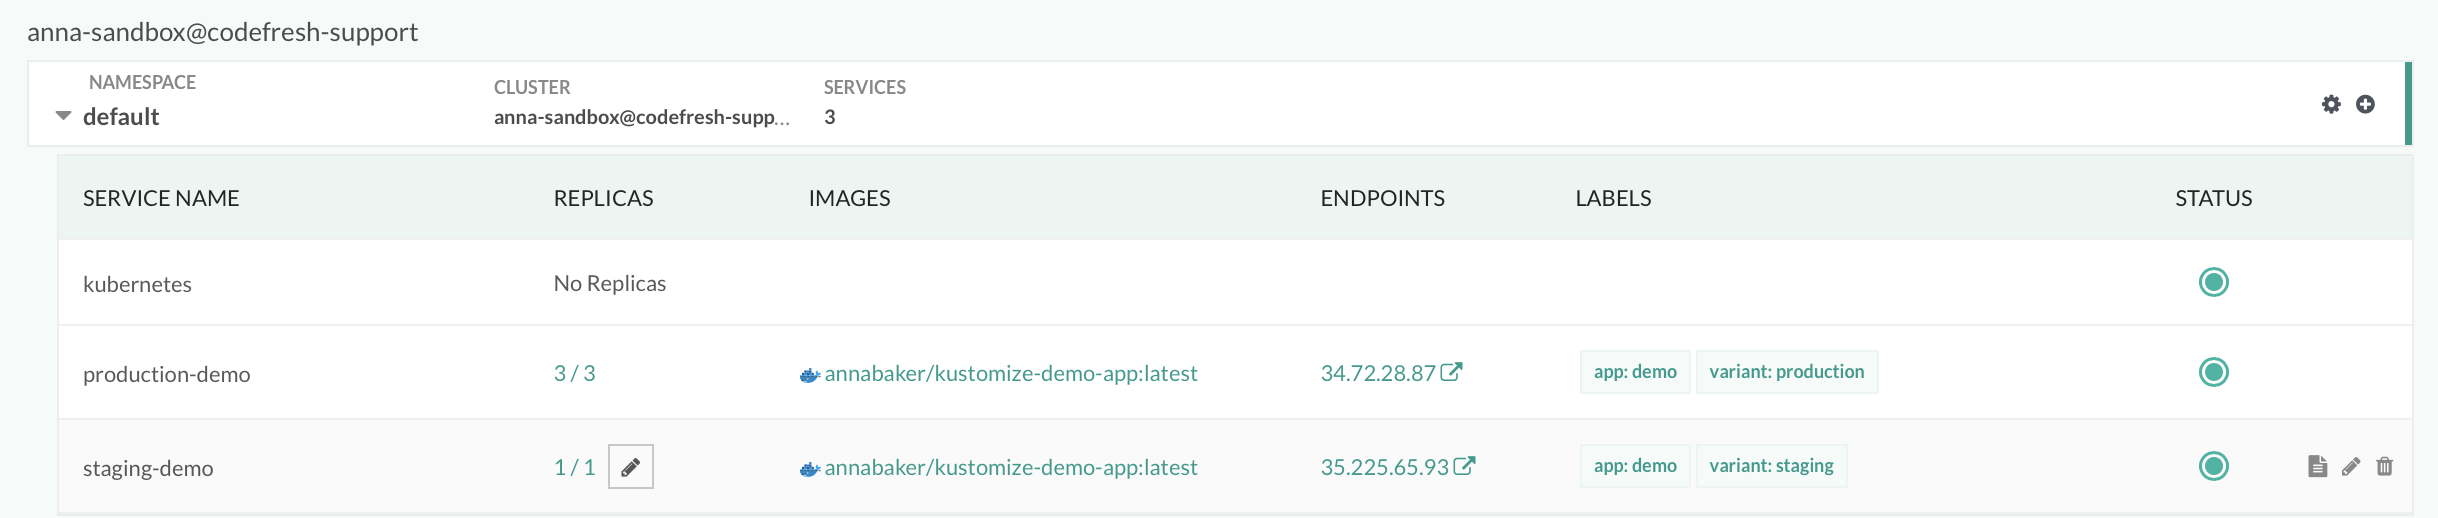
You can test that the application deployed correctly to both environments by accessing the endpoints:


Related articles
CD pipeline examples
Deployment options for Kubernetes
Running custom kubectl commands
Deploy with Helm