Promoting Helm Environments
Manage your Helm Environments with the Codefresh UI
Apart from the Helm Releases dashboard that shows your Kubernetes clusters at the application level, Codefresh also comes with a special environment board that allows you to track one or more applications as they move within your infrastructure (example, Dev, QA, Prod).
The environment board can function both as an overview of the whole lifecycle of the application, as well as a tool to shift-left/right Helm releases between environments.
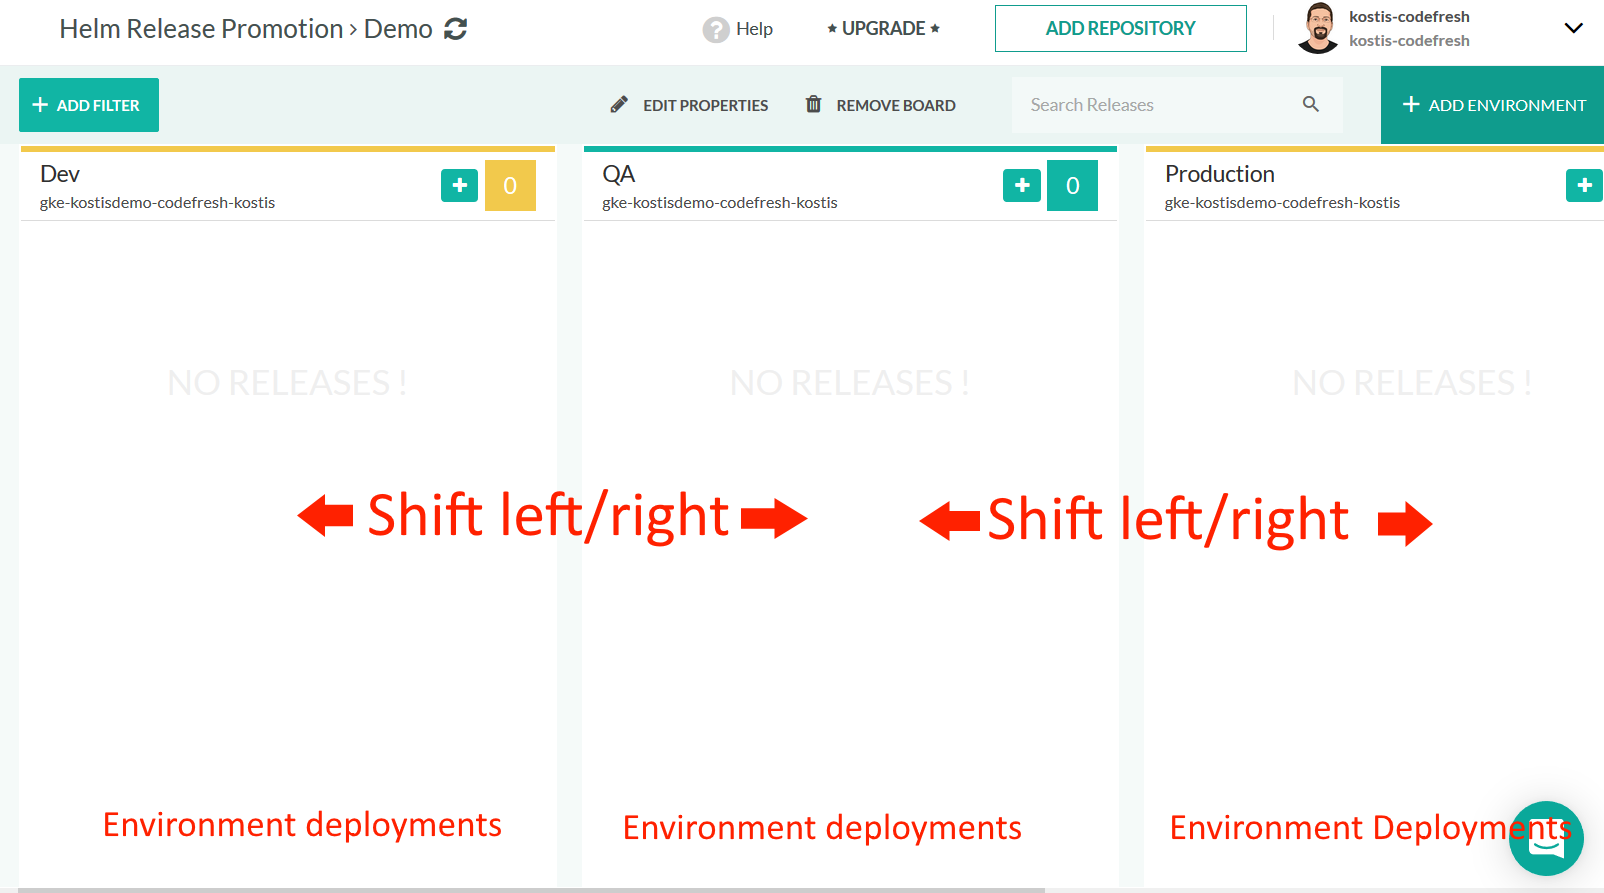
Here is an example board:

This board has three environments that correspond to Kubernetes clusters:
- A Load-testing environment where applications are stress-tested
- A Staging environment where smoke tests are performed
- The Production environment where applications go live
You can see that a Python example app at version 0.2.0 is already in production. Version 0.3.0 is waiting in the staging environment for smoke tests. Once it is tested it can be dragged to the production column therefore promoting it to production status.
Using the Helm Environment Board
You can create and manage as many Helm promotion boards as you want.
For each board, you define how many columns it will contain, where each column is a Helm-enabled Kubernetes cluster.
You can use different clusters for each column or different namespaces from the same cluster. You can even mix and match both approaches.
As an example, you could create a Helm board with the following environments:
- Column 1, dev cluster showing all namespaces (DEV)
- Column 2, namespace qa from cluster staging (QA)
- Column 3, namespace staging from cluster staging (STAGING)
- Column 4, namespace production from cluster prod (PRODUCTION)
Once you have your columns in place, you can move Helm releases between clusters/namespaces by drag-n-drop. Each Helm release can be dragged to any other column either promoting it, for example, from QA to Production, or shifting it left, for example, from Production to QA.
Creating a custom Helm Board
Create your own Helm board with a single or multiple Helm applications. You can create as many boards as you want.
- In the Codefresh UI, from DevOps Insights in the sidebar, select Helm Boards.
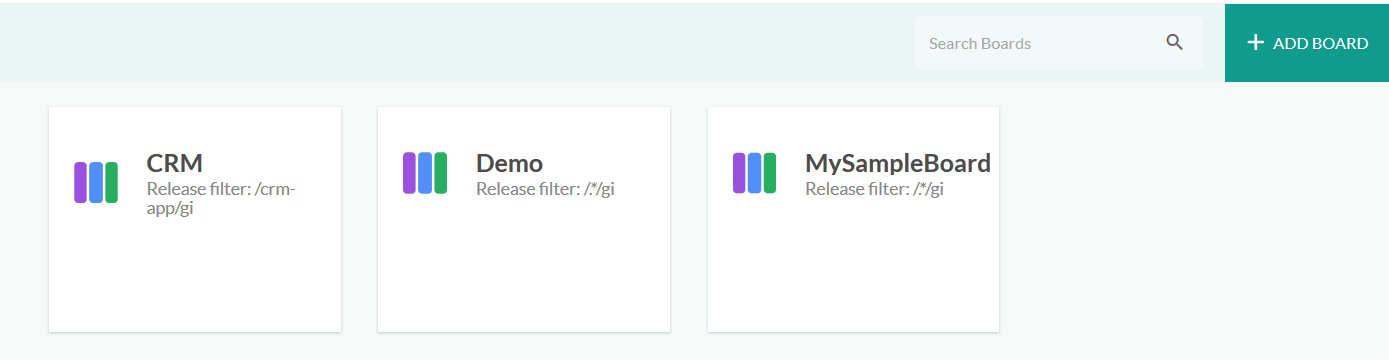
- On the top-right, click Add board.
- Enter the title of your board as the Board Name.
- Optional. In the Release name regex expression field, enter the Regex expression for this board to filter all its environments to show only Helm releases that match this regular expression.
Regex expressions are very helpful if you want your environment board to focus only on a single or set of Helm applications. To see all Helm releases of your clusters, leave empty.
You can edit both options for an existing board if you change your mind later.
Define Clusters/Namespaces for each Environment
Once you create your Helm environment board, you are ready to define its columns.
- To add a column, on the top-right, click Add environment*.
You will see the environment details dialog:
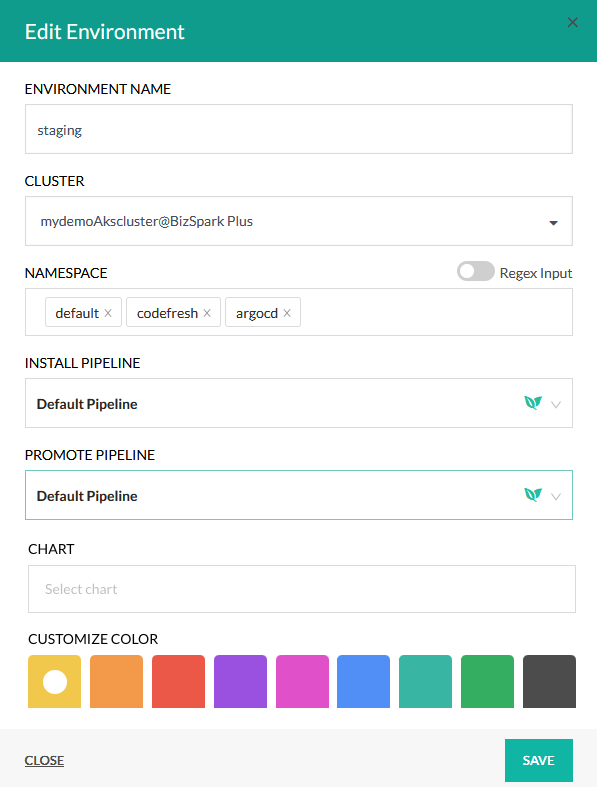
For each environment you can select:
- A name for that column
- The Kubernetes cluster it corresponds to
- One or more namespaces that define this environment (You can even toggle the switch for a regex match)
- A custom pipeline that will be used when a Helm release is installed for the first time in this column
- A custom pipeline that will be used when a Helm release is dragged in this column (promoted from another column)
- Optional. One or more charts to use for the environment. Defining charts for the environment saves you from having to search through all the charts in your Helm repository. When you install an application from the install graphical dialog, only the selected chart(s) are displayed.
- A presentation color to easily identify the environment on the board (For example, a “production” environment should have a red color)
You can also select no namespace at all. In that case, the column will show Helm releases for all namespaces in that cluster. You can change all these options after creation, so feel free to change your mind.
Repeat the same process for additional environments. Remember that you can name your environment as you want and define any combination of cluster/namespace for any of the columns. This gives you a lot of power to define a Helm environment board that matches exactly your own process.
You don’t have to define the environments in order. You can drag-n-drop columns to change their order after the initial creation.
Installing Helm Releases on each Environment
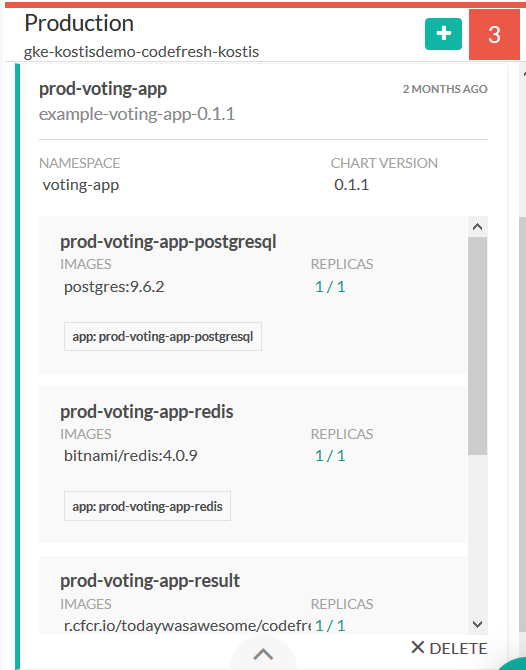
If you already have pipelines that deploy Helm releases, your columns are populated automatically with information.
For each Helm release, you will get some basic details such as the chart version and the name of the release. You can expand a release by clicking on the arrow button to get additional information such as the docker images and the replicas of each pod that are contained in the release.
You can even install manually a Helm release from any external repository by clicking on the PLUS button at the header of each column. In that case you will see a list of possible Helm applications to choose from.
You will be able to select the target cluster and namespace as well as the chart values as any other Helm release.
Moving Releases between Environments
A Helm environment board can be used by different stakeholders in order to get the detailed status of all defined environments. In that aspect it can act as a read-only tool that simply shows the results of Codefresh pipelines that deploy Helm applications.
Promoting Helm Releases with the UI
You can also use the board as an action tool in order to promote/demote a Helm release between individual environments. To move a Helm release between environments just drag-n-drop it to a different column.
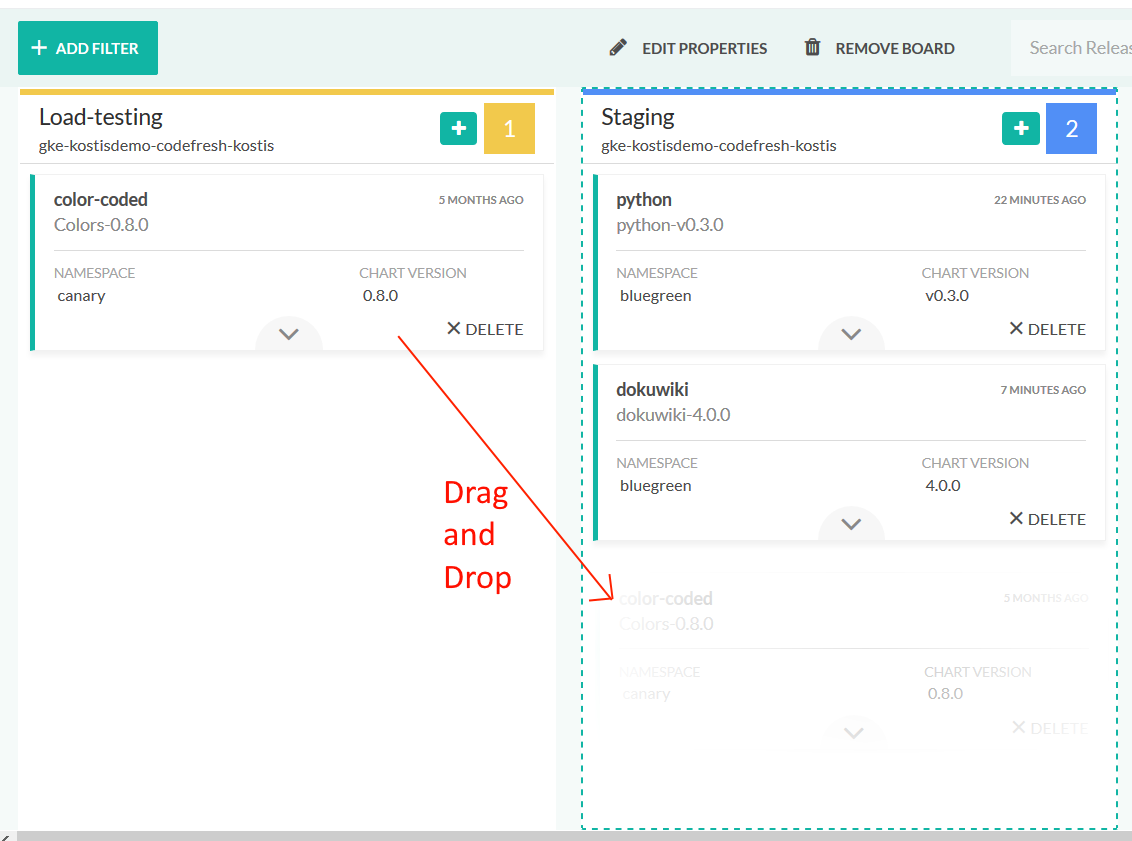
Once you drop the release you will also see the promotion dialog.
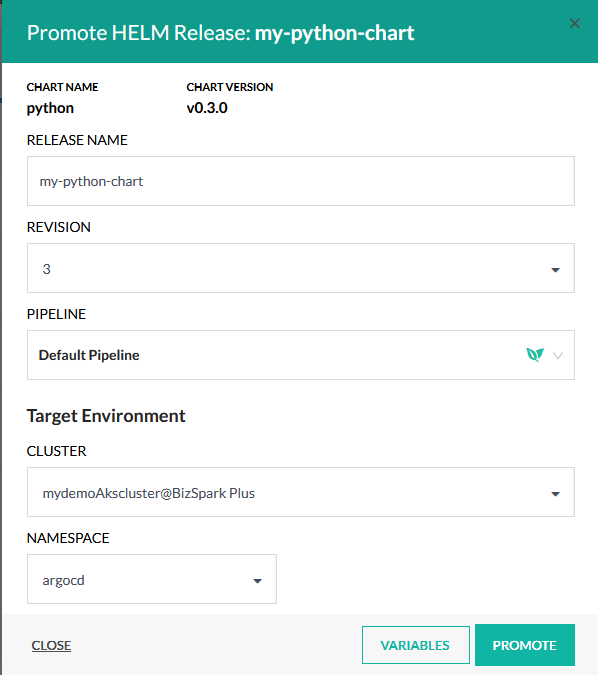
All fields here will be auto-filled according to the Helm release that you dragged. You can also choose a custom pipeline (see below) for the promotion if you don’t want to use the default one.
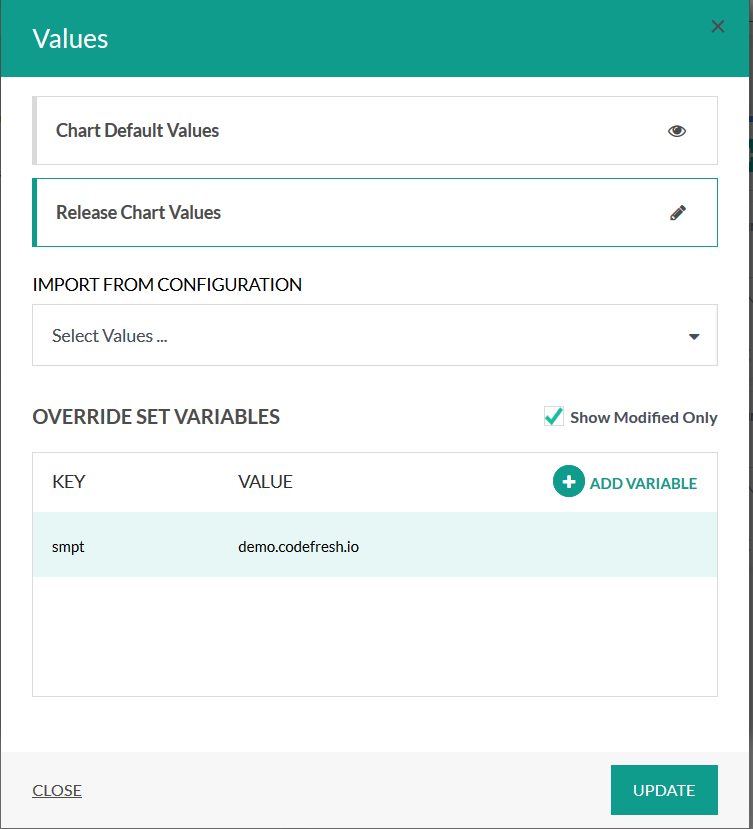
By clicking the Variables button you can override the chart values, import a specific shared configuration or add new values.
By default Codefresh will use a built-in install/upgrade pipeline for performing the promotion. You can choose your own pipeline from the promotion dialog. That pipeline will be automatically provided with the following environment variables:
CF_HELM_RELEASE- name of releaseCF_HELM_KUBE_CONTEXT-kubectlcontext name of target cluster (cluster name from dashboard)CF_HELM_NAMESPACE- Tiller Namespace if you use Helm 2CF_HELM_INSTALLATION_NAMESPACE- namespace where release is promoted toCF_HELM_CONTEXTS- shared configuration Helm contextsCF_HELM_VALUES- Helm chart valuesCF_HELM_SET- Additional values there were overridenCF_HELM_CHART_JSON_GZIP- Gzipped JSON of Helm chart (only for Helm 3)CF_HELM_CHART_JSON- JSON of Helm chart (only for Helm 2)CF_HELM_BOARD- Name of the board that is used for the drag-n-drop-actionCF_HELM_TARGET_SECTION- Name of the Source Environment that you are promoting fromCF_HELM_SOURCE_SECTION- Name of the Target Environment that you are promoting to
Note that the variable CF_HELM_CHART_JSON_GZIP is both compressed and base64 encoded. To get the raw value you need a command like echo $CF_HELM_CHART_JSON_GZIP | base64 -d | gunzip
NOTE
Only Codefresh admin users can override the default pipeline.
Once you click the update button, a new build will run that will perform the deployment.
Note that you can move releases to any column both on the right and on the left of the current column. This is helpful if for example you find a bug in your production environment and you want to bring it back to a staging environment for debugging.
Promoting Helm releases programmatically
You can also promote Helm releases with the Codefresh CLI.
Once you have installed the CLI, you can use it from an external script or terminal with the helm-promotion parameter:
codefresh helm-promotion --board MySampleBoard --source Staging --target Production --source-release my-app --set myenv=prodHere we promote the Helm release my-app to the Production column overriding also the myenv value.
Remember that the Codefresh CLI can also run in a Codefresh pipeline with a freestyle step.
Here is an example of a Helm promotion from within a Codefresh pipeline.
codefresh.yml
version: '1.0'
steps:
  triggerstep:
    title: trigger
    image: codefresh/cli
    commands:
      - 'codefresh helm-promotion --board MySampleBoard --source Staging --target Production --source-release my-app --namespace my-namespace --set myenv=prod'
Viewing the promotion pipeline
When you promote a Helm Release for a Board, you can view the pipeline for that release.
- Click on Boards under the Helm section on the left-hand side
- Select the board you want to view
- Select the Builds tab on the top
- Here, you can see the Promotion Pipelines / builds for promoting a Release
Editing your Helm Boards
For any existing Helm board, you have the following options:
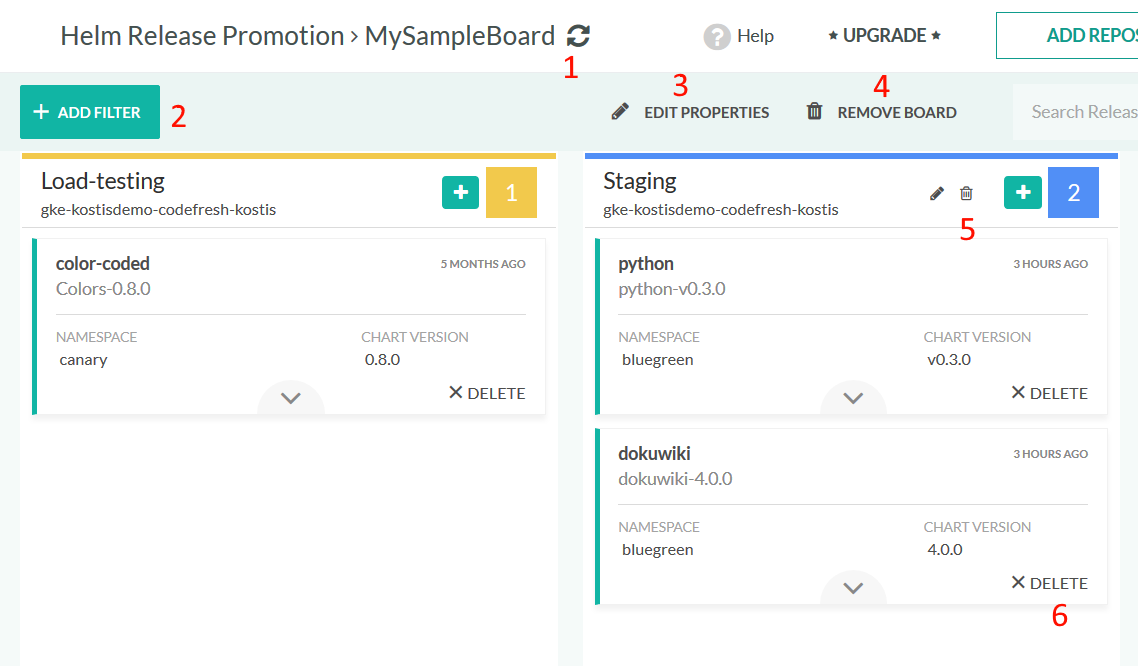
- The refresh button will update the board with the current state of the clusters
- The filtering menu can be used to further constrain the Helm releases shown in each column.
- The edit properties button allows you to change again the title of the board as well as a global filter for Helm releases
- The remove board completely deletes the present board from the Codefresh UI
- The environment details on the environment header are:
- The edit button to change again the options for this column (shown on mouse hover)
- The delete button to remove this column from the board (shown on mouse hover)
- The plus button to install a new chart. If you selected one or more charts when you defined your environment, only the selected charts are displayed.
- A numeric value that shows how many releases are contained on this environment
- The delete button allows you to uninstall a Helm release for an environment
The filtering options allow you to further constrain the Helm release shown for the whole board.
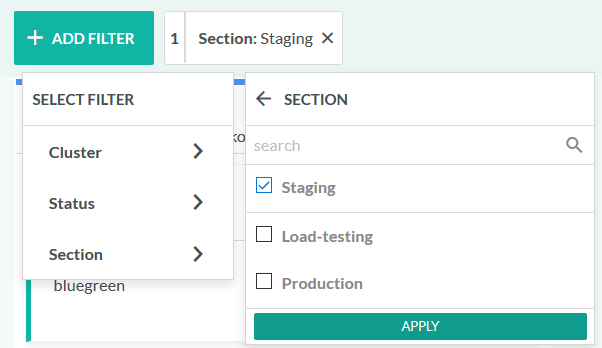
The filters are especially helpful in Helm boards with large numbers of environments and/or releases.
Related articles
Using Helm in a Codefresh pipeline
Helm charts and repositories
Managing Helm releases
Environment Dashboard