Managing Git Sources in GitOps Runtimes
Add Standard/Restricted Git Sources to GitOps Runtimes
Git Sources in GitOps Runtimes
A Git Source is a unique entity created for use with GitOps Runtimes in Codefresh.
The Git Source connects to a Git repository within your organization, serving as an easy way to manage the deployment and configuration of Argo CD applications on clusters.
The Git repository referenced by the Git Source stores application manifests and other resources which are always synced to the cluster. Codefresh manages the Git Source itself as an Argo CD application.
Types of Git Sources
Codefresh allows you to create two types of Git Sources: Standard and Restricted Git Sources.
Both types of Git Sources sync Argo CD application manifests. The main difference lies in the namespace to which Argo CD applications are synced. With a Restricted Git Source, you can sync Argo CD applications to the namespace of your choice, instead of to the default namespace which is the Runtime’s namespace.
Restricted Git Sources
Restricted Git Sources:
- Are optimized for multi-tenant organizations where multiple development teams create and deploy applications for different customers on the same cluster
- Control which teams can create what applications and where they can deploy them
Codefresh removes the complexity from the manual configuration required to sync and manage applications and their resources in different namespaces:
- Administrators set up Restricted Git Sources in Codefresh with the Git repo, cluster, and namespace definitions
- Codefresh manages the Argo CD applications synced to the Git Source, ensuring secure compliance without complex administrative overhead
Standard and Restricted Git Sources further explains the differences between the two types of Git Sources.
See how the Restricted Git Source enforces secure deployment boundaries in Use case: Restricted Git Source in multi-tenant environment.
You can create, and manage both types Git Sources directly in the Codefresh UI. See Git Source settings and Create a Git Source.
To understand how the Git Source interacts with GitOps Runtimes and Argo CD applications, explore Git Sources, GitOps Runtimes, Argo CD applications.
Standard and Restricted Git Sources
Codefresh allows you to create two types of Git Sources:
- Standard Git Source
- Restricted Git Source
Standard Git Source
The Standard Git Source is created as an Argo CD application within the GitOps Runtime’s namespace. Manifests of Argo CD applications synced to a Standard Git Source are also deployed to the Runtime’s namespace. Standard Git Sources are typically assigned to the default Application Project.
Features of Standard Git Sources
-
Application Project
The default or user-defined Application Project allows deployments from any Git repository, to any destination cluster and namespace(s). -
Git repository
The Git repository linked to the Standard Git Source can store different types of resources, from Argo CD applications to config maps, Argo Workflow templates, and more. Git repo URLs must use HTTPS as their permissions are verified using Personal Access Tokens (PATs).
Restricted Git Source
The Restricted Git Source is also created as an Argo CD application within the GitOps Runtime namespace, with two major differences:
- Manifests of Argo CD applications synced to a Restricted Git Source are deployed to a user-defined namespace, not to the Runtime’s namespace.
- Codefresh automatically creates the Application Projects according to the settings defined for the Restricted Git Source.
The most notable feature of the Restricted Git Source is its ability to control access to the Git repositories with Argo CD applications, and to enforce deployments only to specific clusters and namespaces.
Features of Restricted Git Sources
-
Application Projects
All Argo CD applications synced to the same Restricted Git Source must belong to the same Application Project. Codefresh simplifies this by automatically creating the Application Project for the Restricted Git Source. As a user, you do not have the option to manually select the Application Project to which your applications should belong to when working with Restricted Git Sources.Whenever you create a Restricted Git Source, Codefresh generates two Application Projects for the Git Source with the same name as the Restricted Git Source:
- Application Project for the Restricted Git Source application, with the suffix
restrictedadded to the name - Application Project controlling the Argo CD applications synced to the Restricted Git Source.
- Application Project for the Restricted Git Source application, with the suffix
-
Git repository
The Git repository referenced by the Restricted Git Source can house only manifests of Argo CD applications, Application sets, and Application Projects.
Git repo URLs must use HTTPS as their permissions are verified using Personal Access Tokens (PATs). -
Deployment destinations
The destination clusters and namespaces defined by the Restricted Git Source defines the deployment destinations allowed for applications.
Git Sources, GitOps Runtimes, Argo CD applications
Let’s look at how the Git Source interacts with other entities such as GitOps Runtimes and Argo CD applications.

Git Sources & GitOps Runtimes
Git Sources are always linked to GitOps Runtimes within Codefresh’s GitOps ecosystem. Every GitOps Runtime can be associated with one or more Git Sources.
Git Sources are housed in the account’s Shared Configuration Repository, typically within .resources/<runtime-name>/. The Shared Config repo is a dedicated Git repository that stores configuration settings and manifests shared between Runtimes within the same account.

Git Sources & Argo CD applications
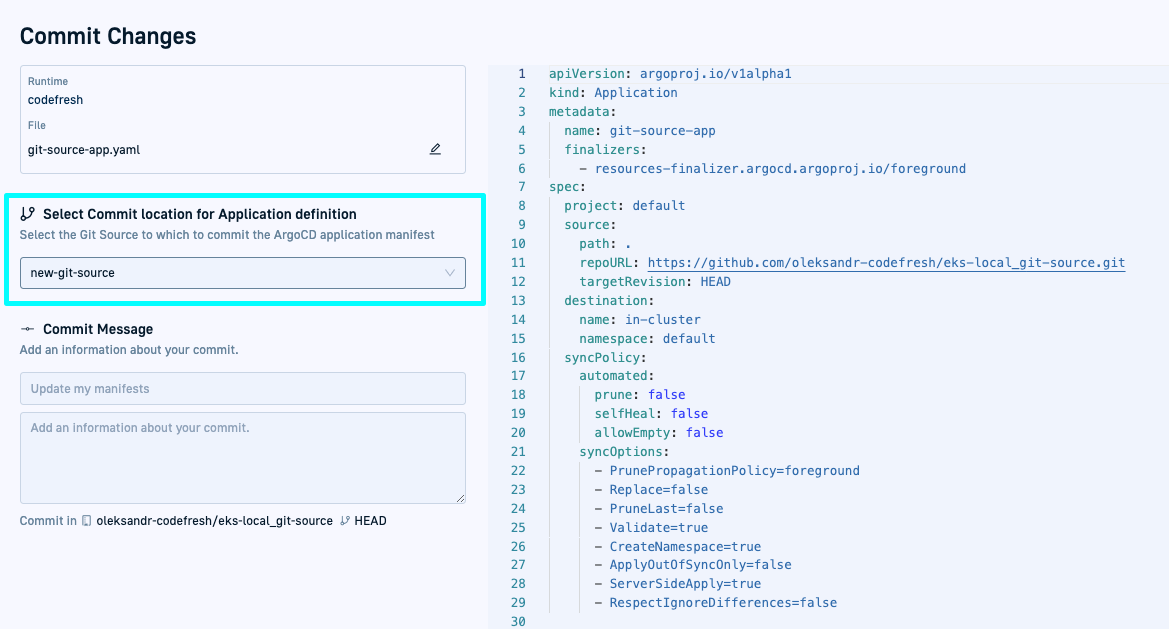
When creating an Argo CD application in Codefresh, selecting the Git Source to which it should sync is a critical step before committing the application manifest.
Syncing an Argo CD application to a Git Source, ensures that:
- The application’s manifest in the Git repository linked to the Git Source is always synced with the cluster.
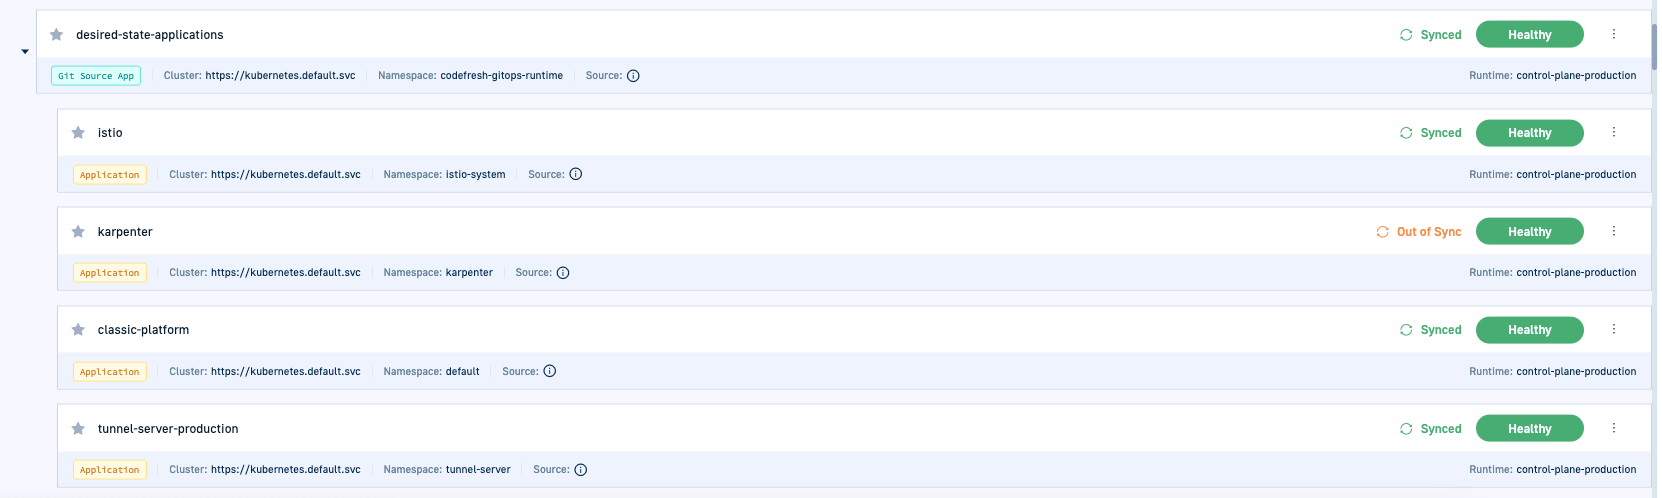
- The application hierarchy is accurately displayed in the GitOps Apps dashboard, as one of a set with the Git Source as the parent application.
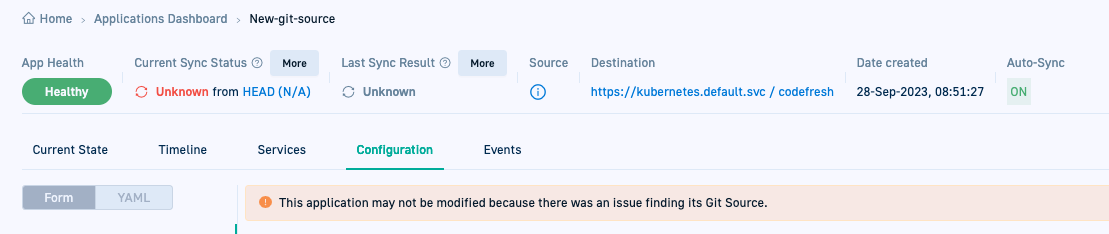
If the Argo CD application is not synced to a Git Source:
- The hierarchy is not correctly displayed in the GitOps Apps dashboard, even if the Argo CD application is part of an application set.
- You cannot modify the application’s settings nor delete the application in Codefresh. The UI displays a notification that “there was an issue with the application’s Git Source.”
Use case: Restricted Git Source in multi-tenant environment
The use case illustrates how the Restricted Git Source can handle secure application deployment in multi-tenant environments.
Scenario
Multiple teams are engaged in creating applications for Marvel characters. Each team must be constrained to create the applications in the Git repos defined for them, and deploy the applications within the namespaces assigned to them.
There are three teams:
- Hulk
- Thor
- Thanos
Objective
Use Codefresh’s Restricted Git Sources to define and enforce restrictions.
Set up the Restricted Git Source for Hulk
Let’s see how to achieve this for a single team, the Hulk team.
-
Create Git repo for the Hulk team
Create the Git repo where the developers in the Hulk team can store their application manifests. Make sure to grant write permissions only to members of the Hulk team.
Let’s name the Git repomarvel-hulk-team-apps. -
Create destination namespace for deployment
Create the namespace on the cluster to which Hulk applications can be deployed. Let’s name it,cf-hulk-apps-zone.
Note that the Namespace must start with the prefixcf-. - Create a Restricted Git Source
Create the Restricted Git Source for the Hulk team that will define the namespace to which to deploy application manifests, and the namespace to which to deploy the applications themselves. For detailed descriptions of the settings, see Git Source settings in this article.- In the Codefresh UI, go to your GitOps Runtime for which to create Git Sources.
- Click the Git Sources tab and click Create Git Source.
- Define the following:
- Name:
hulk-apps - Type:
Restricted - Source:
marvel-hulk-team-apps(this is the Git repo linked to the Restricted Git Source where the Hulk team will store their application manifests) - Branch:
main - Path:
.
- Name:
- Leave the other settings empty, and click Next.
- Specify the deployment settings:
- Source Namespace: Define the namespace to which to deploy the application manifests. Because we want to enforce permissions, we will define
cf-hulk-app-manifestsas the namespace. Thecf-prefix is mandatory for the namespace. If the namespace does not exist, Codefresh will automatically create it. - Allowed Clusters & Namespaces: Select the relevant cluster and namespace to which to deploy the applications. Let’s select
hulk-apps-zoneas the namespace to which to deploy applications.
- Source Namespace: Define the namespace to which to deploy the application manifests. Because we want to enforce permissions, we will define
- Click Create. You have now created the Restricted Git Source. Codefresh creates the Application Projects with the required configurations to enforce the restrictions.
- Create an Argo CD application
When you create an Argo CD application in Codefresh, you are prompted to select the:- GitOps Runtime for the application
- Git Source in which to store the application manifest, from among the Git Sources created for the Runtime to which you have write permissions
The Restricted Git Source you select dictates which target clusters and namespaces are available for deployment.
Codefresh enforces the limitations through both the UI and the GitOps Runtime to ensure that applications cannot be deployed outside their set boundaries.
Repeat this process to set up Restricted Git Sources for other teams.
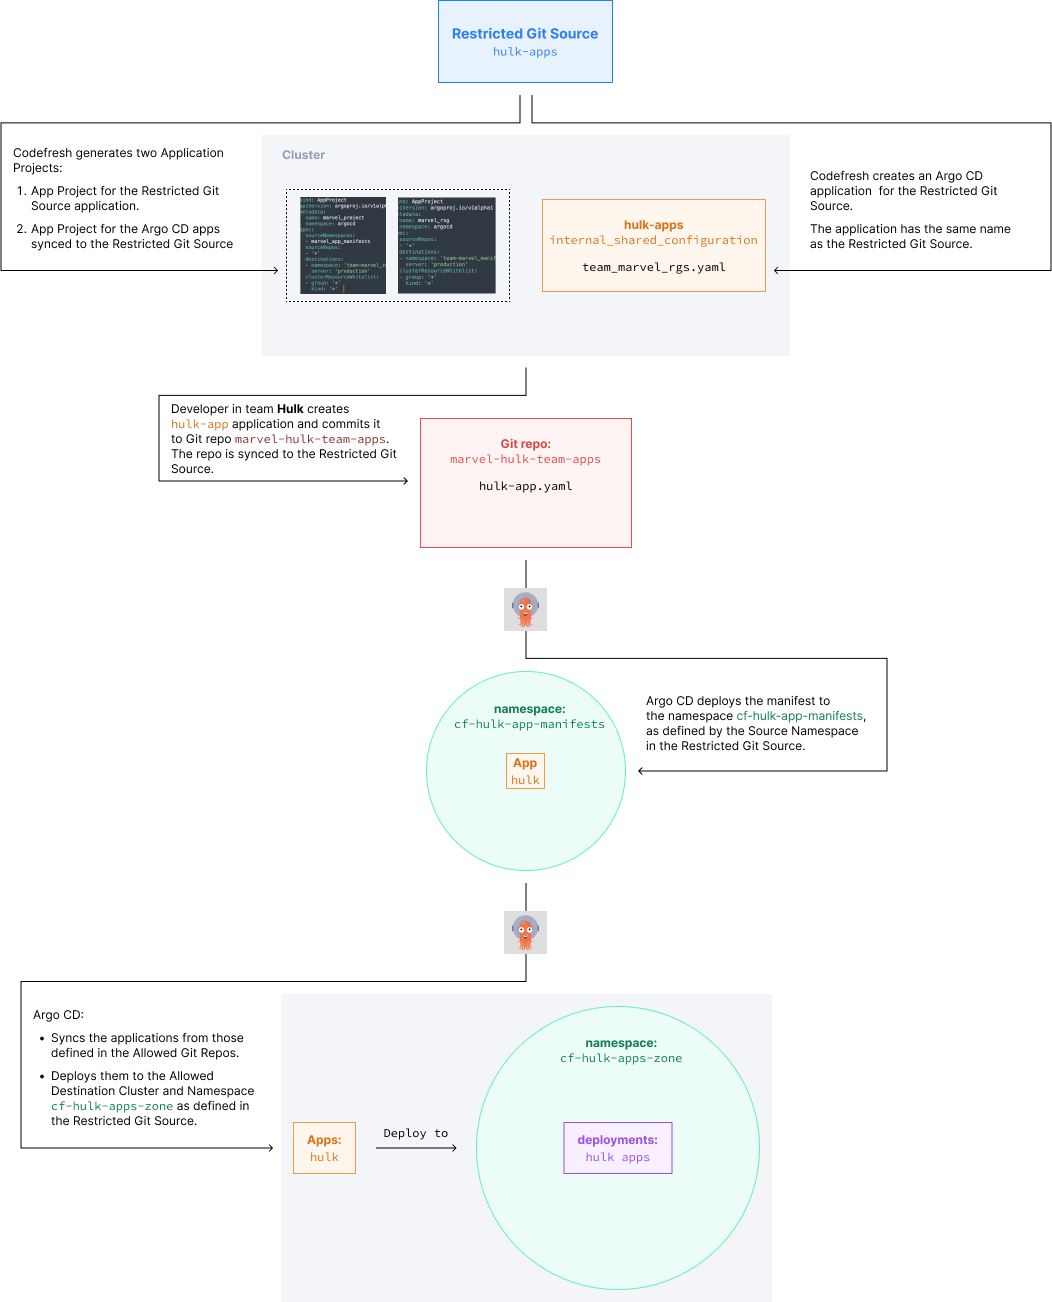
How does the Restricted Git Source function?
The diagram below is a visual representation of the above use case, illustrating how a Restricted Git Source functions to deploy Argo CD applications synchronized to it.
Create a Git Source
Create Standard or Restricted Git Sources for any provisioned GitOps Runtime. You can then commit manifests of Argo CD applications to any of these Git Sources.
NOTE
You must be in the List View for GitOps Runtimes to create Git Sources.
Before you begin
- Review Git Source settings
How to
- In the Codefresh UI, on the toolbar, click the Settings icon.
- From the sidebar, select GitOps Runtimes.
- From the List View, select the Runtime for which to create a Git Source, and then click the Git Sources tab.
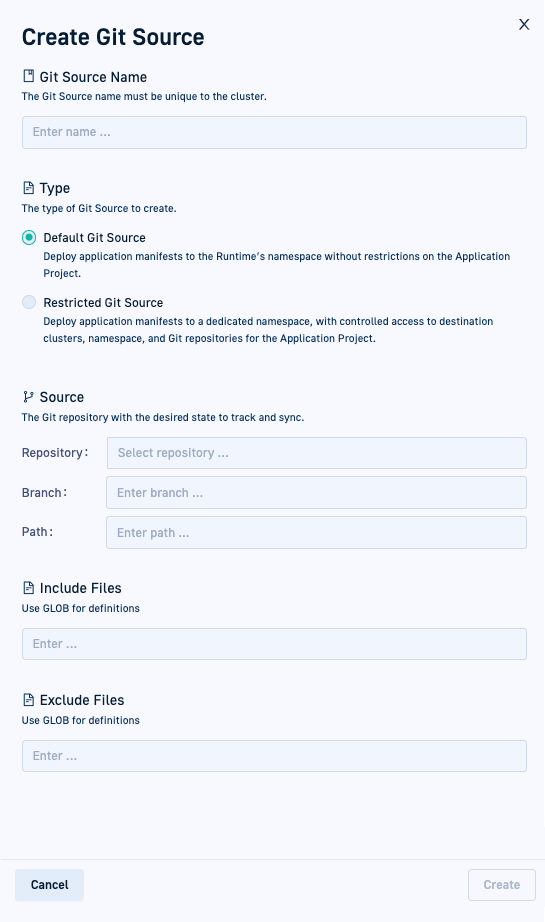
- Click Create Git Source, and in the Create Git Source panel, follow the instructions to define the settings for the Git Source.
- Click + Create Git Source.
Git Source settings
The table describes the settings you can define for Standard and Restricted Git Sources.
For how-to instructions, see Create a Git Source.
| Setting | Description |
|---|---|
| Name | The name of the Git Source, which must be unique within the cluster. The syntax must conform to that of Kubernetes objects. |
| Type | The type of Git Source to create.
|
| Source | The Git repository where the application manifests, including that of the Git Source application, are stored.
|
| Include Files and Exclude Files | The file or files to include or exclude from the Git repo when syncing to the destination cluster. Use GLOB to define patterns using wildcards to match path names in the source Git repo. For example, workflows/**/*.yaml, in the Include Files field would include all files in the workflows directory and all its child directories, with .yaml as the extension. **/images/**/* in the Exclude Files field, would ignore all directories entitled images. For GLOB guidelines and examples, see this article. |
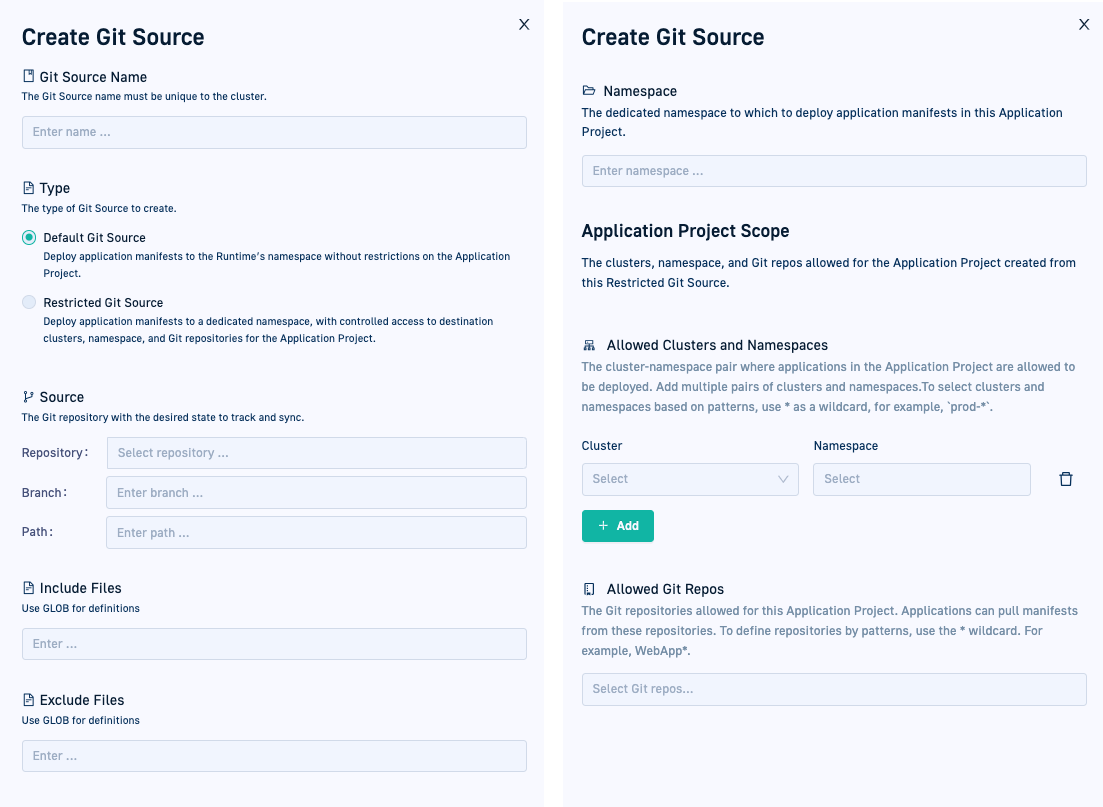
| Namespace | Applies to Restricted Git Sources only. The namespace in the cluster to which to deploy the manifests of Argo CD applications synced with this Git Source, and must start with the prefix cf-.If the namespace doesn’t exist on the cluster, Codefresh automatically creates it. These namespaces are added to the configmap argocd-cmd-params-cm in data.application.namespaces as cf-*. You can define a different prefix for the namespaces by replacing cf with your preferred prefix, <prefix>-* and use that prefix in Restricted Git Sources. Argo CD monitors these additional namespaces for application reconciliation. |
| Application Project Scope | Applies to Restricted Git Sources only. The destination clusters and namespaces to which the applications synced to the Git Source and belonging to this Application Project can be deployed, and the trusted Git repos for the applications.
|
View Git Sources and settings
Drill down on a GitOps Runtime in List View to see its Git Sources.
- In the Codefresh UI, on the toolbar, click the Settings icon.
- From the sidebar, select GitOps Runtimes.
- From the List View (the default), select a Runtime, and then click the Git Sources tab.
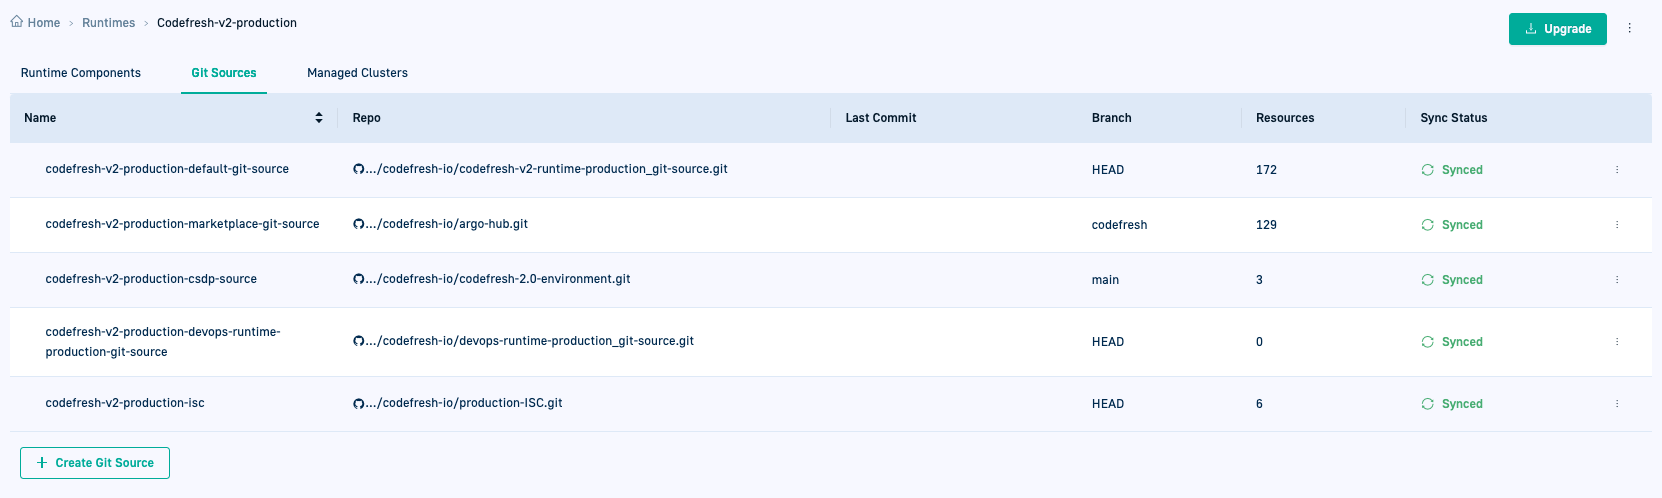
- To go to the Git Source repo, in the Repo column, mouse over the repo name and select Go to Git repo.
- To see the settings for the Git Source, from the context menu, select Details.
Edit Git Source settings
Edit an existing Git Source by changing the source and destination definitions, and included/excluded files.
NOTE
You cannot change the name and type of the Git Source.
- In the Codefresh UI, on the toolbar, click the Settings icon.
- From the sidebar, select GitOps Runtimes.
- From the List View (the default), select the Runtime with the Git Source, and then click the Git Sources tab.
- From the context menu of the Git Source, select Edit.
- Change as needed and select Save.
Delete Git Sources
Delete a Git Source from a GitOps Runtime whenever needed. You may want to delete a Git Source that is empty or no longer associated with active applications.
NOTE
Only account administrators can delete Git Sources.
Effect on applications and resources
Deleting a Git Source impacts all applications and resources associated with it.
Whether an application or a resource is deleted depends on the presence of the resources-finalizer.argocd.argoproj.io finalizer in its parent application manifest.
-
Git Source and linked applications
By default, the Git Source includes theresources-finalizer.argocd.argoproj.iofinalizer. This means that when you delete the Git Source, all linked applications and their manifests are removed from both the Codefresh UI and the cluster. -
Resources associated with applications
Resources associated with applications are deleted only if the manifests of their parent applications contain theresources-finalizer.argocd.argoproj.iofinalizer. If the finalizer is absent, the resources remain in the cluster even after the application is deleted.
How to
- In the Codefresh UI, on the toolbar, click the Settings icon.
- From the sidebar, select GitOps Runtimes.
- From the List View (the default), select the Runtime with the Git Source, and then click the Git Sources tab.
- From the context menu of the Git Source, select Delete.
- To confirm, click Delete.
Example YAMLs of Git Source resources
Example: Standard Git Source manifest
Here’s an example of the Standard Git Source application manifest, which is similar to any Argo CD application.
apiVersion: argoproj.io/v1alpha1
kind: Application
metadata:
  annotations:
    argocd.argoproj.io/tracking-id: in-cluster:argoproj.io/Application:runtime/loans-gs
  finalizers:
    - resources-finalizer.argocd.argoproj.io
  labels:
    app.kubernetes.io/instance: in-cluster
    codefresh.io/entity: git-source
    codefresh.io/internal: "false"
  name: loans-gs
  namespace: runtime
spec:
  destination:
    namespace: runtime
    server: https://kubernetes.default.svc
  project: default
  source:
    directory:
      exclude: ""
      include: "*"
      jsonnet: {}
      recurse: true
    path: atgardner-git-source
    repoURL: https://github.com/noam-codefresh/git-source.git
    targetRevision: main
  syncPolicy:
    automated:
      allowEmpty: true
      prune: true
      selfHeal: true
Example: Restricted Git Source app manifest
Here’s an example of the Restricted Git Source application manifest.
apiVersion: csdp.codefresh.io/v1
kind: RestrictedGitSource
metadata:
  annotations:
    argocd.argoproj.io/tracking-id: in-cluster:csdp.codefresh.io/RestrictedGitSource:runtime/hulk-apps
  labels:
    app.kubernetes.io/instance: in-cluster
  name: hulk-apps     # taken from the name of the Git Source as the name of the Git Source application and Application Project
  namespace: runtime
spec:
  destinations:                             # destination clusters and namespaces allowed by the Application Project
  - namespace: cf-hulk-apps-zone
    server: https://kubernetes.default.svc
  source:                                    # source repos for the Git Source and other Argo CD Applications
    directory:
      exclude: ""
      include: '*'
      recurse: true
    path: applications
    repoURL: https://github.com/team-hulk/marvel-hulk-apps.git/
    targetRevision: HEAD
  sourceNamespace: cf-hulk-app-manifests     # namespace to which to sync application manifests
  sourceRepos:                                   #  Git repos allowed by the Application Project
  - '*'
  syncPolicy:
    automated:
      allowEmpty: true
      prune: true
      selfHeal: true
    syncOptions:
    - allowEmpty=true
    - CreateNamespace=true
Example: Application Project for Restricted Git Source application
Codefresh creates two Application Projects for a Restricted Git Source, one for the Restricted Git Source application itself, and the other for the applications synced to the Restricted Git Source.
Here’s an example of the Application Project created for the Restricted Git Source application.
apiVersion: argoproj.io/v1alpha1
kind: AppProject
metadata:
name: hulk-apps # Name of the Restricted Git Source used also for Restricted App Project
namespace: runtime
spec:
clusterResourceWhitelist: # allow all resource types by default
- group: '*'
kind: '*'
destinations: # Destination Namespace defined in Restricted GitSource
- namespace: cf-hulk-apps-zone
server: https://kubernetes.default.svc
sourceNamespaces:
- cf-hulk-app-manifests # Source Namespace defined in Restricted Git Source for syncing apps
sourceRepos: # Allowed Git repos defined in Restricted Git Source; by default allows all source repositories
- '*'
Example: Application Project for Argo CD applications synced to Restricted Git Source
Codefresh creates two Application Projects for a Restricted Git Source, one for the Restricted Git Source application itself, and the other for the applications synced to the Restricted Git Source.
Here’s an example of the Application Project created for the Restricted Git Source application.
# Restricted AppProject
apiVersion: argoproj.io/v1alpha1
kind: AppProject
metadata:
  name: hulk-apps-restricted             # name is the same as that of RestrictedGitSource with `-restricted` suffix
  namespace: runtime
spec:
  clusterResourceWhitelist:               # allow only Namespace and Application/ApplicationSet resources
  - group: ''
    kind: Namespace
  - group: argoproj.io
    kind: Application
  - group: argoproj.io
    kind: ApplicationSet
  destinations:
  - namespace: cf-hulk-app-manifests     # maps to the Source Namespace defined in Restricted Git Source to sync app manifests
    server: https://kubernetes.default.svc
  sourceRepos:
  - '*'                                     # allowed Git repos defined in Restricted Git Source; by default allows all source repositories
Related articles
Monitoring GitOps Runtimes
Managing GitOps Runtimes
Shared Configuration Repository