Creating Delivery Pipelines
Delivery Pipelines (powered by Argo Workflows) is not being actively maintained.
Please reach out to [email protected] with any questions.
Delivery Pipelines are where all the CI magic happens in Codefresh. Delivery Pipelines connect Argo Workflows and Argo Events with our unique functionality to implement and optimize CI/CD flows, such as checking out code, building and testing artifacts, running unit and acceptance tests, or any customized flows you need in your enterprise.
Codefresh integrates with Argo Workflows and Argo Events, while greatly simplifying the process of creating pipelines and triggering them to submit workflows.
Delivery Pipeline concepts
Let’s start by reviewing the main concepts around Codefresh Delivery Pipelines.
In Codefresh, the Delivery Pipeline is a logical entity that connects an event-source, a sensor, and a Workflow Template.
-
Pipeline per trigger
Every sensor-trigger pair is a unique pipeline in Codefresh. The same sensor with multiple triggers creates a different pipeline for every trigger. -
Git-Ops permission model
Access to Git Sources and Git repositories are based on the user’s write permissions, as defined in their Git provider accounts. -
Git Source for pipeline
The Delivery Pipeline is connected to a specific Codefresh runtime installation, and is also run on this runtime through a Git Source.When the pipeline is created and synced with the cluster, all manifests generated for the pipeline are stored in the Git repository. These include the sensor and event-source manifests, and the pipeline workflow template’s manifest.
-
Centralized location for Argo Event-entities
Codefresh uses Argo Events to listen to events from different sources and define the conditions that trigger the events. All entities for creating and managing an Argo Event - from the event-source and its events, the sensor and its triggers - are available in a centralized location in Codefresh.An intuitive selection mechanism enables you to easily select and configure each entity. Predefined variables and automated mapping to event payload makes parameterization easy. There is no need to manually create the YAML manifests for the different entities, as Codefresh automatically generates them after the entities are set up.
Delivery Pipeline creation flow
Here’s a high-level overview of the Delivery Pipeline creation flow.
For step-by-step instructions, see How to: create a Delivery Pipeline.
- Define pipeline name and select Workflow Template to execute
- Define default values for pipeline workflow template arguments
- Configure trigger conditions for events
- Generate manifests
- Commit resource files and create pipeline
Define pipeline name and select Workflow Template to execute
The Delivery Pipeline creation flow starts with defining a name for the pipeline, selecting the Git Source with the runtime, and selecting the Workflow Template to execute when the pipeline is run. You can use the Codefresh starter Workflow Template, or select an existing Workflow Template you have downloaded to a Git Source.
Both Argo and Codefresh have examples and libraries of Workflow Templates you can use:
- For conceptual information on Argo Workflows, read the official documentation.
- For examples of Workflow Templates in Argo, see their examples page.
- For a fully-certified library of ready-to-use Workflow Templates by Codefresh, see Codefresh Hub for Argo.
In the Delivery Pipeline wizard, we have our starter Workflow Template to use as a base, or the option to select an existing one, or copy and paste any Workflow Template, and then modify as needed.
IMPORTANT
If you select the starter Workflow Template or one of the example templates from the Codefresh Hub for Argo, it is converted to a standalone, independent pipeline workflow template.
To avoid conflicts, the pipeline workflow template is not synced to the original Workflow Template. Any changes to the original starter or example Workflow Template are also not updated in the pipeline workflow template.
NOTE
To share artifacts between steps in workflows, and to view archived logs for completed workflows, you must configure an artifact repository in Codefresh.
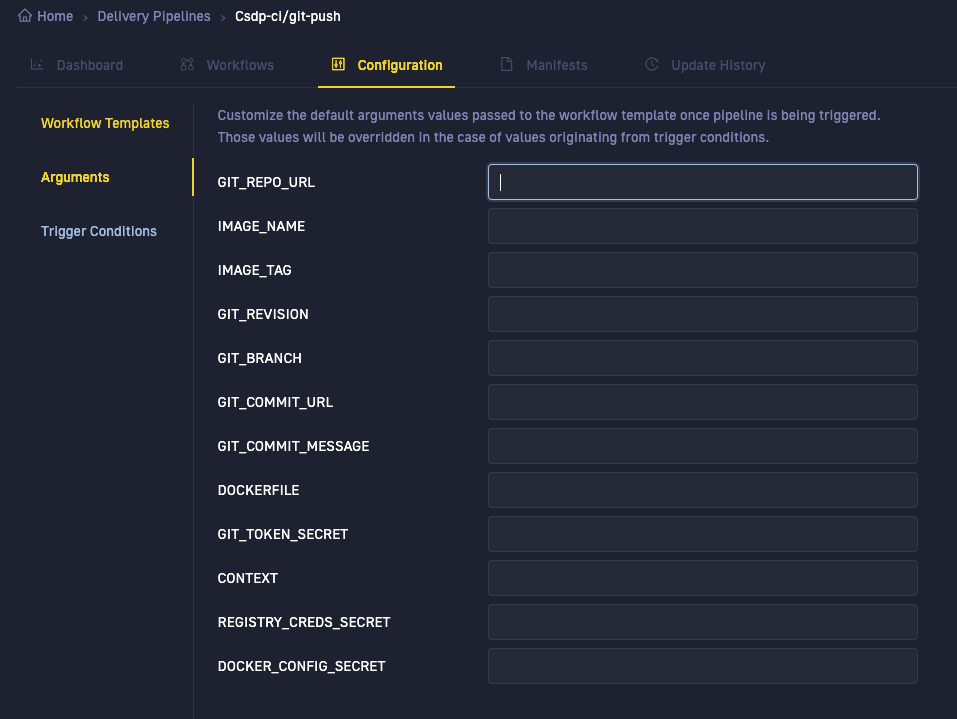
Define default values for Workflow Template arguments
Workflow Template arguments are the list of arguments described in the Workflow Template, and expected to be passed to the workflow when submitted. They are displayed in the Arguments tab. You can define the default values for any argument here.
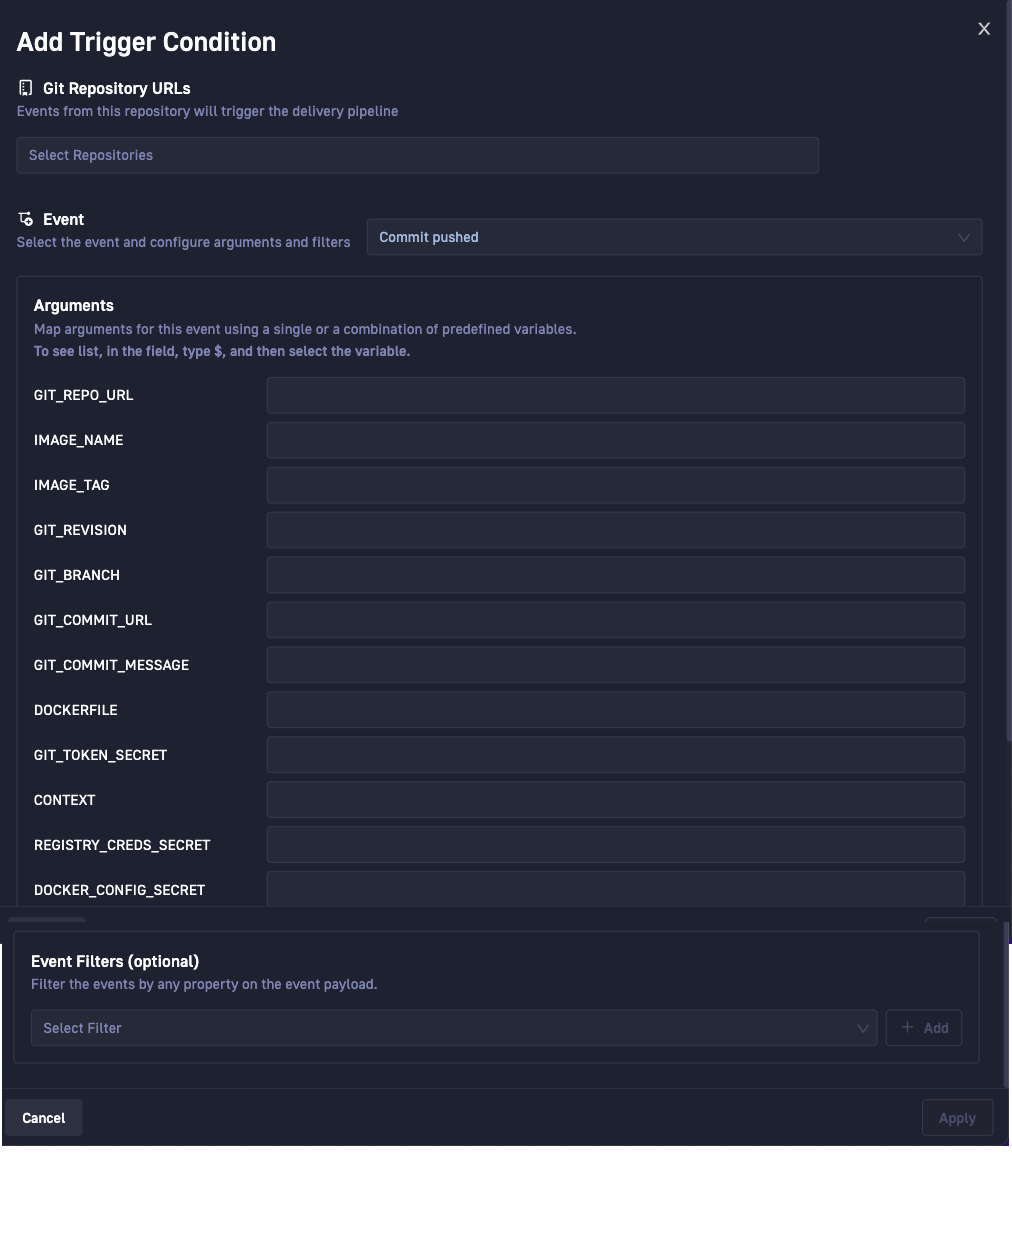
Configure Trigger Conditions for events
The Trigger Conditions tab in the Delivery Pipeline wizard collates the requirements to set up and configure entities for Argo Events. Here you select the event-source, the event of interest, the Git repositories to listen to for the event, and the sensor trigger for the event.
TIP
To create a Delivery Pipeline, you must have at least one Trigger Condition.
For conceptual information on Argo Events, read the official documentation.
The Delivery Pipeline wizard guides you through selecting the event-source, the event to listen to, and the conditions to trigger the event. Let’s review the main entities in Trigger Conditions.
Git repositories
For every sensor trigger condition, you can select single or multiple Git repositories to which to listen to for the event.
NOTE
Only those Git repos to which you have write-permissions are displayed.
Event-sources and Events
Currently, we support GitHub as an event-source, and an extensive list of GitHub events you can select from.
Sensor trigger arguments
The sensor trigger arguments are identical to the Workflow Template arguments. If Workflow Template arguments have default values, these values are displayed for the corresponding Sensor arguments as well.
NOTE
If values are defined for an argument both in the Workflow Template and in Trigger Conditions, the value defined in Trigger Conditions takes precedence.
You can override the default values or define custom values for trigger condition arguments through parameterization and Sprig template functions for Go. For more information, see Parameterization for Argo Events, and Sprig Function Documentation.
Argo Events uses parameterization to pass data from the event payload to the workflow submitted by the sensor trigger. But where in Argo Workflows you would need to manually define the JSON path to the data in the event payload, our Delivery Pipeline wizard automates path definitions through predefined variables.
Every event has a specific payload and a specific list of predefined variables you can select from. You can either parameterize an argument through one or more predefined variables, or use Sprig template functions to define the values. In either case, when the manifests are generated, Codefresh replaces the variables or templated values with the actual JSON path in the event payload.
Filters
Filters create conditions for event triggers by enforcing validity constraints on when to trigger the event. For example, add a filter to a Git push event that triggers that event only on push to a particular branch.
Examples of common events and use of filters
Here are some examples of common Git events that are triggers to run pipelines, and when you would use filters to further control when these Git events run the pipeline.
- Git commits which are push events
- Git pull requests (PRs), which are opened PRs
The table below summarizes the use cases, events, and filters that control the events.
| # | Trigger requirement | Event | Filter |
|---|---|---|---|
| 1 | On Git commit | Commit pushed |
Implicitly on Commit pushed |
| 2 | On Git commit, only when the commit is on a specific branch. This requires a filter to define the target branch. | Commit pushed |
Implicitly on Commit pushed, and explicitly when Git branch = <branch-name>, for example, main |
| 3 | On an opened PR | PR opened |
Implicitly on PR opened |
| 4 | On an opened PR, only for a specific branch | PR opened |
Implicitly on PR opened, and explicitly when PR target branch = <branch-name>, for example, production |
| 5 | On an opened PR, only for a specific branch, and only when the PR name includes the entered value | PR opened |
Implicitly on PR opened, and explicitly when PR target branch = <branch-name>, for example, production and when PR labels = <PR-name>, for example, cf-hotifx-xxxx |
Now let’s review the use cases in more detail.
#1 The Commit pushed event on any of the Git repos defined runs the pipeline.
#2 The Commit pushed event on any of the Git repos runs the pipeline, but only if the branch is production, and not if the branch is staging for example.
#3 The PR opened event runs the pipeline when any PR is opened on any Git repo defined.
#4 The PR opened event with the PR Target Branch filter runs the pipeline only when the PR target branch matches the value entered. You want to run the pipeline when the PR is opened on either master or production, but not when opened on staging or qa.
#5 The PR opened event with the PR Target Branch and PR label filters is a more complex scenario that runs the pipeline when a PR is opened on the target branch, but only when the PR name starts with or includes the provided value. Useful when collaborating on features or when deploying a critical fix. Both the PR Target Branch and PR label must match for the pipeline to run. The filters automatically excludes all PRs opened on the production branch but not matching the PR label, hotfix-runtime.
Generate manifests
Manifests are automatically generated on committing changes after defining at least one Trigger Condition.
Manifests typically include:
- Sensor
- EventSource
- WorkflowTemplate (the pipeline workflow template)
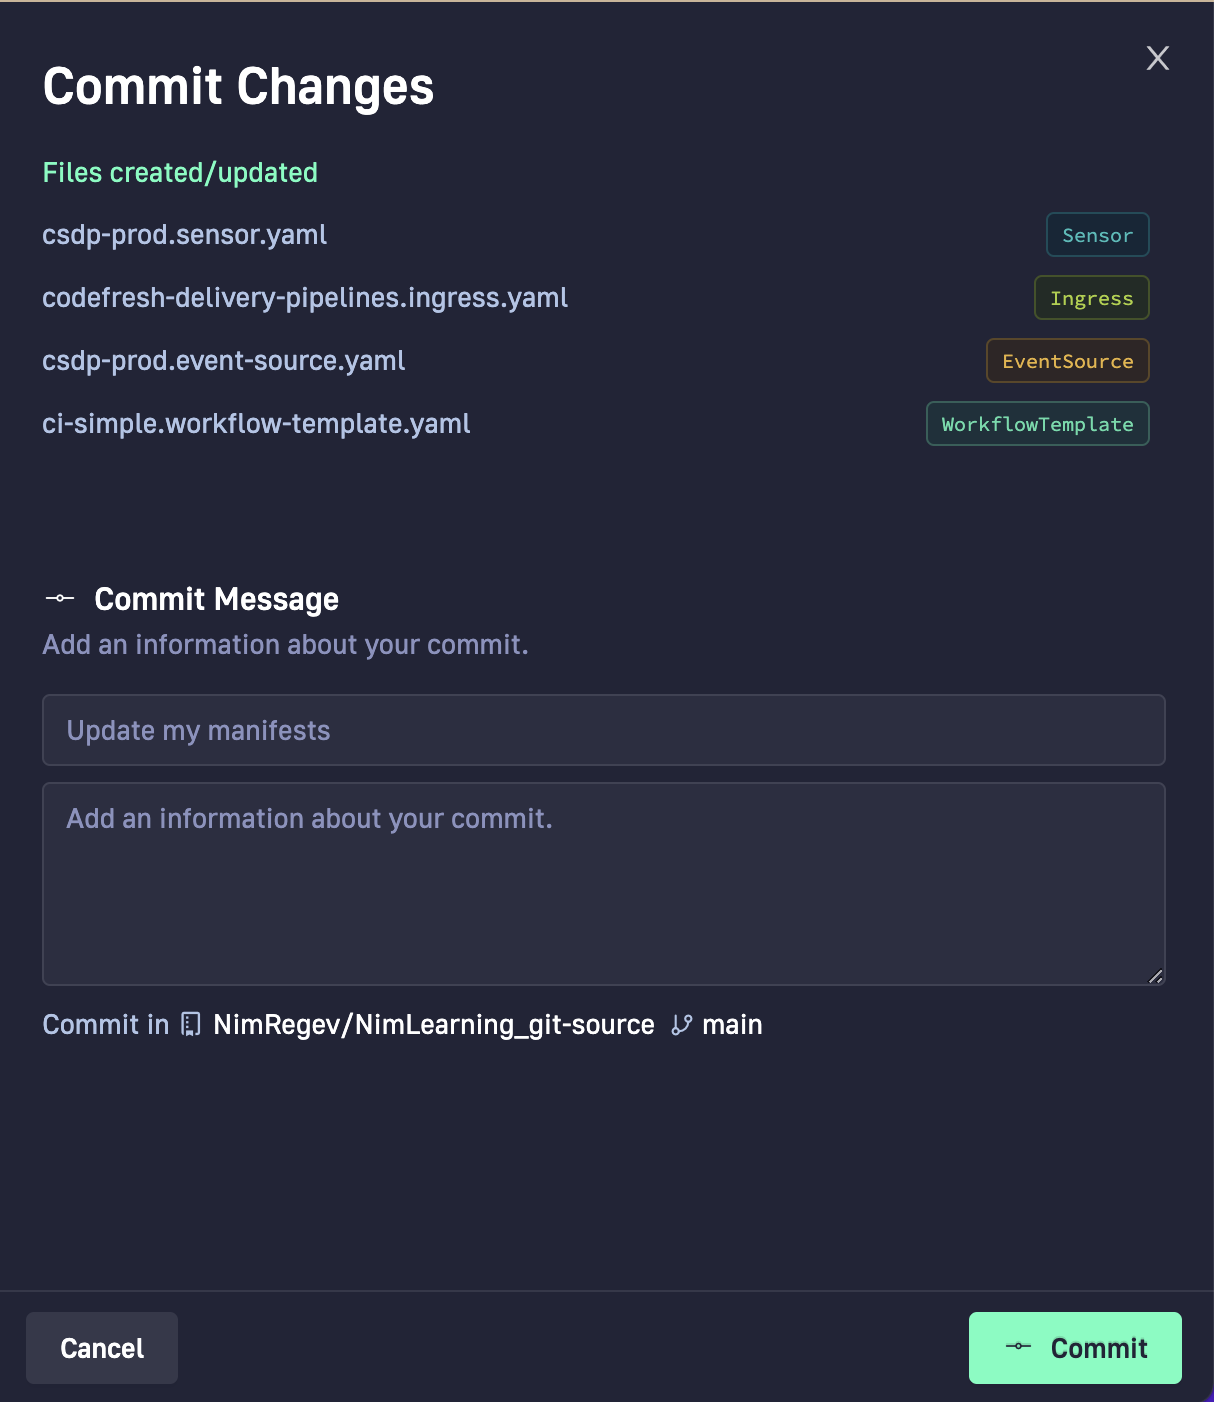
Commit resource files and create pipeline
Once Codefresh generates the manifests, and you validate them, you commit all the changes. The commits are synced to the Git source defined for the pipeline, and then synced to the cluster.
How to: Create a Delivery Pipeline
Follow the step-by-step instructions to guide you through Delivery Pipeline wizard and create a Codefresh pipeline.
- In the Codefresh UI, go to Delivery Pipelines.
- Select + Add Delivery Pipeline.
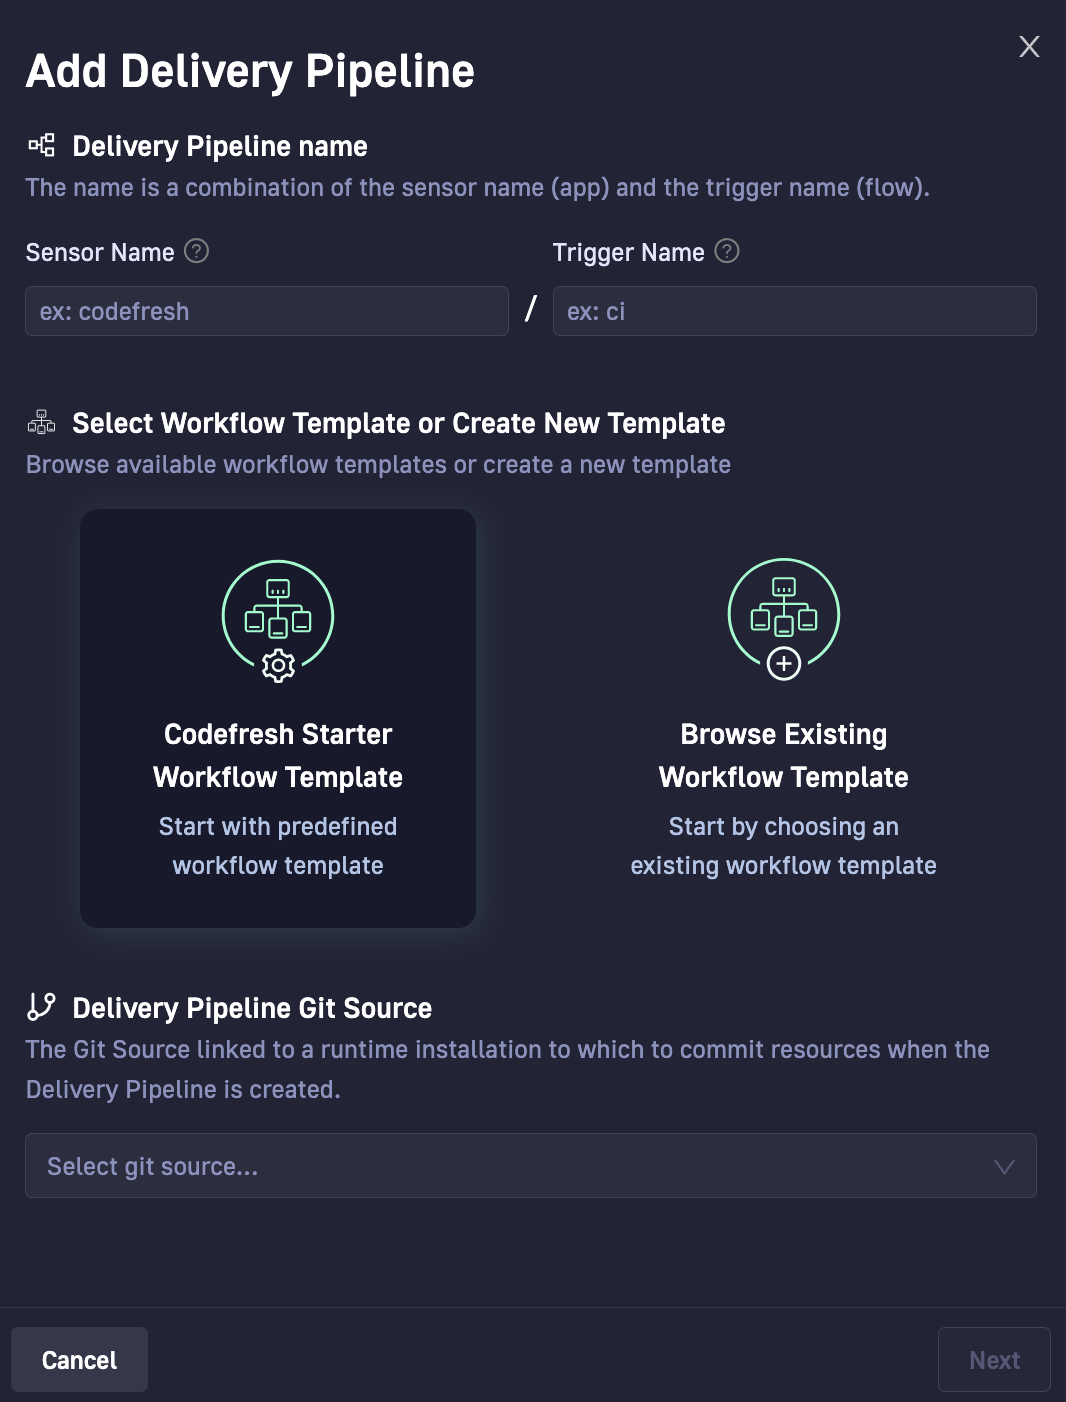
- Enter a name for the Delivery Pipeline.
The name is created from the names of the sensor and the trigger (alphanumeric lowercase, and the - character).- Sensor Name: The name of the sensor resource. For example, the application name, or
codefresh. - Trigger Name: The template that defines the context of the trigger and the actual resources the sensor must execute. For example, the flow that will be run,
ci.
- Sensor Name: The name of the sensor resource. For example, the application name, or
- Select the Codefresh Starter Template or Browse Existing Template.
- From the list of Git Sources, select the Git Source to which to commit the resources for this pipeline.
NOTE
Only those Git Sources to which you have write permissions are displayed.
If you have multiple runtimes installed, the Git Source you select also determines the runtime on which the pipeline is executed. - Select Next.
- If needed, select the Git Source, and then the Workflow Template to work with.
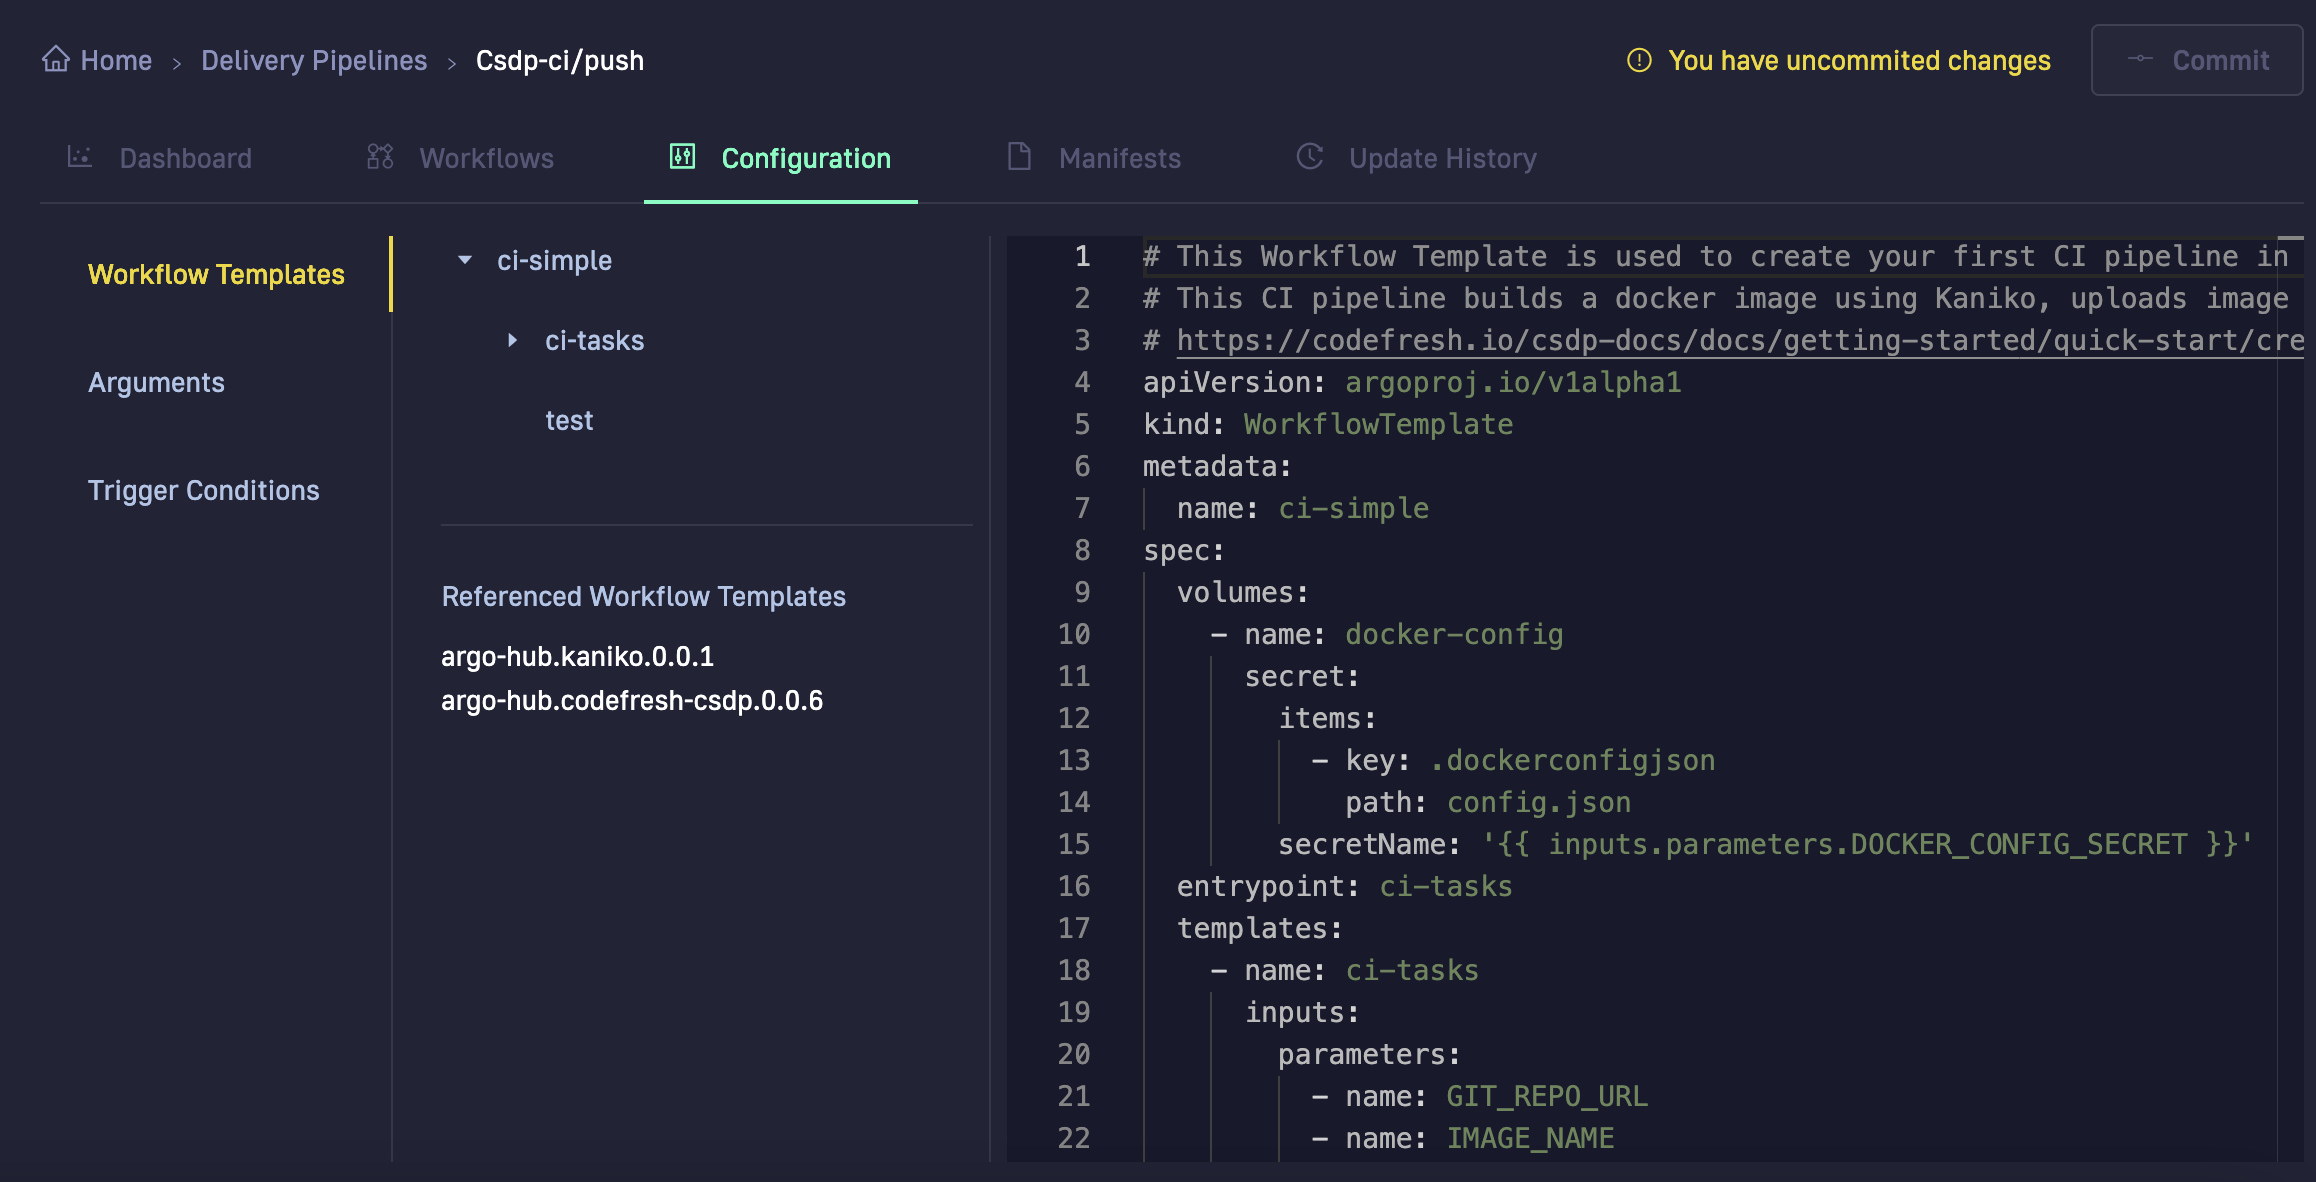
In the Configuration tab, Workflow Templates is selected. Our CI Starter Workflow Template is shown.
Copy and paste any Workflow Template you want to work with, or edit the starter template as needed.
TIP
Codefresh notifies you that you have uncommitted changes. The Commit button remains disabled until you define at least one Trigger Condition.
- Select Arguments.
The Arguments defined in the Workflow Template and passed to the workflow when the pipeline is run, are displayed. - Enter default values for the arguments as needed.
- Select Trigger Conditions.
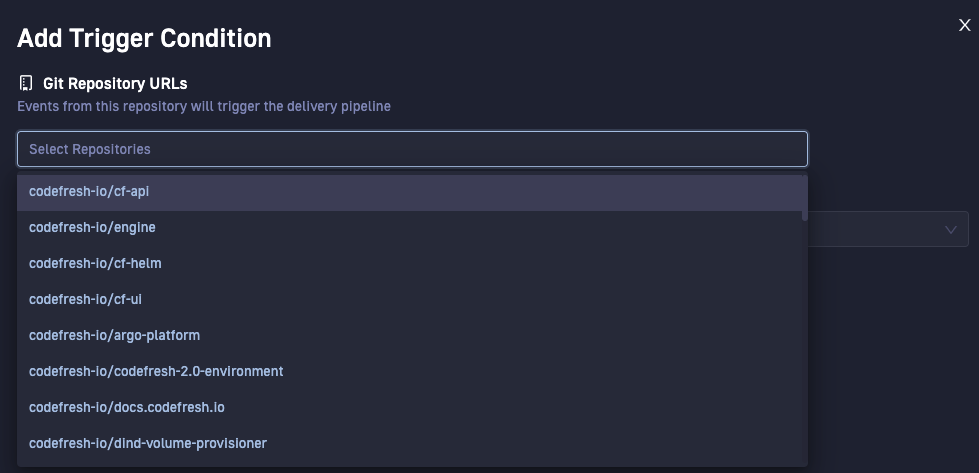
- From the Add dropdown, select Git Events.
- In the Git Repository URLs field, select one or more repositories from the list to listen to for the selected event.
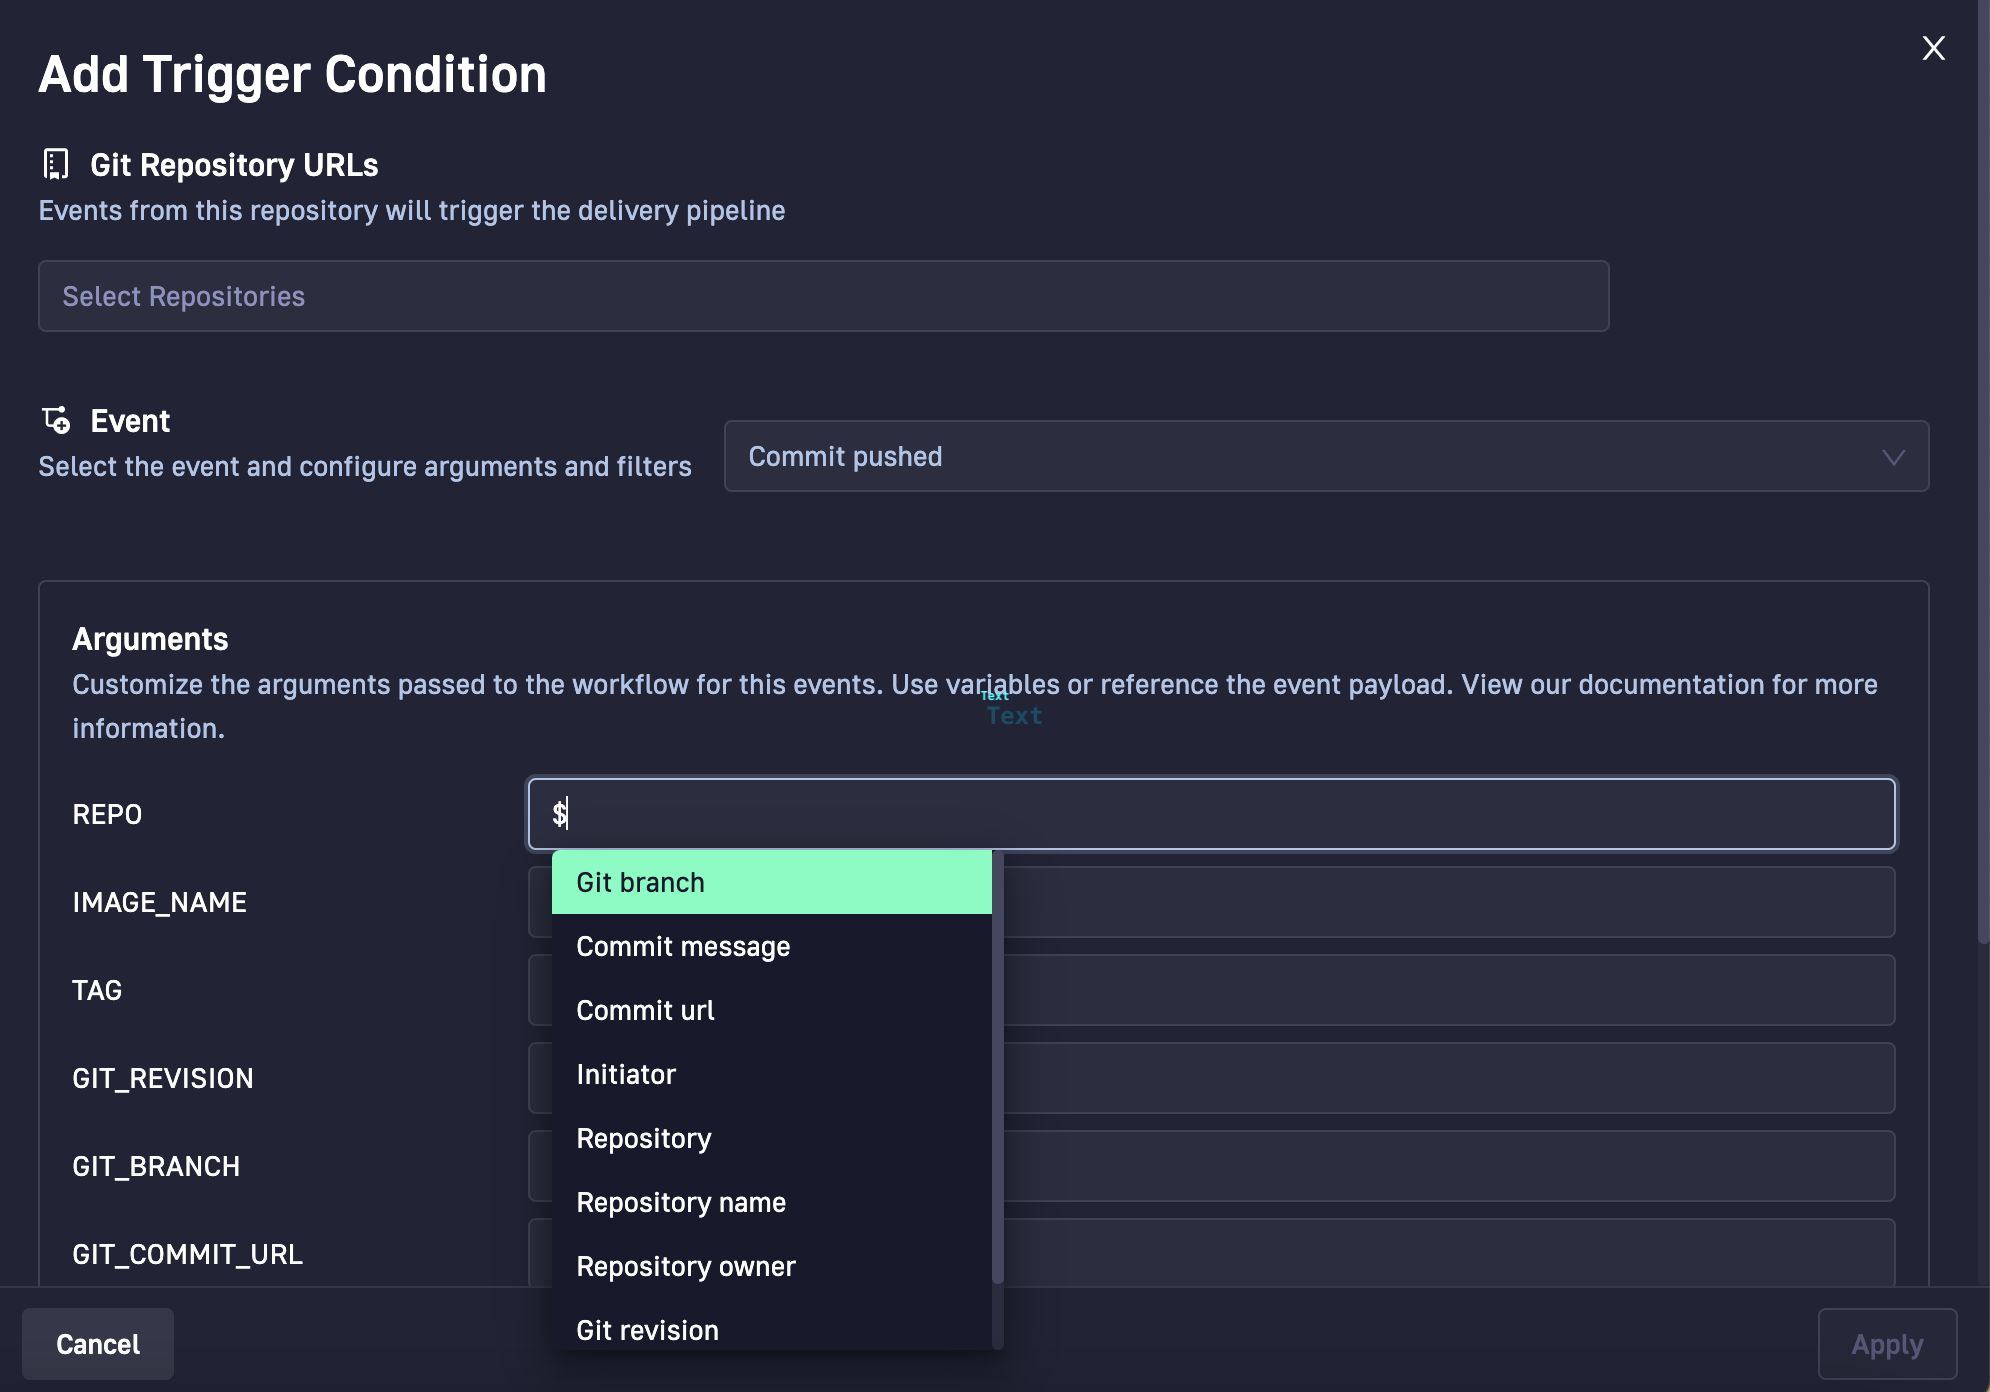
- From the Event dropdown, select the event for the sensor trigger. For example, Commit pushed.
Codefresh displays all the Arguments available for the sensor trigger, identical to the list of Workflow Template arguments. - Customize the value for an argument by selecting single or a combination of predefined variables.
In each field, type$and from the list of predefined variables, select the one you need.
Codefresh automatically maps to the correct JSON path in the event payload when manifests are generated before commit. Argo Workflow then instantiates the values from the event payload.
- To create filters for the event payload:
- From Event Filters, select the filter, and select +Add.
- Select the operational expression and define the value of the filter.
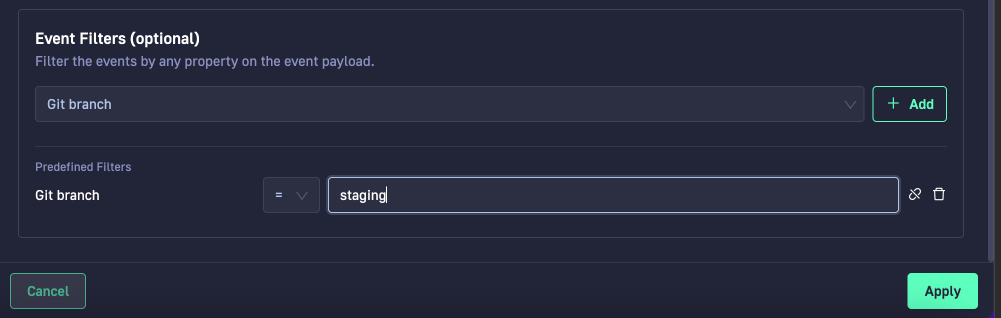
- To transform a predefined filter to a standard data filter, select Detach & Customize.
- Select Apply, and then Commit on the top-right. The Commit Changes panel shows the resource files created for the pipeline. These files are committed to the repository linked to the Git Source you selected in the first step of the wizard.
- Enter a message (optional), and then select Commit.
Codefresh commits the pipeline to the Git repository, and then syncs it to the cluster. Wait a few seconds for the sync to complete, and verify that the pipeline is displayed in the Delivery Pipelines page.
Related articles
Selectors for concurrency synchronization
Nested workflows
Configure artifact repository