Install GitOps Runtime alongside Community Argo CD
Install GitOps Runtime on cluster with existing Argo CD
LEGACY INSTALLATION
This installation method is no longer recommended. If you have your own Argo CD instance, see Installing GitOps Runtimes with existing Argo CD.
If you have a cluster with a version of Community Argo CD already installed, you can install the GitOps Runtime to co-exist with your existing Argo CD installation. This option enables you to extend your environment with Codefresh’s GitOps capabilities through a few simple configuration changes, without the need to uninstall Argo CD.
-
Enhance CI/CD with Codefresh GitOps
Dive into the world of Codefresh GitOps, exploring its capabilities and features without having to uninstall or reconfigure existing Argo CD installations. Read about our GitOps offering in Codefresh for GitOps. -
Gradual migration to GitOps applications
After becoming familiar with Codefresh GitOps, make informed decisions when migrating your Argo CD Applications to Codefresh GitOps.For a smooth transition from Argo CD Applications to the same managed by Codefresh, migrate them at your preferred pace. After successful migration, view, track, and manage all aspects of the applications in Codefresh.
Installing alongside Community Argo CD requires additional flags in the Runtime Install command for all access modes: tunnel, ingress, and service-mesh:
-
fullnameOverrideconfiguration for resource conflicts
Conflicts can occur when resources in both Community and Codefresh’s Argo CD instances have the same name or attempt to control the same objects. CustomizingfullnameOverridevalues for Argo CD (and Argo Rollouts if installed) in the GitOps Runtime’svaluesfile prevents these conflicts. -
Resource tracking with
annotation
Installing the GitOps Runtime on the same cluster as Argo CD requires that each Argo CD instance uses a different method to track resources. Using the same tracking method can result in conflicts when both instances have applications with the same names or when tracking the same resource. Setting the GitOps Runtime’s Argo CD resource tracking toannotation+labelprevents such conflicts.
The Codefresh values.yaml available here, contains all the arguments you can configure, including optional ones.
Review how Codefresh validates the Runtime’s values.yaml.
- Make sure you meet the minimum requirements for installation
- Verify that you complete all the prerequisites
- On the Getting Started page, click Install Runtime.
As a one-time action, define the Shared Configuration Repository and associate it with your Git provider.
The Git provider you select for the first GitOps Runtime applies to all Runtimes in the same account.
The Shared Configuration Repository is a Git repository which stores configuration manifests shared between all the GitOps Runtimes within the same account. Codefresh identifies the Git provider from the URL of the Shared Configuration Repo, and for cloud providers, automatically populates the Git Provider and the API URL fields.
You can specify only the repository URL, or add the path, reference a branch, or both:
<repo_url>.git[/<path>][?ref=<branch>]
where:
-
<repo_url>.gitis required and is the repository URL. This is the standard URL format which references the root of the default branch in the repository. The.gitsuffix is recommended. Example:https://github.com/codefresh-io/our-isc.git -
<path>is optional, and points to a specific path within the repository.
Use<path>if you want your configuration files within a subdirectory.
Example:https://github.com/codefresh-io/our-isc.git/some/path -
<branch>is optional, and references a specific branch in the repository.
Example:https://github.com/codefresh-io/our-isc.git?ref=isc-branch
On-premises Git providers require you to define the API URL:
- GitHub Enterprise:
https://<server-url>/api/v3 - GitLab Server:
<server-url>/api/v4 - Bitbucket Data Center:
<server-url>
To install the GitOps Runtime, follow the instructions in the installation wizard which provides an Install Runtime command with pre-populated values, making installation quick and straightforward.
By default, the runtime name is codefresh.
If you define a custom name, it must:
- Start with a lowercase letter
- Contain only lowercase letters and numbers
- Be no longer than 38 characters
NOTE
If you are installing an additional Runtime in the same account, the Runtime name must be unique.
The namespace where the GitOps Runtime is installed, and must conform to Kubernetes naming conventions.
The API key authenticates the GitOps Runtime with the Codefresh platform, enabling secure registration, configuration retrieval, and communication with Codefresh services.
Generate the API key to automatically include it in the Runtime Install command.
The Install Runtime Command differs based on the access mode. The command below is for the tunnel-based access mode. This is the default access mode and does not require any additional flags.
Ingress-based or service-mesh-based access modes require additional flags, as described in GitOps Runtimes with ingress controllers/service meshes.
helm upgrade --install <helm-release-name> \
  --create-namespace \
  --namespace <namespace> \
  --set global.codefresh.accountId=<codefresh-account-id> \
  --set global.codefresh.userToken.token=<codefresh-api-key> \
  --set global.runtime.name=<runtime-name> \
  --set argo-cd.fullnameOverride=codefresh-argo-cd \
  --set argo-rollouts.fullnameOverride=codefresh-argo-cd \
  --set argo-cd.configs.cm.application.resourceTrackingMethod=annotation+label \
  oci://quay.io/codefresh/gitops-runtime \
--wait| Parameter | Description |
|---|---|
<helm-release-name> |
Name of the Helm release. The default is cf-gitops-runtime, which you can change if needed. |
<namespace> |
Namespace where the GitOps Runtime is installed. Default is codefresh, or a custom name you define. |
<codefresh-account-id> |
Mandatory only for tunnel-based Runtimes (default access mode). Automatically populated by Codefresh. |
<codefresh-api-key> |
API key used for authentication. You can use an existing key or generate a new one. Automatically populated in the command when generated. |
<runtime-name> |
Name of the GitOps Runtime. Default is codefresh, or a custom name you define. |
gitops-runtime |
Chart name defined by Codefresh. Cannot be changed. |
argo-cd.fullnameOverride=codefresh-argo-cd |
Mandatory to avoid conflicts at the cluster-level for resources in both the Community Argo CD and GitOps Runtime’s Argo CD. |
argo-rollouts.fullnameOverride=codefresh-argo-rollouts |
Mandatory when you have Argo Rollouts in your cluster to avoid conflicts. |
argo-cd.configs.cm.application.resourceTrackingMethod=annotation+label |
Mandatory to avoid conflicts when tracking resources with the same application names or when tracking the same resource in both the Community Argo CD and GitOps Runtime’s Argo CD. |
--wait |
Optional. The duration the installation process waits for all pods to become ready before timing out. Recommend to set it to a period longer than 5 minutes which is the default if not set. |
After installation, you can:
- Continue with the Configuration & Management steps in the installation wizard. See Configure GitOps Runtime.
OR - View the installed Runtime in the Runtimes page, and complete the configuration at a later time.
After installation, go to GitOps Runtimes > List View:
- A green dot indicates the Runtime is online.
- The Type column shows Helm with the label Config Runtime, indicating it has been designated as the Configuration Runtime.
- The Sync Status column displays either:
- Synced: Configuration is complete
- Complete Installation: Pending configuration steps
- Drill down into the Runtime shows tabs for Runtime Components, Git Sources, and Managed Clusters.
The Runtime Components are populated only when the GitOps Runtime is configured as an Argo CD Application, as described here.

After successful installation, you may need to complete additional steps based on your Argo CD setup: if you have Argo Rollouts, remove the Rollouts controller deployment.
Based on your requirements, migrate Community Argo CD Applications to the GitOps Runtime to manage them in Codefresh.
If you have Argo Rollouts also installed with Community Argo CD, after confirming successful installation, remove the duplicate Argo Rollouts controller deployment to avoid having two controllers in the cluster.
IMPORTANT
Make sure to remove only deployment and not the CRDs. Removing the CRDs also removes Rollout objects resulting in downtime for workloads.
- Remove the duplicate Argo Rollouts controller:
kubectl delete deployment <argo-rollouts-controller-name> -n <argo-rollouts-controller-namespace>
The final task, depending on your requirements, is to migrate your Community Argo CD Applications to the Codefresh GitOps Runtime.
Why would you want to do this?
Because this allows you to completely and seamlessly manage the applications in Codefresh as GitOps entities.
The process to migrate an Argo CD Application is simple:
- Add a Git Source to the GitOps Runtime to which to store application manifests
- Make the needed configuration changes in the Argo CD Application
- Commit the application to the Git Source for viewing and management in Codefresh
If you have already added a Git Source as part of the GitOps Runtime installation procedure, skip this step.
Otherwise, add a Git Source to the GitOps Runtime to which you can commit your applications. A Git Source is a Git repository managed by Codefresh as an Argo CD Application. Read about Git Sources.
Modify the Argo CD Application’s manifest to remove finalizers if any, and also remove the Application from the argocd namespace it is assigned to by default.
- Remove
metadata.namespace: argocd. - Remove
metadata.finalizers.
Below is an example of a manifest for an Argo CD Application with finalizers.
apiVersion: argoproj.io/v1alpha1
kind: Application
metadata:
  name: my-sample-app
  namespace: argocd
  finalizers:
    - resources-finalizer.argocd.argoproj.io
spec:
  project: default
  source:
    path: guestbooks/apps
    repoURL: https://github.com/codefresh-codefresh/argocd-example-apps
    targetRevision: personal-eks
  destination:
    namespace: my-app
    server: https://kubernetes.default.svc
  syncPolicy:
    automated:
      prune: false
      selfHeal: false
      allowEmpty: false
    syncOptions:
      - PrunePropagationPolicy=foreground
      - Replace=false
      - PruneLast=false
      - Validate=true
      - CreateNamespace=true
      - ApplyOutOfSyncOnly=false
      - ServerSideApply=false
      - RespectIgnoreDifferences=false
As the final step in migrating your Argo CD Application to a GitOps Runtime, manually commit the updated application manifest to the Git Source you created. Once you commit the manifest to the Git Source, it is synced with the Git repo. You can view it in the Codefresh UI, modify definitions, track it through our different dashboards, and in short, manage it as you would any GitOps-controlled resource in Codefresh.
- Go to the Git repo where you created the Git Source.
- Add and commit the Argo CD Application manifest to the Git Source.
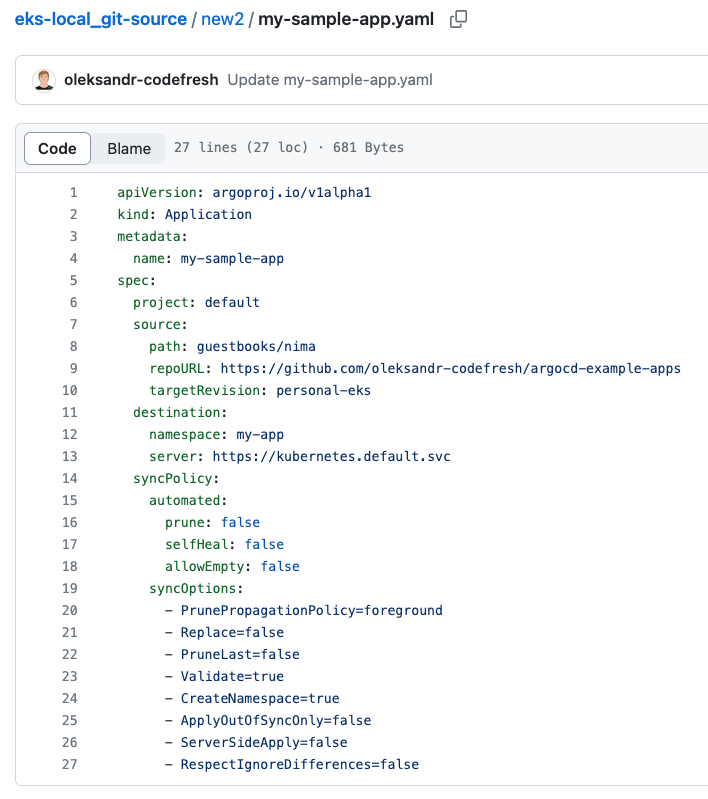
Here’s an example of the
my-sample-appabove committed to a Git Source withoutmetadata.namespace: argocdandmetadata.finalizers.
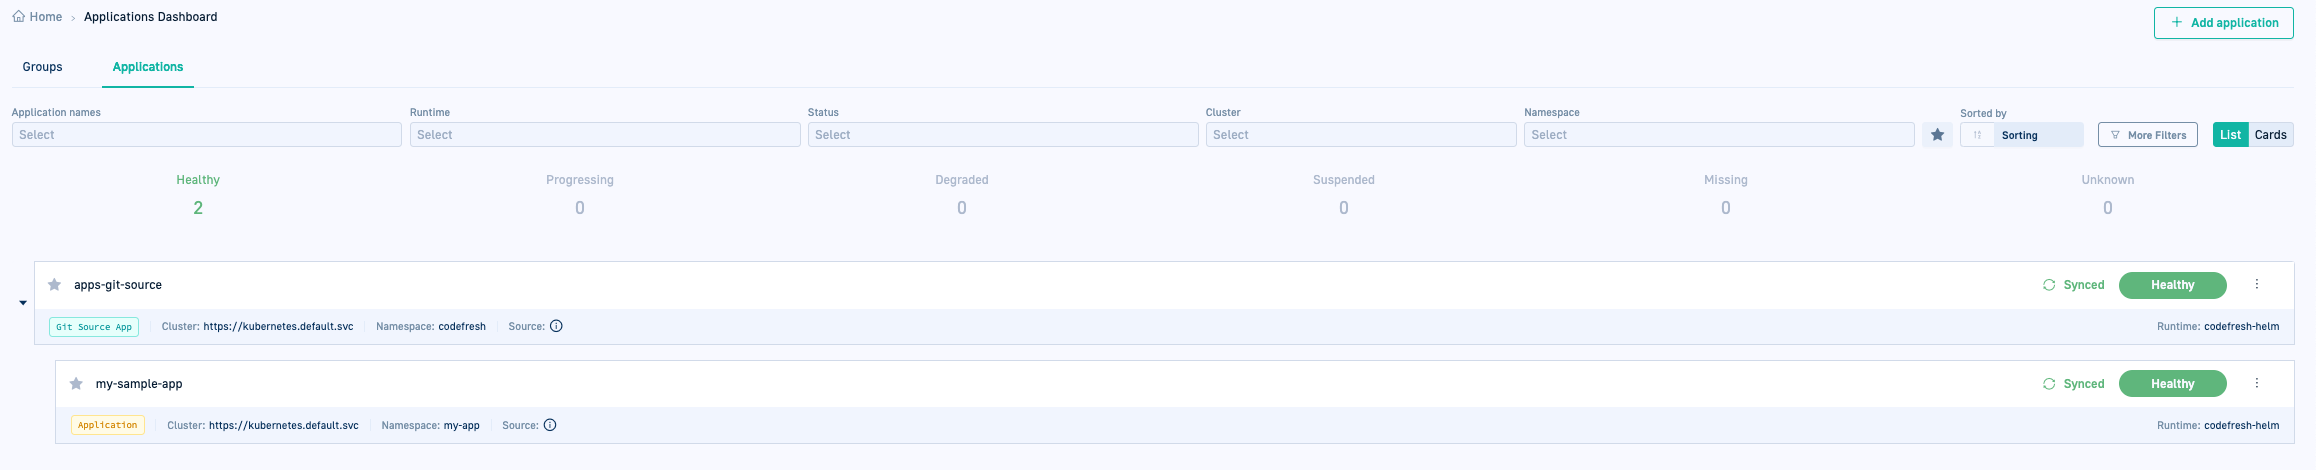
- In the Codefresh UI, from the sidebar, below Ops, select GitOps Apps. The Applications Dashboard displays the new Git Source application.
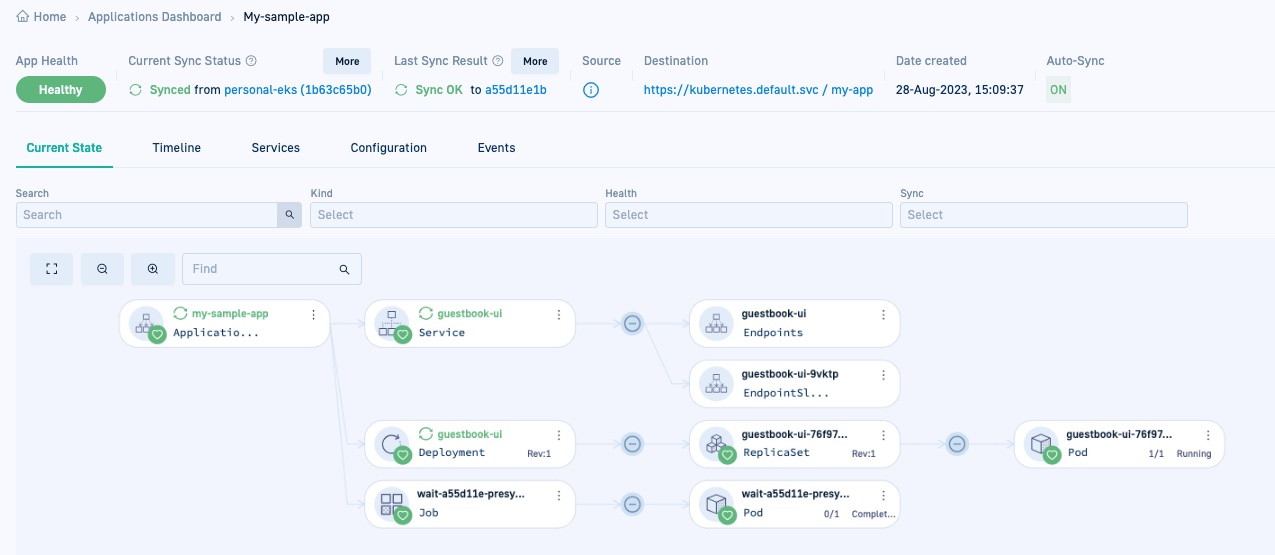
- Click the application to drill down to the different tabs. The Configuration tab displays the application’s settings which you can modify and update.
Here’s an example of the Current State tab for
my-sample-app.
Configuring GitOps Runtimes
Monitoring GitOps Runtimes
Managing GitOps Runtimes
Managing Git Sources in GitOps Runtimes
Managing external clusters in GitOps Runtimes