Article Content
What Is Jenkins?
Jenkins is an open-source automation server that helps automate the building, testing, and deployment of software applications. It is written in Java and was initially released in 2011 as a fork of the Hudson project. Jenkins is widely used for continuous integration (CI) and continuous delivery (CD) practices in software development.
By integrating with various build tools, version control systems, and test frameworks, Jenkins enables developers to automate repetitive tasks, such as building the application, running tests, and deploying to production. This automation helps to increase productivity, ensure code quality, and enable faster delivery of software updates.
This Jenkins tutorial takes you through the following steps:
- Step 1: Installation
- Step 2: Scripted and Declarative Syntax Options
- Step 3: Scripted Pipelines
- Step 4: Using Jenkins Pipeline
- Step 5: Plugin Management
- Step 6: Jenkins Security Management
Step 1: Installation
Prerequisites:
- A machine with at least 256 MB RAM (ideally over 2 GB)
- A drive with 10 GB space to host the Docker image and Jenkins :
- Java 17 or 11
- Docker
To download and run Jenkins:
- Download the Jenkins Generic Java .war package.
- Go to the download directory and open a terminal.
- Run the package
- java -jar jenkins.war --httpPort=8080 - Navigate to the local host (http://localhost:8080) and follow the installation instructions.
Step 2: Scripted and Declarative Syntax Options
You can write a Jenkinsfile in either a scripted or declarative pipeline syntax. The syntax determines how the pipeline is constructed – declarative pipelines are a more recent innovation that offer richer syntax features than scripted pipelines and make it easier to write and read the pipeline code.
Regardless of whether you choose a scripted or declarative pipeline, the syntax comprises multiple individual components known as “steps” that are written in the Jenkinsfile.
Declarative pipelines
With this syntax, the pipeline block specifies all the tasks performed throughout the entire pipeline:
//Jenkinsfile (Declarative Pipeline)
pipeline {
    agent any
    stages {
        stage('Build') {
            steps {
                echo 'Starting the build Stage'
                echo 'Build Stage completed successfully'
            }
        }
        stage('Test') {
            steps {
                echo 'Starting the Test Stage'
                echo 'Test Stage completed successfully'
            }
        }
        stage('Deploy') {
            steps {
                echo 'Starting the Deploy Stage'
                echo 'Deploy Stage completed successfully'
            }
        }
    }
}
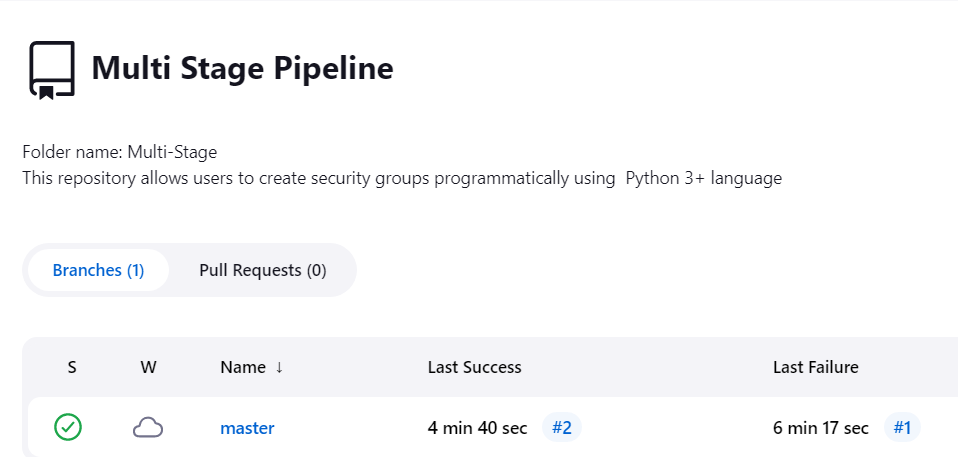
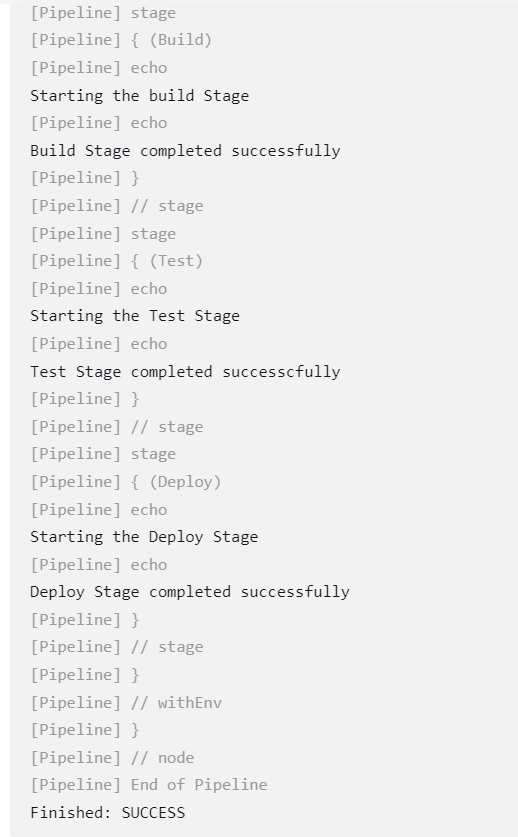
When the pipeline runs, the output should look similar to this:
Step 3: Scripted Pipelines
In this syntax, the main work is done by a node block (or several blocks). It is recommended to confine the pipeline’s work within the node block because it allows the pipeline to run more smoothly. The steps in a block are scheduled additively on the Jenkins queue, so they can run immediately whenever there is a free executor on a node.
Jenkinsfile (Scripted Pipeline)
node {
    stage('Build') {
        echo 'Starting Build Stage'
        echo 'Build Stage completed successfully'
    }
    stage('Test') {
        echo 'Starting Test Stage'
        echo 'Test Stage completed successfully'

    }
    stage('Deploy') {
        echo 'Starting Deploy Stage'
        echo 'Deploy Stage completed successfully'
    }
}
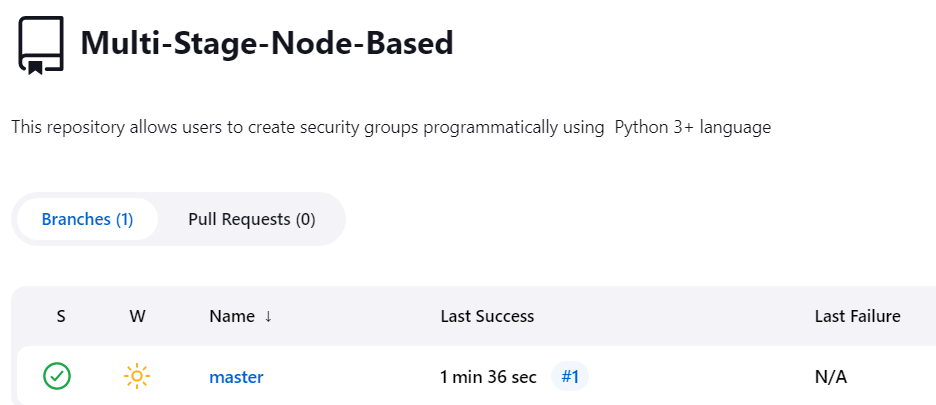
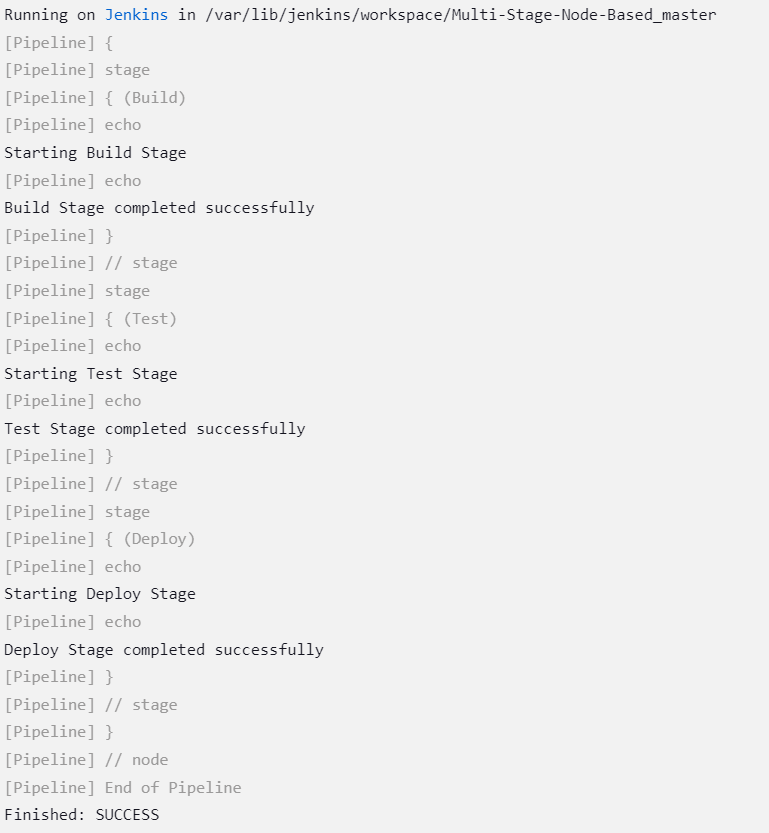
When this pipeline runs, the output should look similar to this:
Step 4: Using Jenkins Pipeline
Jenkins Pipeline is a suite of plugins for integrating and managing various continuous delivery (CD) pipelines in Jenkins. Its extensible selection of tools allows you to model simple and complex delivery pipelines as code using the Pipeline DSL.
Here is an overview of how to start a Jenkins Pipeline project, introducing several approaches to creating and storing a Jenkinsfile.
You can create a Jenkinsfile using the standard UI, which Jenkins stores in its home directory.
To create a pipeline with the UI:
- Log in to Jenkins and go to the Jenkins home page (the Jenkins UI’s dashboard).
- Select the New Item tab at the top of the menu on the left.
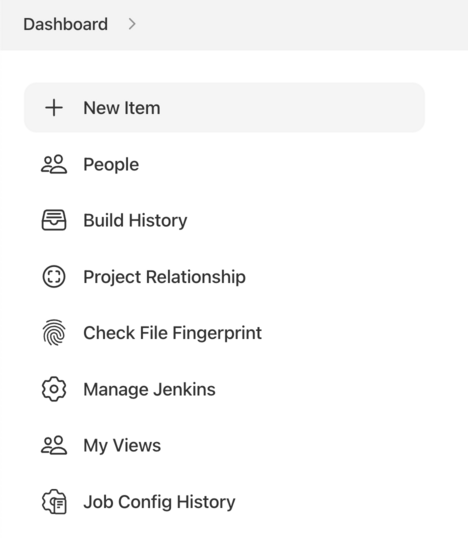
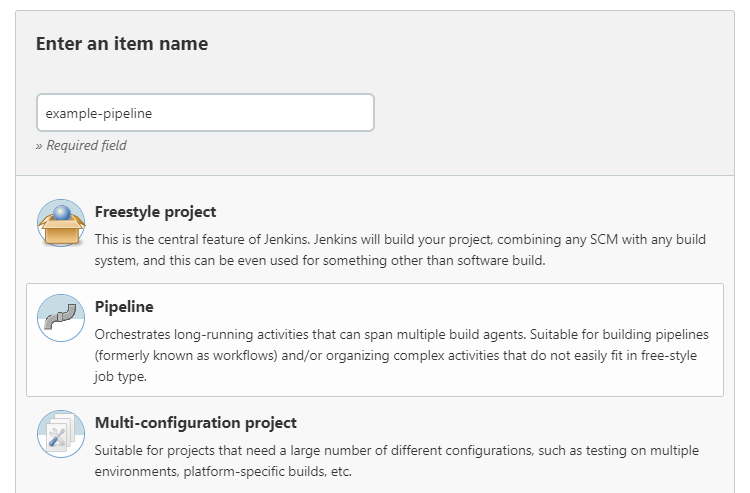
- Fill in the field titled Enter an item name and give your project a name. Note that Jenkins will use the item name to create on-disk directories on disk, so you should avoid incorporating spaces in the names – this is because some scripts cannot properly handle directory paths with spaces.
- Scroll down to Pipeline and click on it, then select OK at the bottom of the page to navigate to the pipeline configuration page.
- Click on the Pipeline tab and go to the Pipeline section at the bottom. If you want to define the Jenkinsfile in source control, you should follow the In SCM instructions below.
- Make sure the Definition field in the Pipeline section specifies the option: Pipeline script.
- Enter the code for your pipeline in the Script text field. For example, you might copy the following declarative pipeline code or an equivalent scripted version:
//Jenkinsfile (Declarative Pipeline)
pipeline {
    agent any
    stages {
        stage('Stage 2') {
            steps {
                echo 'Hello World!'
            }
        }
    }
}
- Select Save and you should be redirected to the pipeline project’s or item’s page.
- Click on Build Now in the menu on the left – this will run the pipeline.
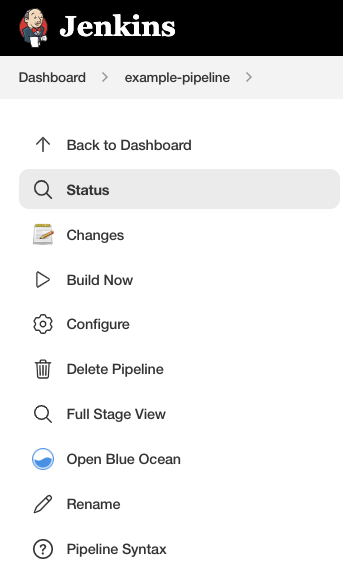
- Under the Build History tab on the left, select #1 to view the details for your specific pipeline run.
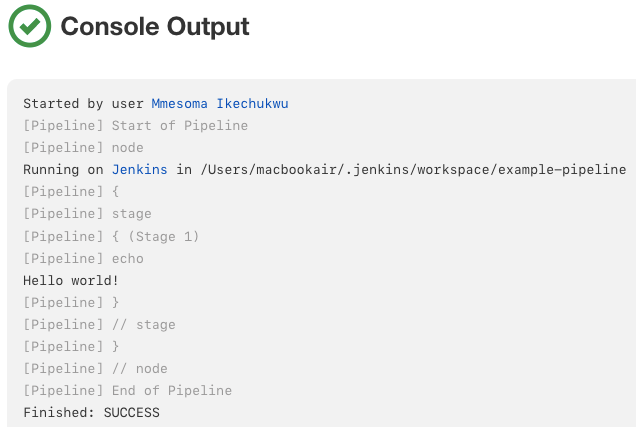
- Click on Console Output to view the run’s full output. A successful pipeline run should generate an output like this:
Step 5: Plugin Management
Plugins are the main way to enhance the Jenkins environment’s functionality to meet an organization’s or user’s needs. There are more than a thousand plugins that can be installed on Jenkins controllers and integrate different build and analysis tools or cloud providers.
You can download plugins automatically alongside the necessary dependencies from the Jenkins Update Center. This service offers an inventory of open-source Jenkins plugins, created and maintained by contributors to the Jenkins community.
There are two ways to install a plugin on a Jenkins controller: via the web UI’s Plugin Manager or via the Jenkins CLI using the install-plugin command. The result of each approach is the same but there may be different tradeoffs and access levels required to use the plugin.
The easiest, most popular installation approach is to use the Plugins view under Manage Jenkins, accessible to the Jenkins environment’s administrator. The Available tab lets you search for the plugins available from the Update Center for download.
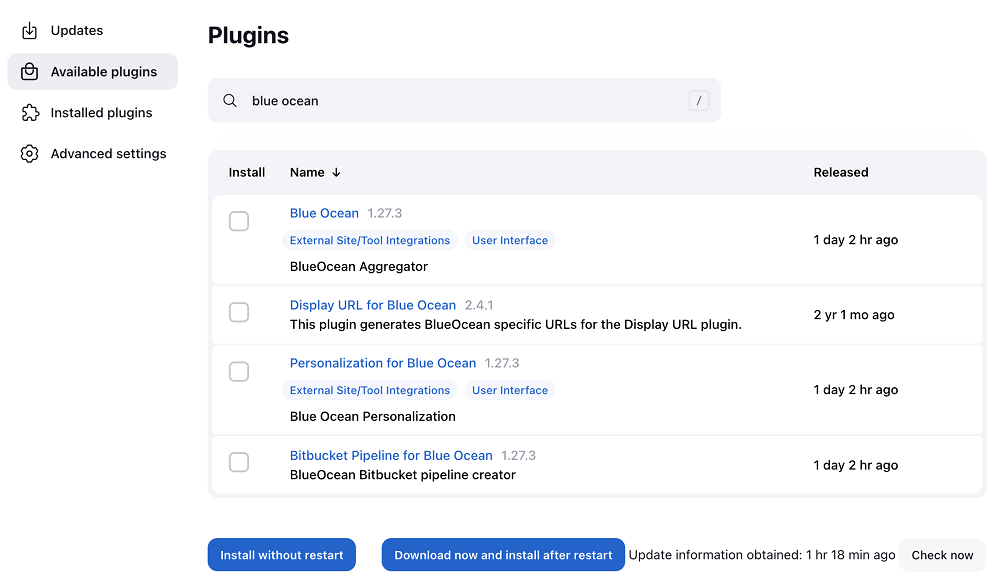
In most cases, you can use the installed plugins straight away – you check the box next to the plugin and click on Install without restart.
Step 6: Jenkins Security Management
Jenkins is commonly used in different environments, including protected corporate workstations and public-facing servers. Thus, Jenkins allows you to configure various security options to manage the security threats facing a Jenkins project. These include enabling, disabling, and modifying security features.
Since Jenkins 2.0, many of these security options have been enabled by default, providing better security for Jenkins environments – although administrators can disabled specific features via the Security section in the web UI. The UI lets admins enable additional features, configure protections, or disable certain features applied to the overall environment.
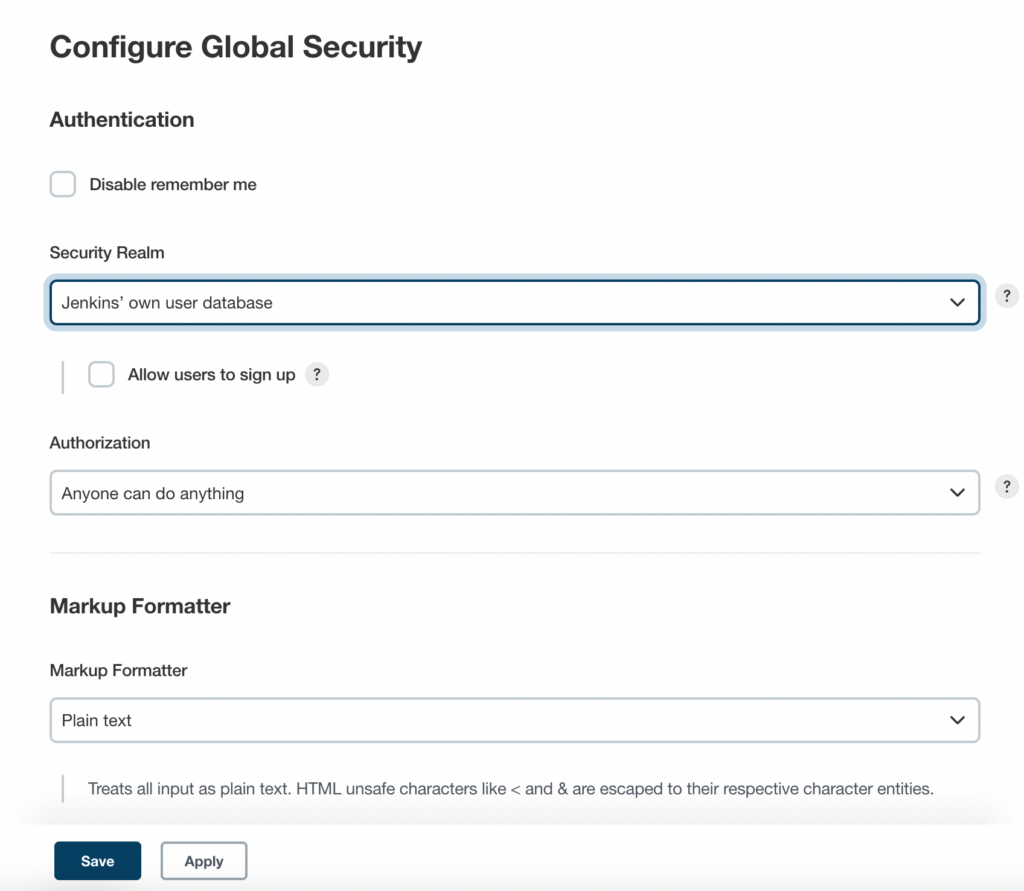
The main security mechanism protecting against unauthorized access to the Jenkins environment is access control You can configure the following to enable access control in Jenkins:
- Authentication: A security realm that tells the Jenkins environment where and how to pull user or identity information. Also commonly known as “authentication.”
- Authorization: A configuration that informs the environment which users or user groups can access specific areas of Jenkins, and the extent of their access.
These configurations allow you to relax or tighten your Jenkins authentication/authorization scheme. There are also plugins that can extend Jenkins access control functionality to support more nuanced security schemes (i.e., the role-based authorization strategy plugin).
Codefresh: A Modern Alternative to Jenkins
You can’t get to continuous delivery or deployment without first solving continuous integration. Codefresh automatically creates a Delivery Pipeline, which is a workflow along with the events that trigger it. We’ve added a pipeline creation wizard that will create all the component configurations so you can spend less time with YAML and more time getting work done.
At the end of the pipeline creation wizard, Codefresh commits the configuration to git and allows its built-in Argo CD instance to deploy them to Kubernetes.
The Delivery pipeline model also allows the creation of a single reusable pipeline that lets DevOps teams build once and use everywhere. Each step in a workflow operates in its own container and pod. This allows pipelines to take advantage of the distributed architecture of Kubernetes to easily scale both on the number of running workflows and within each workflow itself.
Teams that adopt Codefresh deploy more often, with greater confidence, and are able to resolve issues in production much more quickly. This is because we unlock the full potential of Argo to create a single cohesive software supply chain. For users of traditional CI/CD tooling, the fresh approach to software delivery is dramatically easier to adopt, more scalable, and much easier to manage with the unique hybrid model.
Learn more about Codefresh

The World’s Most Modern CI/CD Platform
A next generation CI/CD platform designed for cloud-native applications, offering dynamic builds, progressive delivery, and much more.
Check It Out