What Is Argo Events?
Argo Events is a framework for automating workflows in Kubernetes. It can consume events from over 20 event sources, including Amazon Simple Storage Service (S3), Amazon Simple Queue Service (SQS), Google Cloud Platform Pub/Sub, webhooks, schedules, and messaging queues. Based on these events, you can trigger tasks such as:
- Kubernetes Objects
- Argo Workflows
- AWS Lambda
- Serverless workloads
In addition, Argo Events can:
- Support customization of business-level constraint logic to automate workflows.
- Manage all event types, ranging from linear and simple to multi-source and complex.
- Help maintain compliance with the CloudEvents specification.
This is part of an extensive series of guides about Kubernetes.
Argo Events Components

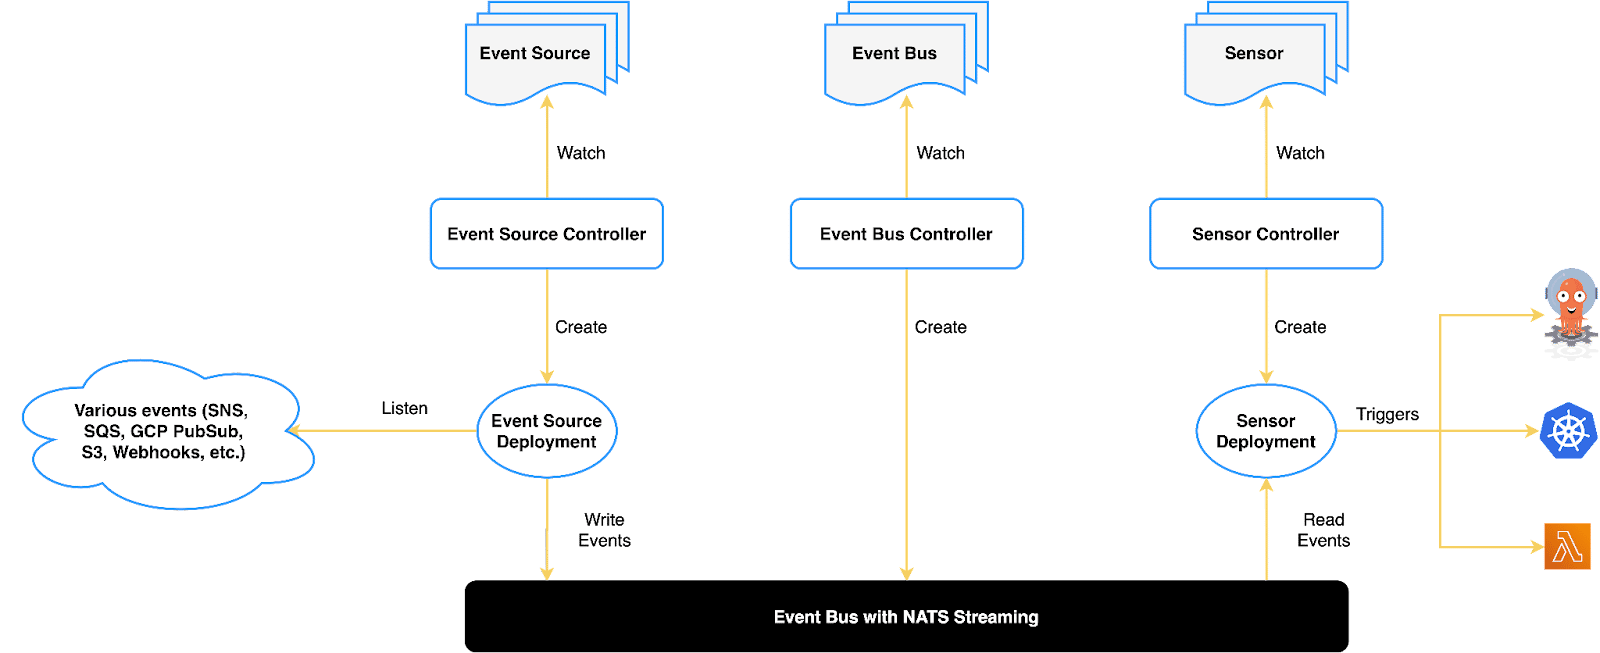
The following diagram illustrates the architecture of Argo Events, and below is a description of each component in more detail.
Image Source: Argo
Event Source
Event sources define the required configurations for consuming events from sources such as AWS SQS, SNS, GCP Pub/Sub, and webhooks. An event source can transform events into a cloud event (per the CloudEvents spec) and forward them to the event bus.
Sensor
Sensors define the dependencies and triggers of events corresponding to inputs and outputs. Sensors listen to events on the event bus and manage event dependencies independently to resolve and execute triggers.
Eventbus
The eventbus is a custom resource in Kubernetes that acts as a transport layer and transmits events between event sources and sensors.
An event source publishes events, and a sensor subscribes to them to execute event triggers. Event-Sources publish the events while the sensors subscribe to the events to execute triggers. NATS streaming powers the current event bus implementation.
Triggers
Triggers are resources or workloads that sensors execute after resolving the event dependencies. Various types of triggers include:
- Argo Rollouts and Argo Workflows
- Kafka, NATS, and Azure Event Hubs messages
- Slack notifications
- AWS Lambda
- Apache OpenWhisk
- Kubernetes objects
- HTTP requests
- Custom triggers
How Argo Events Integrates with Argo Workflows
Argo Events is not so useful on its own. To provide value, it must be integrated with a system that can run workflow steps. Therefore, you can set up Argo Events together with Argo Workflows, which helps you orchestrate parallel Kubernetes jobs.
A workflow in Argo is a set of steps, which Kubernetes may execute sequentially or simultaneously. Each step in a workflow is a separate container. Whatever you can place in a container image, you can incorporate it into your workflow.
Argo Workflows lets you model a complex, multi-task workflow as a step sequence. You can use directed acyclic graphs (DAGs) to capture inter-task dependencies, allowing you to specify which tasks depend on other tasks and the order of execution.
A major advantage of Argo is the ability to run Kubernetes-native CI/CD pipelines, which allows you to set up your workflows in Kubernetes directly.
For more information about how Events work, you can reference the Argo Events project GitHub repository, here.

TIPS FROM THE EXPERT
- Combine with Argo Workflows for powerful orchestration: Integrate Argo Events with Argo Workflows to manage complex, multi-step processes. This combination allows you to handle both event-driven triggers and detailed workflow orchestration within Kubernetes.
- Implement detailed logging and monitoring: Set up comprehensive logging and monitoring for your events and sensors. Use tools like Prometheus, Grafana, and ELK stack to track event flow and detect issues early.
- Integrate with notification systems: Configure Argo Events to trigger notifications through systems like Slack or email. This keeps your team informed about important events and workflow statuses, ensuring timely responses.
- Optimize event processing with custom filters: Apply custom filters to your event sources to preprocess and filter incoming events. This reduces the load on your workflows and ensures that only relevant events trigger your tasks.
- Use sensors for conditional logic: Deploy sensors to add conditional logic to your workflows. This enables you to trigger different actions based on the event’s content, creating more dynamic and intelligent workflows.
Quick Tutorial: Getting Started with Argo Events
Prerequisites
- Existing Kubernetes cluster running Kubernetes version 1.11 or higher
- kubectl command-line version 1.11.0 or higher
Step 1: Installation
Here is how to install Argo Events using several methods: kubectl, Helm Charts, and Kustomize, an open source tool for customizing Kubernetes configuration.
Installing Argo Events Using kubectl
First, create a namespace called argo-events:
kubectl create namespace argo-events
Deploy Argo Events and dependencies like ClusterRoles, Sensor Controller and EventSource Controller using this command:
kubectl apply -f https://raw.githubusercontent.com/argoproj/argo-events/stable/manifests/install.yaml
Note: You can install Argo Events with a validating admission webhook. This notifies you of errors when you apply a faulty spec, so you don’t need to check the CRD object status for errors later on. Here is how to install with validating admission controller:
kubectl apply -f https://raw.githubusercontent.com/argoproj/argo-events/stable/manifests/install-validating-webhook.yaml
Using Helm Chart
First install the Helm client—see instructions here.
Create a namespace called argo-events, and create a Helm repository called argoproj as follows:
helm repo add argo https://argoproj.github.io/argo-helm
Note: Be sure to update the image version in values.yaml to v1.0.0. The Helm chart for Argo Events is maintained by the community and the image version could be out of sync.
Install the Argo Events Helm chart using the following command:
helm install argo-events argo/argo-events
Using Kustomize
First install Kustomize—see instructions here.
If you use the cluster-install or cluster-install-with-extension folder as your base for Kustomize, add the following to kustomization.yaml:
bases:

  - github.com/argoproj/argo-events/manifests/cluster-install
If you use the namespace-install folder as your base for Kustomize, add the following to kustomization.yaml:
bases:

  - github.com/argoproj/argo-events/manifests/namespace-install
Step 2: Set Up a Sensor and Event Source
Now that Argo Events is installed, let’s set up a sensor and event source for the webhook. This will allow us to trigger Argo workflows via an HTTP Post request.
First, deploy the eventbus:
kubectl -n argo-events apply -f https://raw.githubusercontent.com/argoproj/argo-events/stable/examples/eventbus/native.yaml
Use this command to create an event source for the webhook:
kubectl -n argo-events apply -f https://raw.githubusercontent.com/argoproj/argo-events/stable/examples/event-sources/webhook.yaml
Finally, create the webhook sensor:
kubectl -n argo-events apply -f https://raw.githubusercontent.com/argoproj/argo-events/stable/examples/sensors/webhook.yaml
A Kubernetes service should now be created for the event source. You can see the new service by running kubectl get services.
Finally, expose the event source pod for HTTP access. For example, the following command exposes the event source pod on port 12000 using port forward.
kubectl -n argo-events port-forward <event-source-pod-name> 12000:12000
Step 3: Submit Post Request and See that a Workflow Runs
Let’s send a post request to http://localhost:12000/example—here is how to do it with curl – curl -d ‘{“message”:”this is my first webhook”}’ -H “Content-Type: application/json” -X POST http://localhost:12000/example
Run this command to see if an Argo workflow is created, triggered by our POST request:
kubectl -n argo-events get wf
You should see a context message indicating your webhook is running. Finally, ensure the pod defined in the workflow is running in your cluster.
That’s it! You set up an event system that accepts POST requests and creates pods as part of an Argo workflow.
Using Argo Workflows and Argo Events in Codefresh
Argo Workflows is a generic Workflow solution with several use cases. Two of the most popular use cases are machine learning and Continuous Integration. Having a flexible solution is an advantage for organizations that wish to use Argo Workflows in different scenarios, but can be a challenge for organizations that need a turn-key solution that works out of the box.
At Codefresh our focus is on Continuous Integration and Deployment. This means that the version of Argo Workflows included in Codefresh is already fine tuned specifically for Software Delivery.
This means that no customization is required in order to get a working pipeline. Organizations that adopt the Codefresh platform can start building and deploying software with zero effort while still taking all the advantages that Argo Workflows offer under the hood.
Codefresh offers several enhancements on top of vanilla Argo Workflows but the most important ones are:
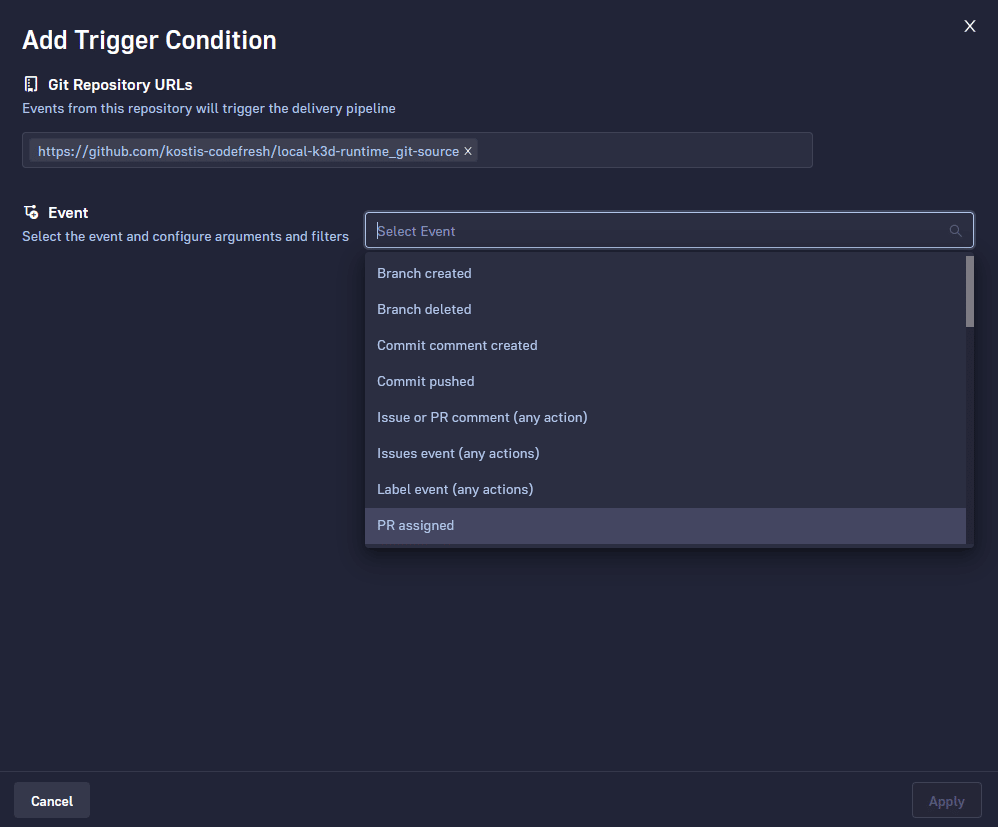
- A complete trigger system with all the predefined events that users of a CI/CD platform expect (i.e. trigger on Git push, PR open, branch delete etc)
- A set of predefined pipeline steps that are commonly used in CI/CD pipelines (security scanning, image building, unit tests, etc)
- A build view specifically for CI/CD pipelines.
Here you can see again the importance of having a common runtime that bundles Argo Workflows plus Argo Events. If you use Argo Workflows on your own, it is up to you to create the appropriate triggers and sensors that you need for your CI/CD pipelines. With Codefresh you get all this out of the box.
As a quick example, Codefresh offers you all the Git events that you might need for your pipeline in a friendly graphical interface. Of course under the hood everything is stored in Git in the forms of sensors and triggers.

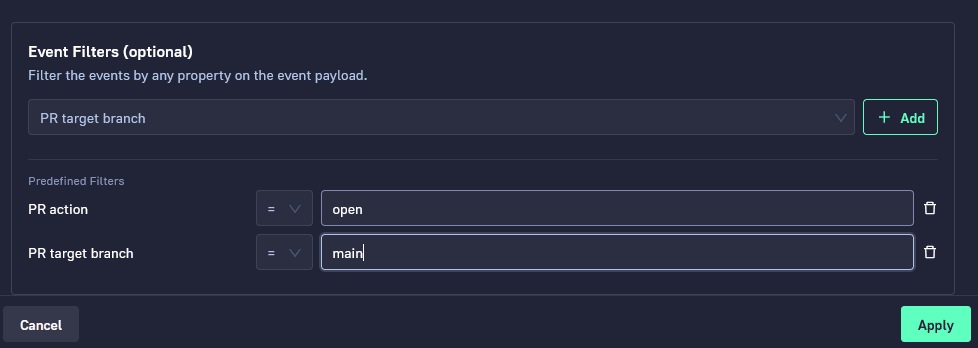
A smart filtering system is also offered for more advanced workflows. This comes in a dynamic UI component that allows you to chain multiple filters with different conditions. Some examples are:
- Trigger a workflow only when somebody opens a Pull request that is targeted at “main”
- Trigger a workflow only when a branch named “feature-*” is created
- Trigger a workflow only when a Git tag is created for repository X

All these are very common scenarios that users expect from traditional CI/CD platforms. With Codefresh workflows you have full access to all predefined filters and can also create your own with minimal effort.
See Additional Guides on Key Kubernetes Topics
Together with our content partners, we have authored in-depth guides on several other topics that can also be useful as you explore the world of Kubernetes.
Argo CD
Authored by Codefresh
- [Guide] Argo Support: All the Options to Get Support for Argo Projects
- [Guide] Understanding Argo CD: Kubernetes GitOps Made Simple
- [Blog] Progressive Delivery for Kubernetes Config Maps Using Argo Rollouts
Argo Rollouts
Authored by Codefresh
- [Guide] Argo Rollouts: Quick Guide to Concepts, Setup & Operations
- [Blog] Minimize Failed Deployments with Argo Rollouts and Smoke Tests
- [Product] Codefresh | GitOps Software Delivery Platform
Spinnaker
Authored by Codefresh
- [Guide] Spinnaker: Key Features, Use Cases, Limitations & Alternatives
- [Blog] Crafting the Perfect Java Docker Build Flow
The World’s Most Modern CI/CD Platform
A next generation CI/CD platform designed for cloud-native applications, offering dynamic builds, progressive delivery, and much more.
Check It Out