Article Content
What Is a Jenkins Pipeline?
Jenkins Pipeline is a feature of the Jenkins build server, deployed as a plugin, that lets you implement continuous delivery (CD) pipelines on the Jenkins automation server.
Continuous delivery pipelines are automated sequences of processes to deliver software from version control to customers and end-users. Each software change a developer commits in source control passes through a set of automated processes before being released to production. The pipeline involves building software using repeatable, reliable steps and pushing the build through various testing and deployment stages.
Jenkins Pipelines offers an extensible toolset to model delivery pipelines of varying complexity. Developers build pipelines as code using Domain-Specific Language (DSL).
Each Jenkins pipeline has a definition written in a text-based Jenkinsfile, which development teams can commit to their source control repository. This textual approach is the core of the pipeline-as-code method that treats the CD pipeline as an integral part of the application code. Like other code, team members can version and review it.
Jenkins Pipeline Syntax with Examples
Traditional Jenkins pipelines are scripted, meaning they prescribe the exact order of steps that need to happen in the pipeline. Pipelines are coded as Jenkinsfiles, and the end-to-end pipeline script is written in Groovy, and require some programming knowledge.
Here is a simple example of a scripted Jenkinsfile. To begin with, we use the node statement, which says that this pipeline and any of its stages should be run on any available Jenkins agent.
Jenkinsfile (Scripted Pipeline)

node {
Now we define several stage blocks. These are optional, but highly recommended because they make it easy to understand the tasks or steps occurring in each stage. Stage block descriptions are displayed in the Jenkins UI.
Here we are defining three stages – Build, Test, and Deploy. Each of them can contain specific scripted code that performs the required operations.
   stage('Build') {
        //
    }
    stage('Test') {
        //
    }
    stage('Deploy') {
        //
    }
}
Jenkins Declarative Pipeline
Recently, Jenkins Pipeline introduced declarative pipelines. This provides a new syntax you can use to define the desired end result of the pipeline, and Jenkins will automatically perform the required options.
Declarative pipelines require predefined constructs, and so are less flexible than scripted pipelines. On the other hand, they are easier to work with and do not require knowledge of Groovy code. Another plus is that Jenkins can automatically validate the syntax of a declarative pipeline.
The code looks like this. We start with the pipeline statement that specifies this is a declarative pipeline.
Jenkinsfile (Declarative Pipeline)
pipeline {
The agent any statement is a declarative syntax that tells Jenkins to allocate an executor on a node and create a workspace for the pipeline.
agent any
Next, we define build steps. Note that unlike the scripted pipeline above, within each stage block is a steps statement. This is a declarative syntax that describes the steps to be run in this stage.
 stages {
        stage('Build') {
            steps {
                sh 'make'
            }
        }
        stage('Test'){
            steps {
                sh 'make check'
                junit 'reports/**/*.xml'
            }
        }
        stage('Deploy') {
            steps {
                sh 'make publish'
            }
        }
    }
}
This code runs the following operations:
- In the Build stage, we run
sh 'make'. The Jenkins Pipeline Nodes and Processes plugin executes the required shell command. - In the Test stage, we use JUnit to aggregate test reports. It executes via the JUnit plugin.
- In the Deploy stage, we run
sd 'make publish'. Again this is executed by the Nodes and Processes plugin.
How to Create a Jenkins Pipeline
Prerequisites: To use Jenkins Pipeline you will need Jenkins 2.x of later, and the Pipeline plugin (which may be installed by default).
You can create pipelines through the Blue Ocean UI, the Classic UI, and manually using Jenkinsfiles. Let’s see how to do it in the classic UI.
To create a pipeline in the Jenkins Classic UI:
- Log into Jenkins.
- In the Dashboard, select New Item.
- Type an item name and select Pipeline from the list of item types. Click OK.
 Image Source: Jenkins
 - In the Pipeline configuration page, click the Pipeline tab. Under Definition, select the option Pipeline script.
- Type your Pipeline code in the text area, as shown below.
 Image Source: Jenkins
 - Click Save. The Pipeline project/item view page appears. Click Build Now.
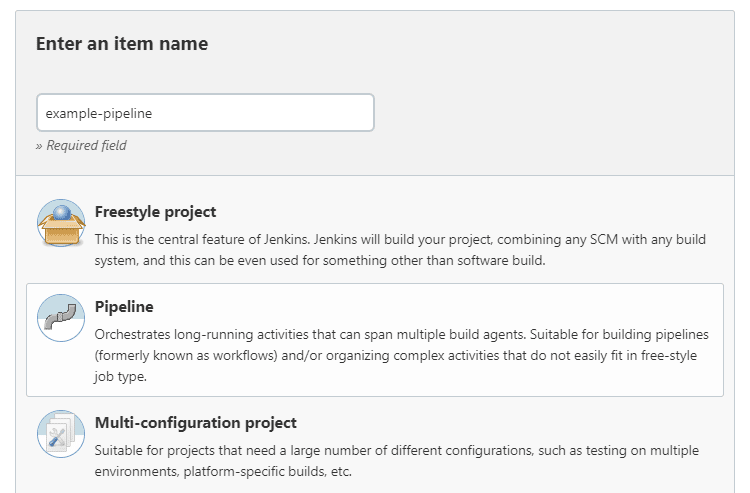 Image Source:
 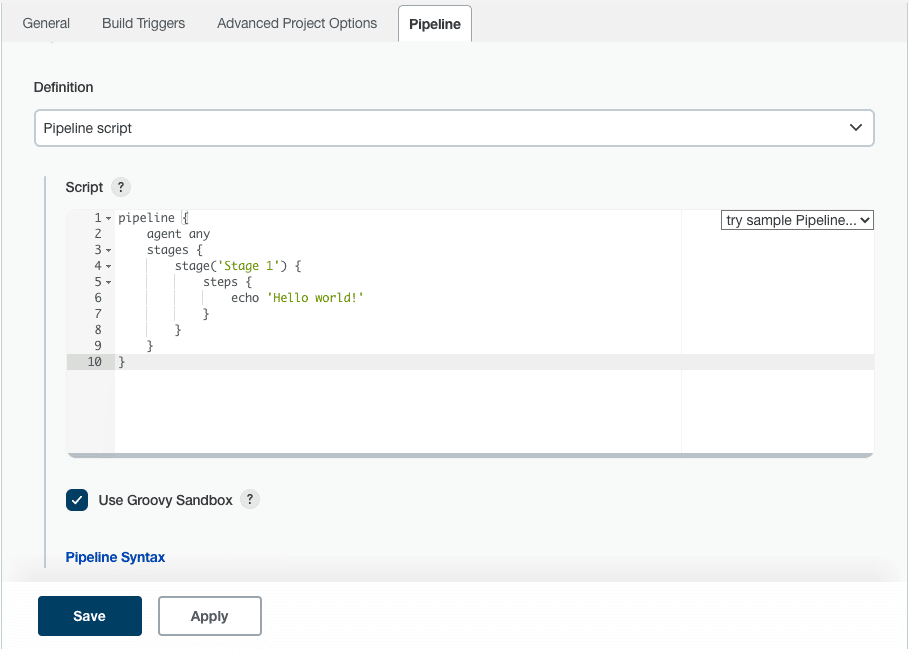 Image Source:
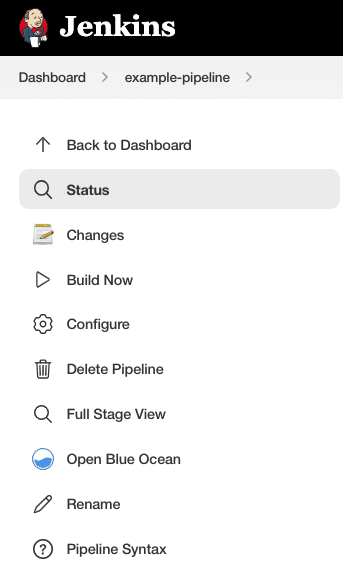
Image Source: Jenkins
That’s it! You’ve launched a pipeline using the pipeline script you provided. You can now:
- Access details for your pipeline by clicking Build History and selecting the pipeline.
- See full output from the pipeline run by clicking Console Output.
Jenkins Pipeline Best Practices
Don’t Use Groovy Code for Main Pipeline Functionality
Prefer to use single steps (such as shell commands), and not Groovy code, for each step of the pipeline. Use Groovy code to chain your steps together. This will reduce the complexity of your pipeline, and ensure that as the number of steps grows, the pipeline can still run without major resources on the controller.
Use Shared Libraries
As an organization uses Jenkins Pipeline for more projects, different teams will probably create similar pipelines. It is useful to share parts of the pipeline between different projects to reduce duplication. To this end, Jenkins Pipeline lets you create shared libraries, which you can define in an external source control repo and load into your existing pipelines.
Use Docker Images in Your Pipeline
Many organizations use Docker to set up build and test environments and deploy applications. From Jenkins 2.5 onwards, Jenkins Pipeline has built-in support for interacting with Docker within Jenkins files.
Jenkins Pipeline lets you use Docker images for a single stage of the pipeline or the entire pipeline. This lets you define the tools you need directly in the Docker image, without having to configure agents. You can use Docker containers with minor modifications to a Jenkinsfile.
The code looks like this. When this pipeline runs, Jenkins will automatically start the required container.
Jenkinsfile (Declarative Pipeline)
pipeline {
    agent {
        docker { image 'node:16.13.1-alpine' }
    }
    stages {
        stage('Test') {
            steps {
                sh 'node --version'
            }
        }
    }
}
Use Multi-Branch Pipelines
When working with Jenkins, you may need to build an application using several branches in one Git repository. Normally, you would create new Jenkins jobs for every new branch—a multi-branch pipeline job can make this process less time-consuming. All the pipeline information, including the Jenkinsfile, must be in the same place (i.e., the Git repo).
Backup Every Jenkins Instance
It is also crucial to have strong backups of every Jenkins instance to enable disaster recovery and restore corrupted or accidentally deleted files. Backup creation schemes include snapshots of the file system, backup plugins, and shell scripts that back up Jenkins instances. The number of backed-up files affects the overall backup size, complexity, and recovery time.
Cleaning Up Old Jenkins Builds
Jenkins admins can delete old and unwanted builds, and this will not affect operations of the Jenkins controller. However, if you don’t delete old builds, you will eventually run out of resources for new releases. The buildDiscarderdirective in pipeline jobs can help you define a policy for automatically removing older builds.
Codefresh: A Modern Alternative to Jenkins
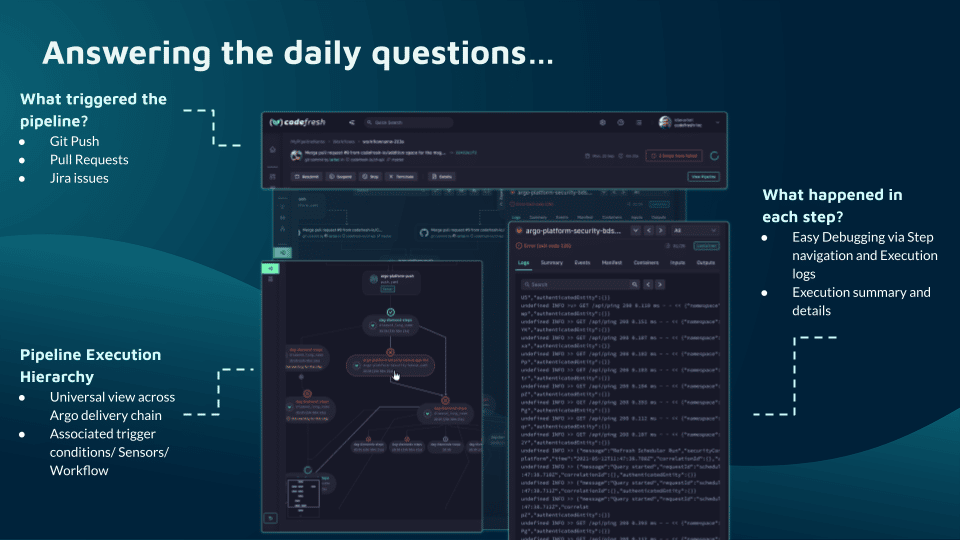
You can’t get to continuous delivery or deployment without first solving continuous integration. Codefresh automatically creates a Delivery Pipeline, which is a workflow along with the events that trigger it. We’ve added a pipeline creation wizard that will create all the component configurations so you can spend less time with YAML and more time getting work done.
At the end of the pipeline creation wizard, Codefresh commits the configuration to git and allows its built-in Argo CD instance to deploy them to Kubernetes.
The Delivery pipeline model also allows the creation of a single reusable pipeline that lets DevOps teams build once and use everywhere. Each step in a workflow operates in its own container and pod. This allows pipelines to take advantage of the distributed architecture of Kubernetes to easily scale both on the number of running workflows and within each workflow itself.
Teams that adopt Codefresh deploy more often, with greater confidence, and are able to resolve issues in production much more quickly. This is because we unlock the full potential of Argo to create a single cohesive software supply chain. For users of traditional CI/CD tooling, the fresh approach to software delivery is dramatically easier to adopt, more scalable, and much easier to manage with the unique hybrid model.