
In our big guide for Kubernetes deployments, we explained the benefits of using dynamic environments for testing.
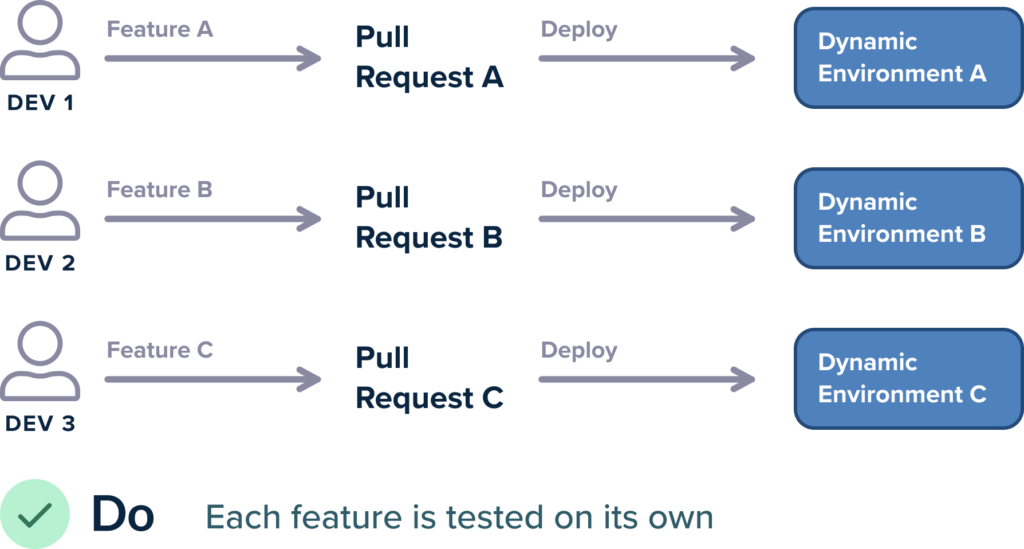
The general idea is that each developer gets a preview environment instead of having a fixed number of testing/QA environments. The environment gets created on the fly when you open a pull request. Typically, it gets destroyed when you merge the pull request (or after a specific amount of time).
Previously, we explained how to implement this pattern using just Helm applications and an Ingress on a Kubernetes cluster with a traditional deployment pipeline.
If your organization has moved to GitOps, you might wonder if you can replicate this setup with Argo CD (or the Codefresh runtime). The answer is yes!
In this guide, you learn how to create preview environments with Argo CD by using the Pull Request Generator designed for this scenario.
Keeping developers happy
There are several approaches for creating preview environments with Argo CD. One major decision is whether you want a preview environment created for a pull request in the application source code, or a pull request on the Kubernetes manifests. As a reminder, it’s always a good idea to separate source code from manifests in two separate Git repositories.
Both approaches are valid, but in this guide, we focus on pull requests created on the source code. Developers open these pull requests when they’ve implemented a feature and want to test or share it with their team.
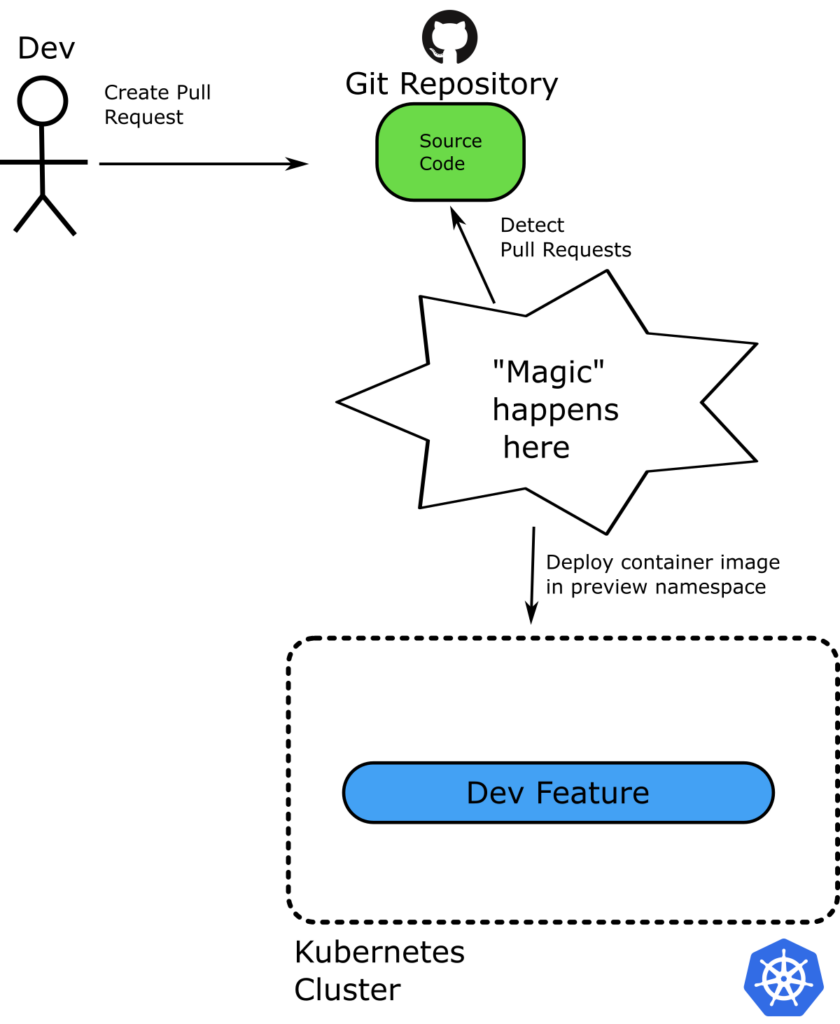
We don’t want to force developers to learn how Argo CD or Kubernetes works. So, as far as they’re concerned, they open a pull request as usual, and after some time, a new preview environment gets created with the contents of the pull request.
There are many ways to create preview environments for Kubernetes. For simplicity, we’ll follow the same assumptions as in the Helm article.
- We’ll use a single cluster for all preview environments.
- Argo CD will run inside the same cluster.
- We’ll deploy each pull request to its own namespace.
- The name of the namespace will match the name of the pull request.
If two developers create two pull requests named “my-billing-feature” and “fix-queue-size”, two new namespaces with the same name get created with the respective deployments. Each namespace contains the container from the respective Continuous Integration build. So both developers can test their own features in isolation.
In a future article, we’ll cover more advanced scenarios, like creating a virtual cluster per pull request.
Generating Argo CD applications automatically
The basic concept of an Argo CD installation is the application, which is a link between a Git repository and a destination cluster. We explained how to create Argo CD applications using generators in our article about Argo CD application sets.
Things are a bit different in preview environments, as we don’t really have a folder in Git that represents the application. If we did, we could use the Git generator and create preview environments as more folders get created/destroyed.
In theory, we could instruct our Continuous Integration (CI) system to commit new folders on the manifest repo for each preview application. But this process is too cumbersome and there’s no need to go down that route. The Pull Request (PR) Generator solves this problem by creating applications directly from pull requests instead of folders.
Unlike other Argo CD generators, the PR Generator is special because it can monitor any Git repository for pull requests. It doesn’t have to be the same one that has manifests. This lets you monitor the Git repository for source code while still deploying manifests from a different Git repository.
Here’s our updated architecture where we’ve expanded the “magic” section from the previous picture.
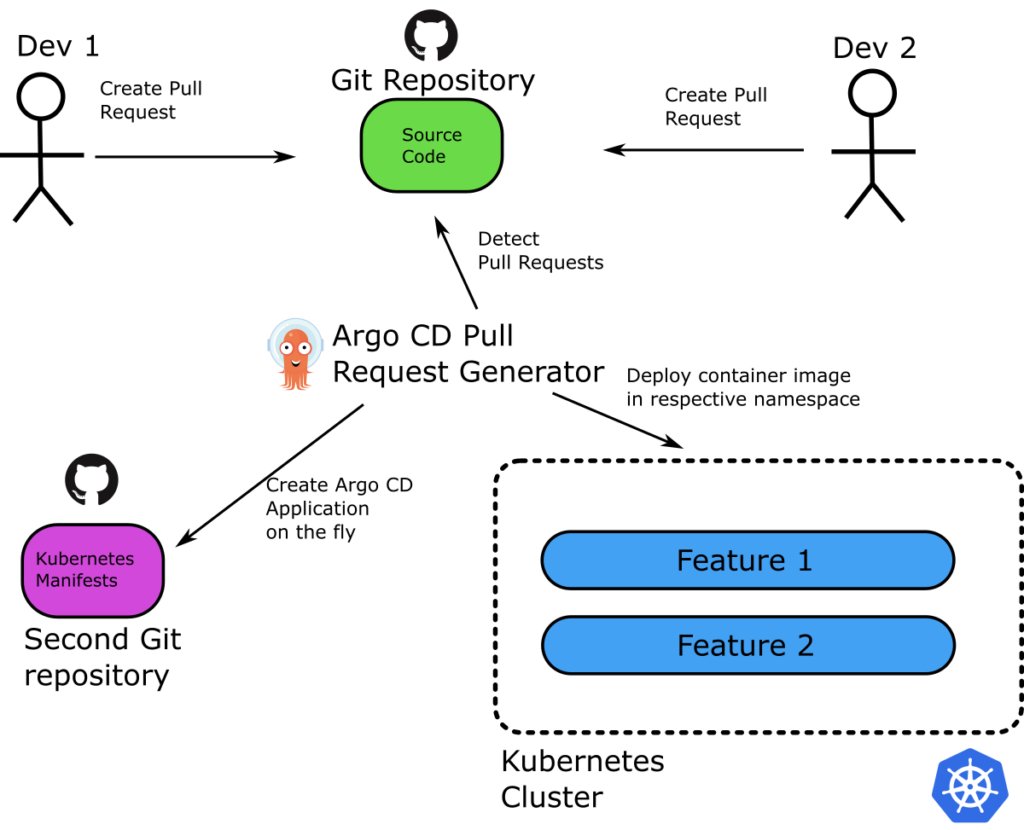
The whole process goes like this:
- There’s one Git repository with just the source code of the application. There’s another Git repository with Kubernetes manifests (Helm, Kustomize, or plain manifests).
- A developer creates a branch on the source Git repository and starts working on a feature.
- When the developer finishes, they create a pull request on the branch (usually pending tests and feedback from their team).
- Argo CD notices the pull request on the source code Git repository and creates a new application for it.
- The Pull Request Generator takes the manifests from the infrastructure repository and templates/modifies them according to the pull request in the source code repo.
- A new application gets created and deployed in the Kubernetes cluster.
- The developer accesses the new application, reviews it, runs unit tests, shares it, etc.
- When the pull request gets merged/closed, Argo CD automatically discards the preview environment.
- The process works in parallel for all developers working on features.
This is the heart of the process. There are also several supporting factors we must consider to create a rock-solid experience for developers.
Coordinating with the Continuous Integration system
The main goal of the preview environment is to let developers test their new features in isolation. Before dealing with Argo CD deployments, we need a Continuous Integration (CI) system that covers two basic requirements:
- It automatically builds a container every time you open a pull request.
- It pushes the container using the Git hash of the source code as a tag.
We use Codefresh CI in our example application, but any CI system should be able to cover these requirements.
You can find the source code of the example application at https://github.com/kostis-codefresh/preview-env-source-code. All the manifests are at https://github.com/kostis-codefresh/preview-env-manifests. Note that we follow the Argo CD best practices for splitting source code from Kubernetes manifests.
This example uses Kustomize. For an example with Helm, see Piot’s guide on the same subject.
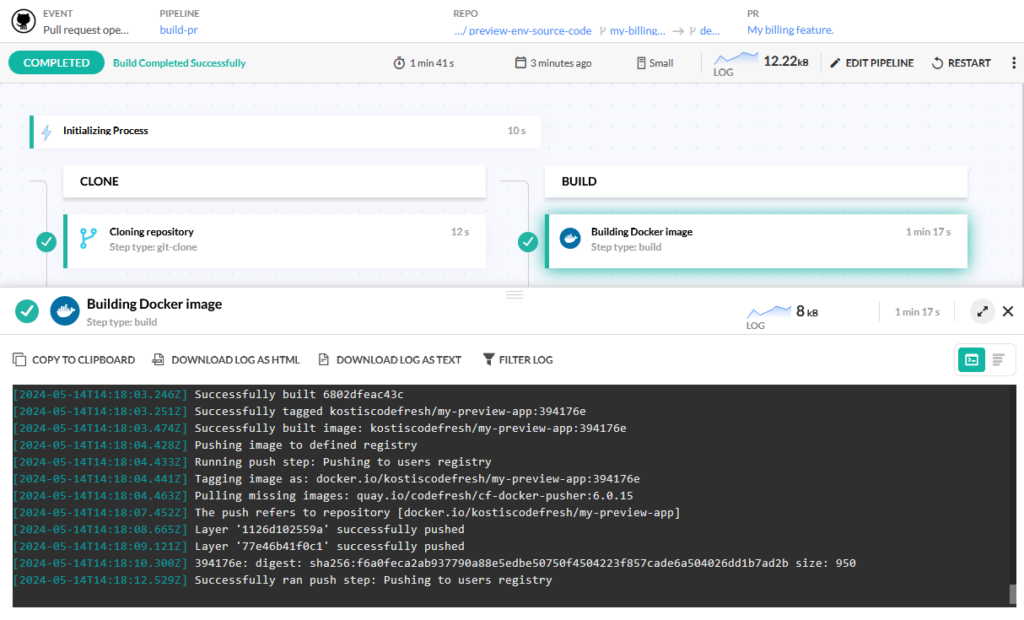
Here’s a minimal Codefresh pipeline that builds a container image with the same tag as the source code.
version: "1.0"
stages:
  - "clone"
  - "build"
steps:
  clone:
    title: "Cloning repository"
    type: "git-clone"
    repo: "kostis-codefresh/preview-env-source-code"
    revision: "${{CF_REVISION}}"
    git: "github-1"
    stage: "clone"


  build:
    title: "Building Docker image"
    type: "build"
    image_name: "kostiscodefresh/my-preview-app"
    working_directory: "${{clone}}"
    tag: "${{CF_SHORT_REVISION}}"
    dockerfile: "Dockerfile"
    stage: "build"
The important part here is the “tag” line that instructs Codefresh to tag the Docker image with the same hash as the source code. The short revision variable represents the Git hash and gets automatically injected by Codefresh with the commit that we checked out.
The second requirement is to make this pipeline run only for pull request events. This happens out of the box with Codefresh Git triggers.
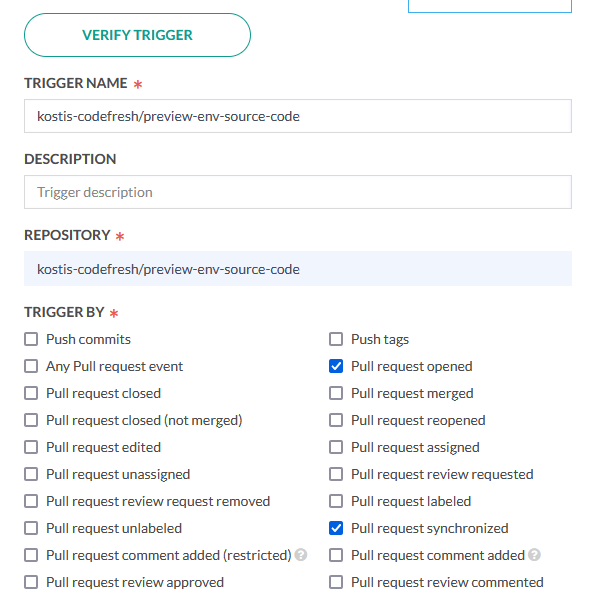
We now have a pipeline that satisfies our requirements. If you create pull requests on the source code repository, Codefresh automatically builds them. Here’s an example build.
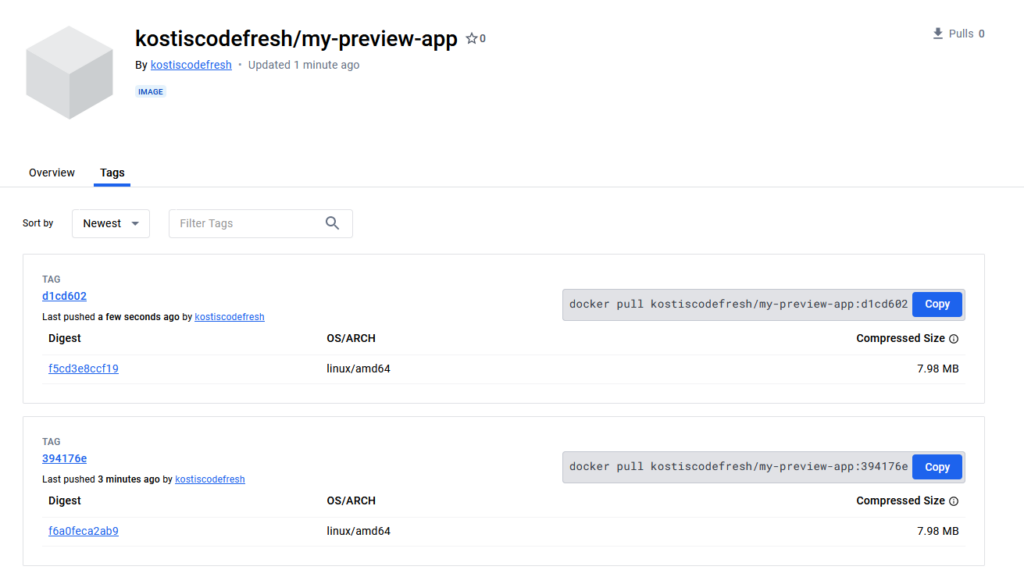
When the pipeline has finished, you can see in Docker Hub (or whichever container registry you’re using) the resulting images tagged with the same Git hash as the source code branch:
This concludes the setup for the Continuous Integration part. Let’s move on to the deployment process.
Performing the initial deployment
With the CI part in place, we can create our Pull Request Generator. Here’s the initial version:
apiVersion: argoproj.io/v1alpha1
kind: ApplicationSet
metadata:
  name: myapps
  namespace: argocd
spec:
  goTemplate: true
  goTemplateOptions: ["missingkey=error"]
  generators:
  - pullRequest:
      github:
        owner: kostis-codefresh
        repo: preview-env-source-code
      requeueAfterSeconds: 180
  template:
    metadata:
      name: 'myapp-{{.branch}}'
    spec:
      source:
        repoURL: 'https://github.com/kostis-codefresh/preview-env-manifests.git'
        targetRevision: HEAD
        path: kustomize-preview-app/
        kustomize:
          images:
            - 'docker.io/kostiscodefresh/my-preview-app:{{.head_short_sha_7}}'
      project: "default"
      destination:
        server: https://kubernetes.default.svc
        namespace: 'preview-{{.branch_slug}}'
      syncPolicy:
        automated:
          prune: true
        syncOptions:
        - CreateNamespace=true
This Pull Request Generator does the following:
- Monitors the kostis-codefresh/preview-env-source code repository for pull requests.
- If it finds a pull request, it creates an Argo CD application named myapp-<name of branch>.
- The Argo CD application syncs manifests found at preview-env-manifests folder “kustomize-preview-app”.
- It deploys the manifests to the local cluster (the same cluster where Argo CD is installed) at a namespace with the same name as the branch of the pull request prepended with “preview”.
- It sets the container tag with the same hash as the source code, so that it matches the CI pipelines of Codefresh described in the previous section.
You can test this Pull Request Generator by applying it to your local Argo CD instance.
kubectl apply -f pr-generator.yml -n argocd
Then, you can start creating pull requests on your source code repository and see applications created automatically. Isn’t this great?
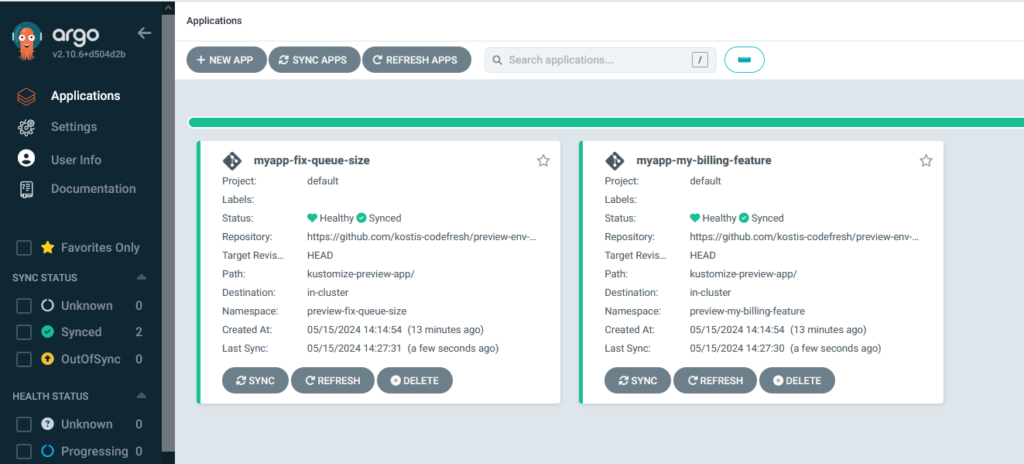
Note that in our example, we instructed Argo CD to check for new pull requests every 3 minutes via the requeueAfterSeconds property. You need to fine-tune this property according to your organization’s needs.
As always, you can click on any application to see its Kubernetes resources.
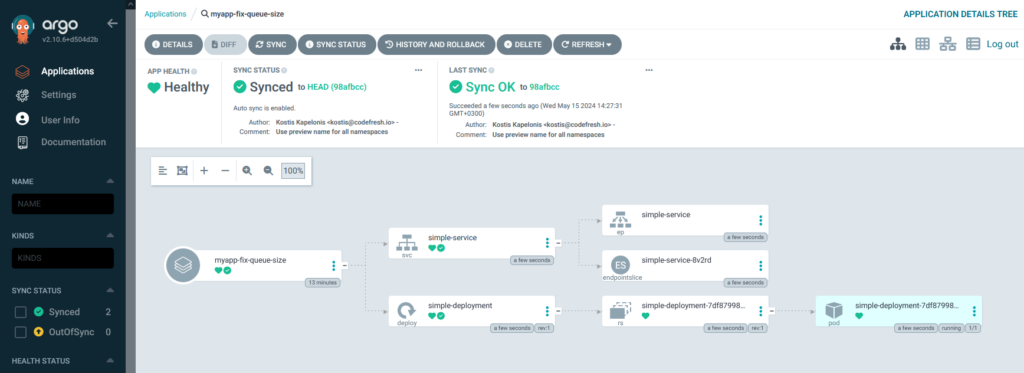
That’s it!
Now every time a developer creates a new pull request, their container image gets deployed automatically in the same namespace as the branch name. You can also inspect the applications manually in the cluster with the CLI.
➜  argocd git:(main) kubectl get ns
NAME                     	STATUS   AGE
argocd                   	Active   26d
default                  	Active   26d
kube-node-lease          	Active   26d
kube-public              	Active   26d
kube-system              	Active   26d
preview-fix-queue-size   	Active   2m14s
preview-my-billing-feature   Active   2m14s
To make things easy, we use the “preview” prefix for all namespaces. But you can choose any naming convention for your organization.
Handling subsequent commits for the same pull request
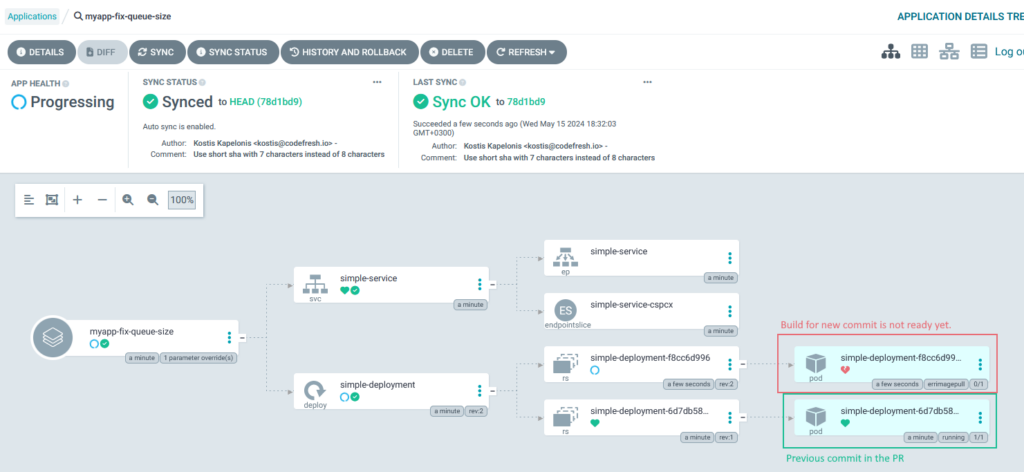
Often, a developer notices something in a preview environment, fixes it, and wants to perform a redeployment. With our setup, this happens automatically. If the developer commits again, the Pull Request Generator detects the commit and redeploys the application.
Note that in our example, we set the refresh period to 3 minutes. Our application is very simple, so usually when the Pull Request Generator is redeploying an environment, the container image is already built and pushed to our registry.
There’s also the scenario where the image build is not yet complete. Argo CD will mark the deployment with an ImagePullBackOff error. Kubernetes will automatically retry the pull later and the application will eventually succeed. But note that this will work only if your application takes less than 5 minutes to build as this is the default timeout for image pull operations.
If this is an issue for your developers, you can simply instruct the Pull Request Generator to only deploy pull requests with a special label, for example “preview-ready”. Then you have your CI system or developers add that label on the pull request after the CI build has finished. This way you guarantee the image is always there when Argo CD creates the temporary environment.
Destroying the temporary Argo CD application
Destroying an environment is straightforward. After you merge or reject/close a pull request, Argo CD detects it and automatically discards the respective environment.
Note that in our simple example, the preview namespace stays behind. To delete the namespace as well, you need to add a namespace resource in your Helm chart or Kustomize folder.
Alternatively, you can set up a job that periodically clears unused namespaces.
Passing the name of the branch to a preview environment
The setup we have works great for several common scenarios. One key point is that the application itself doesn’t know if it’s running in a preview environment.
Sometimes, however, you want to pass to the application, information about the pull request environment, and most probably give it as a parameter with the name of the branch or the Git hash. These can be used to make the application adapt in some way to the preview environment. An example scenario would be to set up an Ingress with the URL that matches the pull request. So in our example, we’d have URLs like this:
Our example application source code already accepts the Git hash and the branch name as environment variables.
We can modify our Pull Request Generator to pass these parameters in the created application.
apiVersion: argoproj.io/v1alpha1
kind: ApplicationSet
metadata:
  name: myapps
  namespace: argocd
spec:
  goTemplate: true
  goTemplateOptions: ["missingkey=error"]
  generators:
  - pullRequest:
      github:
        owner: kostis-codefresh
        repo: preview-env-source-code
      requeueAfterSeconds: 180
  template:
    metadata:
      name: 'myapp-{{.branch}}'
    spec:
      source:
        repoURL: 'https://github.com/kostis-codefresh/preview-env-manifests.git'
        targetRevision: HEAD
        path: kustomize-preview-app/
        kustomize:
          images:
            - 'docker.io/kostiscodefresh/my-preview-app:{{.head_short_sha_7}}'
          patches:
            - target:
                kind: Deployment
                name: simple-deployment
              patch: |-
                - op: replace
                  path: /spec/template/spec/containers/0/env/0
                  value:
                    name: GIT_BRANCH
                    value: '{{.branch_slug}}'
                - op: replace
                  path: /spec/template/spec/containers/0/env/1
                  value:
                    name: GIT_HASH
                    value: '{{.head_short_sha_7}}'
      project: "default"
      destination:
        server: https://kubernetes.default.svc
        namespace: 'preview-{{.branch_slug}}'
      syncPolicy:
        automated:
          prune: true
        syncOptions:
        - CreateNamespace=true
Now, when you create a preview application, if you visit the application, you see that it knows which branch and hash it was created from.
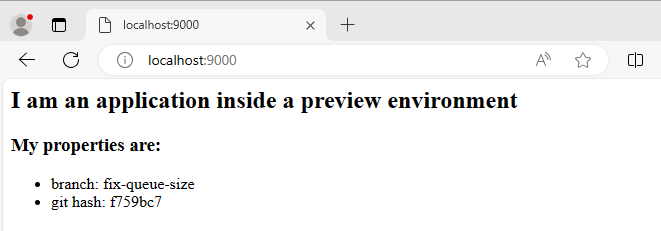
Notice that this override syntax is something we DO NOT recommend for static and/or production environments. It mixes Argo CD resources with information that belongs to the Kubernetes manifests. We recognize, however, that some developers like this capability, so we include it in this guide for completeness.
Limitations and Future Considerations
The approach we’ve seen – monitoring the source code repository for pull requests – is very simple to set up, but there are some limitations:
- By default, it deploys the new manifests without actually waiting for the container image to be ready. Kubernetes will automatically retry to pull it for the first 5 minutes only. So if your CI system needs more than 5 minutes to build (and test) the application, this approach won’t work for you.
- Developers can only create a preview environment for a single application (the one that has the pull request). If your organization has adopted microservices, a developer might want to create a common preview environment with different applications from different Git repositories. This scenario is not possible with the approach in this guide.
- There are some cases where the preview environment is not just a new container tag, but the developer wants to preview a change in configuration as well, for example, introducing a new variable or configuration file. Again, this scenario is not possible with the approach in this guide
You can solve all these limitations by changing the behavior of the Pull Request Generator to monitor the Kubernetes manifest repository for pull requests. This process is more complex, though, so we’ll cover it in a future article.
Summary
In this guide, you’ve seen how you can use Argo CD even for preview environments. Using the ApplicationSet Pull Request Generator, you can create temporary/ephemeral deployments so developers can test a feature in isolation. Updating the environment with new code when the developer performs additional commits in the pull request is also very easy to set up.
The benefits of GitOps can now apply to preview environments as well. For example, it’s now possible to quickly find configuration differences between environments or even revert back to a preview version of the environment using just a Git action.
With the power of the ApplicationSet Generator, you can also automatically delete all inactive temporary environments. This helps with cloud costs and long-term maintenance of temporary environments.
The process is fully transparent for developers. They can keep creating pull requests in the source code repository like they already do. After they merge/reject the pull request, Argo CD discards the temporary environment without any human intervention.
We hope you now have a good starting point for your preview environment strategy.