
The security and storage of secrets is one of the most controversial subjects when it comes to GitOps deployments. Some teams want to go “by the book” and use Git as the storage medium (in an encrypted form of course) while others accept the fact that secrets must be handled in a different way (outside of GitOps). There is no right or wrong answer here and depending on the organization requirements, either solution might be a great fit.
In the previous article of the series we explained how to use the Argo CD Vault plugin to fetch secrets from the AWS Secret Manager. In the present article you will learn about an alternative method using the External Secrets Operator (while still using the AWS Secret Manager for the original storage). Like last time we will use Argo CD/Codefresh for the actual deployment of the application.
Solution overview
The assumption is that we already have a Kubernetes cluster (Amazon EKS in our case) and we want to deploy applications to it. The applications need several secure credentials such as database passwords or certificates that are stored in the AWS secret manager.
We want to deploy the applications on the cluster using a GitOps Runtime (the Codefresh runtime in our case). Therefore we need a way to make the secrets available inside the cluster by fetching them from the AWS secret manager.
Here is an overview of the system architecture:
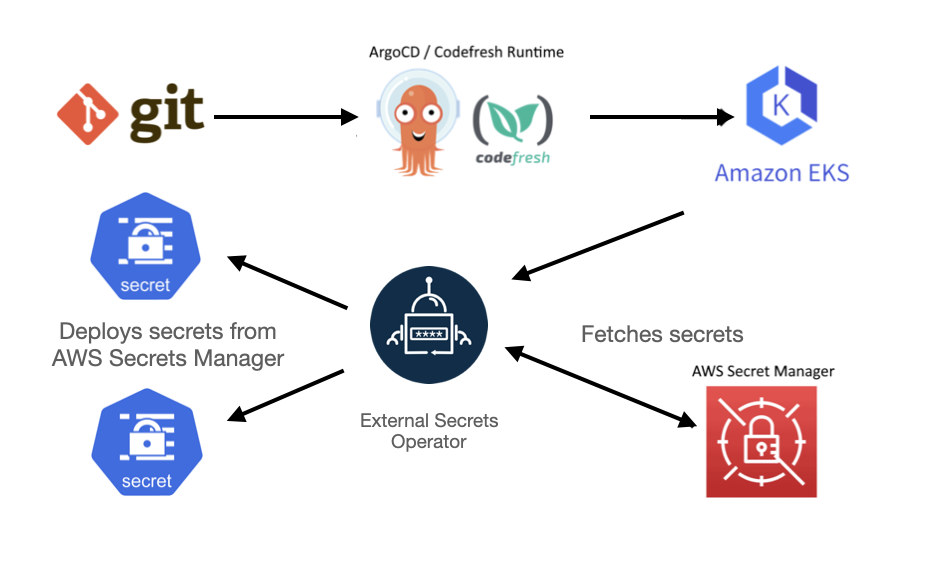
The External Secret Operator (ESO) is the perfect fit for this challenge. It works by retrieving secrets from the AWS Secret Manager and making them available as standard Kubernetes Secrets to be used by our applications. Note that ESO supports several other sources apart from AWS.
The steps we are going to take are
- Install ESO in our Kubernetes cluster
- Create secrets in AWS secret manager
- Instructing ESO to fetch the secrets
- Creating an Argo CD application manifest for our deployment
- Deploying everything with the Codefresh runtime.
Note that we assume that your cluster already has a Codefresh runtime installed and it is available in the Codefresh platform.
Prerequisites
Before moving to the main setup we need to create a new Git Source for your Codefresh Runtime. When creating the Git source use the path of gitops/argocd
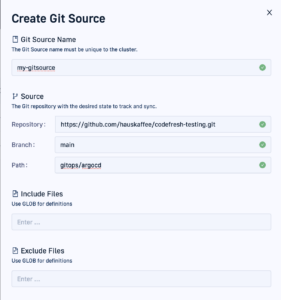
This is to make sure that the “infrastructure” manifests for the operator will be in a different folder than our application that will consume the secrets.
Installing the External Secrets Operator
The next step is to install the External Secrets Operator. To do that, we are going to add an Application to our Git Source. Create a file in your Git Source called external-secrets-operator.yaml and use the following application manifest to install it.
apiVersion: argoproj.io/v1alpha1
kind: Application
metadata:
  name: external-secrets-operator
  finalizers:
    - resources-finalizer.argocd.argoproj.io/foreground
spec:
  project: default
  source:
    repoURL: https://charts.external-secrets.io
    targetRevision: 0.9.11 # make sure to change this to the version you need
    chart: external-secrets
  destination:
    name: in-cluster
    namespace: external-secrets # you can use any namespace
  syncPolicy:
    automated:
      prune: false
      selfHeal: false
      allowEmpty: false
    syncOptions:
      - PrunePropagationPolicy=foreground
      - Replace=false
      - PruneLast=false
      - Validate=true
      - CreateNamespace=true
      - ApplyOutOfSyncOnly=false
      - ServerSideApply=true
      - RespectIgnoreDifferences=false
Once done, save, commit, and push to your Git repository.You should now see the operator when viewing the Codefresh application dashboard.
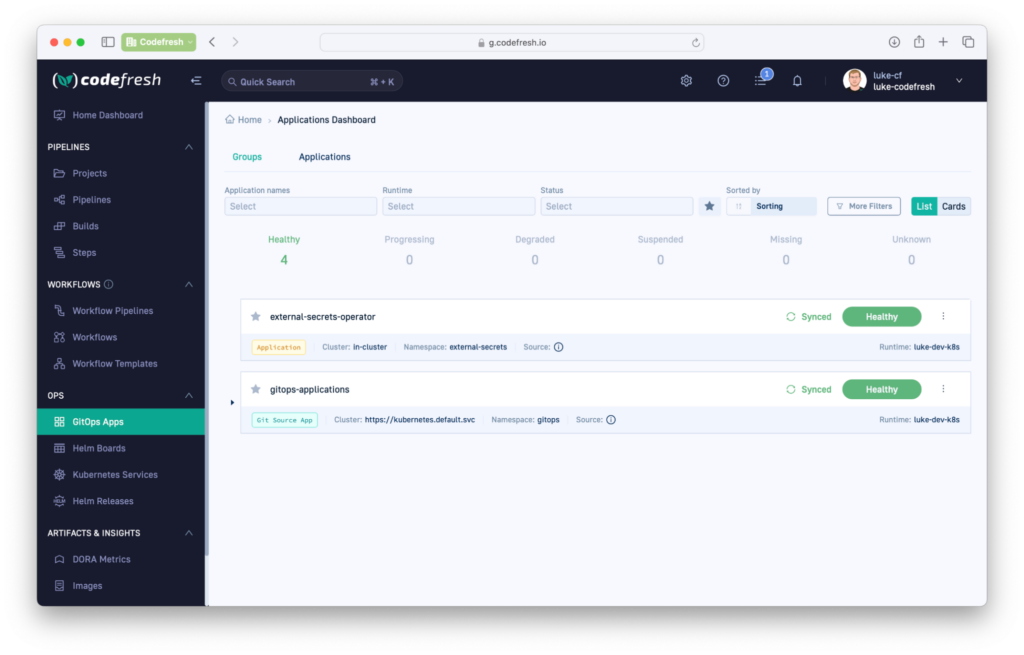
Notice that we treat the operator like any other GitOps application.
Using the External Secrets Operator
Installing the operator is an one-off process. To actually use the External Secret Operator in a GitOps application we need to do the following:
- Define Secrets in AWS secret manager
- Instruct ESO to bring them to our deployment cluster
- Deploy the application that is using the secrets.
Let’s see these steps in order.
Connect ESO with Amazon Secret Manager
ESO supports several sources of secrets, so we must set it up to work specifically with AWS for our use case. First, we need to create an IAM Role for Service Accounts (IRSA) that is going to be used to access the secrets. You will need to create a role based on the EKS Documentation. Below are the minimum permissions needed to access the secrets that start with testing/. You can edit the Resource section that suits your needs.
{
    "Version": "2012-10-17",
    "Statement": [
        {
            "Effect": "Allow",
            "Action": [
                "secretsmanager:GetResourcePolicy",
                "secretsmanager:GetSecretValue",
                "secretsmanager:DescribeSecret",
                "secretsmanager:ListSecretVersionIds"
            ],
            "Resource": [
                "arn:aws:secretsmanager:us-east-1:<ACCOUNT_ID>>:secret:testing/*"
            ]
        }
    ]
}
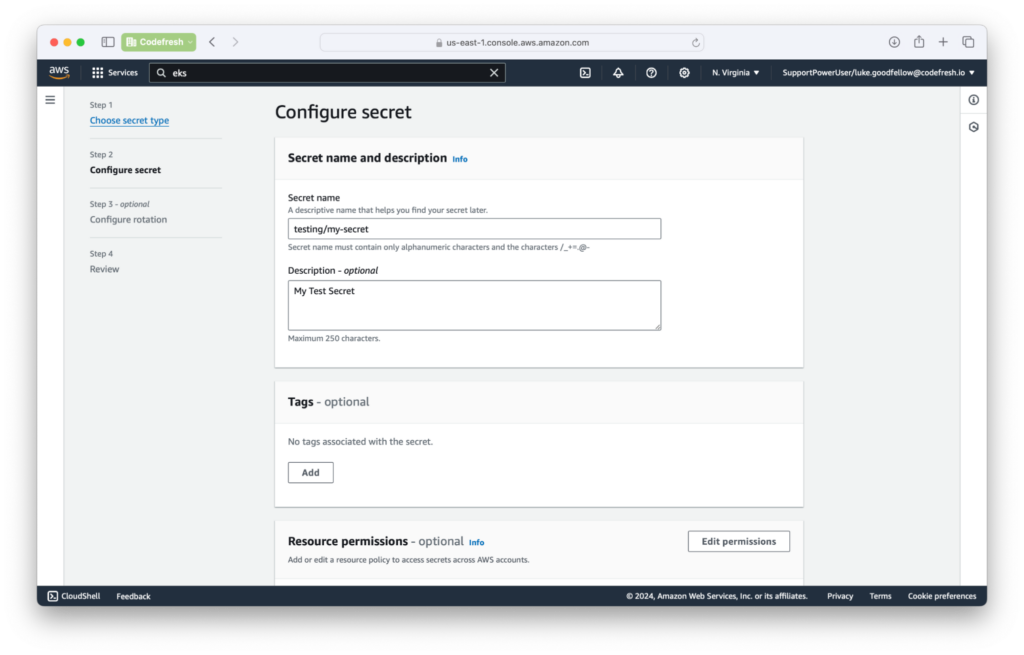
Once the IRSA is created, create a secret in AWS Secrets Manager (region us-east-1 in this example). Use the “Other type of Secret” when creating the secret.
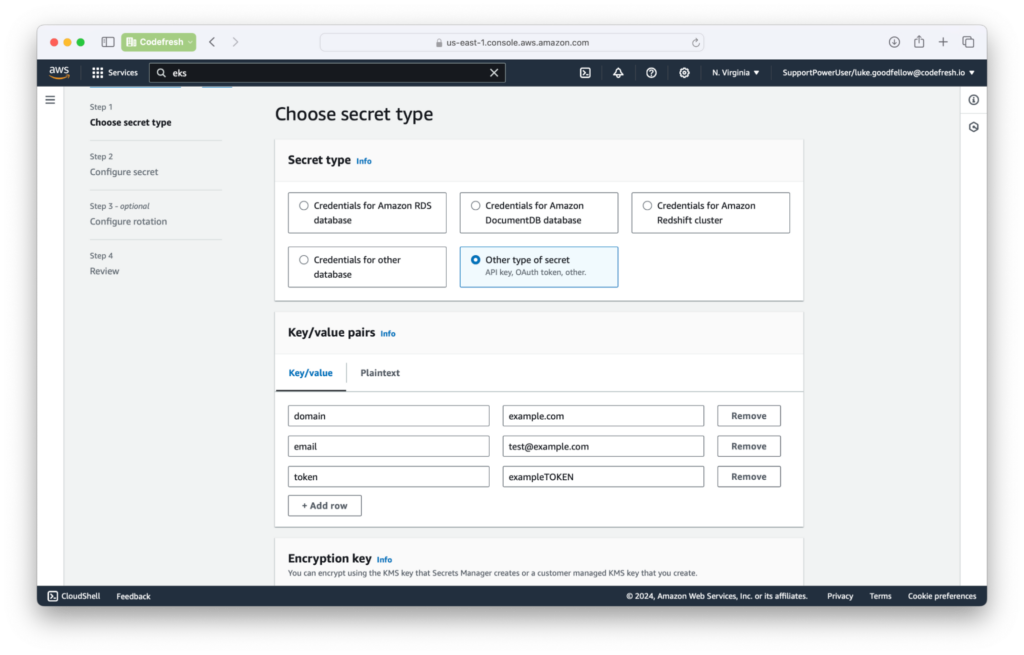
Add the key-value pairs that you want. When naming, use the prefix of testing/ for this example. For the rest of the options, use the defaults.
The secrets are now in AWS and we need to bring them into our deployment cluster.
Adding Secrets to Git Source
Now that we have everything set up on AWS, time to create a Service Account, Secret Store, and External Secret. First, create a Directory in your Git Source Repo that’s outside of the application path for the Git Source.
In this example, our Git Source path is gitops/argocd (for infra) while gitops/test-applications is used for the actual applications.
├── gitops
│   ├── argocd
│   │   └── external-secrets-operator.yaml
│   ├── test-applications
Inside the test-applications directory, create a file called secret-store.yaml. Here we will create a Service Account and a Secret Store Config. The Secret Store will allow us to access the AWS Secrets Manager and use the Service Account to make the API Calls to AWS.
apiVersion: external-secrets.io/v1beta1
kind: SecretStore
metadata:
  name: secretstore-sample # the name you want to call the Secret Store
spec:
  provider:
    aws:
      service: SecretsManager # Specifing AWS Secret Manager
      region: us-east-1
      auth:
        jwt:
          serviceAccountRef:
            name: aws-secret-store # use an SA with IRSA to gain access to the Secrets.
---
apiVersion: v1
kind: ServiceAccount
metadata:
  annotations:
    eks.amazonaws.com/role-arn: arn:aws:iam::<ACCOUNT_ID>:role/<ROLE_NAME> # The Role that you created to have access to Secrets Manager
  name: aws-secret-store
Now create another file called external-secret.yaml in the testing-applications directory. This is how we are going to generate a kubernetes secret. We will define a refresh interval so the secret is up to date in the cluster, how to access the secret via the Secret Store, the name of the secret in AWS Secret Manager, and what to name the k8s secret kind once retrieved.
apiVersion: external-secrets.io/v1beta1
kind: ExternalSecret
metadata:
  name: example-secret
spec:
  refreshInterval: 1h # allows us to update secret. Be aware of API limits for AWS if doing shorter intervals.
 secretStoreRef:
    kind: SecretStore
    name: secretstore-sample # name of the secret store so we can access AWS Secret Manager
  target:
    name: my-secret  # name of the k8s Secret to be created. aka kind: Secert
    creationPolicy: Owner
  dataFrom:
  - extract:
      key: testing/my-secret  # name of the secret from AWS Secret Manager
      conversionStrategy: Default
      decodingStrategy: None
      metadataPolicy: None
We now have integrated our Kubernetes cluster (that runs ESO) with secrets in AWS.
Adding an Application that consumes secrets for AWS
The last piece of the puzzle is to deploy an application that needs those secrets. We are going to add another application under gitops/argocd that will contain our example for fetching the secrets.
Create a file called test-application.yaml with the following values.
apiVersion: argoproj.io/v1alpha1
kind: Application
metadata:
  name: test-application
  finalizers:
    - resources-finalizer.argocd.argoproj.io/foreground
  annotations:
    codefresh.io/app-group: example
spec:
  project: default
  source:
    path: gitops/test-applications
    repoURL: https://github.com/OWNER/REPO.git # replace with your repo URL
    targetRevision: main
  destination:
    name: in-cluster
    namespace: testing
  syncPolicy:
    automated:
      prune: false
      selfHeal: false
      allowEmpty: false
    syncOptions:
      - PrunePropagationPolicy=foreground
      - Replace=false
      - PruneLast=false
      - Validate=true
      - CreateNamespace=true
      - ApplyOutOfSyncOnly=false
      - ServerSideApply=true
      - RespectIgnoreDifferences=false
This application is going to be deployed in the testing namespace. All the items before are name-spaced specific and can be reused in different namespaces. Now save, commit, and push these items to your git repo.
Now you should see the Application in your dashboard. You should see a k8s secret that has all the key-value pairs that you created in AWS Secrets Manager.

You can also run the following command to verify the existence of the secret inside the cluster.
kubectl get secrets -n testing my-secret -o yaml
You should see something similar for your secret.
apiVersion: v1
data:
  domain: EXAMPLEguaW8=
  email: EXAMPLEguaW8=
  token: EXAMPLEguaW8=
immutable: false
kind: Secret
metadata:
  annotations:
    argocd.argoproj.io/tracking-id: test-application:external-secrets.io/ExternalSecret:testing/example-secret
    reconcile.external-secrets.io/data-hash: 77cc2a82549cebdce8da1382d888f919
  creationTimestamp: "2024-02-07T19:36:49Z"
  labels:
    app.kubernetes.io/instance: test-application
    reconcile.external-secrets.io/created-by: 1cef718909ba30c1b96f7026c513b567
  name: my-secret
  namespace: testing
  ownerReferences:
  - apiVersion: external-secrets.io/v1beta1
    blockOwnerDeletion: true
    controller: true
    kind: ExternalSecret
    name: example-secret
    uid: dfb6d035-2e76-419b-b287-b2e98d6cb8af
  resourceVersion: "47288"
  uid: 99ef0789-4d70-486f-b846-9c9ef685612c
type: Opaque
The application should be up and running. The main application manifests are located in Git, but the secrets are dynamically fetched from AWS secret manager.
Conclusion
In this blog post we have seen how to use the AWS secret manager with GitOps applications. We have shown you how to
- Install the External secret operator in your cluster
- Define secrets that will be stored in AWS
- Integrate your Kubernetes cluster with the operator and the stored secrets
- Deploy an example application that consumes the secrets.
The big advantage of course is that the External Secret manifests of the operator do not contain any confidential information. You can safely commit them to git without worrying about sensitive information being exposed.
As an added bonus, your Kubernetes secrets will get automatically generated, and refreshed when the secret changes in AWS Secrets Manager.
If you would like to see an alternative way of using secrets from AWS, we also have a post on using ArgoCD Vault Plugin with the Codefresh GitOps Runtime.