Article Content
What Is Azure DevOps?
Azure DevOps offers software development services that help teams plan tasks, collaborate on developing code, and deploy application releases. Azure DevOps helps foster a culture of cross-team collaboration, supporting processes in which project managers, developers, and other contributors work together to deliver software. This allows organizations to produce and update applications faster than conventional software development methods.
You can use Azure DevOps Services to work in the cloud or Azure DevOps Server to work on-premises.
Creating a Project in Azure DevOps
Create an Azure DevOps project to set up a source code repository to plan and keep track of your development project. Each project can be managed and customized according to specific business needs. Every project you create delineates the boundaries isolating its data from other projects.
Azure DevOps Services lets you have up to 1000 projects within your organization.
To create an Azure DevOps project:
1. Go to Azure DevOps and navigate to Projects.
2. Select your organization, then click on New project.

Image Source: Azure
- Fill out the relevant information on the form and enter a project name.
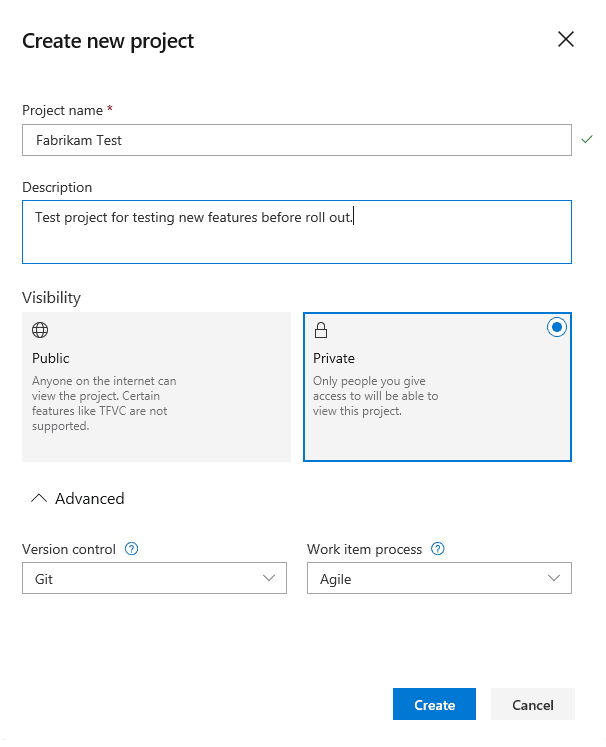
Image Source: Azure
4. Click on Create and it will display the project’s welcome page.
Azure DevOps Code Examples
These examples illustrate the basics of building images and pipelines with Azure DevOps. To go beyond the basics, check out a more advanced tutorial from Microsoft showing how to use Azure DevOps with Kubernetes.
Build a Docker Image
Azure Pipelines can build Linux and Windows container images. It requires active Azure and GitHub accounts. It also requires that the Dockerfile of the image is present in the repository.
Related content: Read our guide to Azure pipelines
To build a Docker Image with Azure DevOps:
- Navigate to your project in the Azure DevOps organization.
- Select New Pipeline after going to the Pipelines option.
- From the options for the location of your source code, choose GitHub, and then choose your repository. Then, sign in and install the Azure Pipelines app if needed.
- After selecting the Starter pipeline option, paste the following code in the
azure-pipeline.ymlfile.trigger: - main pool: vmImage: 'ubuntu-latest' variables: imageName: 'demo-pipelines-docker' steps: - task: Docker@2 displayName: Build the demo image inputs: repository: $(imageName) command: build Dockerfile: app/Dockerfile - Select the Save and run option. Add a commit message when prompted when you add
azure-pipeline.ymland select the Save and run option again.
Customize Pipeline: Adding Code Coverage
The YAML file named azure-pipelines in the repo defines a pipeline in Azure DevOps. This file is located at the root of the repository.
To customize and edit a pipeline in Azure DevOps:
- Select the pipeline that needs customization from the Pipelines page in Azure Pipelines.
- In the context menu, select Edit to open the pipeline’s YAML file in the editor.
- Make the required changes.
- Select the Save options afterward and then confirm changes.
This tutorial uses a demo azure-pipelines.yml with the following code:
trigger:
 - main

 pool:
   vmImage: 'ubuntu-latest'

 steps:
 - task: Maven@3
   inputs:
     mavenPomFile: 'demo-pom.xml'
     mavenOptions: '-Xmx3072m'
     javaHomeOption: 'JDKVersion'
     jdkVersionOption: '1.11'
     jdkArchitectureOption: 'x64'
     publishJUnitResults: true
     testResultsFiles: '**/demo-surefire-reports/TEST-*.xml'
     goals: 'package'
This code specifies a pipeline triggered when a change gets pushed to the main branch or a pull request is created. The pipeline runs on a Linux machine hosted by Microsoft.
The entire pipeline consists of a single step that runs a Maven task. First, it specifies the JDK version and architecture. Then it publishes results from JUnit tests in XML files. Finally, the filename is generated according to the regular expression in testResultsFiles.
Change the Platform to Build On
Azure provides agents hosted by Microsoft that come with tools and SDKs installed for different languages. You can build projects on these agents or self-hosted agents.
Changing to a different platform for the project to build on requires changing the vmImage variable in the YAML. The demo YAML code above has set the latest version of Ubuntu as the platform.
To change the platform to build on Windows:
Change the YAML code in the following way:
pool:
  vmImage: "windows-latest"
Add Pipeline Steps
Steps in the pipeline YAML code can run external scripts. Additionally, it can run pre-packaged scripts called tasks to build, test, deploy, or publish an app. For example, the demo code above runs a Maven task that tests and publishes results.
Publishing the code coverage results can be separated into its task.
To separate the code coverage results into its task:
Paste the following snippet at the end of the YAML code:
- task: DemoPublishCoverageResults@1
  inputs:
    codeCoverageTool: "JaCoCo"
    summaryFileLocation: "$(System.DefaultWorkingDirectory)/**/site/demo-jacoco/jacoco.xml"
    reportDirectory: "$(System.DefaultWorkingDirectory)/**/site/demo-jacoco"
    failIfCoverageEmpty: true
Results from tests and code coverage related to a build are available in the Test and Coverage tabs after you select a build.
Building a Project Across Multiple Platforms
Azure allows you to build your project and test it on multiple platforms. It is specified in the YAML file by using strategy and matrix variables. Other parts of the YAML code can use variable values and proceed accordingly.
In the demo azure-pipelines.yml, remove the pool.vmImage line and paste the following code:
strategy:
  matrix:
    linux:
      imageName: "ubuntu-latest"
    mac:
      imageName: "macOS-latest"
    windows:
      imageName: "windows-latest"
  maxParallel: 3

pool:
  vmImage: $(imageName)
Once saved, the project build can run a maximum of three jobs. It can run them on linux, mac, and windows.
Configure Pipeline Settings
The YAML file doesn’t specify all the settings of a pipeline. Instead, certain configurations, such as the pipeline’s enabled status and the YAML file path are set on the GUI.
To configure the pipeline settings through the GUI:
- Navigate to a pipeline’s details page and choose the More actions option shown with three dots. Next, choose Settings from the dropdown menu.

Image Source: Azure - From the settings pane, you can control the processing of new run requests, automatically link any work items included in a run, and specify the YAML file path.
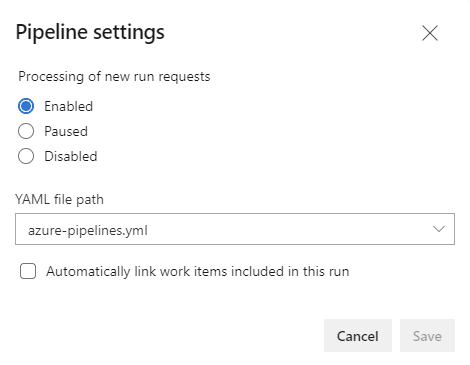
- You can enable, pause, or disable the new runs starting on the pipeline.
- This option is enabled by default to allow all types of triggers.
- When paused, it queues all run requests. Then, the first run in the queue gets processed the next time the option gets enabled.
- When disabled, users cannot start new runs, and triggers are also disabled.
- You can specify the pipeline’s YAML file path if you want to use another file. You also use this option in case you rename the file.
- Selecting the Automatically link work items included in this run option links the work items coming from a pipeline run to the run. Once selected, the option asks you to specify the branch. If you give a certain branch, it only associates work items with runs of that branch. If given *, it associates with all runs.
Run and Update Tests
Azure DevOps supports adding, updating, running, expanding, and collapsing inline tests. You can define and track inline tests on the Kanban board and run the tests too.
To manually run and update tests in Azure DevOps:
- Navigate to the project and select the Boards option in the sidebar on the main page.

Image Source: Azure - Open the menu for a work item on the board to add a test for it. Then, select the Add Test options in the dropdown.

Image Source: Azure - Enter a title for each test you want to add for the work item and press Enter.

Image Source: Azure - Add details for a test case by selecting the title and double-selecting the inline item.

Image Source: Azure - Open the context menu by selecting the title and then the three dots. Then, select Run Test from the dropdown options to run the test.

Image Source: AzureA new browser instance will open that shows the Microsoft Test Runner. - Update the status of the test by going into the context menu and selecting from either:
- Pass test
- Fail test
- Block testImage Source: Azure
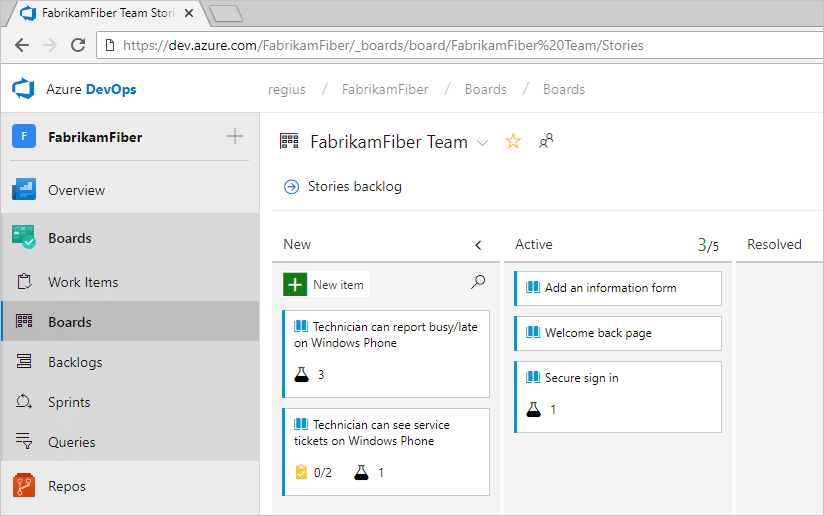

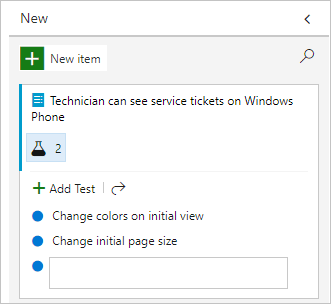

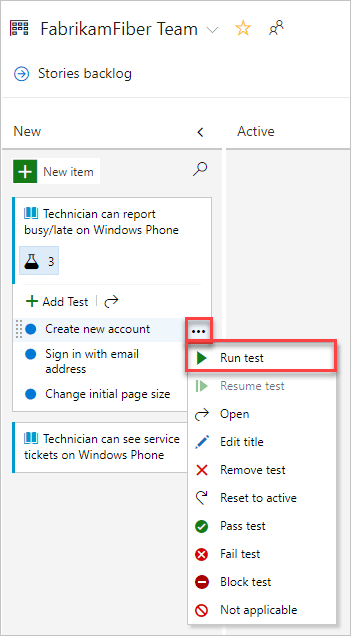
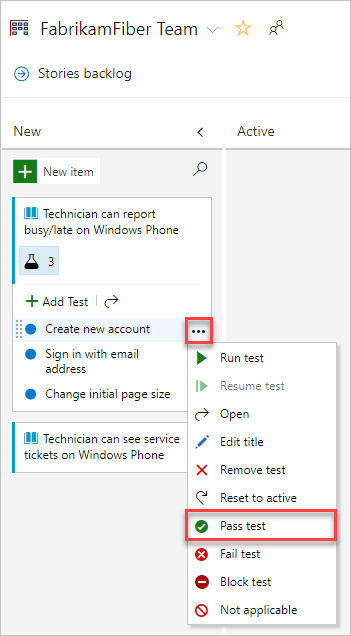 Image Source:
Codefresh: an Azure DevOps Alternative
Azure DevOps is a generic DevOps product that tries to work with both legacy and modern architectures with pipelines as the central tool for building automation. On the one hand this means great compatibility but on the other it means that you only get the lowest common denominator for your organization regardless of your position in the cloud native journey.
Codefresh is a modern alternative to Azure DevOps built specifically for Kubernetes applications and teams that want to adopt the GitOps methodology. While Codefresh does have CI/CD pipelines, they focus on GitOps powered deployment tooling.Codefresh is powered by the Argo family of tools (Argo CD, Argo Rollouts, Argo Events, Argo Workflows) and is specifically designed for organizations that work with containers and cloud applications.
Codefresh makes it easy to follow a GitOps deployment structure and automatically handle deployments and rollbacks for applications across a large scale of clusters. Codefresh lets you answer many important questions within your organization, whether you’re a developer or a product manager. For example:
- What features are deployed right now in any of your environments?
- What features are waiting in Staging?
- What features were deployed last Thursday?
- Where is feature #53.6 in our environment chain?
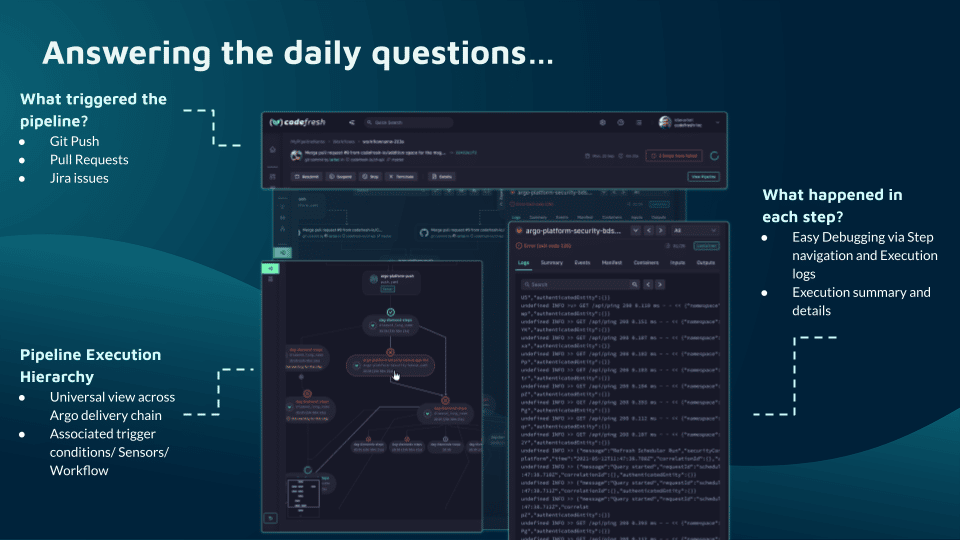
What’s great is that you can answer all of these questions by viewing one single dashboard. Our applications dashboard shows:
Teams that adopt Codefresh deploy more often, with greater confidence, and are able to resolve issues in production much more quickly. This is because we unlock the full potential of Argo to create a single cohesive software supply chain. For users of traditional CI/CD tooling, the fresh approach to software delivery is dramatically easier to adopt, more scalable, and much easier to manage with the unique hybrid model.

The World’s Most Modern CI/CD Platform
A next generation CI/CD platform designed for cloud-native applications, offering dynamic builds, progressive delivery, and much more.
Check It Out