
This article is part of our series “Codefresh in the Wild” which shows how we picked public open-source projects and deployed them to Kubernetes with our own pipelines. The results are public at https://github.com/codefresh-contrib/example-padloc-gitops-deployments
We will use several tools such as GitHub, Docker, Codefresh, Argo CD, Kubernetes. This guide chronicles how we integrated all those tools together in order to build an end-to-end Kubernetes deployment workflow.
About Padloc
This week’s pick is Padloc, a modern, open source password manager for individuals and teams. The official repository already contains Dockerfiles for packaging everything into containers.
We will build a complete process for building and deploying Padloc in two environments (Development and Production). Since we are deploying on Kubernetes we will also need to create the appropriate manifest files and Helm charts.
CI/CD Process Design and Considerations Explained
Here is an overview of the solution that we will create:
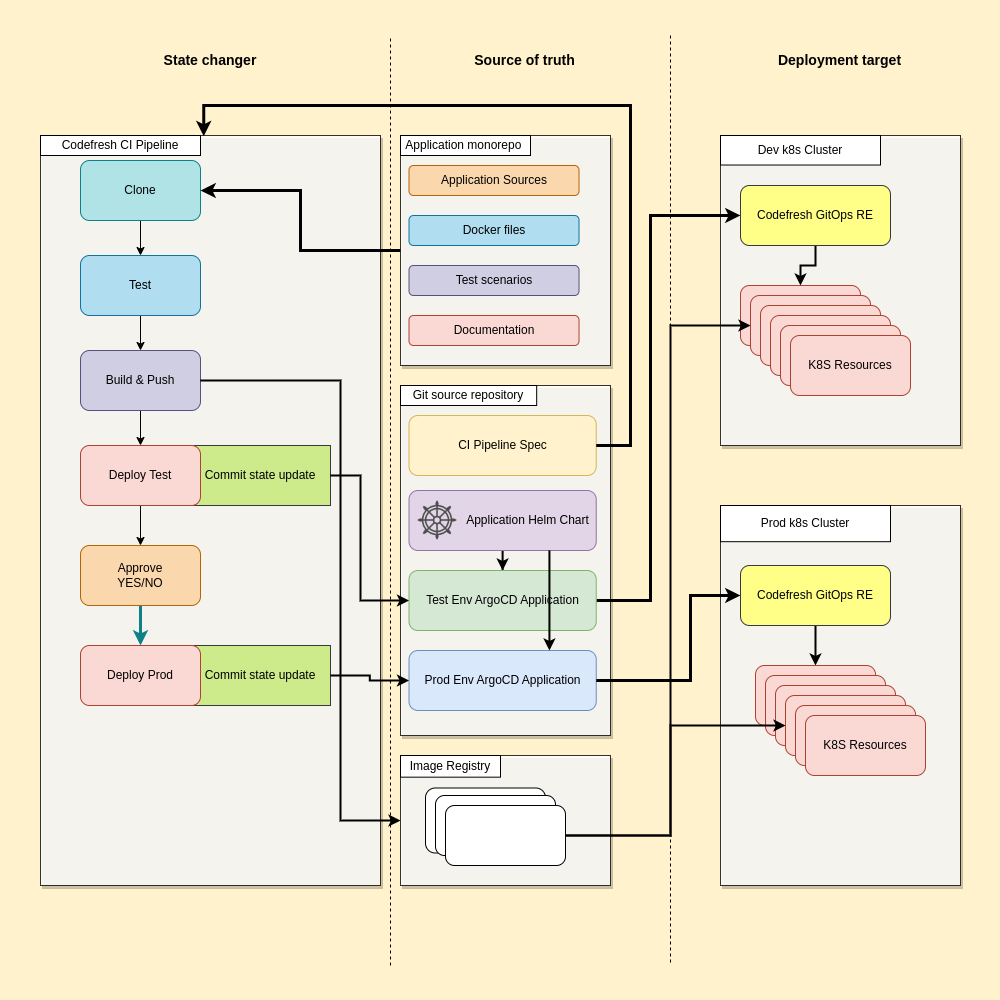
In order to follow best practices, we adopt a solution that separates the repository with application code from the git source repository containing Kubernetes manifests. The latter also includes the Codefresh pipeline (CI) and ArgoCD Application specs (CD) for the Dev and Prod environments, respectively. The Helm chart will also be included in this repository.
This approach allows us to isolate our microservice application code in its own monorepo from the source of truth for deployment, enabling separate control over access and changes. These repositories are shown in the middle column of the diagram above.
The Continuous Integration (CI) pipeline will conduct necessary tests, build the application elements into Docker images, and utilize Codefresh’s visualization component for better evaluation and monitoring across different environments. Once the artifacts are built, we will deliver the application to the Dev environment first and then, upon confirmation, deploy it to the Prod environment. The pipeline is shown on the left column on the diagram above.
Both clusters have an ingress controller and Codefresh GitOps runtime pre-installed. We won’t cover the installation process of hybrid runtimes here as it is well-documented in our corresponding documentation section. The clusters are shown on the right column of the diagram.
Creating the CI Pipeline
Let’s start by building the Continuous Integration (CI) Pipeline as depicted on the left side of the diagram.
The pipeline is triggered by a commit to the git repository, and all relevant information of the commit event is passed to the Pipeline as environment variables. You can see the full source of the pipeline at GitHub.
The pipeline has several stages for better understanding and organization of its steps.
Cloning of source code
The first step, Git Clone, fetches a cloned copy of the application data and makes it available to the subsequent steps.
Parallel Testing
The “test” stage contains several unit/integration tests as well as other checks such as linters. If any of these fails, the pipeline will stop as it doesn’t make sense to deploy broken code. For optimization purposes, we have implemented parallel execution of all tests.
Build and Push
The next step involves building Docker images for the necessary microservices. Once the build is complete, the images are pushed to the Image Registry.
Deploy to Test Environment
This step involves deploying the newly assembled application components to a test cluster. We achieve this by committing to the repository containing our Argo CD application, updating the tags of the Docker images. The Codefresh GitOps Runtime in the relevant cluster picks up the changes, applying the new images to deployments. The final step of this stage includes generating a link to the ingress for easy access and verification.
Here is the full manifest for the Argo CD application in the “dev” environment:
apiVersion: argoproj.io/v1alpha1
kind: Application
metadata:
  name: padloc-dev
  finalizers:
    - resources-finalizer.argocd.argoproj.io/foreground
spec:
  project: default
  source:
    path: ./charts/padloc
    repoURL: https://github.com/alexaladov-codefresh/gitops_deployments.git
    targetRevision: main
    helm:
      parameters:
        - name: ingress.enabled
          value: 'true'
        - name: ingress.host
          value: 'padloc-dev-alexaladov.support.cf-cd.com'
        - name: dataVolume.storageClassName
          value: 'ebs'
        - name: attachmentsVolume.storageClassName
          value: 'ebs'
        - name: pwa.image
          value: alexaladovcodefresh/padloc-pwa:main-1e5f3b5
        - name: server.image
          value: alexaladovcodefresh/padloc-server:main-1e5f3b5
  destination:
    name: in-cluster
    namespace: padloc
  syncPolicy:
    automated:
      prune: false
      selfHeal: true
      allowEmpty: false
    syncOptions:
      - PrunePropagationPolicy=foreground
      - Replace=false
      - PruneLast=false
      - Validate=true
      - CreateNamespace=true
      - ApplyOutOfSyncOnly=false
      - ServerSideApply=true
      - RespectIgnoreDifferences=false
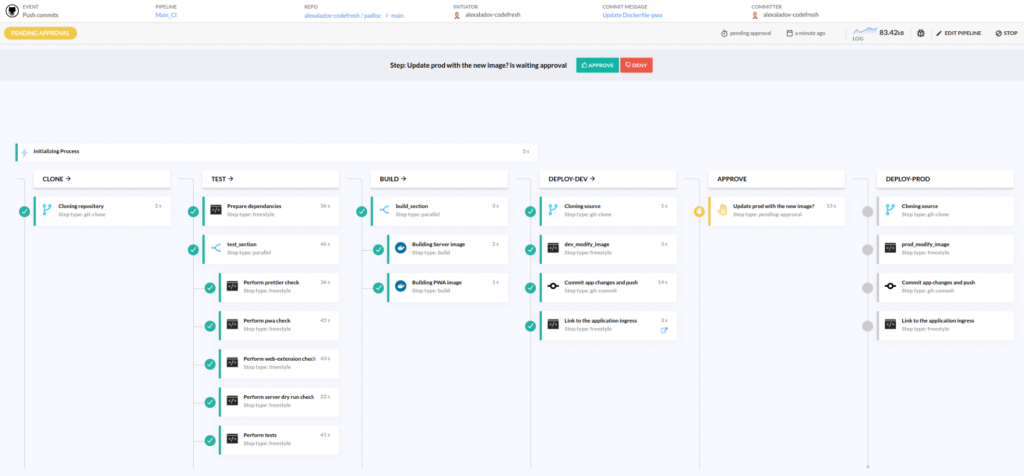
At this point the pipeline pauses. We now include an Approval step requiring manual intervention before deploying to production.
Here is how it looks:

At this point we can also run some tests manually in the “dev” environment to make sure that everything works as intended. After confirming that the application is working correctly, we can click the “approve” button and the pipeline will resume.
Deploy to Production
The final step mirrors the delivery process to the Dev cluster, committing to the Prod Argo CD application stored in the same repository. We are able to leverage the corresponding ingress link right from the build page.
Here is our Argo CD manifest for the “Production” environment:
apiVersion: argoproj.io/v1alpha1
kind: Application
metadata:
  name: padloc-prod
  finalizers:
    - resources-finalizer.argocd.argoproj.io/foreground
spec:
  project: default
  source:
    path: ./charts/padloc
    repoURL: https://github.com/alexaladov-codefresh/gitops_deployments.git
    targetRevision: main
    helm:
      parameters:
        - name: ingress.enabled
          value: 'true'
        - name: ingress.host
          value: 'padloc-prod-alexaladov.support.cf-cd.com'
        - name: dataVolume.storageClassName
          value: 'ebs'
        - name: attachmentsVolume.storageClassName
          value: 'ebs'
        - name: pwa.image
          value: alexaladovcodefresh/padloc-pwa:main-1e5f3b5
        - name: server.image
          value: alexaladovcodefresh/padloc-server:main-1e5f3b5
  destination:
    name: in-cluster
    namespace: padloc
  syncPolicy:
    automated:
      prune: false
      selfHeal: true
      allowEmpty: false
    syncOptions:
      - PrunePropagationPolicy=foreground
      - Replace=false
      - PruneLast=false
      - Validate=true
      - CreateNamespace=true
      - ApplyOutOfSyncOnly=false
      - ServerSideApply=true
      - RespectIgnoreDifferences=false
The main pipeline is now complete. Now every change that happens in the code will automatically be deployed to the “dev” environment and optionally it is deployed to production. We are now practicing Continuous Delivery! How cool is that?
Promoting between GitOps Environments with Codefresh
With the basic functionality out of the way we can look into more advanced promotion scenarios between our two environments. One of the benefits of using a Codefresh runtime instead of vanilla Argo CD is the great visibility we have on what is deployed where.
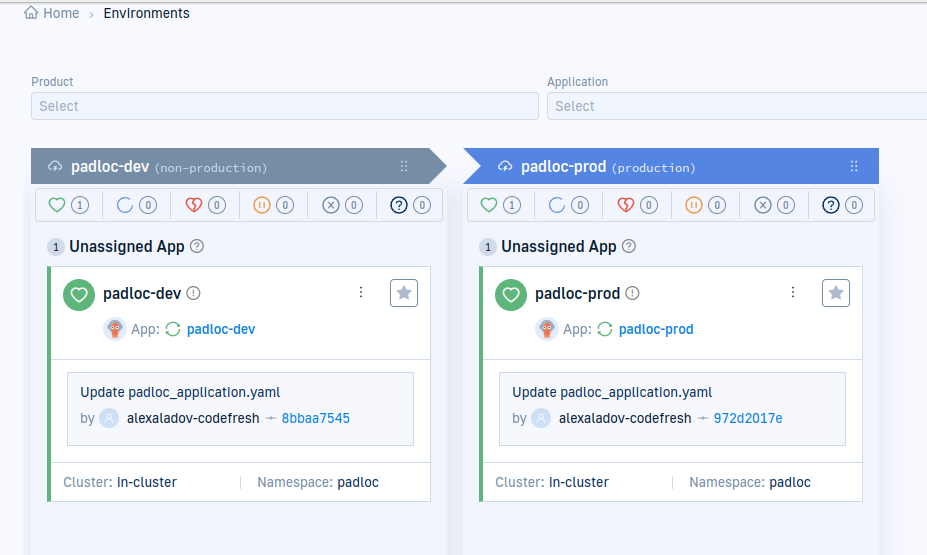
Right now, the underlying Argo CD runtime thinks that these are two different unrelated applications. We know that it is the same application that has two instances on two different environments.
We can therefore create a “Product” for Padloc to make Codefresh understand the relationship between the two deployments:
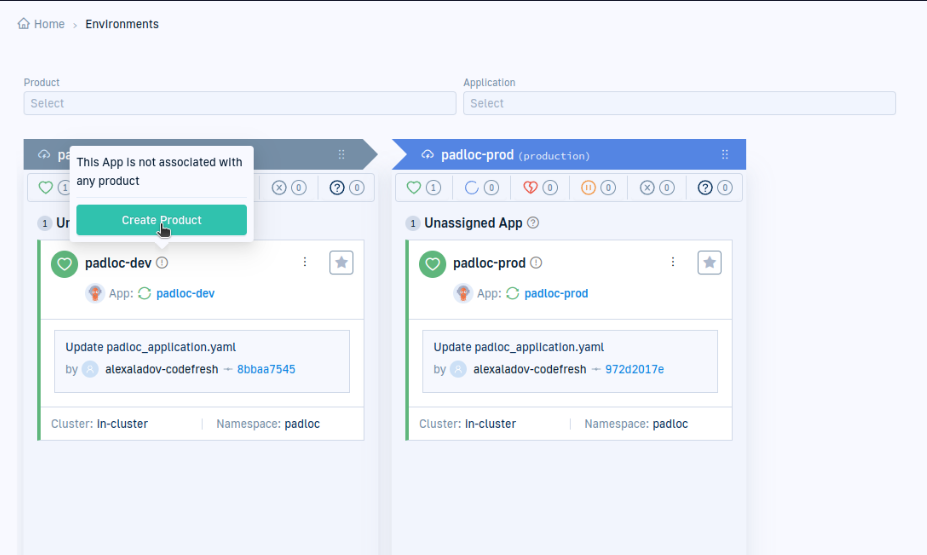
In the case of Argo CD, a product is just an extra annotation. We add this annotation to both Argo CD manifests:
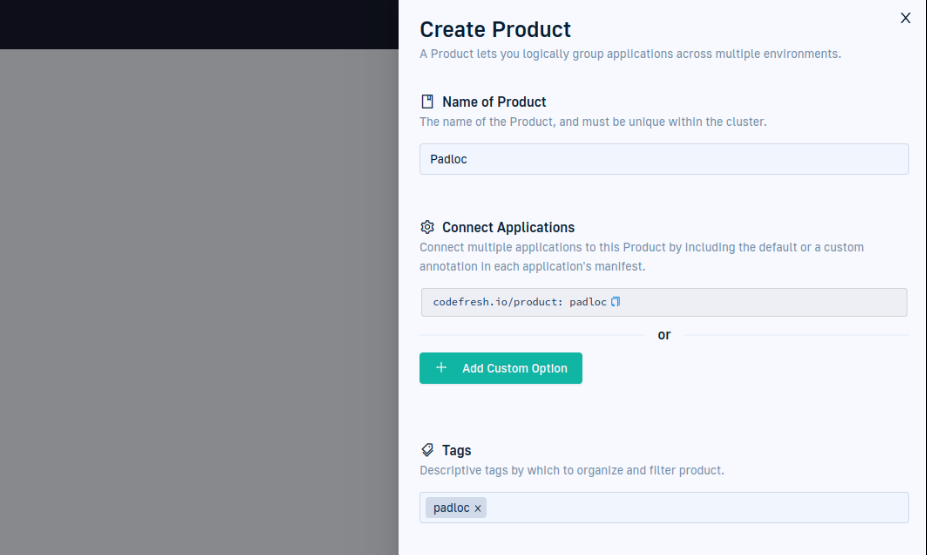
With the product defined, we can now assign our ArgoCD applications to the newly created Product:

Now finally Codefresh knows that this is the same application deployed on two different environments! 🙂
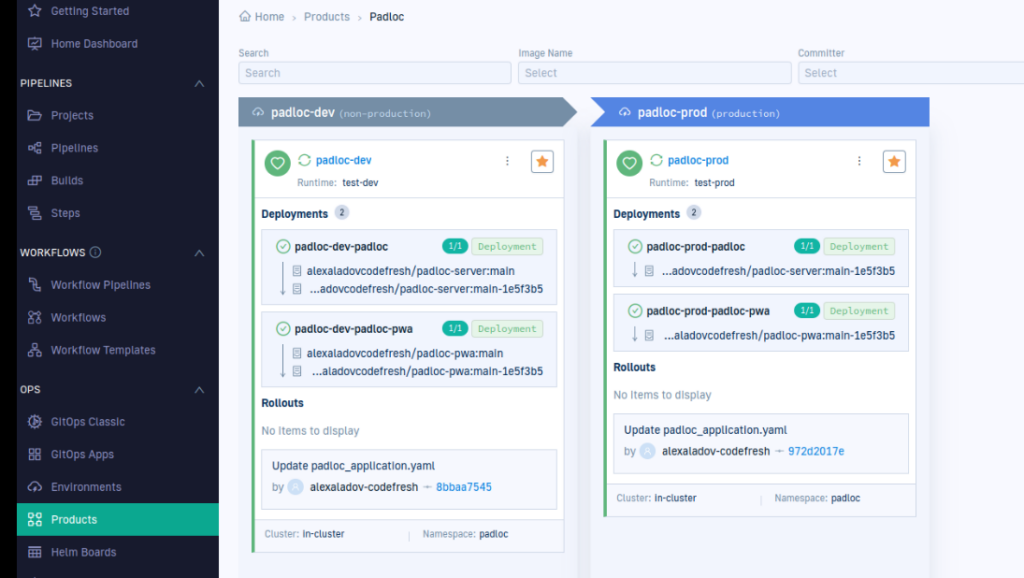
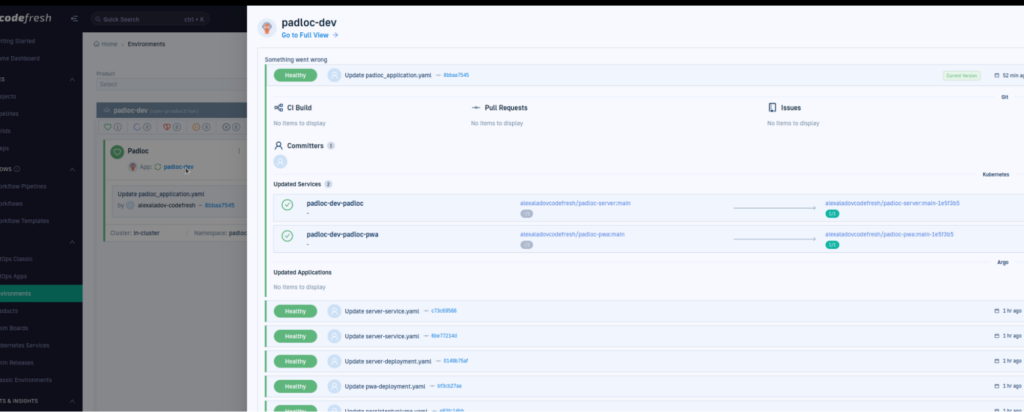
Clicking on a product we can also get all the benefits of the Codefresh platform such as the complete timeline of deployments along with all the extra metadata such as what features or PRs are included in a release.
You can now promote releases between environments with a simple drag and drop action. Your developers will love you 🙂
Summary
In this article we have taken a public open-source application (Padloc) and have created a complete deployment process with Codefresh with the following
- A Helm chart for Kubernetes deployments
- A Continuous Integration pipeline that also runs unit/integration tests and other checks
- Argo CD Application manifests for two environments
- Kubernetes deployment clusters that run the Codefresh runtime
- An end-to-end deployment solution for environment promotions using Codefresh GitOps environments
For more details see our repositories at GitHub.