Article Content
What Is a Kubernetes Deployment?
A Kubernetes deployment is a higher-level abstraction that manages the lifecycle of containerized applications using replica sets and pods. Deployments provide declarative updates for applications, enable automated rollouts and rollbacks, and maintain the desired state for the application.
When an object is created in Kubernetes, the desired state of the object is defined in its configuration file. The Kubernetes control plane is responsible for continuously monitoring the cluster and comparing the actual state with the desired (target) state. If discrepancies are detected, the control plane takes necessary actions to achieve the desired state. This process is called reconciliation.
Below we provide examples showing the following Kubernetes Deployment operations:
- Example 1: Creating a Kubernetes Deployment
- Example 2: Updating the Deployment
- Example 3: Editing Labels or Annotations
- Example 4: Rolling Back the Deployment
- Example 5: Scaling the Deployment
Kubernetes Deployment Examples
Example 1: Creating a Kubernetes Deployment
This example deployment creates a ReplicaSet that brings up four NGINX pods:
apiVersion: apps/v1
kind: Deployment
metadata:
  name: dep-nginx
  labels:
    app: nginx-app
spec:
  replicas: 4
  selector:
    matchLabels:
      app: nginx-app
  template:
    metadata:
      labels:
        app: nginx-app
    spec:
      containers:
      - name: nginx-app
        image: nginx:1.20.2
        ports:
        - containerPort: 80
This script creates a deployment called dep-nginx, specified in the namefield under metadata. Let’s store the above configuration in a file called deploy.yaml. This name can serve as the basis for pods and ReplicaSets created after. The deployment sets up a ReplicaSet with three pod replicas, specified in the replicasfield under spec.

The selectorfield under specdefines how this ReplicaSet identifies the pods it needs to manage. In this example, the label selected is nginx-appas defined in the pod template. It’s possible to set more complex rules for pod selection, but the pod template must satisfy the rules.
You can confirm if the deployment is created using the kubectl get deploymentscommand. This prints out a list of current deployments:

You can also export the running configuration of a specific deployment in YAML format. To do this, use the kubectl get <deployment-name> -o yamlcommand. Replace <deployment-name>with the name of your deployment. In our case, it would be dep-nginx.
You can check the number of deployed pods by using the kubectl get podscommand. This prints out the list of pods for all current deployments:

You can also view full details for the deployment with this command:
kubectl describe deployment <deployment-name>
Example 2: Updating the Deployment
Here is an example showing how to update a deployment:
- Start by updating the NGINX pods so they use the 1.23.4 version of the NGINX image instead of 1.20.2:
kubectl set image deployment.v1.apps/dep-nginx nginx-app=nginx:1.23.4

- Run the following to view the rollout status:
kubectl rollout status deployment/dep-nginx
This should produce an output like:

- Once the rollout is successfully completed, run the
kubectl get deploymentscommand to view the deployment by running. It should produce an output like this:

- Run the
kubectl get rscommand to verify if the deployment has updated the pods and created a ReplicaSet with four replicas, while scaling down the original ReplicaSet to zero replicas. It should produce an output like this:

- Use the
kubectl get podscommand to see the new pods. The old pods should no longer be displayed.
When it is time to update the pods again, it will only be necessary to update the deployment’s pod template.
Example 3: Editing Labels or Annotations
To make changes to labels, annotations, or other fields, you can use the kubectl editcommand. This command will open the deployment’s YAML configuration in your default text editor, allowing you to make changes directly. Here’s an example of how to use it:
kubectl edit deployment dep-nginx
In the editor, you can navigate to the metadata section to add or update labels or annotations. For example, to add a label environment: production, your metadata section might look like this:
metadata:
  labels:
    app: nginx-app
    environment: production
Once you save and close the file, Kubernetes will begin to apply your changes immediately. Please note, the kubectl editcommand should be used with caution, especially in production environments. Always make sure to validate your changes before saving the file.
Example 4: Rolling Back the Deployment
In some cases, it might be necessary to roll back an unstable or faulty deployment – for instance, if there is a crash loop error. Kubernetes stores all the deployment rollout history by default, making it easy to roll back to any point in time.
In this example, let’s assume there was a typo made when updating the deployment. The NGINX image’s name was accidentally entered as 1.234 instead of 1.23.4:
kubectl set image deployment/dep-nginx nginx-app=nginx:1.234

The new deployment will get stuck, which can be verified by viewing the rollout status:
kubectl rollout status deployment/dep-nginx

Check the deployment’s revisions to view the rollout history:
kubectl rollout history deployment/dep-nginx
It should produce an output like this:

The CHANGE-CAUSEelement is copied to the revisions from the deployment’s annotation in kubernetes.io/change-causewhen they are created.
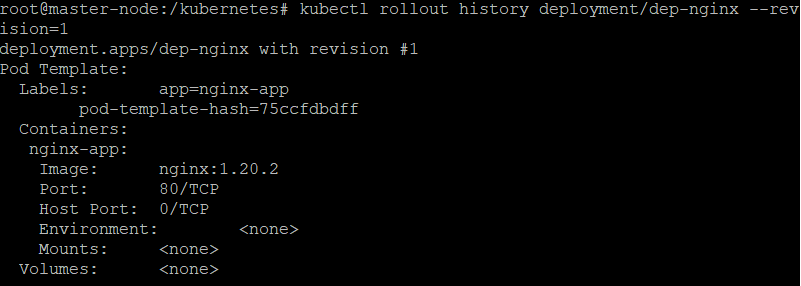
Run this command to see each revision’s details:
kubectl rollout history deployment/dep-nginx --revision=1
Rolling back to an older version
Here are the steps involved in rolling back a deployment to a previous revision—in this case, version 1:
- Run this command:
kubectl rollout undo deployment/dep-nginx

The deployment should now be rolled back to the previous stable revision. The deployment controller should generate a DeploymentRollbackevent.
- Verify that the rollback is successful and the deployment is running normally with the following command:
kubectl get deployment dep-nginx

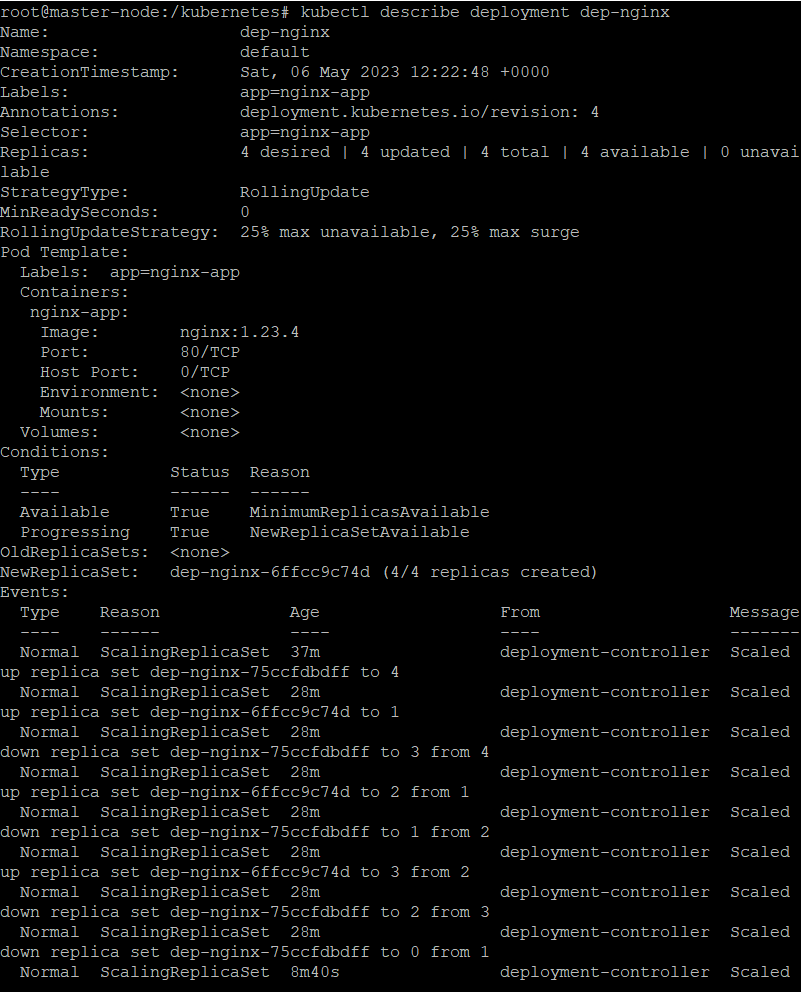
- View the deployment’s description with the following:
kubectl describe deployment dep-nginx
Example 5: Scaling the Deployment
<
Use the kubectl scale deploymentcommand to adjust the deployment’s size – in this case, from 4 replicas to 12. For example:
kubectl scale deployment/dep-nginx --replicas=12

You can run kubectl get rsto check if replicas has been scaled:

If horizontal pod autoscaling (HPA) is enabled on the cluster, it is possible to configure an autoscaler for the deployment and specify the minimum and maximum number of pods that can be run on the deployment. The scaling should be based on the existing pods’ CPU utilization. For example:
kubectl autoscale deployment/dep-nginx --min=8 --max=16 --cpu-percent=80
The output should look like this:

Kubernetes Deployment with Codefresh
Codefresh lets you answer many important questions within your organization, whether you’re a developer or a product manager. For example:
- What features are deployed right now in any of your environments?
- What features are waiting in Staging?
- What features were deployed last Thursday?
- Where is feature #53.6 in our environment chain?
What’s great is that you can answer all of these questions by viewing one single dashboard. Our applications dashboard shows:
- Services affected by each deployment
- The current state of Kubernetes components
- Deployment history and log of who deployed what and when and the pull request or Jira ticket associated with each deployment
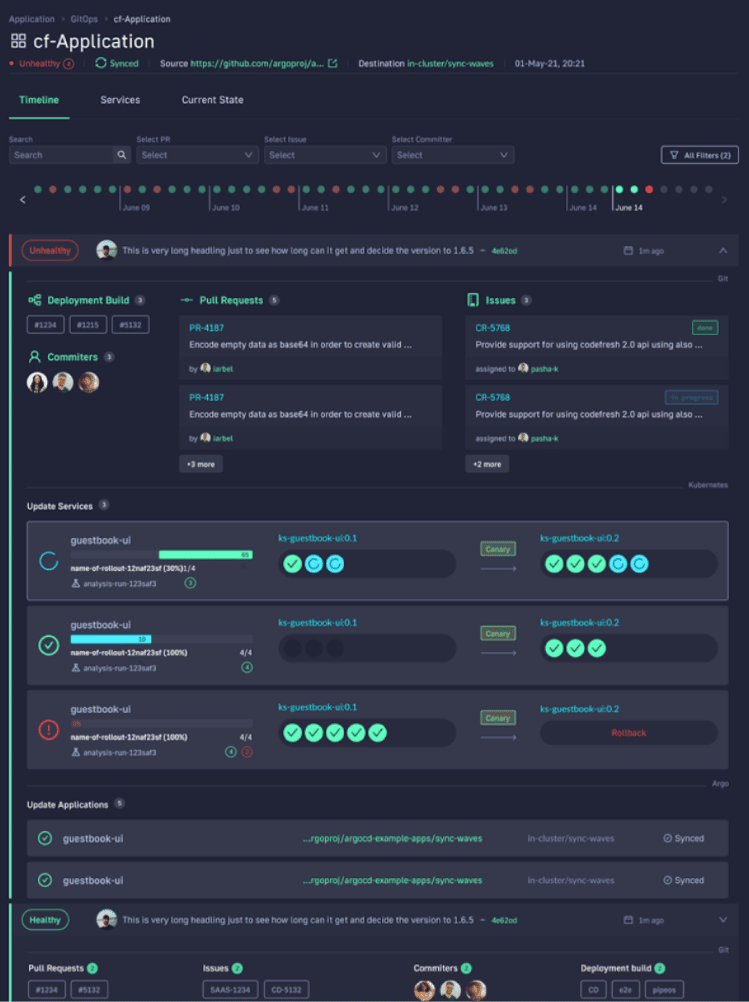
This allows not only your developers to view and better understand your deployments, but it also allows the business to answer important questions within an organization. For example, if you are a product manager, you can view when a new feature is deployed or not and who was it deployed by.

The World’s Most Modern CI/CD Platform
A next generation CI/CD platform designed for cloud-native applications, offering dynamic builds, progressive delivery, and much more.
Check It Out