Article Content
GitLab is an open source code repository and continuous integration / continuous delivery (CI/CD) platform. There are two basic requirements to use GitLab CI/CD: application code hosted in a Git repository, and a file called .gitlab-ci.yml in the root of the repository, which specifies the GitLab configuration.
The .gitlab-ci.yml file defines scripts that should be run during the CI/CD pipeline and their scheduling, additional configuration files and templates, dependencies, caches, commands GitLab should run sequentially or in parallel, and instructions on where the application should be deployed to.
GitLab makes it possible to group scripts into jobs that run as part of a larger pipeline, and run them in a specific order. This can be defined within the .gitlab-ci.yml file. When you add the file to your repository, GitLab detects it and an application called GitLab Runner runs the scripts defined in the jobs within it.
This is part of a series of articles about GitLab CI.
Editing the .gitlab-ci.yml file with Pipeline Editor
The main way of editing a CI/CD configuration in GitLab is through its provided editor. The editor modifies the .gitlab-ci.yml in the repository’s root directory, and can be accessed via the CI/CD > Editors menu.
You can do the following through the Pipeline Editor page:
- Select the branch to work on
- Check syntax validity and correctness while working on the file
- View any CI/CD configurations that got added through the include keyword
- Commit any changes to a particular branch
- View the full configuration
- Commit any changes to a particular branch
You can validate the pipeline’s configuration against the GitLab CI/CD pipeline’s architecture through the pipeline editor. The validation can happen while you edit it. First, the feature checks YAML configuration syntax and performs fundamental logic validation. Then, the results are displayed at the top of the editor page.
The editor also has a lint tool to check the CI/CD configuration’s validity. Users can access it by going to CI/CD, Editor, and then the Lint tab, as shown below. It checks for syntax and logical errors and has deeper checking functionality than the editor. Changes to the configuration and results from the CI Lint tool are updated in real-time.
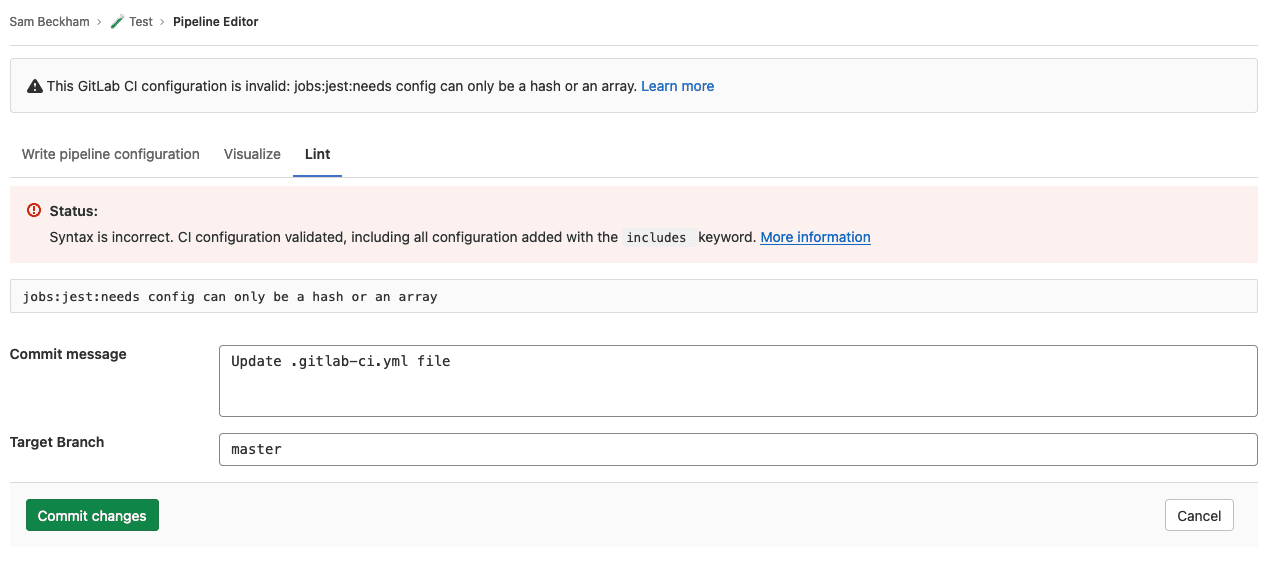
Image Source: GitLab
.gitlab-ci.yml File Example
Here is what a .gitlab-ci.yml file might have inside it:
stages:
  - build
  - test

demo-job-build-code:
  stage: build
  script:
    - echo "Running demo for checking Ruby version and executing Ruby files"
    - ruby -v
    - rake

demo-test-code-job-first:
  stage: test
  script:
    - echo “If the demo files got built properly, test the build through test files
    - rake test1

demo-test-code-job-second:
  stage: test
  script:
    - echo “If the demo built went through, test it with some more test files”
    - rake test2
Here, demo-job-build-code runs first since it has a build stage, and the order is specified in stages. The job outputs the version of Ruby it is running and builds project files. Once it completes, the next two jobs with testas their stage run in parallel and run tests on the file.
The entire pipeline consists of three jobs categorized into two stages specified at the start,buildand test. This pipeline gets triggered every time a change gets pushed to a branch associated with the project.
Optimizing GitLab CI/CD YAML Files
Here are a few techniques that can help you optimize GitLab YAML configurations.
Using YAML Anchors
Anchors in YAML are useful for duplicating content at different parts of the document. They are also useful for merging YAML arrays. For example, the following YAML code creates two jobs. Both inherit the same configuration and have their separately defined scripts:
.demo_job_template: &demo_job_config
  image: ruby:2.6
  services:
    - postgres
    - redis

demoTest1:
  <<: *demo_job_config
  script:
    - demoTest1 project

demoTest2:
  <<: *demo_job_config
  script:
    - demoTest2 project
Here, the <<part specifies the anchors, and the part with the demo_job_configalias specified above gets inserted. Anchors are also handy in defining and easily inserting different sets of services:
.demo_job_template: &demo_job_config
  script:
    - test project
  tags:
    - dev

.demo_postgres_services:
  services: &demo_postgres_config
    - postgres
    - ruby

.demo_mysql_services:
  services: &demo_mysql_configuration
    - mysql
    - ruby

demoTtest:postgres:
  <<: *demo_job_config
  services: *demo_postgres_config
  tags:
    - postgres

demoTest:mysql:
  <<: *demo_job_config
  services: *demo_mysql_config
Reusing Configuration Using extends
The extends keyword works similarly to anchors but is simpler to use. It supports multi-level inheritance but using it for more than three levels should be avoided. For example, here there are two levels of inheritance:
.tests:
  rules:
    - if: $CI_PIPELINE_SOURCE == "push"

.rspec:
  extends: .tests
  script: rake rspec

demo_rspec 1:
  variables:
    DEMO_RSPEC_SUITE: '1'
  extends: .rspec

demo_rspec 2:
  variables:
    DEMO_RSPEC_SUITE: '2'
  extends: .rspec

spinach:
  extends: .tests
  script: rake spinach
It also comes in handy when reusing YAML code from other scripts. For example, the demo_file1.yml file has a script. For example, the following script in the .gitlab-ci.yml file refers to the contents in demo_file1.yml uses extends:
In demo_file1.yml:
.demoTemplate:
  script:
    - echo This is a demo!

In .gitlab-ci.yml:

include: demo_file1.yml

demoTemplateUsed:
  image: demoImage
  extends: .demoTemplate
Using !referenceTags
The !referenceYAML tag is useful for reusing selected keyword configuration, which can come from other job sections. !reference tags also allow for reusing configuration from files that are included. For example, here is how to use !reference tags to reuse scripts from two different locations while creating a job
In the demoSetup.yml file:
.demoSetup:
  demoScript:
    - echo environment is now created
In the .gitlab-ci.yml file:
include:
  - local: demoSetup.yml

.demoTeardown:
  demoScript2:
    - echo environment is now deleted

demoTest:
  demoScript:
    - !reference [.demoSetup, demoScript]
    - echo running earlier command
  demoScript2:
    - !reference [.demoTeardown, demoScript2]
Combine GitLab with Codefresh to Support GitOps and Kubernetes Deployments
GitLab is a very powerful platform but it is focused mostly on CI and does not support GitOps and native Kubernetes deployments. Codefresh is created specifically for GitOps and Cloud native applications and includes native support for using GitLab as a Git provider.
This means that you can get the best of both worlds by keeping all your CI workflows in GitLab, while using Codefresh for advanced features such as:
- Application dashboards
- Git source managements
- Configuration drift management
- Kubernetes environment dashboards
- Topology views
In case you are new to Codefresh – we have made it our mission since 2014 to help teams accelerate their pace of innovation. Codefresh recently released a completely rebuilt GitOps CI/CD toolset. Powered by Argo, Codefresh now combines the best of open source with an enterprise-grade runtime allowing you to fully tap the power of Argo Workflows, Events, CD, and Rollouts. It provides teams with a unified GitOps experience to build, test, deploy, and scale their applications.

The World’s Most Modern CI/CD Platform
A next generation CI/CD platform designed for cloud-native applications, offering dynamic builds, progressive delivery, and much more.
Check It Out