What Is AWS CodeBuild?
AWS CodeBuild is a fully managed continuous integration service that compiles source code, runs tests, and produces software packages ready for deployment. Unlike traditional build servers, CodeBuild scales automatically and processes multiple builds concurrently, eliminating the need to manage, patch, or scale your own build servers. This results in faster builds and streamlined operations, particularly beneficial for agile and fast-paced enterprise environments.
Developers can integrate CodeBuild with other AWS services like S3, EC2, and Amazon RDS, enhancing its functionality and extending its reach. The service supports several programming languages and various build environments, providing flexibility for a wide range of software project requirements.
This is part of a series of articles about DevOps tools.
Key Features of AWS CodeBuild
Here are some of CodeBuild’s main features.
Code Building and Testing
AWS CodeBuild runs builds within preconfigured environments that include necessary runtimes and tools like Maven, npm, or Gradle. Users specify the source code location and select build commands. CodeBuild compiles, tests, and stores the output in Amazon S3, or another specified location. Developers can initiate builds via the console, AWS CLI, SDKs, or CodePipeline, making it flexible for various workflows.
Configurable Settings
You can define custom build steps using a YAML build specification file. This allows developers to set commands for each phase of the build process, such as running tests or installing dependencies. CodeBuild also provides different compute options to tailor CPU and memory requirements to project needs, ensuring builds run efficiently.
Continuous Integration and Delivery Workflows
AWS CodeBuild integrates into continuous integration (CI) and delivery (CD) pipelines. It can be connected to AWS CodePipeline or third-party services like GitHub and Bitbucket to automatically trigger builds when code is committed. The pay-as-you-go model encourages frequent code integration, helping developers detect issues early in the process and reducing deployment risks.
Security and Permissions
CodeBuild secures artifacts using encryption keys managed by AWS Key Management Service (KMS). Access control is managed through AWS Identity and Access Management (IAM), which allows setting detailed permissions on who can initiate builds or access build data, enhancing security across your CI/CD pipeline.
How CodeBuild Works
AWS CodeBuild operates by utilizing a structured approach to compile source code, run tests, and produce software packages. Here’s a brief overview of how it works:
- Build project setup: The process begins with the creation of a build project. This project contains critical information such as the source code location, the build environment configuration, build commands, and storage locations for the build output. The build environment includes the operating system, programming language runtime, and various tools required to execute the build.
- Source code download: Once the build project is defined, CodeBuild initiates the build by downloading the source code into the designated build environment. The source code location can be specified in the build project.
- Buildspec execution: CodeBuild then refers to the build specification file, known as buildspec. The buildspec is written in YAML format and includes a series of build commands and settings that guide CodeBuild on how to execute the build. This file can either be defined within the build project or embedded directly in the source code repository.
- Build process: During the build process, the build environment compiles the source code according to the instructions provided in the buildspec. This includes running tests and any other specified build tasks.
- Output storage: After the build process, any generated build output is uploaded to an Amazon S3 bucket. This ensures that the output artifacts are securely stored and accessible for deployment or further processing.
- Notifications and logging: CodeBuild can also perform additional tasks as defined in the buildspec, such as sending build notifications to an Amazon SNS topic. Throughout the build process, detailed logs are sent to Amazon CloudWatch Logs, enabling real-time monitoring and troubleshooting.
- Build information access: While the build is running, users can access summarized build information via the AWS CodeBuild console, AWS CLI, or AWS SDKs. Detailed logs and more granular information are available through Amazon CloudWatch Logs. If the build is part of an AWS CodePipeline workflow, limited build information can also be accessed through CodePipeline.
AWS CodeBuild Pricing
AWS CodeBuild employs a pay-as-you-go pricing model with no upfront costs or minimum fees. This means you are only charged for the resources you use, calculated based on the duration of your build and the type of compute instance selected. Please note that AWS pricing is subject to change, for the latest information consult the official pricing page.
Free Tier
AWS CodeBuild offers a free tier that includes 100 build minutes per month using the general1.small or arm1.small instance types for on-demand EC2, and 6,000 build seconds per month using the lambda.arm.1GB or lambda.x86-64.1GB compute types for on-demand Lambda.
The free tier is available to both new and existing AWS customers and does not expire at the end of the 12-month AWS Free Tier term. Note that the free tier is not available for reserved capacity EC2 instances.
On-Demand EC2 Pricing
On-demand EC2 instances offer the most flexibility, supporting the most use cases. Pricing is calculated per minute from the start to the termination of your build, rounded up to the nearest minute. Different compute instance types come with varying amounts of memory and CPU, and their charges differ accordingly. For example:
- general1.small: 3 GB memory, 2 vCPU, $0.005 per build minute (Linux only)
- general1.medium: 7 GB memory, 4 vCPU, 0.01 per build minute (Linux), $0.018 per build minute (Windows)
- general1.large: 15 GB memory, 8 vCPU, 0.02 per build minute (Linux), $0.036 per build minute (Windows)
Reserved Capacity EC2 Pricing
A reserved capacity fleet can be used for multiple CodeBuild projects. In order to enable sharing of these instances, AWS makes cached data available to other projects in the same account. Reserved capacity pricing is calculated per minute from the start to the termination of your instance, rounded up to the nearest minute, with a minimum charge of 60 minutes per instance:
- reserved.x86-64.g1.small: 3 GB memory, 2 vCPU, $0.003 per instance minute (Linux only)
- reserved.x86-64.g1.medium: 7 GB memory, 4 vCPU, 0.006 per instance minute (Linux), 0.0108 per instance minute (Windows)
- reserved.x86-64.g1.large: 15 GB memory, 8 vCPU, 0.012 per instance minute (Linux), 0.0216 per instance minute (Windows)
On-Demand Lambda Pricing
AWS Lambda can accelerate the build process by reducing latency upon startup. It enables automatic scaling to prevent builds from having to wait in a queue. It’s important to note that AWS Lambda doesn’t support all use cases. Lambda pricing is calculated per second from the start to the termination of your build, rounded up to the nearest second. Charges differ based on the memory allocated to the build:
- lambda.arm.10GB: 10 GB memory, $0.0001 per build second
- lambda.x86-64.10GB: 10 GB memory, $0.0002 per build second
- lambda.arm.4GB: 4 GB memory, $0.00004 per build second

TIPS FROM THE EXPERT
In my experience, here are tips that can help you better use AWS CodeBuild:
- Optimize buildspec.yml for caching: Use the cache section in your buildspec.yml file to define paths for dependencies or build outputs that can be reused in future builds. This reduces build time significantly by avoiding redundant work.
- Implement parallel builds for microservices: If you’re building a microservices architecture, configure CodeBuild to run parallel builds for each microservice. This speeds up the overall CI process and reduces bottlenecks.
- Integrate with AWS Secrets Manager: Store and manage sensitive information like API keys and database credentials in AWS Secrets Manager. Integrate these secrets with CodeBuild to securely use them during builds.
- Monitor builds with CloudWatch Alarms: Set up CloudWatch Alarms to monitor build statuses and performance metrics. This helps in proactively identifying and addressing issues, ensuring builds remain healthy.
- Employ build badges: Utilize build badges to visually display the build status on your GitHub or Bitbucket repository. This provides immediate feedback to developers about the health of the codebase.
Quick Tutorial: 8 Steps to Get Started with AWS CodeBuild
To get started with AWS CodeBuild, follow these steps:
Step 1: Create the Source Code
Begin by creating your source code in your preferred programming language. This could be a new project or an existing one. Ensure the code is stored in a version control system like GitHub, Bitbucket, or AWS CodeCommit.
After creating the source code, verify its integrity and functionality. Conduct preliminary tests to ensure that the code is free from errors and performs as expected. This step helps identify any issues prior to initiating the build process, thus ensuring smoother execution down the line.
Step 2: Create the buildspec File
Next, create a buildspec.yml file. This file contains the build commands and settings necessary for the build process. Structure the buildspec.yml file with four main sections: install, pre-build, build, and post-build. Each section should clearly define the commands needed to set up dependencies, compile the code, run tests, and handle post-build tasks such as packaging and artifact storage:
version: 0.2

#This file shows how to package a Python Flask application.

phases:
  install:
    commands:
      - echo Installing dependencies...
      - pip install -r requirements.txt  # Install dependencies listed in requirements.txt

  pre_build:
    commands:
      - echo Running tests...
      - pytest --junitxml=report.xml  # Run pytest and generate a report in XML format

  build:
    commands:
      - echo Zipping up the application...
      - zip -r app.zip .  # Zip the entire project directory

  post_build:
    commands:
      - echo Build completed. Checking if an artifact has been uploaded to S3...
      - aws s3 ls s3://<OUTPUT-Directory-Name>/artifacts/app.zip || echo "Artifact not found in S3."  # Verify the artifact upload
      - echo All build steps are complete.

artifacts:
  files:
    - app.zip  # Include the zipped code as an artifact
    - report.xml  # Include the test report as an artifact
  discard-paths: yes  # Flatten the directory structure in S3
  base-directory: .  # Root directory for artifacts
Ensure that the buildspec.yml file is included in the root directory of your source code repository. This placement is crucial as AWS CodeBuild must locate the file to execute the build instructions. Properly formatted and thoroughly reviewed buildspec.yml files streamline the build process and minimize the risk of errors during execution.
See the buildspec reference for examples and parameters used in the buildspec file.
Step 3: Create Two S3 Buckets
Create two S3 buckets in AWS. The first bucket will store the input artifacts (e.g., source code and buildspec.yml), while the second will store the output artifacts (e.g., compiled binaries, logs). These buckets act as storage endpoints for build inputs and outputs, ensuring that CodeBuild has the necessary files to execute and complete the build process.
Name the S3 buckets uniquely to avoid conflicts and comply with naming conventions. Set appropriate permissions to ensure that CodeBuild can access the buckets without issues. Additionally, applying lifecycle policies helps manage storage costs by automatically archiving or deleting objects after a specified period.
Refer to Amazon S3 documentation to learn how to create buckets.
Step 4: Upload the Source Code and buildspec File to S3
Upload your source code and buildspec.yml file to the first S3 bucket created. This step allows AWS CodeBuild to fetch these files during the build process. Organize the uploaded files neatly within the bucket to maintain clarity and ease of access.
Verify the upload to ensure all necessary files are present. Any missing or incorrectly placed files can lead to build failures, so double-check for completeness. With the files correctly uploaded, you can proceed to set up the build project in AWS CodeBuild.
Step 5: Create the Build Project
Create a new build project in the AWS CodeBuild console. Select Create build project and navigate to Build, then Build projects, and click on Create build project. Under Project configuration, specify the name of your project, the source repository type, and the location of the source code in the S3 bucket. Also, define the environment settings such as runtime, image version, and compute type.
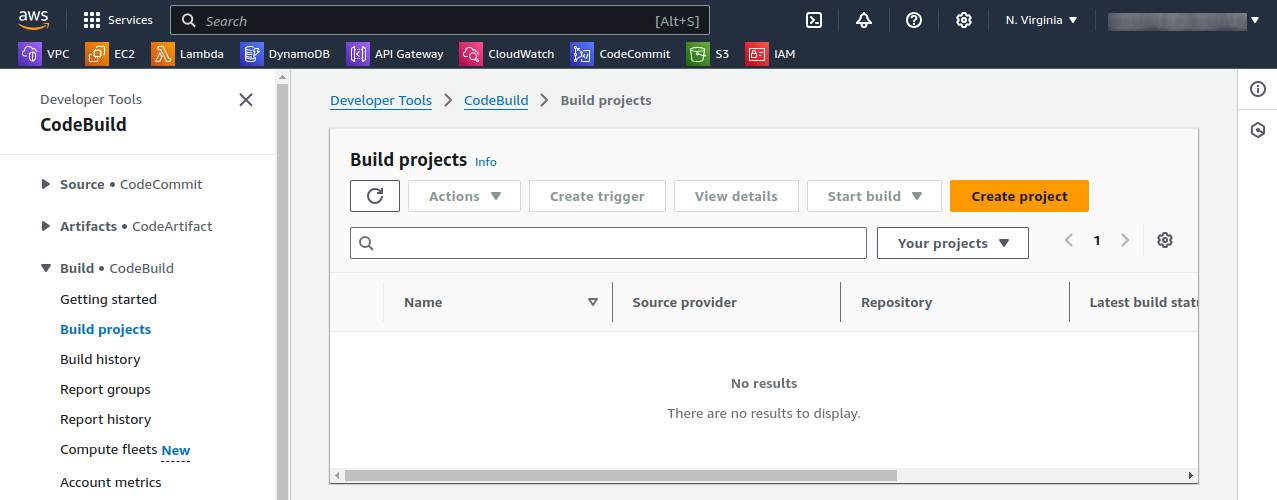
Click ‘Create Project’ yellow button in the above screenshot and you will be redirected to the following screen:
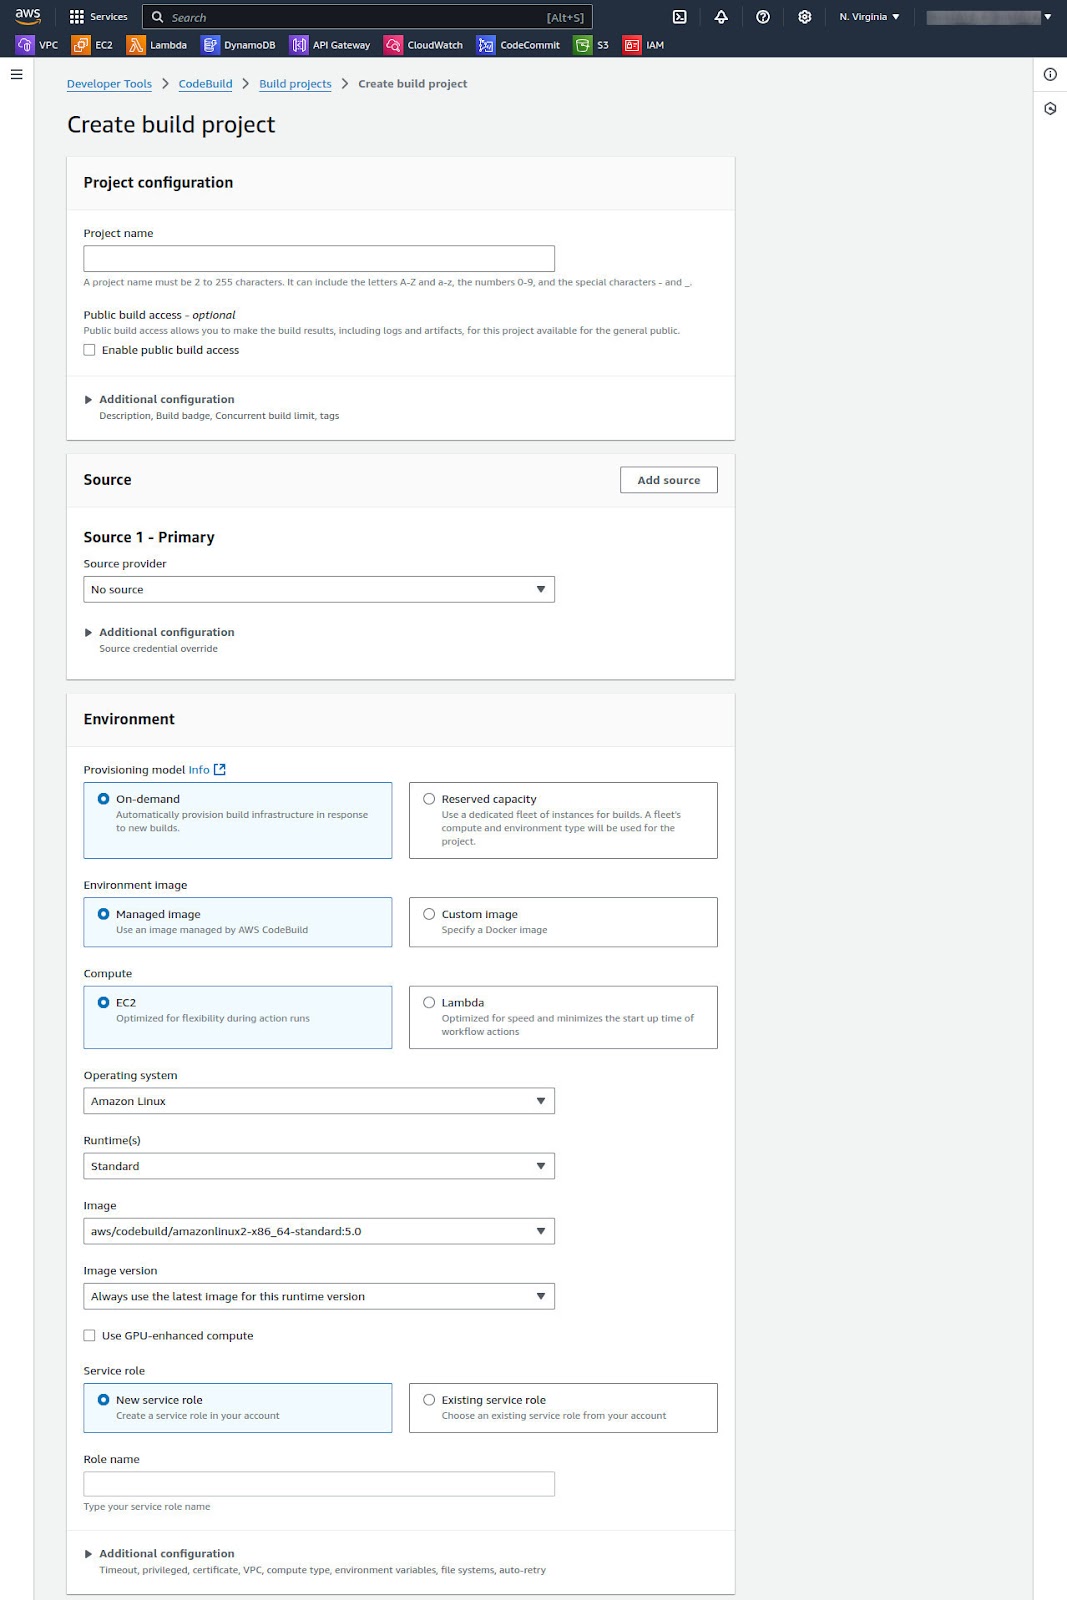
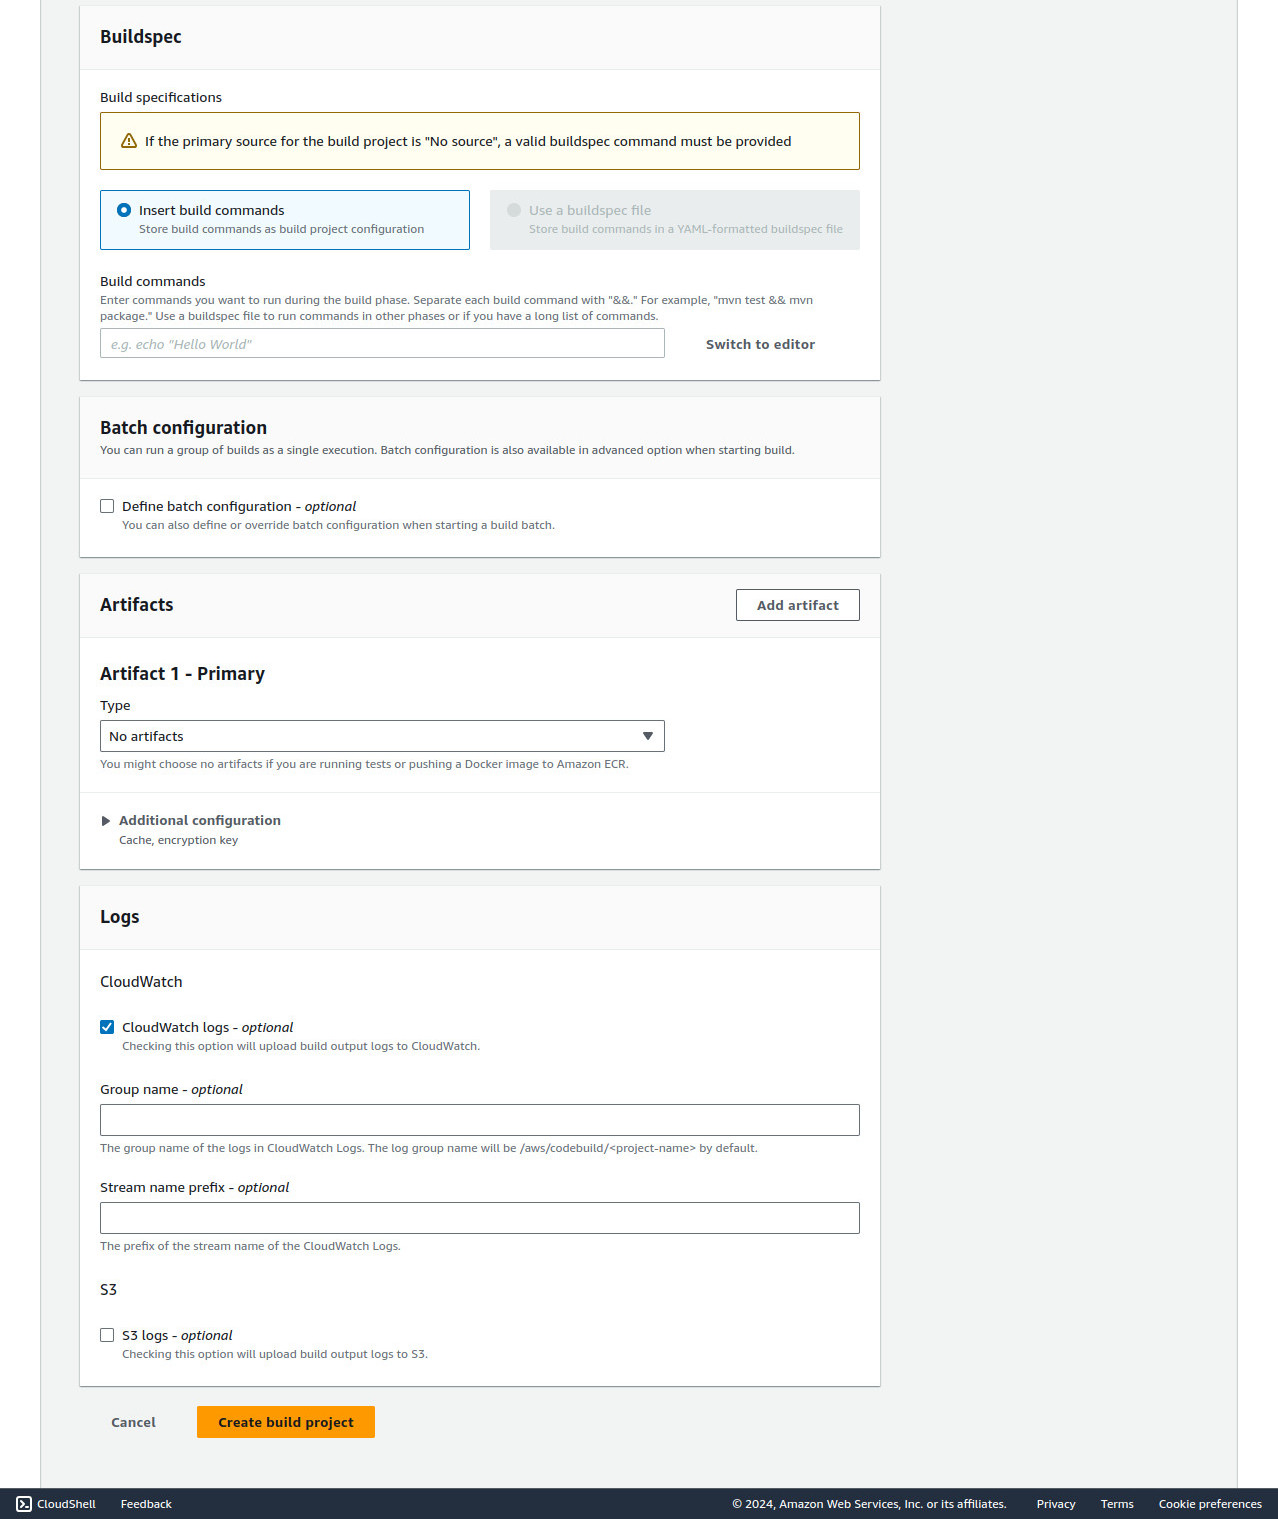
Configure the buildspec file and set the output artifact location to the second S3 bucket. Ensure all settings align with your project requirements and review the project configuration for accuracy.
Step 6: Run the Build
Initiate the build by triggering it from the AWS CodeBuild console. Open the Build projects list and select your project, then select Start build. CodeBuild will start provisioning resources, fetching input files from the S3 bucket, and executing the steps defined in the buildspec file. Monitor the build process via the console to track its progress and status.
If the build fails, review the error logs provided by CodeBuild to diagnose and resolve issues. Common issues may include missing dependencies or syntax errors in the buildspec file. Successful builds will generate output artifacts and store them in the specified S3 bucket, ready for deployment or further testing.
Step 7: View Build Information
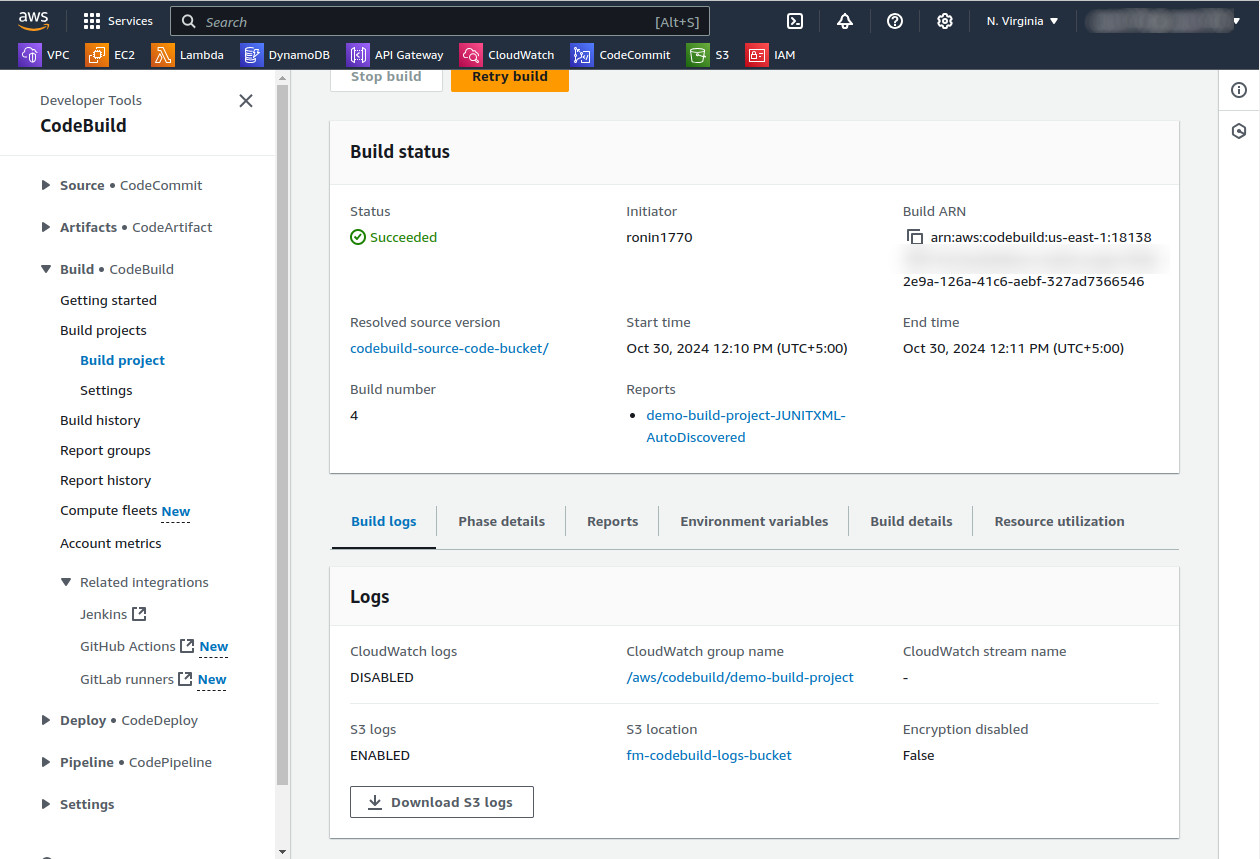
Before proceeding, set the Log Destination to Cloudwatch.
Once the build completes, view the summarized build information under the Phase details sections of the Build status page, in the AWS CodeBuild console. This summary includes details such as the build status, duration, and steps executed. It also provides an overview of the build’s performance metrics.
Consistent and successful builds are indicators of a stable and reliable codebase, while frequent failures may indicate underlying issues that require attention. Use the summarized data to inform future build strategies and optimizations.
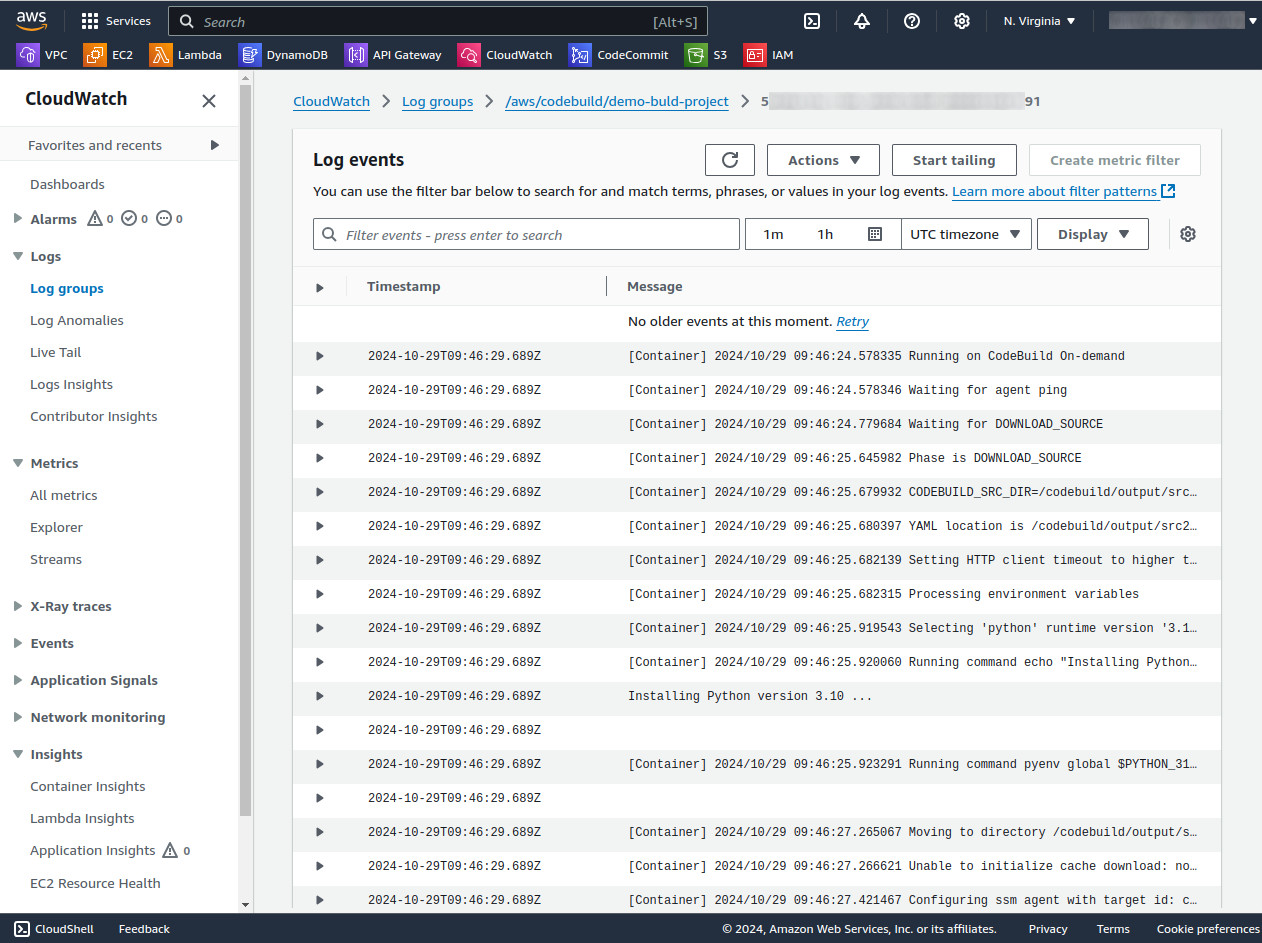
For an in-depth analysis, view the detailed build information available in the AWS CloudWatch Logs. You can access this by clicking on View entire log under Build logs. This detailed view includes comprehensive logs, environment variables, and step-by-step execution details.
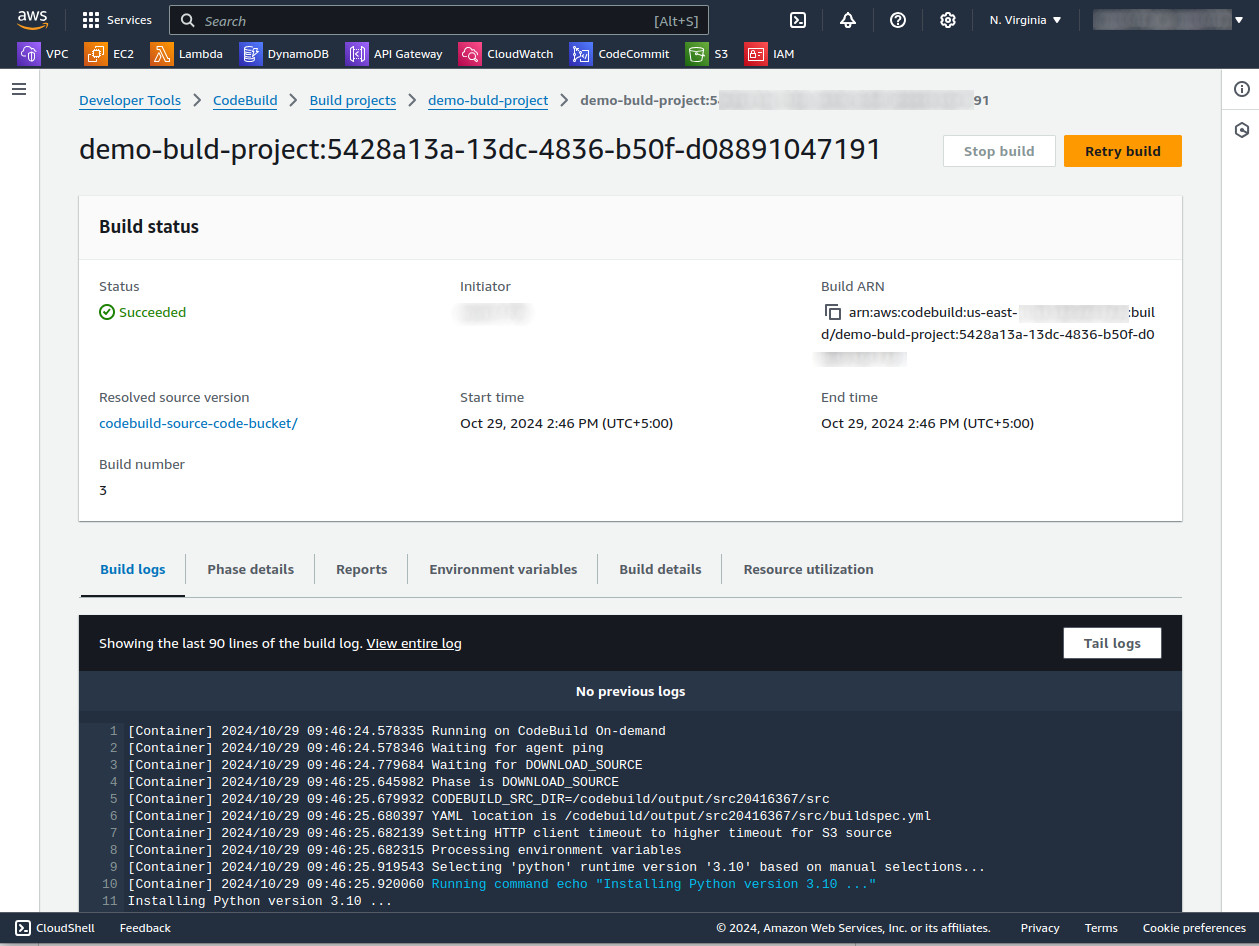
Clicking on View Entire Log displays the following screen:
If you selected S3 as the log destination, you will see a button Download S3 Logs.
Step 8: Get the Build Output Artifact
Retrieve the output artifact from the designated S3 bucket where CodeBuild stored it. From the Build details tab, navigate to Artifacts and then open the link under Artifacts upload location. These artifacts can include compiled binaries, application packages, and logs. Downloading and verifying the output artifacts ensure that the build process produced the expected results.
Utilize these artifacts in deployment pipelines, additional testing phases, or as deliverables to stakeholders. Proper handling and storage of build artifacts are crucial for maintaining the integrity and traceability of the software development lifecycle.
Related content: Read our guide to DevOps tools for testing.
Deploy more and fail less with Codefresh and Argo
