Editors Note: We did a webinar on this very topic! Scroll to the bottom of this post to watch the webinar.
Building upon the success of Helm 2, Helm 3 has recently been released and the server-side component, Tiller, is finally gone! Helm works out-of-the-box with Coderesh, so releasing your Helm 3 applications is as easy as pie. In this blog post, you will learn about viewing Helm releases, and monitoring Helm environments. Still using Helm 2? Not to worry! With a click of a button, in Codefresh, you can manage both Helm 2 and Helm 3 clusters simultaneously!
What is Helm?
Helm is the package manager for Kubernetes. It’s very similar to apt/yum/homebrew. If you’re familiar with the way these tools work with operating systems, the same analogy can be made for Helm, with Kubernetes being the “operating system.” In this way, Helm greatly simplifies the process of creating, managing, and deploying applications using Helm Charts.
What is a Helm Chart?
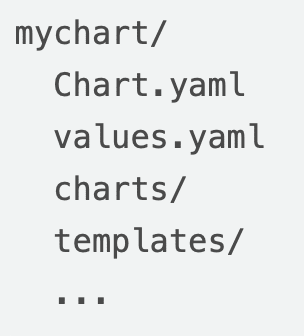
In Helm, a chart is basically just a collection of manifests that describe a related Kubernetes resource. There are two main components to a chart: templates and values. These templates and values go through a template rendering engine, producing a manifest that is easily digestible by Kubernetes.
Charts are very similar to RPM and DEB packages for Linux, making it easy for developers to distribute and consume/install applications via different repositories.
Why use Helm?
Kubernetes can be difficult to manage with all the objects you need to maintain (ConfigMaps/Secrets, pods, services, etc.). Helm manages all of this for you, packaged into one simple chart, where you can even manage which portions of your application should be configurable.
In addition, Helm also maintains a versioned history of every chart installation. If something goes wrong, you can simply call “helm rollback.” Similarly, if you need to upgrade a chart, you can simply call “helm upgrade.”
Combine this with a CI/CD tool, like Codefresh, and you can easily integrate extra actions into your pipelines, i.e. before an installation of a chart, you could run some integration tests, or after an upgrade has finished, you can trigger a notification.
Helm 2 vs Helm 3
There were many changes introduced in the new release of Helm, namely:
- Removal of Tiller: Tiller was the server-side component of Helm 2. When installing Helm 2, you also needed to install Tiller on your Kubernetes cluster. Tiller’s main responsibility was to allow multiple Helm operators to work with the same set of releases. However, Role Based Access Control was enabled by default in Kubernetes 1.6, making Tiller difficult to manage. Configurations would be granted that enabled users to have a broad range of permissions they weren’t intended to have. Now, with RBAC enabled by default, Helm no longer needs to control who installs what.
- Security is now on a per user basis, and can be configured via the kubeconfig file
- Chart installation information is stored in Kubernetes itself (previously this was saved to Tiller)
- Release names are now scoped to the release namespace, as opposed to the Tiller namespace. Previously, if you wanted to have two releases with the same name, this was not possible since in Helm 2 releases were scoped to the Tiller namespace. Now, you can have two releases with the same name, provided they are in different namespaces.
- 3-way Strategic Merge Patching: Helm 2 took only a two-way approach for merge patching, meaning on an upgrade or rollback, only the old chart and the new chart were considered. If someone were to go in and modify the live state of the application via kubectl, for instance, and apply the upgrade/rollback, no changes would be applied as the old chart and “new” chart would be the same. In Helm 3, for merge patching, the old chart, the live state of the application, and the new chart are considered.
- Secrets as the default storage driver for release information: previously, in Helm 2, release information was stored in ConfigMaps, which were stored encrypted, making it difficult to access/apply. Helm 3 has moved release information over to Secrets, so now, to retrieve release information Helm can simply access the secret, decrypt it, and apply it.
- JSON Schema Chart Validation: if a chart maintainer wants to impose specific value types on a chart, they may — all they need to do is include a JSONSchema file along with their chart, and the validation tool will automatically be run on helm install/upgrade/lint.
Other notable mentions: - Templates do not use Lua in Helm 3. There was some talk over the past year that Lua would be used for templating, and that work was not released with version 3, but will likely be a part of subsequent versions.
- Namespaces not automatically created for releases: In Helm 2, if you attempted to install a release in a namespace that did not exist, it would create the namespace for you. Helm 3 now follows kubectl convention by throwing an error message if you attempt to create a release where the namespace does not exist.
- There are many other changes between Helm 2 and 3, and you can read about them on their official documentation.
Native Support for Helm within Codefresh
We know developers want to get started right away, so we have several Helm integrations within Codefresh!
- A fully managed and hosted internal Helm repository (private by default, but you can also set to public if you wish
- A Helm release dashboard, where you can view a list of all your installed charts on their corresponding clusters
- A Helm/Kubernetes environment dashboard, where you can monitor the status of your releases and clusters
- A Helm promotion dashboard, where you can promote installed charts to different environments/namespaces
- If you are already familiar with Helm 2 support in Codefresh, you get the same capabilities available with Helm 3 as well!
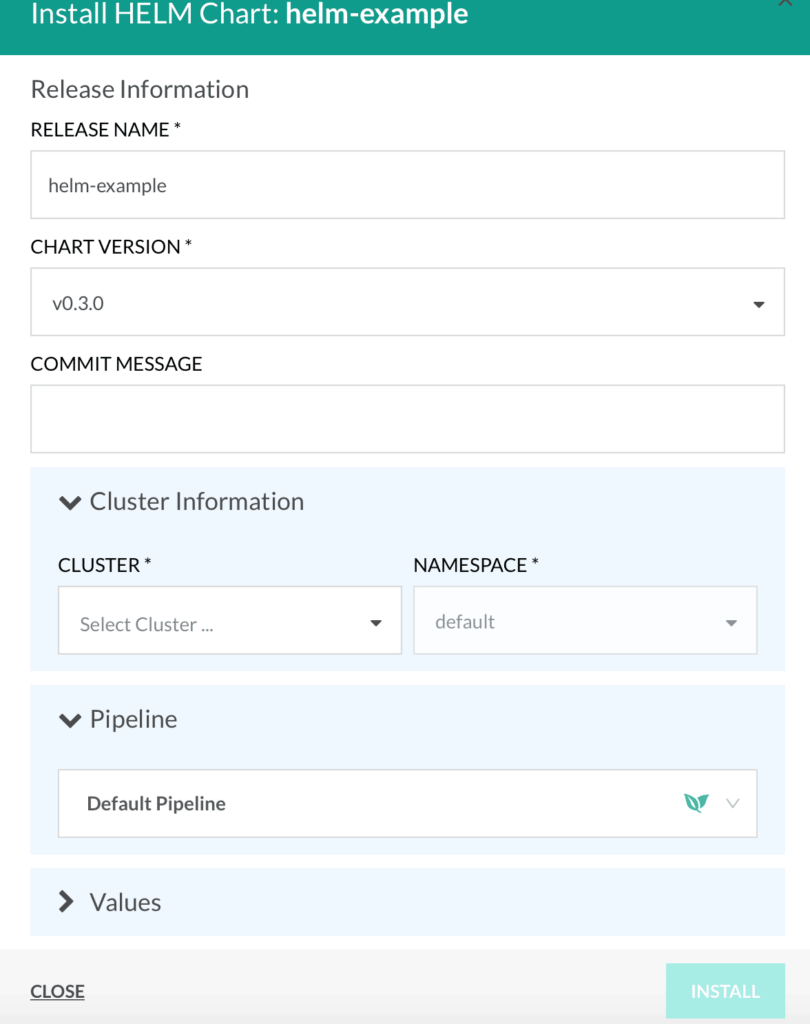
Helm Repository
A default managed repo is created automatically for every account and you can add other external repositories from this view as well.
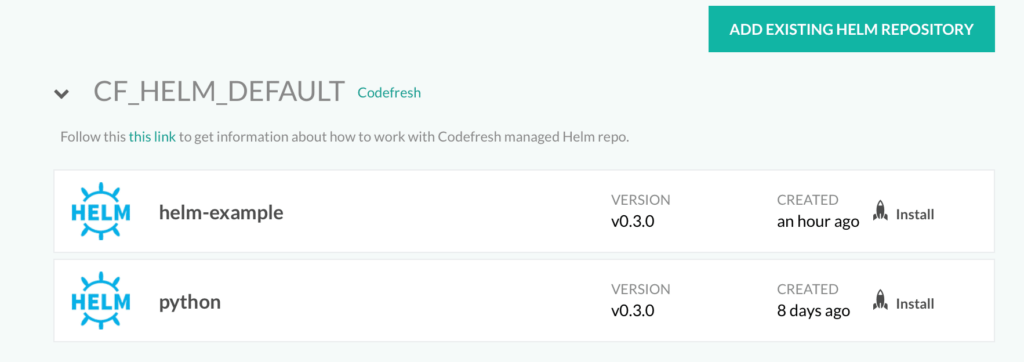
Take special note of the Install button, which allows you to manually install a chart with the click of a button. This is very handy for non-technical users who wish to spin up a demo environment .
By default, the install button uses the Helm command helm install behind the scenes, but if for example, you wanted to trigger integration tests as a part of the installation process, you could create a pipeline and select it from the drop-down menu as shown in the screenshot below.
Helm Release Dashboard
From the Helm Release dashboard, you can view the current status of your cluster, currently deployed releases, and previous versions of installed charts. You can even rollback to previous revisions. Similar to installations, you can also define your own pipelines for test/rollbacks/delete operations.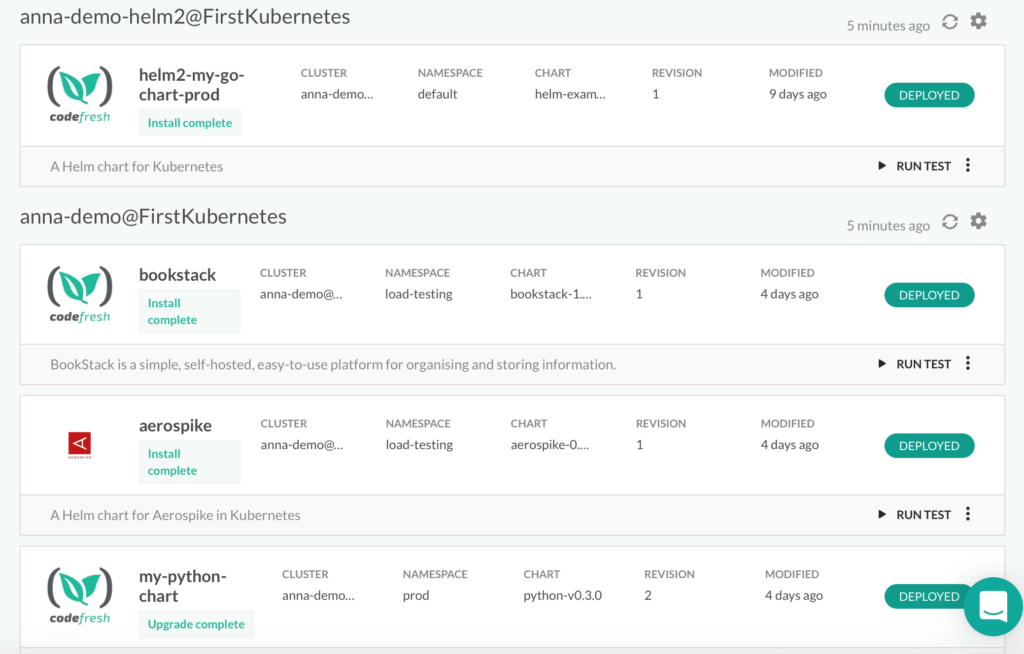
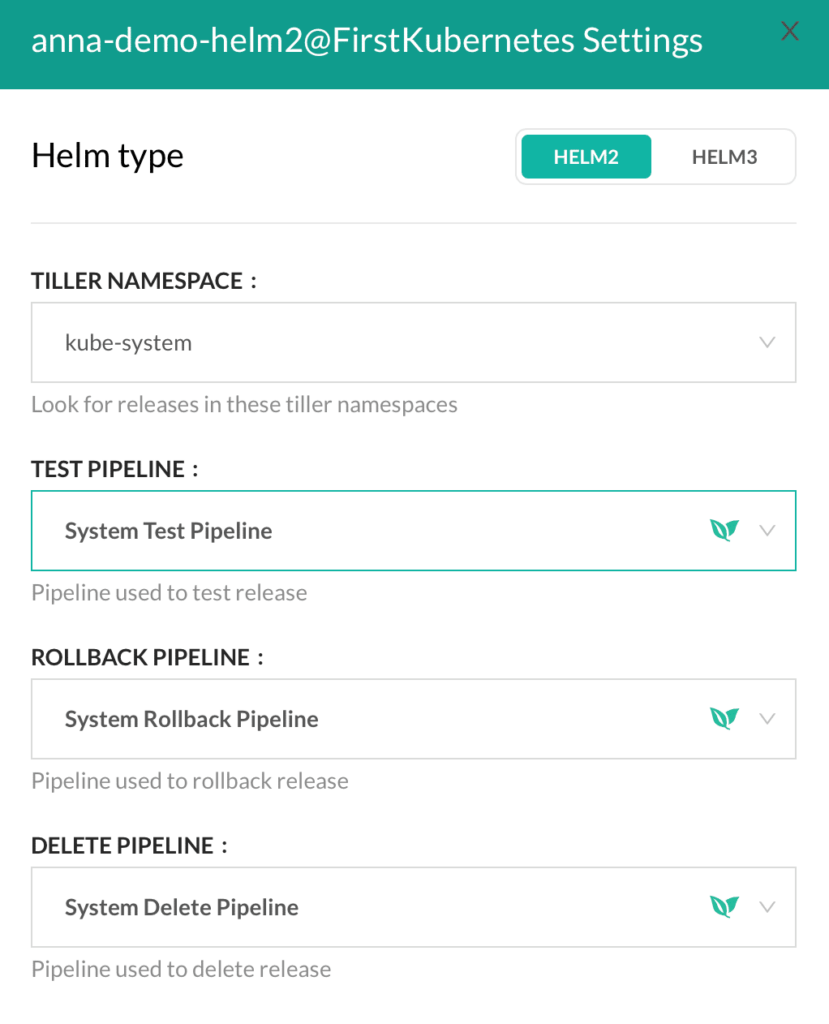
To toggle between Helm 2 or Helm 3 releases, simply click the gear icon next to your cluster, and select whether your releases are Helm 2 or Helm 3. For Helm 2 releases, you will need to define the namespace Tiller was installed on.
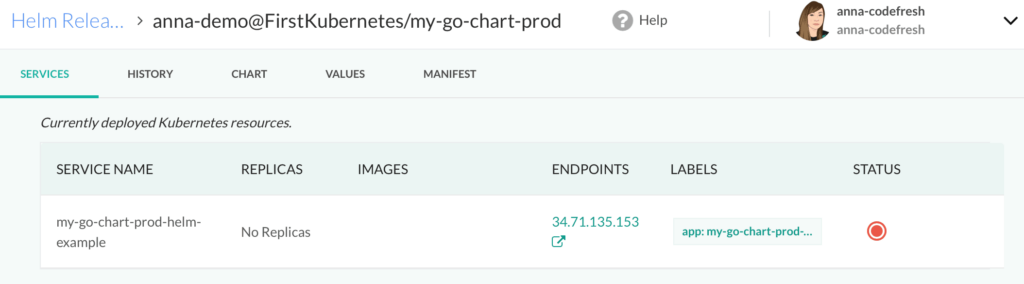
 Clicking on a specific release will take you to its details, showing you the individual services that make up your application, and their status.
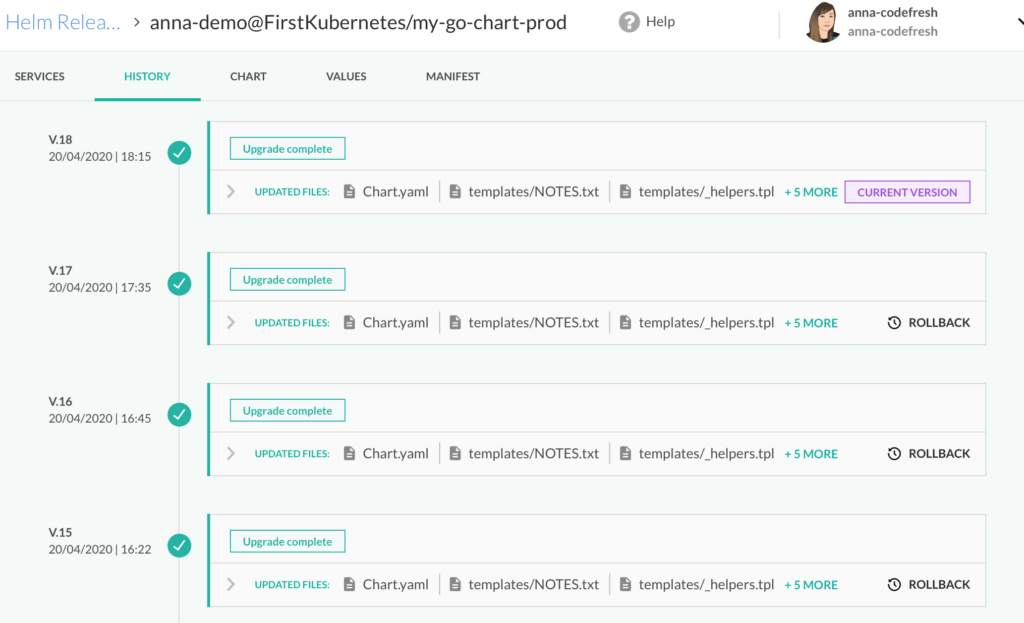
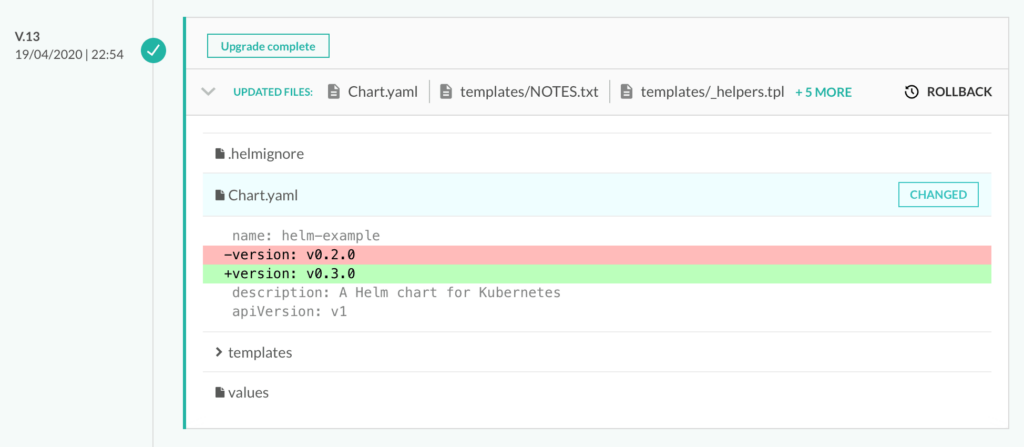
The History tab will show you current and previous revisions, and you can further expand a revision and view a helm diff to see which files were changed between specific releases. You can even rollback to a specific version of a chart by selecting the rollback button.
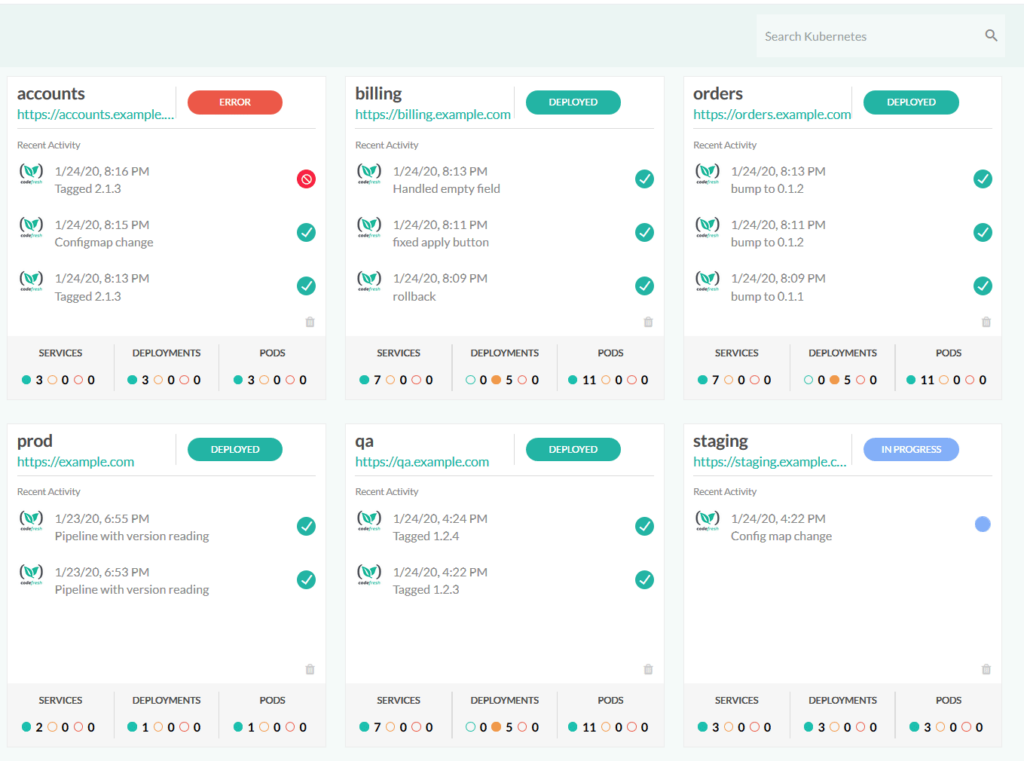
Helm/Kubernetes Environment Dashboard
Codefresh also provides a Helm/Kubernetes Environments dashboard, where you can see cluster status information, in addition to what your pipelines are doing. This view is useful for project leads to get an update on their environments, or for a developer to come see the status of a build after a PR has been merged.
Helm Promotion Dashboard
Codefresh also provides a Helm promotion dashboard, that can allow you to track your applications as they move through your infrastructure. Each column in the dashboard represents either a different cluster or a different namespace. So, the possibilities are endless when it comes to how you want to configure the dashboard specifically. You can also create more than one dashboard so each team can cater to their own needs.
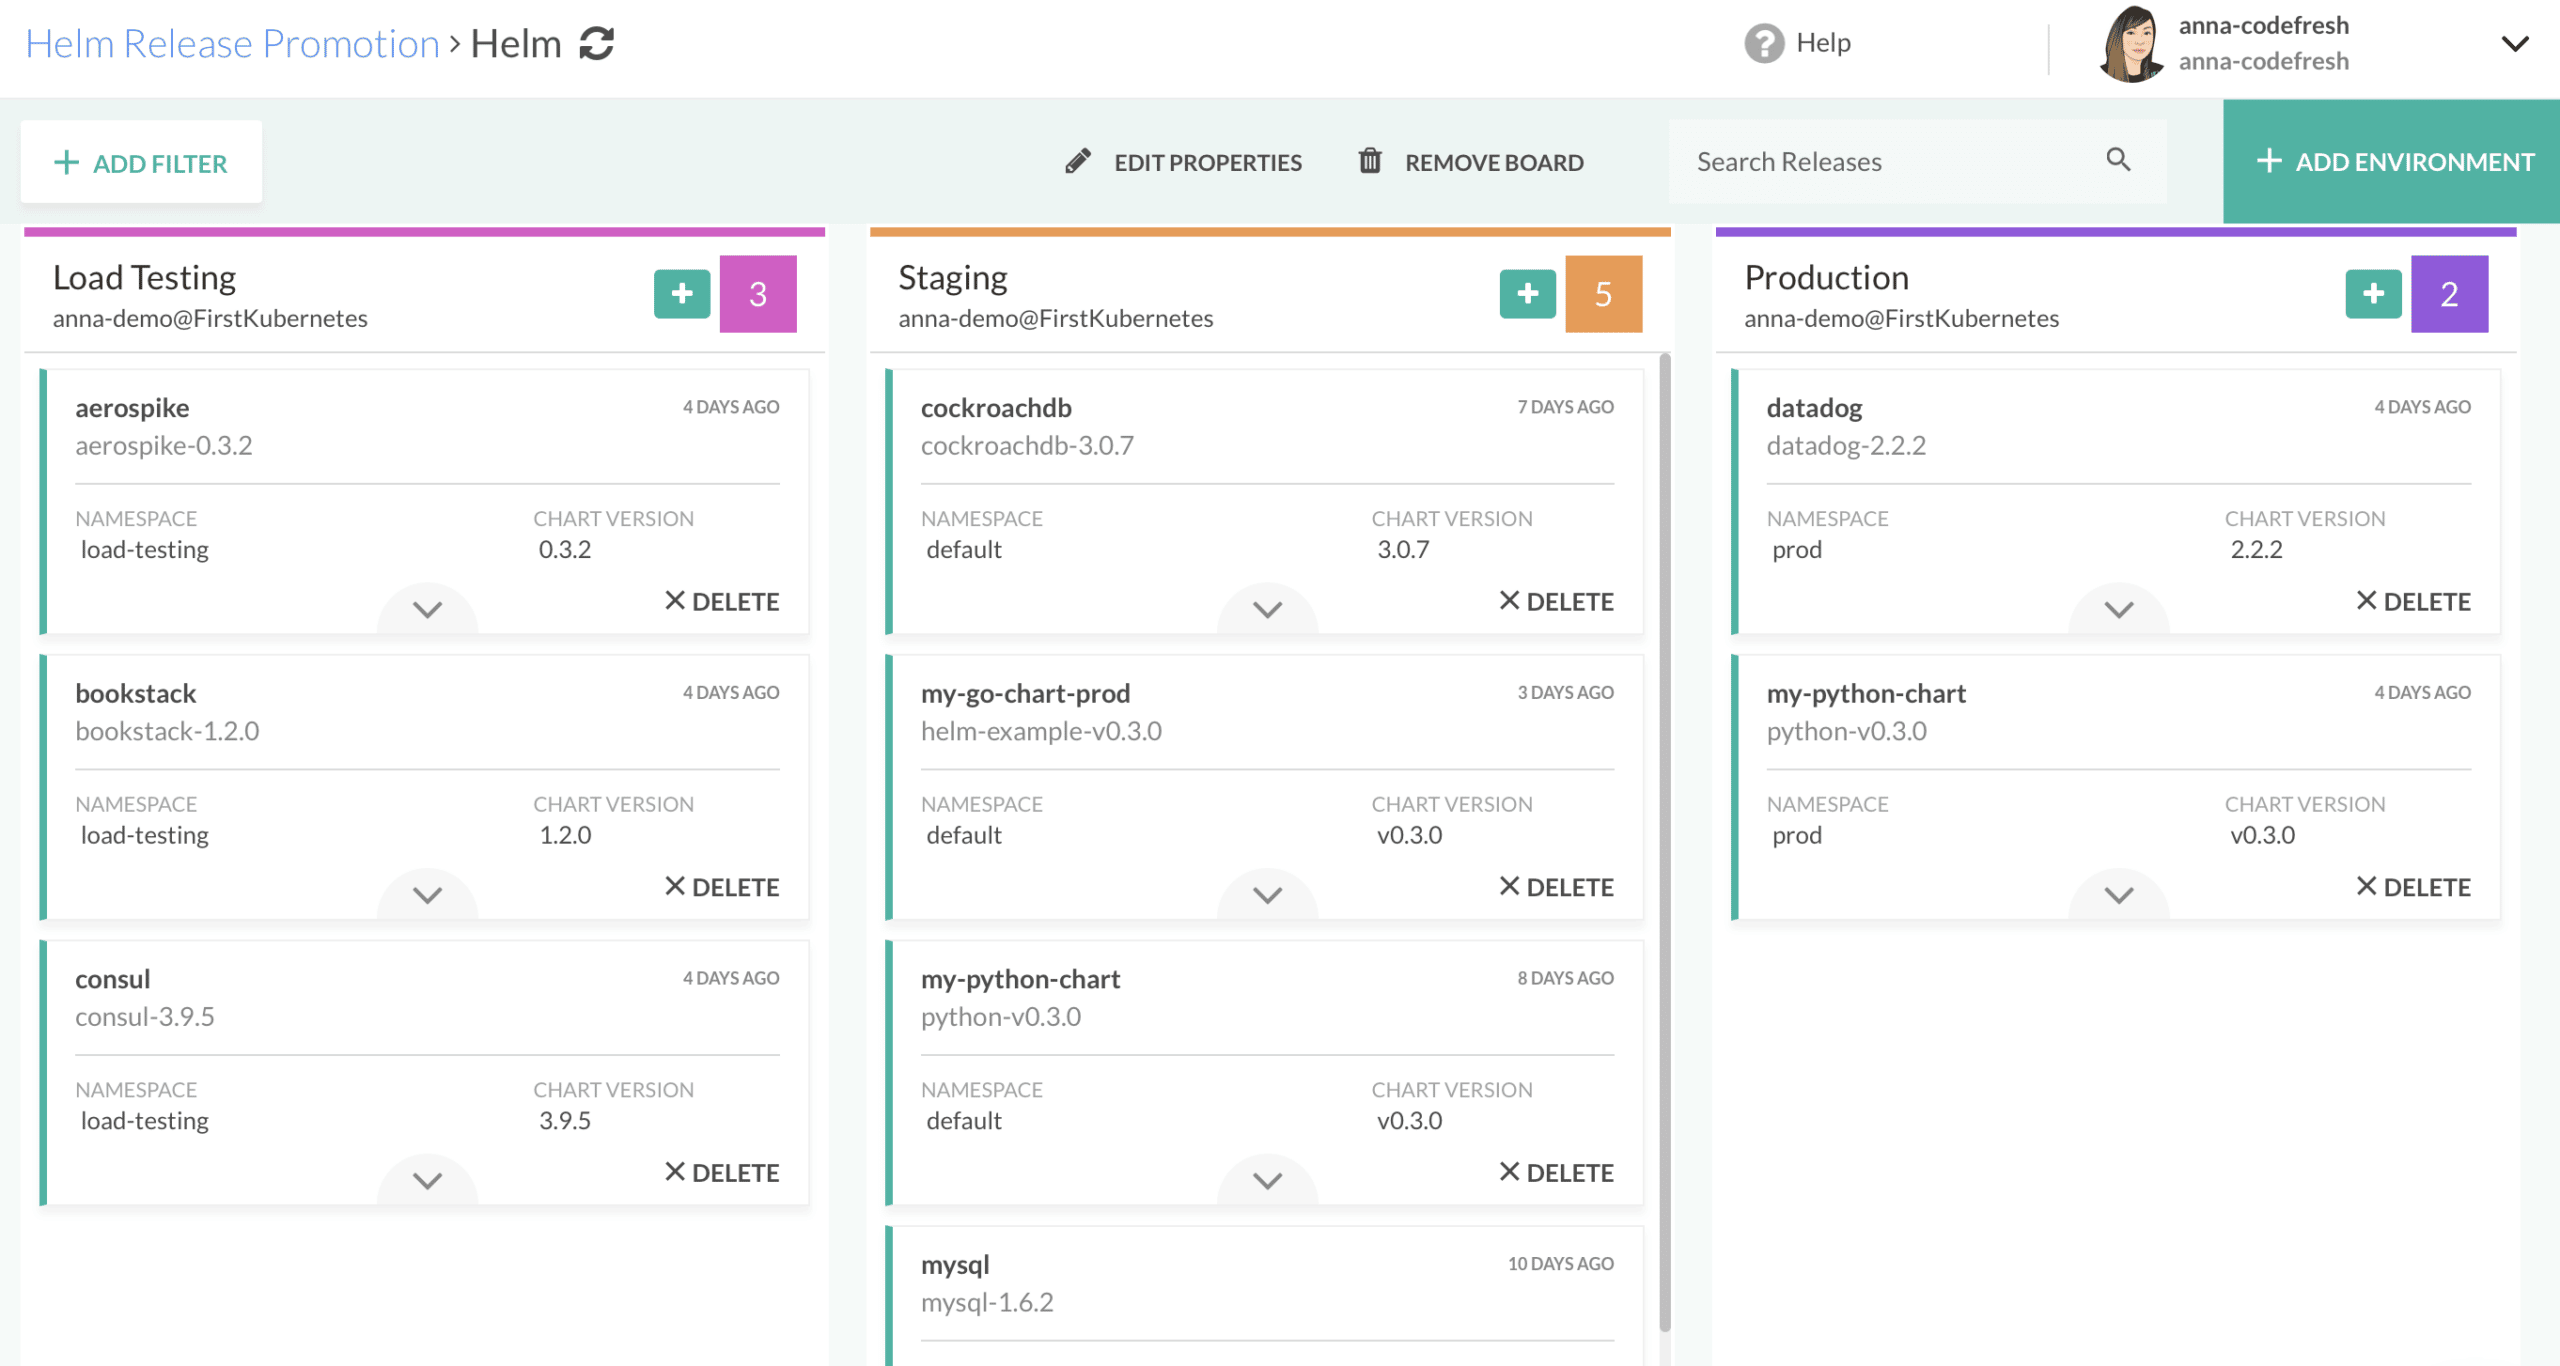
You can see from this example board, we have 3 environments corresponding to a cluster, load-testing, staging, and production. Once an application is ready to be promoted to the next environment, you can simply drag-and-drop it to the corresponding column, therefore promoting it.
Start your Helm journey here!
The ability to deploy entire application stacks allows developers to focus their work on writing code, and less on deployment environments. Helm is the way to go for packaging and deploying Kubernetes applications, and Codefresh is the only CI/CD platform to offer native support for it!
If you enjoyed this blog post, check out our associated webinar, Making the Most of Helm 3 with Codefresh.
New to Codefresh? Create Your Free Account Today!