
The customer in question is one of the world’s leading providers of technology and telecommunication services. In this guide, we will share how one of their teams migrated from a traditional CI solution to a powerful Internal Developer Portal using Codefresh and Port.
Setting the stage
When the people from the big Telco approached us they already had their basic Continuous Integration (CI) flow in place but wanted to level up the experience offered to developers by offering a one-stop solution for fully managing their environments and artifacts with a modern and cloud-native solution for their entire Software delivery flow.
They had a few goals:
- Tool Consolidation
- Most of their teams were already successfully using Codefresh for CI/CD operations. Removing other one-off solutions would allow for more efficient management and support of tools.
- Reduce license and resource costs.
- Standardize the process for developing and delivering software across all teams in the organization to provide faster onboarding and reduce friction.
- Modernize their CI/CD Tooling
- A cloud and Kubernetes-native solution was needed, something Codefresh provides
- Better support for modern ecosystems
- A clear path forward for their applications adopting GitOps in the future
With the goals and scope of this project in hand, we identified several requirements to make this effort a success with a high adoption rate.
Even though the benefits of migrating to Codefresh were clear to the team, the transition needed to be smooth and seamless. We didn’t want any friction for developers, project managers, and other users of the current tooling.
Here are some of the constraints and design principles that were considered as we brainstormed possible solutions:
- Improve upon the user experience that engineers and project managers were already familiar and comfortable from Bamboo.
- Recreate the flows already established in Bamboo within the Codefresh platform.
- Maintain the same flow and structure in which information is presented to the users.
- Create a smooth transition process between platforms.
Solution Overview – the Internal Developer Portal
With the goal, contexts, and constraints clearly identified, we brainstormed possible solutions.
After several conversations, we figured out that an Internal Developer Portal would be the best solution to model the experience provided by Bamboo but powered by Codefresh behind the scenes (pipelines, builds, API). This solution would also give us the flexibility required to satisfy the team’s requests in terms of user experience, interactions, and flow.
An Internal Developer Portal is the perfect abstraction for big companies that want to offer the best possible experience to their developer teams without burdening them with unnecessary operational information.
At Codefresh, we love Port as a superior solution for internal developer Portals. We have previously explained how easy it is to integrate Codefresh and Port to create a powerful and customizable developer experience.
End User Experience
Before diving into the details of the implementation, it is important to show the end-user experience and understand the value that derives from having a single pane of glass for all your cloud-native deployments.
One of the benefits of Port is the level of customizability it offers. Unlike competing solutions, that are constrained to offering just simple catalog services, a Port dashboard can be customized to show the exact information you need in any way you prefer. You can craft dashboards for different personas, teams or use cases.
While Port is great for functioning as the central aggregator of all pieces of information, you also need a deployment platform behind the scenes to do the heavy lifting of all the activities needed for a deployment. And this is where Codefresh comes in. You can find more information about Port in their blog or our joint webinar.
The Environments Dashboard for Products
One of the central concepts in the Telco Developer Portal is the “product”. This represents a single application in the business sense that can be deployed as an individual unit.
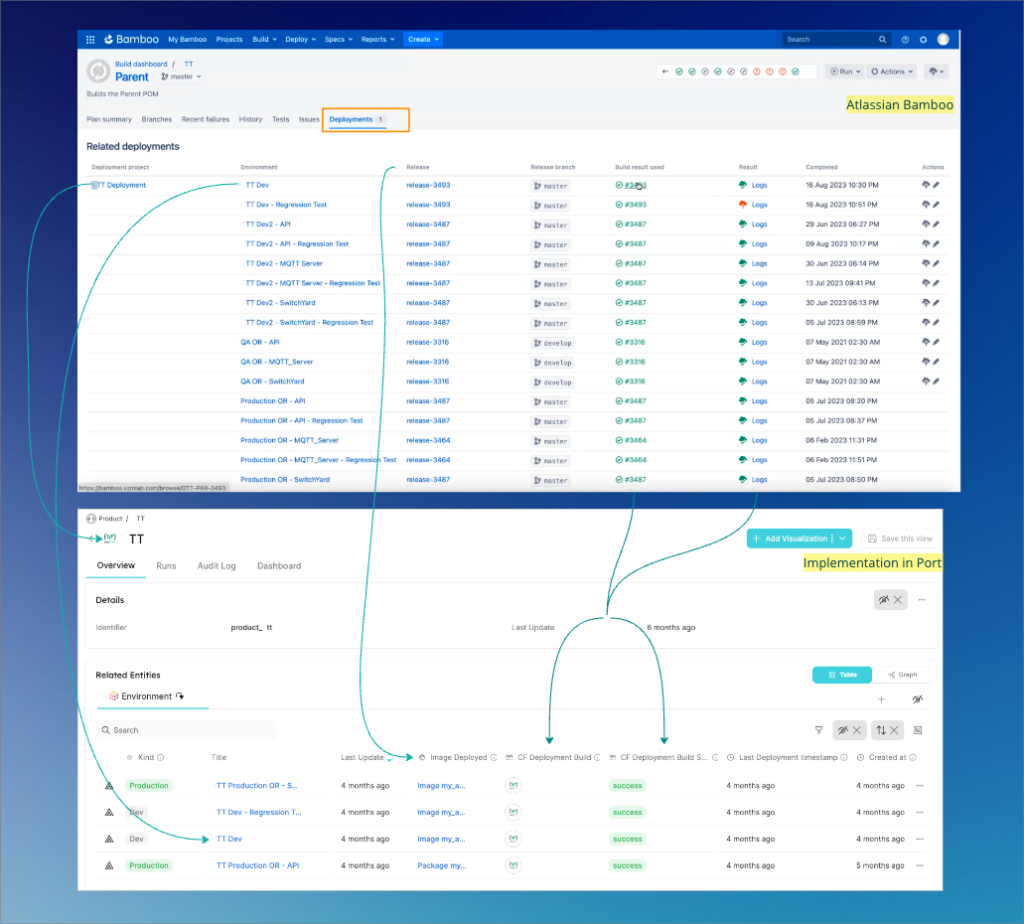
Each Product in our Portal can have multiple Environments. Users need to have a clear understanding of the Environments associated with a particular Product and the versions of the Image deployed to it. Here is the overall dashboard that we created in the Port UI.
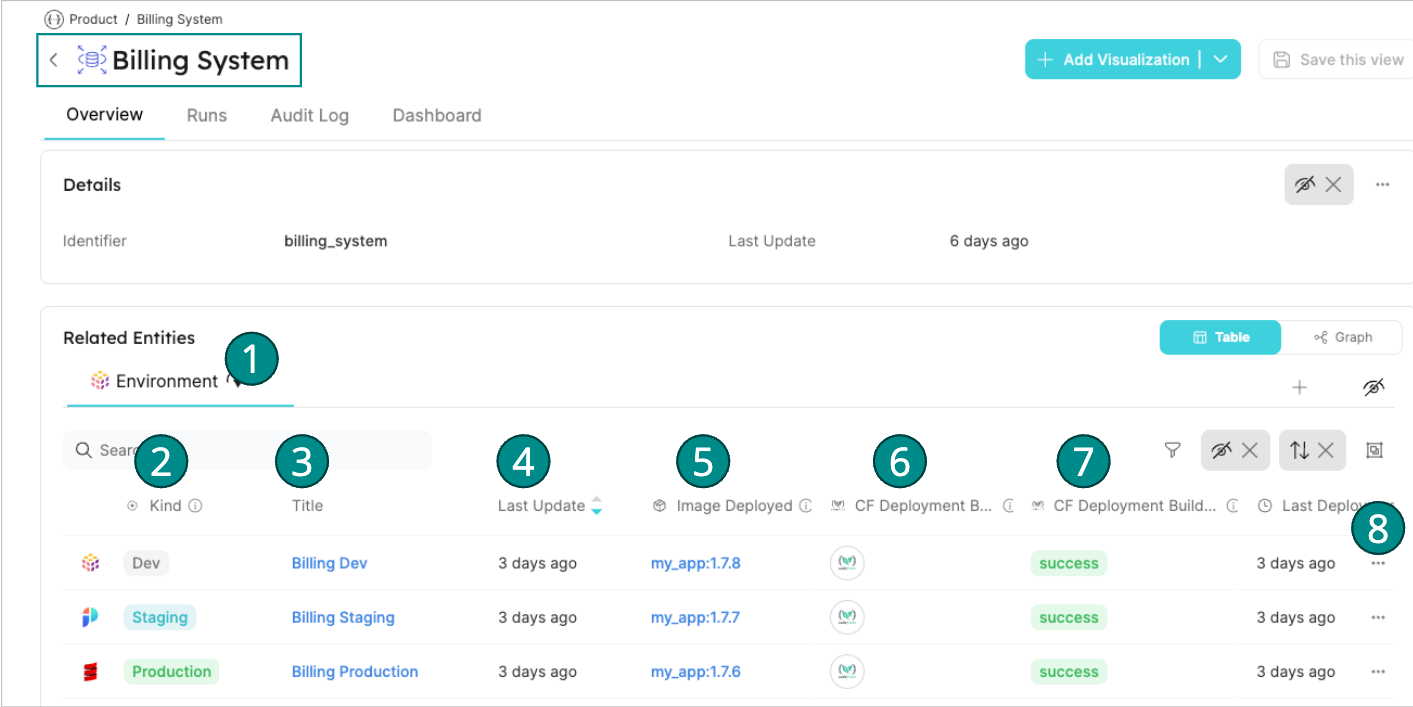
This dashboard provides an overview of all the relevant information about a Product and the Environments where the system is deployed. Some information we can see here is:
- A list of all the Environments of that Product via the “Related Entities / Environment” tab
- Environment Kind: there’s no need to assume the kind of Environment of a specific deployment. This field allows us to systematically identify the production and non-production environments of our Product
- Title: this is the name of the Environment
- Last Update: when was the Environment instance updated in Port. This could be because a new deployment updated the Image the Environment is referencing or because a user changed some metadata of the Environments, for example.
- Image Deployed: this attribute references an Image instance. It’s not just plain text with the name of the Image; it is a link to the Image instance if the user needs more information:
- Link to the build in Codefresh that built the image
- Git branch and repo used to build the image
- The result of the Codefresh build that built the image
- Among others (you can add any other attribute users consider relevant for an Image)
- Codefresh Deployment build: this is a link to the build in Codefresh that orchestrated the deployment of a particular image on the environment: the “Deployment pipeline”. This is helpful for developers to understand what exactly happened during this process or to get any additional information that’s available on the Codefresh platform.
- Codefresh Deployment build result: the result of the Deployment build that deployed the image.
- The Deploy Action: each of the Environments listed has an option to initiate a deployment to them. Once the user clicks that button, an Action form will be presented allowing it to choose the image to deploy to the selected Environment.
The High-Level Environments Dashboard for all Products
For an SRE or DevOps Engineer, it’s important to keep a record of all the Environments and Products their Organization is managing. In this dashboard, they can achieve this, and if needed, drill down on any particular Environment and get the information they’re looking for:
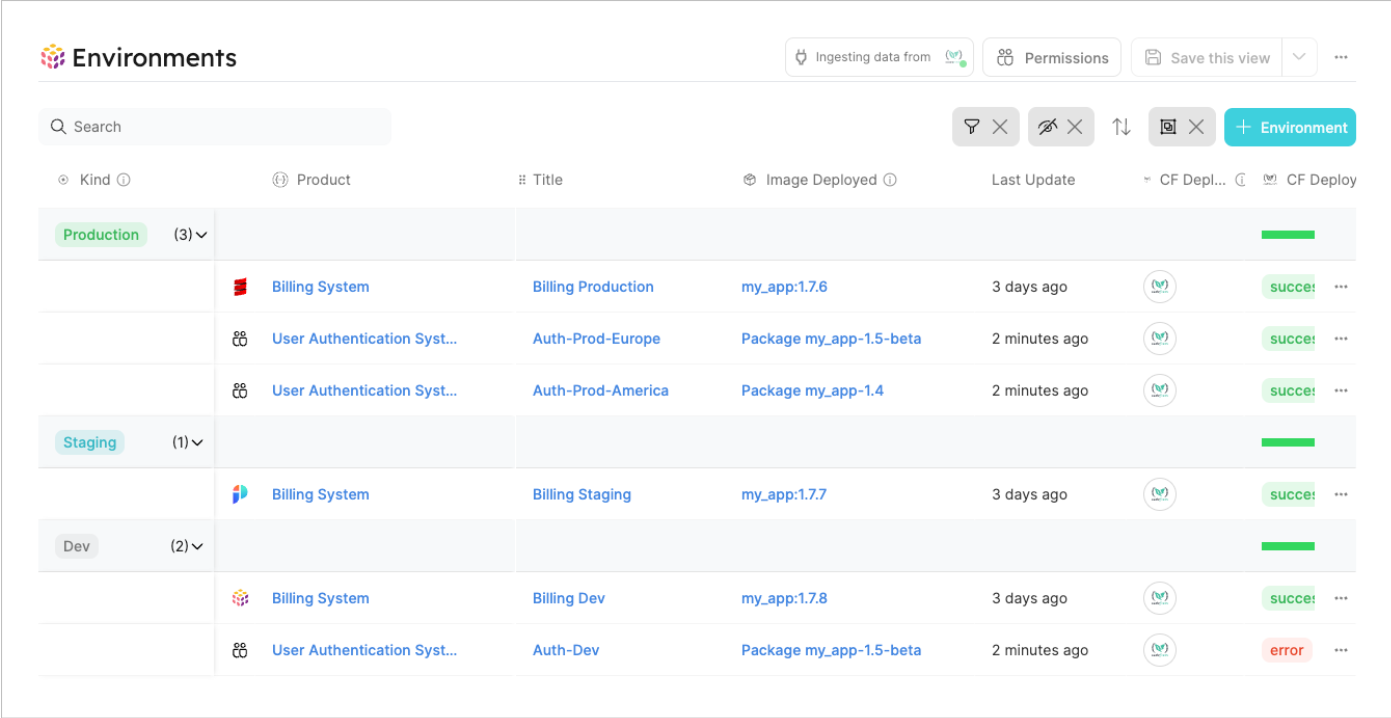
The dashboard groups all your Environments based on their “Kind“, which makes it easier for you to locate the ones you are looking for. The remaining details are similar to those found on the “Environments Dashboard for Products”. However, in this case, we’re showing information for all Environments across all Products in the organization.
The Image View
Sometimes, instead of looking for a specific Environment, we want to get all the details of an Image, including a list of all the Environments the Image is deployed to.
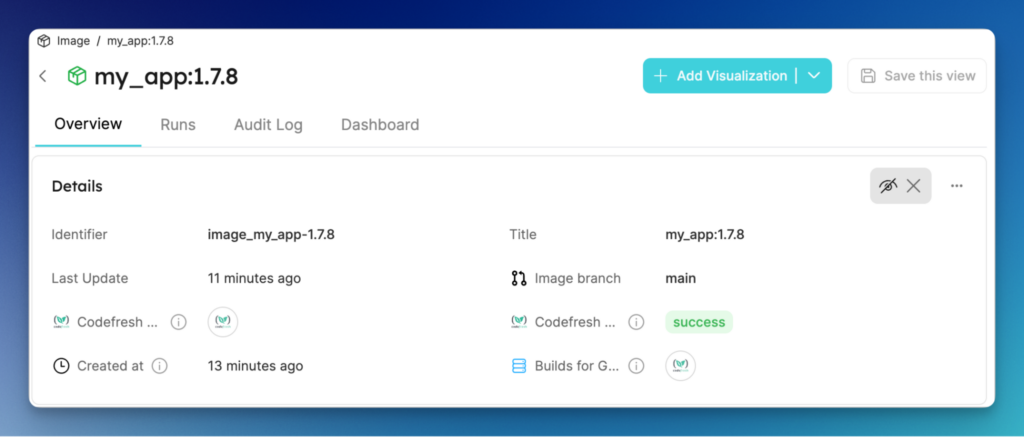
This is possible when looking at the instance view of an Image. The following picture illustrates it:
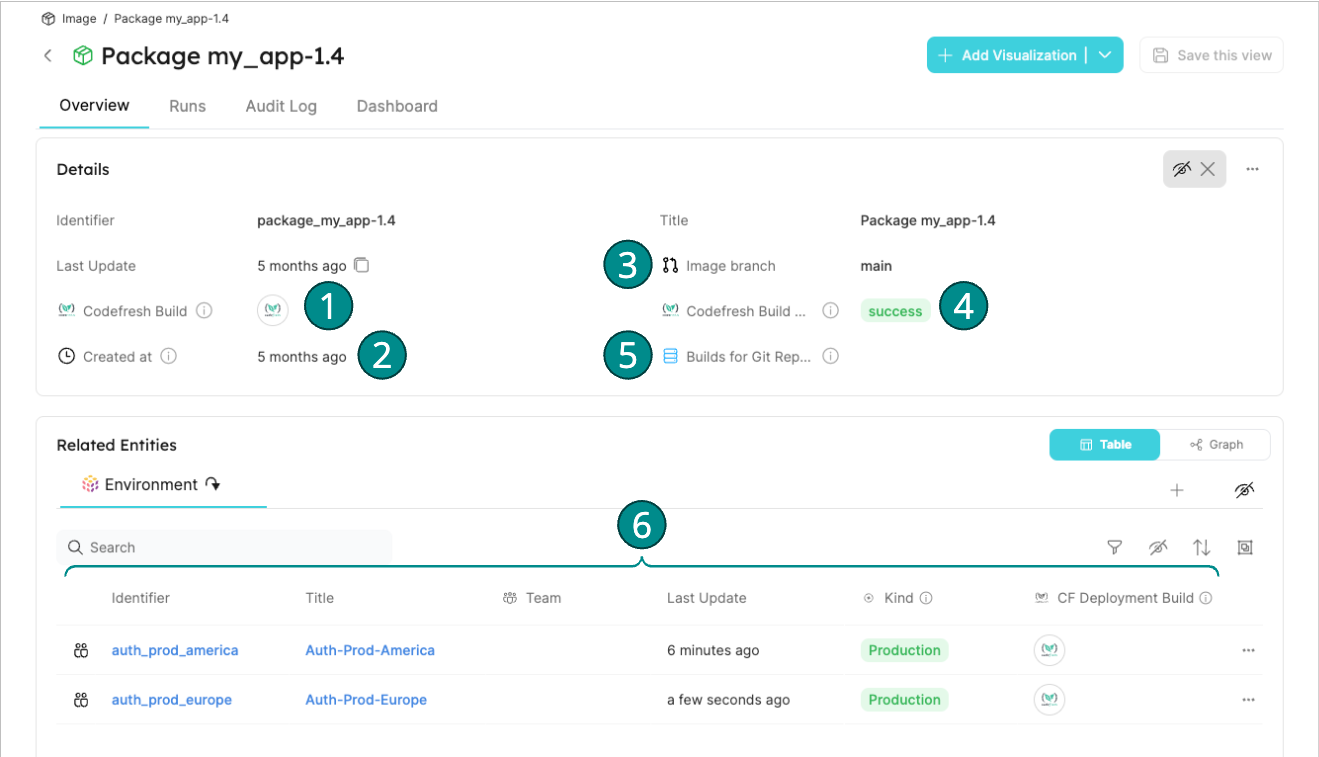
Here, you can see all the details of an Image based on the attributes we have defined in its Blueprint.
The details include:
- Codefresh build: a link to the build in Codefresh where the Image was built
- Created at: the timestamp of when that Image was created and pushed to a registry (based on the info reported by Codefresh)
- Image branch: the git branch associated with the repository used to build the Image.
- Codefresh build result: allows to quickly check what was the status of the build associated with this Image
- Builds for Git Repository: it’s a link to a Filtered View in Codefresh. It allows users to easily get a list of all the builds associated with the repo and branch used for this Image.
Finally, as mentioned above, we can get a list of all the Environments where this image is currently running (point 6 in the picture).
With this solution, Telco developers can focus only on the things that matter to them. And if they need more information they can always drill down in the specifics of an entity by just clicking a link to go to the respective Codefresh build.
Expert developers or platform engineers can always look under the hood and inspect all the “raw” information in Codefresh.
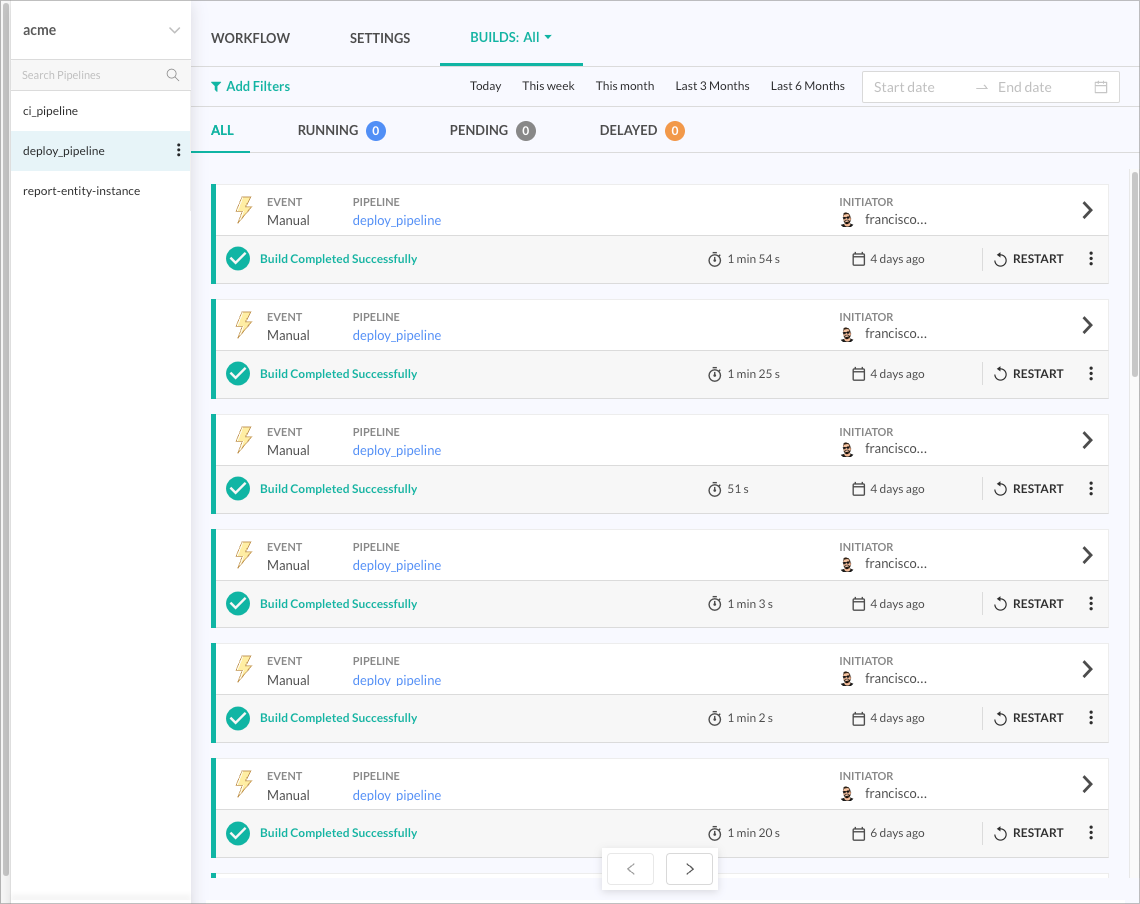
It is also very easy to debug the communication between the two systems as the integration points are isolated in a single Codefresh step. Here is a Codefresh deployment pipeline with standard pipeline steps:
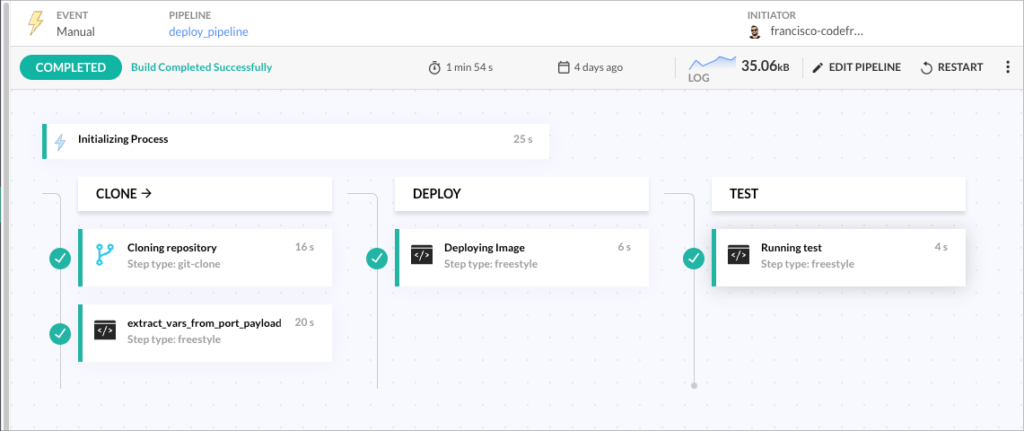
Notice the second step that essentially parses all the information given from Port when a developer creates a new deployment from the Port dashboard.
Implementation of the Solution
Now that we have seen the end-user experience, let’s look behind the curtains to learn all the details of the implementation. We will also share some insights about the migration from the existing CI system (Bamboo) and how we recreated with Port several existing screens to make all developers feel at home at their new internal Portal.
The following is a diagram that illustrates the components involved in this solution:
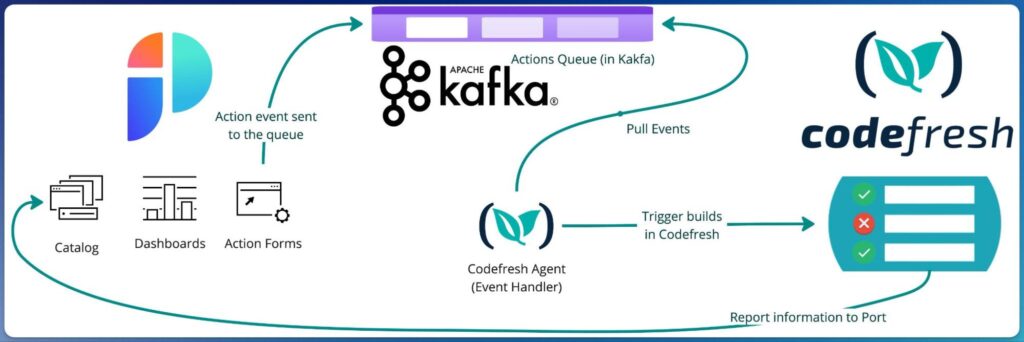
To model the entities and interactions found in Bamboo, we’ll use a series of components to implement the whole solution.
Port is the Internal Developer Platform that will serve as the interface to model Bamboo Entities, more specifically “Deployment Projects” entities, and orchestrate the automations powered by Codefresh. Port is great for showing information and starting “actions” while Codefresh is taking care of the actual deployments and builds.
In the diagram above, we can see how Kafka will be used as the place where all different actions triggered from Port will be sent (e.g., deploying an Image to an Environment). Then, the Codefresh Agent will be constantly pulling events from the queue, processing them, and triggering the corresponding pipeline in Codefresh. The triggered builds will have access to the full payload sent by the original Port Action, enabling them to determine what to deploy (the Image) and where to deploy it (the Environment).
This first part covers the communication from Port to Codefresh, but we also need to report information from Codefresh to Port. For example, when a new Container image is built and pushed to a registry or when an image is deployed into an environment.
For this reason, we will instrument our pipelines with some extra steps to report this information back to Port. That will keep our Catalog in Port up to date, enabling us to manage all the entities in Port with accurate and current information.
Modeling all entities of the dashboard with Port
As mentioned before, Port will serve as the interface between the user and the automation executed by Codefresh. The first step then is to create these entities in Port, where they’re called “Blueprints”.
Besides the attributes of these entities, we also need to define the Actions that can be performed on them.
This is a diagram of the Port Blueprints and their relationships, representing the original Bamboo Entities:

You can find the complete specification of the Blueprints and Actions in this repository: github.com/codefresh-contrib/codefresh-port-internal-portal. Note that we are using JSON for the definition, but Port also supports other ways to model your Portal including using a Terraform provider.
The team transitioning from Bamboo to Codefresh focuses on deploying Container Images on Kubernetes Clusters (and to AWS ECS). For that reason, we changed the terminology a little bit, merging Artifacts and Releases as “Images” (Container Images).
Here’s a summary of the mapping between the terminology used in Bamboo’s Deployment Projects and the implementation proposed for this project:
- Deployment Project → Product
- Artifact | Release → Image
- Environment → Environment
Implementing the Continuous Integration flow
The first flow to implement is the one reporting information to Port about an image built via a Codefresh pipeline; otherwise, Port won’t know what images are available for future deployments, and its catalog would be incomplete.
To cover this scenario, we added a couple of steps to our Codefresh CI pipeline. These steps are responsible for reporting all the image metadata to Port. Since we wanted to make sure images were available in our Port Catalog until all the CI Pipeline steps had been completed, we added the reporting step as an “on finish” hook.
Here’s a snippet of what the CI pipeline looks like:
## Expects:
## PORT_CLIENT_ID and PORT_CLIENT_SECRET

version: "1.0"
stages:
  - "init"
  - "build"

hooks:
  on_success:
    steps:
      export_build_status:
        image: codefresh/cli
        commands:
          - cf_export BUILD_STATUS=success
  on_fail:
    steps:
      export_build_status:
        image: codefresh/cli
        commands:
          - cf_export BUILD_STATUS=error
  on_finish:
    steps:
      generate_vars_for_port:
        image: codefresh/cli
        shell: bash
        commands:
          - |
            #!/usr/bin/env bash
            set -euo pipefail
            IFS=$'\n\t'
            export BUILD_TIMESTAMP="`codefresh get build ${{CF_BUILD_ID}} -o json | jq -r .started`"
            export BUILDS_FILTER_URL="`echo "${{CF_URL}}/builds2?filter=page:1;repository:${{CF_REPO_NAME}};branch:${{CF_BRANCH}}"`"

            export JSON_PAYLOAD='{"image_branch":"${{CF_BRANCH}}", "builds_for_git_repo_and_branch":"TO BE DEFINED", "codefresh_build":"${{CF_BUILD_URL}}", "codefresh_build_result":"${{BUILD_STATUS}}", "created_at":"TO BE DEFINED"}'

            cf_export IMAGE_ENTITY_PROPERTIES=$(jq -r -c \
                --arg BUILD_TIMESTAMP $BUILD_TIMESTAMP \
                --arg BUILDS_FILTER_URL $BUILDS_FILTER_URL \
                '.builds_for_git_repo_and_branch = $BUILDS_FILTER_URL | .created_at = $BUILD_TIMESTAMP' \
                <<< "$JSON_PAYLOAD")

      report_entity_instance:
        image: public.ecr.aws/y8q1v8m0/codefresh-port-entity:1.1.0
        working_directory: IMAGE_WORK_DIR
        environment:
          - OPERATION=upsert
          - BLUEPRINT_IDENTIFIER=image
          - ENTITY_IDENTIFIER=image_${{SERVICE_NAME}}-${{SERVICE_VERSION}}
          - ENTITY_TITLE=${{SERVICE_NAME}}:${{SERVICE_VERSION}}
          - ENTITY_PROPERTIES=${{IMAGE_ENTITY_PROPERTIES}}

steps:
  clone:
    ...

  export_variables:
    ...

  build:
    ...
The entire CI Pipeline YAML can be found here: github.com/codefresh-contrib/codefresh-port-internal-portal/codefresh/ci_pipeline.yaml
As expected, the idea of this flow is to initiate a build in Codefresh triggered by a git event.
The build in Codefresh will perform the common tasks of a regular CI pipeline: cloning the repo, building the Docker image, performing some tests, and pushing the image to a registry. The difference this time is that at the end of the build, it will send all the image metadata to Port so it’s accessible in the Catalog.
The final result will be a new instance in Port with all the information sent from Codefresh:
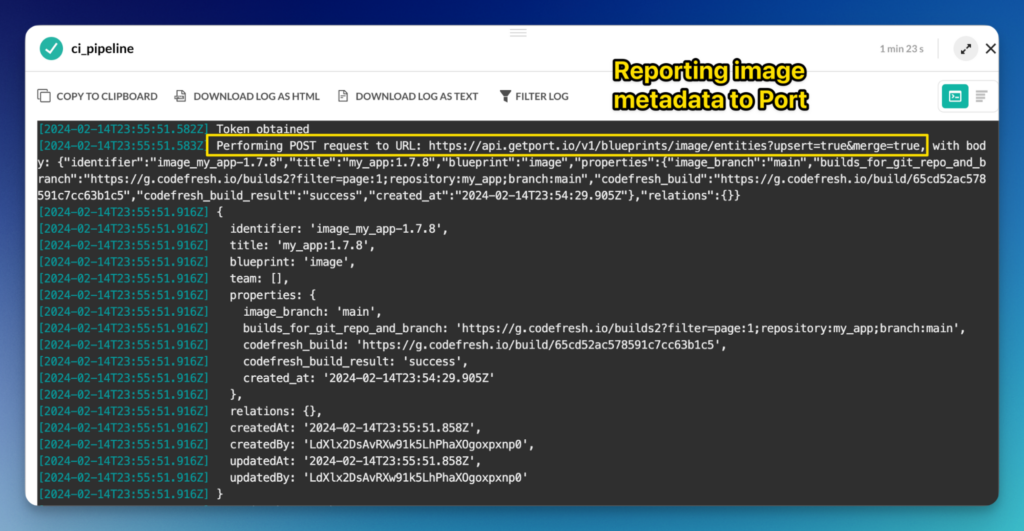
Now when a Codefresh pipeline runs, its results will also be visible in Port. Here is how it looks in the image list of Port.
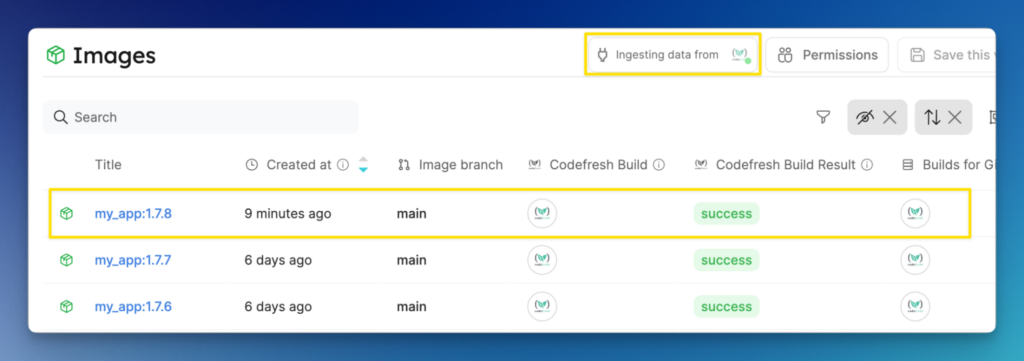
Developers can also click on an individual image and see more details including a link back to the Codefresh pipeline that created it.
Implementing the Continuous Deployment Flow
With the Image instances in Port, we now need to simulate the flow of deploying an artifact using Bamboo.
In this case, we’ll leverage the Actions in Port to define an Image and an Environment to deploy that Image.
Actions in Port are specific UI dialogs that allow users to initiate any kind of flow needed by the platform. Port only initiates actions. To actually implement them a second system is needed – Codefresh in our case.
Port will send that information to Codefresh, via the Kafka queue in combination with the Codefresh Agent to execute the corresponding “Deployment Pipeline”.
Modeling User Interactions through Actions in Port
To implement the desired flow (a form where the user can select the image and the environment to deploy to), we’ll create two different Port Actions. We need to cover both scenarios:
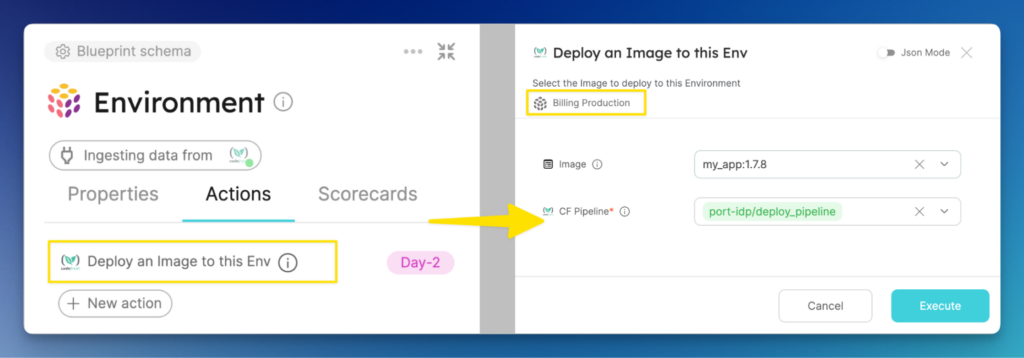
- The user is in the context of an Environment instance (Prod, Staging, etc.), and it wants to select the image to deploy to that Environment
- The user is in the context of an Image instance, and it wants to select the Environment to deploy that image to.
The implementation of those Actions in Port looks like this:
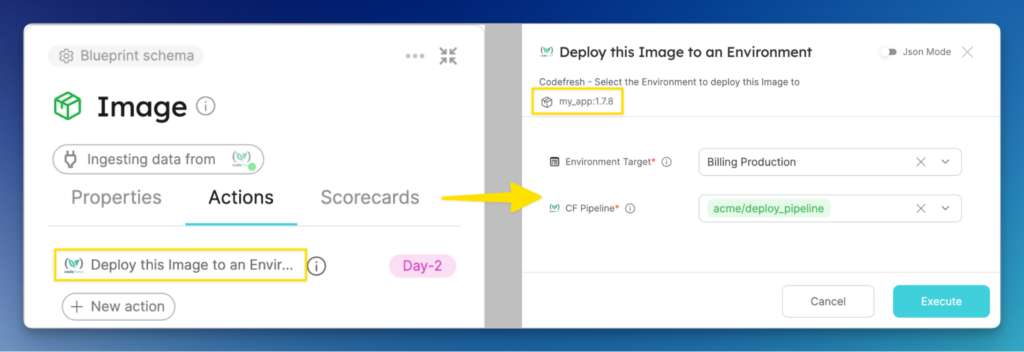
Users can also start a deployment from an environment
Here is the full specification of the Actions required to implement this flow:
- github.com/codefresh-contrib/codefresh-port-internal-portal/port/environment_actions.json
- github.com/codefresh-contrib/codefresh-port-internal-portal/port/image_actions.json
The role of the Codefresh Agent (the Event Manager)
In order to trigger a build in Codefresh using Port, we will use the Kafka queue provided by Port to store the events-payload generated by the Port Action. The Codefresh Agent will then process the events-payload and trigger the corresponding build in Codefresh, as described in the “Solution Overview” diagram.
For this project, we have implemented the Codefresh Agent as a Lambda function, but it can be deployed in any other way, such as in a Kubernetes cluster, an ECS task, etc.
Below is a code snippet that pulls the events from Kafka, processes and parses them, and finally triggers the Codefresh build:
def lambda_handler(event, context):
    '''
    Receives an event from AWS, if configured with a Kafka Trigger, the event includes an array of base64 encoded messages from the different topic partitions
    '''
    ...
    for messages in event['records'].values():
        for encoded_message in messages:
            try:
                message_json_string = base64.b64decode(
                    encoded_message['value']).decode('utf-8')
                message = json.loads(message_json_string)
                run_id = message['context']['runId']
                # The pipeline to execute will come from the cf_pipeline property of the Action in Port
                # It needs to match an existing CF pipeline ID or Pipeline Full Name. E.g., '64ed0bc7c64d3336272d6c51' or 'my_project/my_pipeline'
                pipeline_id = message['payload']['properties']['cf_pipeline']
                build_id = run_codefresh_pipeline(pipeline_id, message)
                links = [f'{CODEFRESH_URL}/build/{build_id}']
                report_action_links(run_id, links)

                run_status_from_build_id = convert_build_id_to_run_status(
                    build_id)
                logger.info(
                    f'Run status based on resulting Build Id ({build_id}): {run_status_from_build_id}')

                if run_status_from_build_id == PORT_RUN_STATUSES['failure']:
                    report_action_status(run_id, run_status_from_build_id)
                ...
    return {"message": "ok"}
To view all the required code for the Codefresh Agent (via a Lambda Function), please refer to this link: github.com/codefresh-contrib/codefresh-port-internal-portal/codefresh_agent-event_manager/lambda_function.py.
Parsing the Port’s Event Payload in a Codefresh Build
Finally, our Deployment Pipeline needs to get access to the options selected by the user in Port’s interface: the Environment and Image selected.
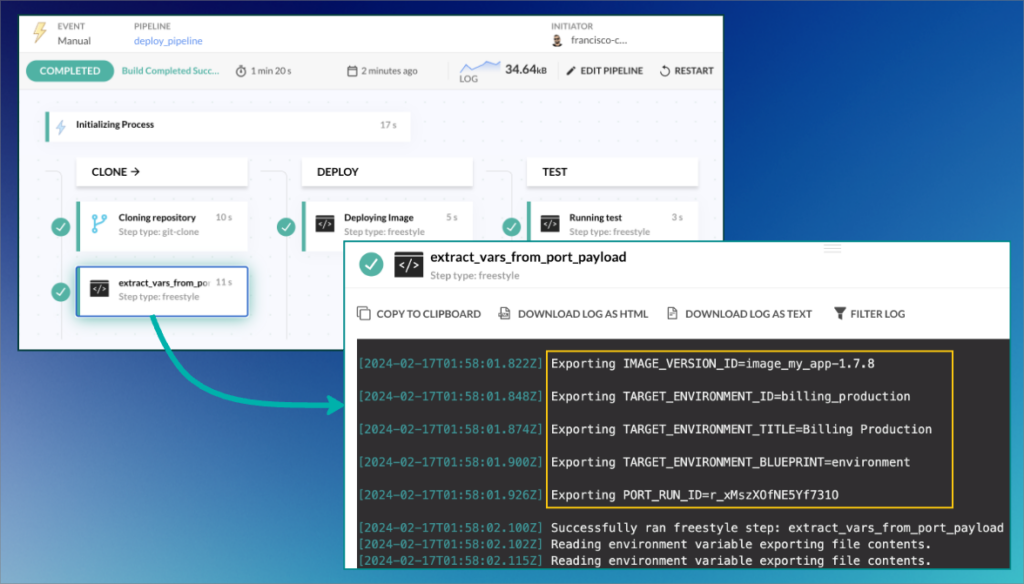
To do that, we can add a new step to our Deployment Pipeline: extract_vars_from_port_payload or parse_port_payload.
This step will parse the Port’s Payload available in the environment variable called port_payload (automatically set up by the Codefresh Agent when it triggers the build in Codefresh).
It will also instantiate new Pipeline Variables so they’re accessible to subsequent steps (e.g., the Environment to deploy to, the image to be deployed, the associated Port Action Run ID, and the Blueprint Entity ID of the instance in Port that’s associated with the Actions.
The following is a snippet of the Deployment Pipeline. More specifically, the extract_vars_from_port_payload step:
extract_vars_from_port_payload:
    type: "freestyle"
    image: "codefresh/cli"
    shell: bash
    working_directory: "${{clone}}"
    commands:
      - |+
        export PORT_PAYLOAD=$port_payload
        export ENTITY_BLUEPRINT="`jq -r .payload.entity.blueprint <<< ${PORT_PAYLOAD}`"
        export IMAGE_VERSION_ID_PATH='.payload.properties.image'
        export TARGET_ENVIRONMENT_ID_PATH='.payload.entity.identifier'
        export TARGET_ENVIRONMENT_TITLE_PATH='.payload.entity.title'
        export TARGET_ENVIRONMENT_BLUEPRINT_PATH='.payload.entity.blueprint'
        if [[ "$ENTITY_BLUEPRINT" == "image" ]] ; then
          export IMAGE_VERSION_ID_PATH='.payload.entity.identifier'
          export TARGET_ENVIRONMENT_ID_PATH='.payload.properties.environment_target'
          export TARGET_ENVIRONMENT_TITLE_PATH='.payload.properties.environment_target'
        fi
        cf_export IMAGE_VERSION_ID="`jq                           -r $IMAGE_VERSION_ID_PATH <<< ${PORT_PAYLOAD}`"
        cf_export TARGET_ENVIRONMENT_ID="`jq                -r $TARGET_ENVIRONMENT_ID_PATH <<< ${PORT_PAYLOAD}`"
        cf_export TARGET_ENVIRONMENT_TITLE="`jq         -r $TARGET_ENVIRONMENT_TITLE_PATH <<< ${PORT_PAYLOAD}`"
        cf_export TARGET_ENVIRONMENT_BLUEPRINT="`jq -r $TARGET_ENVIRONMENT_BLUEPRINT_PATH <<< ${PORT_PAYLOAD}`"
        cf_export PORT_RUN_ID="`jq                                      -r .context.runId <<< ${port_payload}`"
Once we have parsed the payload and exported the corresponding pipeline variables, the Deployment Pipeline has all the information required to make the deployment of the image to the desired environment:
At this point, it’s up to the user how to deploy the application (the new image). It can be a step that directly interacts with a Kubernetes cluster, a step that deploys a Helm Chart, or a step that commits the desired state to the manifest repository monitored by an Argo CD Application. Codefresh supports these and many other deployment options.
Reporting the Codefresh build Result to the corresponding Port Action Run
Each time an Action in Port is executed, it results in an Action Run.
In an analogy, Actions Runs and Actions in Port are very similar to what a Build is for a Pipeline in Codefresh. They’re instances of the predefined automation or step.
When a developer deploys an image to an environment by executing an Action in Port, which then triggers a build in Codefresh, it’s important for the user to track the final status of the corresponding build in Codefresh and, of course, understand what is the build ID triggered by the Action Run.
This kind of feedback is something we can implement by updating the Action Run metadata during the execution of the Build in Codefresh.
The following is a snippet of code in Python to achieve that result. The idea is to execute it as part of an on_finish hook so that it can report to Port the final status of the build:
## Expects the following Environment Variables
## CLIENT_ID: the PORT_CLIENT_ID
## CLIENT_SECRET = the PORT_CLIENT_SECRET
## PORT_RUN_ID = the PORT_RUN_ID. It'll be available in the payload sent by Port
## CF_BUILD_STATUS = the build status. To be determined during the post-build stages

# Constants
PORT_RUN_RUNNING_STATUS = 'RUNNING'
PORT_RUN_SUCCESS_STATUS = 'SUCCESS'
PORT_RUN_FAILURE_STATUS = 'FAILURE'
...

def report_action_status(run_id: str, cf_build_status: str):
    '''
    Reports to Port on the status of an action run
    '''
    cf_build_status = cf_build_status.lower()
    port_run_status = PORT_RUN_RUNNING_STATUS
    if cf_build_status.count("success") > 0:
        port_run_status = PORT_RUN_SUCCESS_STATUS
    elif cf_build_status.count("fail") > 0 or cf_build_status.count("error") > 0 :
        port_run_status = PORT_RUN_FAILURE_STATUS


    port_run_summary = PORT_RUN_SUMMARY if PORT_RUN_SUMMARY != '' else f"The action status is {port_run_status}"
    token = get_port_api_token()

    headers = {
        'Authorization': f'Bearer {token}'
    }

    body = {
        "status": port_run_status,
        "summary": port_run_summary
    }

    logger.info(f'Reporting action {run_id} status:')
    response = requests.patch(f'{API_URL}/actions/runs/{run_id}', json=body, headers=headers)
    logger.info(response.status_code)

    return response.status_code
The full script is available here: github.com/codefresh-contrib/codefresh-port-internal-portal/codefresh/report_run_status.py, and here you can see where exactly this script is used during our Deployment Pipeline:
github.com/codefresh-contrib/codefresh-port-internal-portal/codefresh/deployment_pipeline.yaml
This concludes the main overview of the implementation. Now let’s look at the adoption of the solution within the Telco teams.
Migrating to the new Developer Portal
In the end, the Telco platform team managed to implement an experience adapted to the developer requirements while achieving the goal of modernizing their CI/CD by transitioning to Codefresh. In this section, we’ll see what the new experience looks like compared to what the team had when using Bamboo.
We were successful in creating a customized experience that met the team’s needs and accomplished the objective of upgrading their CI/CD by moving to Codefresh. Here is a comparison of the new experience with what the team previously had while using Bamboo:
The dashboard presenting the Environments of a Product (“Deployment Project” in Bamboo) and the information associated with each Environment:
Deployment form to select the Image (“Release|Artifact” in Bamboo) to deploy to the Environment:

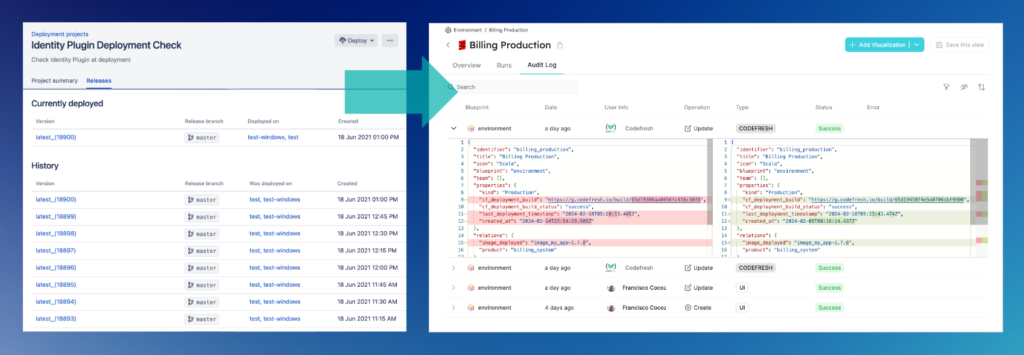
Full auditability of the Deployment history:
Future Considerations
When using an Internal Developer Portal, you need to consider that in addition to your CI/CD tool (Codefresh), you may need to pay for the portal’s licenses, depending on the size of your team. If you establish an internal initiative to leverage all the features a portal can offer to your organization, you will see a greater return on this investment.
Here are some benefits of utilizing a portal:
- It improves the developer experience and productivity by reducing the cognitive load and complexity associated with common tasks.
- It enables faster and more frequent delivery of software features and updates by integrating with the different tools that are part of the development process (CI/CD platforms, git providers, registry providers).
- It promotes standardization and consistency across the software development lifecycle by using reusable components, services, and processes.
- It improves system reliability by automating infrastructure operations, testing, and deployment.
It is also important to mention that both environments and “products” are natively supported in the GitOps component of Codefresh Enterprise.
Summarizing success
In conclusion, transitioning from Atlassian Bamboo to Codefresh was challenging but necessary for our large telecommunications customer. The migration was successful, and we were able to avoid additional friction or overhead for the users (developers, project managers, and release engineers). In a short period of time, this team fully migrated their operations to Codefresh.
This implementation demonstrates that it’s possible to combine multiple tools to achieve a successful migration. In this case, leveraging Port as the interface, dashboard, and catalog provider; while using Codefresh as the automation engine behind the scenes. All of this without compromising the goals and requirements established during the design phase.
As a result, all development teams of this sub-organization at the Telco were able to standardize Codefresh as their CI/CD platform, which has intangible benefits on its own. Additionally, they were able to have a fully customized presentation of the information they care about.
With the initial implementation of the Developer Portal, this team can start exploring new and modern strategies to build and deploy software, such as GitOps. This has given them a clear path forward for the future of their applications.
We’ve shown that Codefresh is a great fit for integrating with Internal Developer Portals to achieve any desired customization and workflow. This opens up multiple possibilities and provides a reliable solution for upcoming projects. It’s important to note that the project discussed in this blog post is just one of the several scenarios where we can use Codefresh as our automation platform.
If you are interested in learning more or discussing how this solution can be applied to your organization, please reach out to [email protected].