This article is part of our series “Codefresh in the Wild” which shows how we picked public open-source projects and deployed them to Kubernetes with our own pipelines. The results are public at https://github.com/codefresh-contrib/example-draw.io-application
This week’s pick is draw.io an online application for drawing different types of diagrams. We will use several tools such as GitHub, Docker, Helm Codefresh, Argo Rollouts, Argo CD. This guide chronicles how we integrated all those tools together in order to build an end-to-end Kubernetes deployment workflow.
About Draw.io
Draw.io is a well-known whiteboarding / diagramming application and we were surprised to see that not only do they have a SaaS service, but you can also host your own instance locally — there are several different versions. We have selected a simple one that includes one deployment and a service.
We started by forking https://github.com/jgraph/docker-drawio. This gives us a starting point and we now need to create a simple Helm chart for it for better interaction with Argo CD.
Creating a Continuous Integration process
The first step is always to create a Continuous Integration (CI) pipeline that takes the source code and creates a docker image after performing several tests.
The CI component of the project was completed using a Codefresh CI pipeline which includes clone, lint, build, cypress tests, approval, push, update and commit steps.
Here is the visual overview of the pipeline:
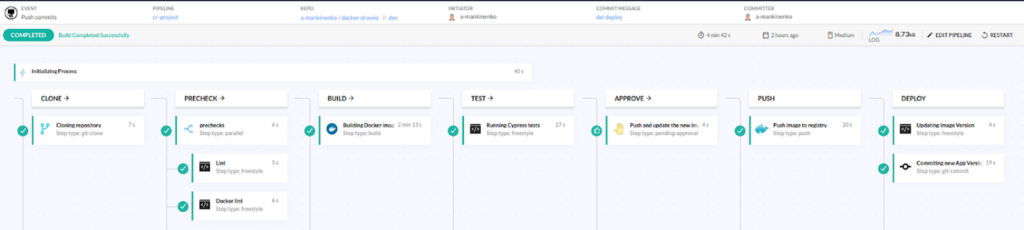
The pipeline includes the following stages
- Clone – fetches all code from the Git repo
- Lints the source code and the Dockerfile
- Creates a container image
- Runs integration steps with Cypress
- Waits for manual approval
- Push the image to a container registry
- Updates the image version in the Kubernetes manifests
- Pushes the Kubernetes manifests (so that Argo CD takes over)
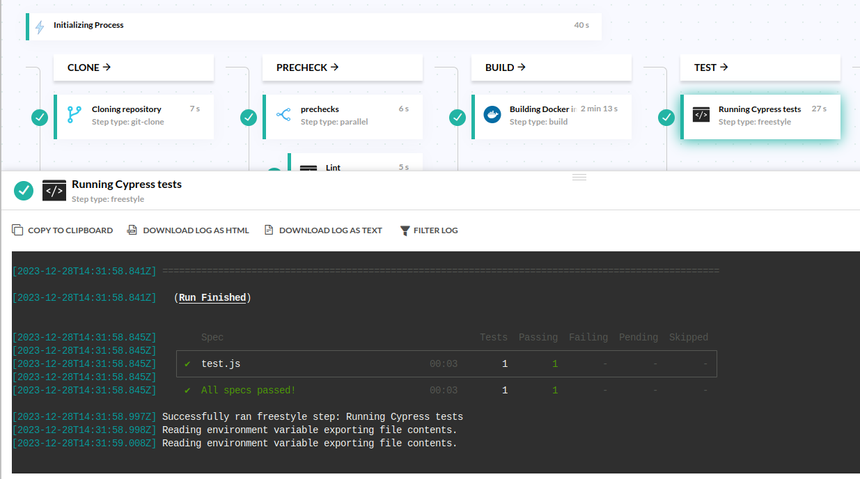
The Cypress tests step includes a service container with a readiness block that starts the container we built in this pipeline and executes a simple cypress test plan in the live environment, if it fails for any reason the build will immediately stop.
test:
   image: cypress/included:9.7.0
   title: "Running Cypress tests"
   working_directory: "${{clone}}/cypress/test"
   stage: test
   commands:
    - cypress run
   services:
    shared_host_network: true
    composition:
     drawio:
      image: ${{build}}
      ports:
        - 8080
        - 8443
    readiness:
            image: 'byrnedo/alpine-curl'
            timeoutSeconds: 5
            periodSeconds: 3
            commands:
              - "curl drawio:8080"
This means that our build will succeed only if Cypress tests also finish with success.
Here is an example run:
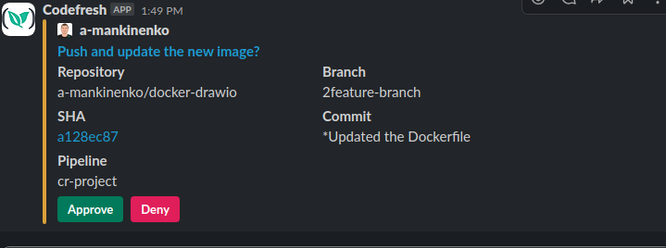
If the tests are successful we move on to the Approval step that we can approve or decline in the build UI or in the Slack notification message (received from Codefresh Jira integration):
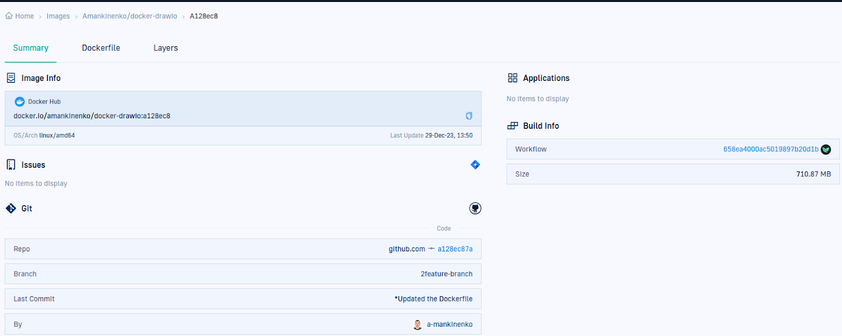
We need to decide if we need to push the image and then to update the Argo CD manifest. After the image is pushed we can observe it in the images menu enriched with the Git commit information:
In the next step we update the ArgoCD application with the new image version in update_tag step:
update_tag:
     title: Updating Image Version
     type: freestyle
     stage: deploy
     working_directory: "${{clone}}"
     arguments:
       image: mikefarah/yq:4
       commands:
         - yq -i e '.spec.source.helm.parameters[1].value = "${{CF_SHORT_REVISION}}"' argocd-apps/drawio.yaml
         - cat argocd-apps/drawio.yaml
In this step, we use the yq tool to update the ArgoCD manifest that is located in the same repository (for learning purposes only, I’d recommend keeping the Git-Source and application manifests in a separate repository). After these changes we continue to the CD part which is powered by the ArgoCD and Argo Rollouts.
Continuous Deployment with Argo CD and Argo Rollouts
As a first deployment we can use the friendly Codefresh UI to create an Argo CD application manually. Note that even in this case Codefresh will actually create a commit for us behind the scenes. This is why the button says “Commit” and not “Save” or “Apply” 🙂
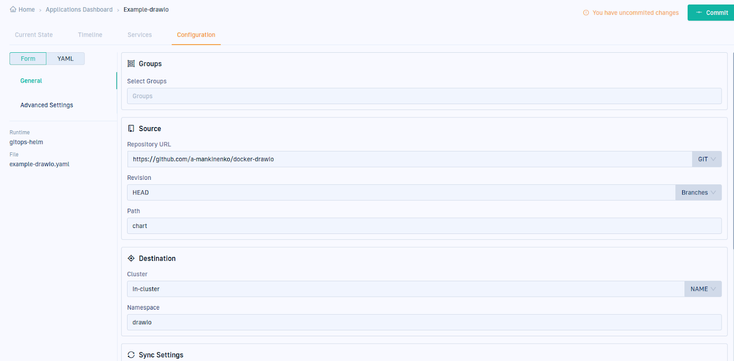
After adjusting a few settings and adding the necessary values.yaml files, here is the created Argo CD application manifest:
apiVersion: argoproj.io/v1alpha1
kind: Application
metadata:
  name: drawio
  finalizers:
    - resources-finalizer.argocd.argoproj.io/foreground
spec:
  project: default
  source:
    path: chart
    repoURL: https://github.com/a-mankinenko/docker-drawio
    targetRevision: dev
    helm:
      valueFiles:
        - values.yaml
      parameters:
        - name: image.repository
          value: amankinenko/docker-drawio
        - name: image.tag
          value: 13647df
  destination:
    name: in-cluster
    namespace: drawio
  syncPolicy:
    automated:
      prune: false
      selfHeal: false
      allowEmpty: false
    syncOptions:
      - PrunePropagationPolicy=foreground
      - Replace=false
      - PruneLast=false
      - Validate=true
      - CreateNamespace=true
      - ApplyOutOfSyncOnly=false
      - ServerSideApply=true
      - RespectIgnoreDifferences=false
Since we have a Helm chart for draw.io , we have created a Rollout resource from the application deployment and added a canary rollout strategy in it:
apiVersion: argoproj.io/v1alpha1
kind: Rollout
metadata:
name: {{ include "drawio.name" . }}
labels:
app: {{ include "drawio.name" . }}
spec:
replicas: {{ .Values.replicaCount }}
revisionHistoryLimit: 1
selector:
matchLabels:
app: {{ include "drawio.name" . }}
template:
metadata:
labels:
app: {{ include "drawio.name" . }}
spec:
containers:
- name: {{ include "drawio.name" . }}
image: "{{ .Values.image.repository }}:{{ .Values.image.tag }}"
imagePullPolicy: Always
ports:
- containerPort: 8080
protocol: TCP
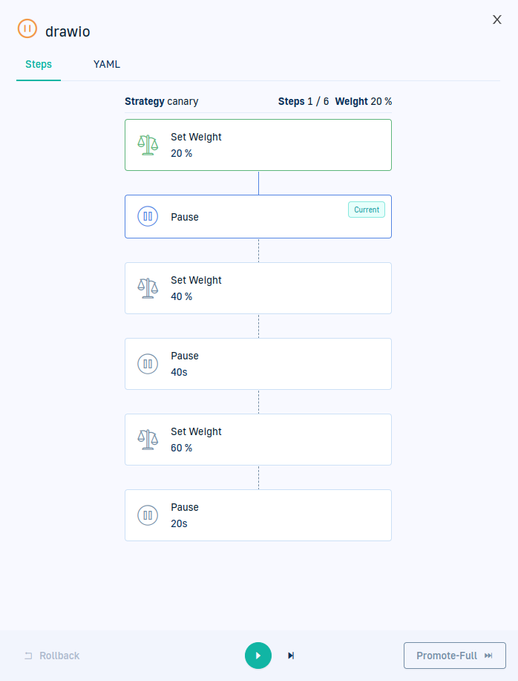
strategy:
canary:
steps:
- setWeight: 20
- pause: {}
- setWeight: 40
- pause: {duration: 40s}
- setWeight: 60
- pause: {duration: 20s}
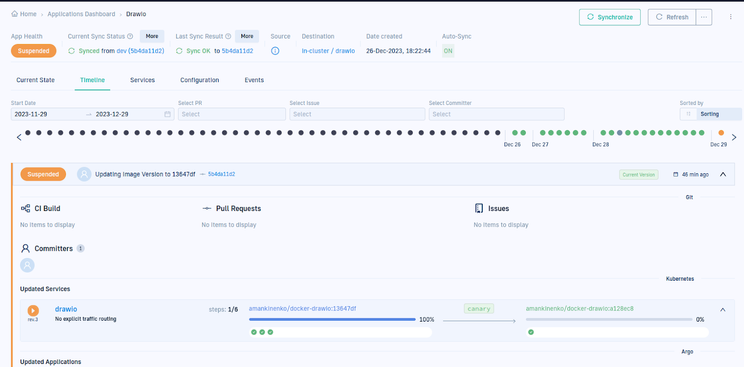
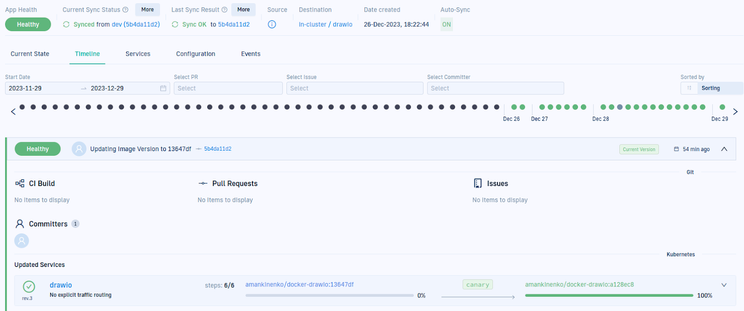
If you want to learn more about canaries and Argo Rollouts, see our documentation for progressive delivery. In this case we set the percentage of traffic that should be sent to the canary to 20 and pause the rollout waiting for the operator to continue it manually. After resuming the rollout we increase the percentage further. The Codefresh Timeline tab allows us to see the overall rollout progress:
Also we can get more information about the rollout stage and status in the Rollout Player
Finally the rollout is complete and we can see that everything went well:
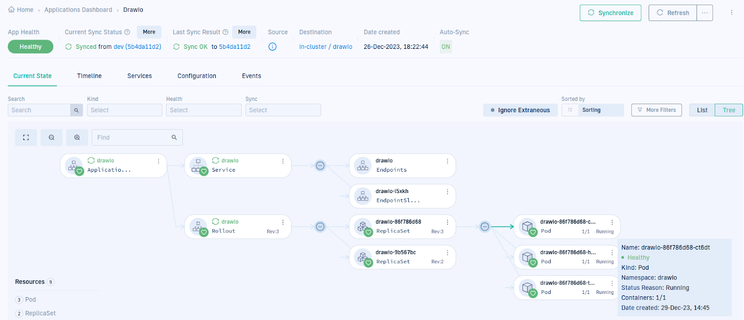
We can also visit the GitOps application Current State overview and see that all Kubernetes resources are deployed successfully.
Conclusion
In this article we have seen how…
- We picked the draw.io diagramming application for our project
- We forked the dockerfile and manifests to this project repository
- We created a Helm chart for a Kubernetes deployment
- We created CI pipeline found in the project repository
- We created an ArgoCD application for the image built in the CI pipeline
- We created a canary rollout for the ArgoCD application and successfully deployed it
This way we’ve got a simple and complete CI/CD process that includes Codefresh Pipelines, an ArgoCD application deployment and Argo Rollouts with Canary deployment for Progressive Delivery
Resources and Links
- Project Repository: GitHub – codefresh-contrib/example-draw.io-application
 Introduction to Codefresh pipelines
- Example Argo CD application in Codefresh documentation
- Slack integration documentation
- Images in Codefresh
- Managing Argo CD applications
- Argo Rollouts – Kubernetes Progressive Delivery Controller
Photo by Jonathan Ridley on Unsplash