In our last webinar, we showed how to create an efficient Docker build pipeline for Java apps. We found that a lot of “Docker for Java developers” tutorials out there unintentionally encourage some Docker bad practices. So we had our Cheif Researcher, Alexei Ledenev, demonstrate how to craft the perfect Java-Docker build flow to consistently produce small, efficient, and secure Docker images.
View the webinar on-demand to learn:
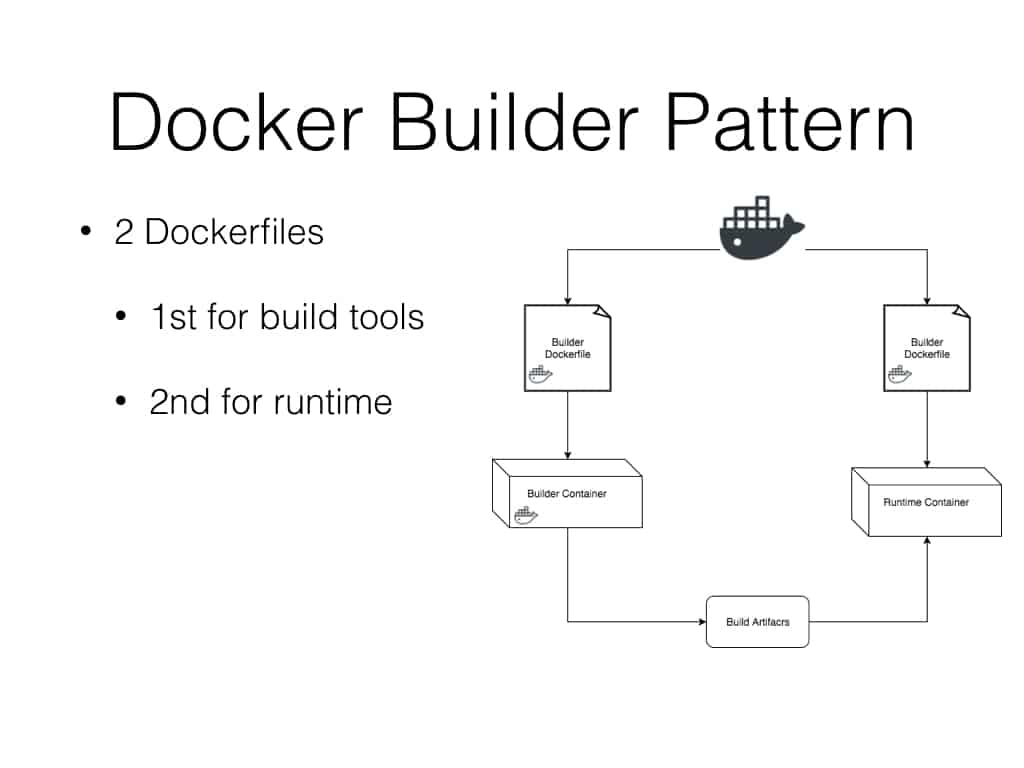
- The Docker Builder Pattern
- How to define all pipeline steps and Dockerize them
- How to pass build context between steps
- How to Automate your build pipeline
- Java tips/ best practices for each step
Highlights of Alexei’s Talk:
Common Pitfalls
Most new Docker users start with a “Naive Approach” when Dockerizing their application and use a familiar VM build and install flow. In fact, there are many blog posts and articles teach you to do this. They usually start with some kind of Linux image, and first install all required packages, Oracle JDK, etc. Then they copy all project files into this box, run maven install, and define the command line or how the app should be executed. This is a straight forward process but what you’re actually left with is a huge image size. In this case, the image is 1.3 GB in size and took me 30 minutes to build on my laptop.
# start from ubuntu
FROM ubuntu:14.04

# add required packages and java repository
RUN apt-get update && apt-get install -y python-software-properties software-properties-common
RUN add-apt-repository ppa:webupd8team/java

# install Oracle JDK 8 with auto-accept license agreement
RUN echo "oracle-java8-installer shared/accepted-oracle-license-v1-1 boolean true" | debconf-set-selections
RUN apt-get update && apt-get install -y oracle-java8-installer maven

# add ALL project files
ADD . /usr/local/app

# build Java application with Maven (fetch packages, compile, test and deploy)
RUN cd /usr/local/app && mvn install

# define default command to run the application
CMD ["/usr/bin/java", "-jar", "-Dspring.profiles.active=test", "/usr/local/app/target/spring-boot-rest-example-0.3.0.war"]Anther approach “standard” most people use is take image library, prepared images, install maven, when do one trick -add own maven project file, and install all dependencies, for every build docker tries to recreate this layer, if file had not been changed it will use cache from the previous build, in this case if didn’t download diff dependencies it will be
FROM java:8

# Install maven
RUN apt-get update
RUN apt-get install -y maven

WORKDIR /code

# Prepare by downloading dependencies
ADD pom.xml /code/pom.xml
RUN ["mvn", "dependency:resolve"]
RUN ["mvn", "verify"]

# Adding source, compile and package into a fat jar
ADD src /code/src
RUN ["mvn", "package"]

EXPOSE 4567
CMD ["/usr/bin/java", "-jar", "-Dspring.profiles.active=test", "target/spring-boot-rest-example-0.3.0.war"]
“A Linux container is nothing more than a process that runs on Linux. It shares a host kernel with other containerized processes.” –Joe Fernandes, Senior Director, OpenShift Product Management, Red Hat
What is the bare minimum required to run Java App?
- Base Image with C Runtime and Posix shell (Alexei recommends Alpine)
- Java Runtime Environment (OpenJDK JRE)
- Application byte-code and resources (app.jar)
- 3rd Party Libraries (lib/*.jar)
- Optionally HTTP server (Alexei recommends Tomcat, Jetty, or Netty, not enterprise servers since their design wasn’t built for containers)
Why is your Docker image size important?
- Time to build
- Network latency
- Storage
- Service availability and elasticity
- Security
- Development agility
Docker Builder Pattern
Java Docker Builder
Our Java Docker builder should contain the following:
- Base Image with C Runtime and Posix shell (Alpine)
- Java Development Kit (OpenJDK)
- Javac or other JVM compiler (Scala, Kotlin, …)
- Build Management Tool (Maven, SBT, Gradle, …)
- Linters, code scanners, test frameworks, test tools,
Maven Builder Dockerfile
FROM openjdk:8-jdk-alpine

RUN apk add --no-cache curl tar bash

ARG MAVEN_VERSION=3.3.9
ARG USER_HOME_DIR="/root"

RUN mkdir -p /usr/share/maven &&
  curl -fsSL http://apache.osuosl.org/maven/maven-3/$MAVEN_VERSION/binaries/apache-maven-$MAVEN_VERSION-bin.tar.gz | tar -xzC /usr/share/maven --strip-components=1 &&
  ln -s /usr/share/maven/bin/mvn /usr/bin/mvn

ENV MAVEN_HOME /usr/share/maven
ENV MAVEN_CONFIG "$USER_HOME_DIR/.m2"
# speed up Maven JVM a bit
ENV MAVEN_OPTS="-XX:+TieredCompilation -XX:TieredStopAtLevel=1"

ENTRYPOINT ["/usr/bin/mvn"]

# make source folder
RUN mkdir -p /usr/src/app
WORKDIR /usr/src/app

# install maven dependency packages (keep in image)
COPY pom.xml /usr/src/app
RUN mvn -T 1C install && rm -rf target

# copy other source files (keep in image)
COPY src /usr/src/app/src
Java App Dockerfile
FROM openjdk:8-jre-alpine

COPY spring-boot-*.war /app.war

CMD ["/usr/bin/java", "-jar", "-Dspring.profiles.active=test", "/app.war"]
Build Pipeline Orchestration
…

builder:
    docker build -t $(NS)/builder:mvn -f Dockerfile.build .

mvn-package: builder
    docker run -it --rm -v $(shell pwd)/target:/usr/src/app/target $(NS)/builder:mvn package -T 1C -o -Dmaven.test.skip=true

mvn-test: builder
    docker run -it --rm -v $(shell pwd)/target:/usr/src/app/target $(NS)/builder:mvn -T 1C -o test

docker:
    docker build -t $(NS)/$(REPO):$(VERSION) target

build: builder
    make docker

push:
    docker push $(NS)/$(REPO):$(VERSION)

release: build
    make push -e VERSION=$(VERSION)

…

default: build
Demo
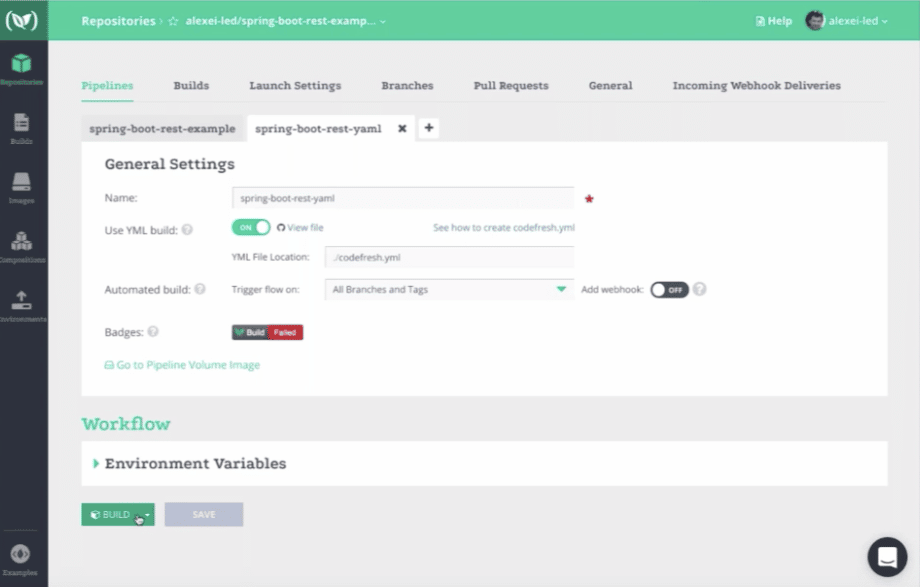
In the demo, Alexei shows how to easily automate your pipeline using a Docker-native CI/CD like Codefresh to consistently produce small, efficient, and secure Docker images.
(See demo – 32 minutes 25 seconds of the webinar)
- Using a Codefresh YAML file like this:
version: '1.0' steps: mvn_builder: type: build description: create Maven builder dockerfile: Dockerfile.build image_name: alexeiled/mvn-builder mvn_test: description: run unit tests image: ${{mvn_builder}} commands: - mvn -T 1C -o test mvn_package: description: package application WAR image: ${{mvn_builder}} commands: - mvn package -T 1C -o -Dmaven.test.skip=true build_image: type: build description: create Docker image with application WAR dockerfile: Dockerfile working_directory: ${{main_clone}}/target image_name: alexei-led/sbdemo image_push: type: push description: push to DockerHub candidate: '${{build_image}}' tag: ‘${{CF_BRANCH}}' - Using the Codefresh UI
Additional Resources
- Check out Alexei’s blog post – Crafting perfect Java Docker build flow
- Join our next in-person or online event
- Request a one-on-one onboarding session with our support engineers to configure your automated pipeline in Codefresh.
- Email us with questions, feedback, or webinar topic requests at [email protected]