One of the unique advantages of Codefresh is the easy way for sharing data between pipeline steps. In other CI solutions it is your responsibility to decide what files should be shared with the next pipeline step or not and you need to manually upload/download or save/restore the exact folders that need to be shared. This is not only cumbersome to setup but also super slow in the case of big artifacts.
Codefresh offers instead a shared directory volume that by default is accessible to all pipeline steps. Everything you copy to that volume is automatically moved to the next pipeline step without any further setup.
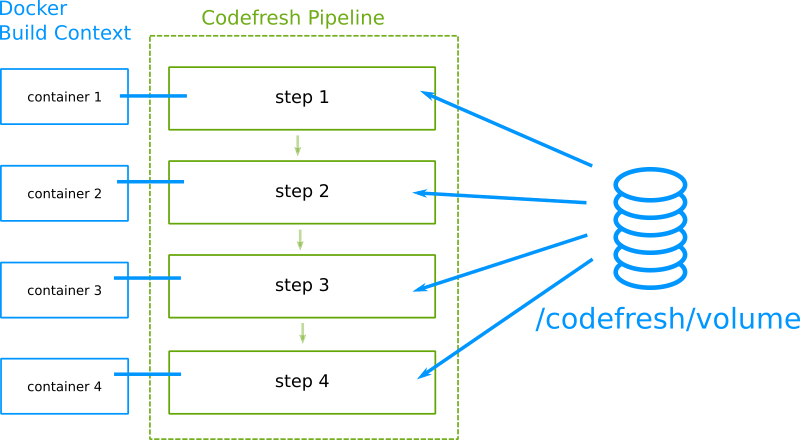
This shared folder is mounted at /codefresh/volume and you can read more details about it in the introduction for Codefresh pipelines.
This shared volume is very useful and can be used for all sorts of artifact sharing such as Node.js modules, Maven dependencies, GoLang vendoring etc.
But what if you need to share data across different builds? Maybe you have some different but related pipelines (e.g. building multiple Java microservices) where you want to have access to a shared folder outside of the same pipeline.
Or you might want to split your workflow into different pipelines that call each other in a parent-child relationship and you want to move a large amount of data from the parent pipeline to its children pipelines.
This is a very common question among Codefresh customers, especially in the case of parent/child pipelines.The “parent-child” pipeline pattern is indeed a very popular approach when implementing complex Codefresh pipelines. The `codefresh-run` plugin|step has more than 9 million executions so far 🙂
Setting up a common workspace directory between different pipelines
Several of our customers have taken different approaches to sharing data between different pipelines.
These include
- Uploading/downloading artifacts to network/cloud storage (slow and needs manual setup)
- Passing data via pipeline variables (easy but limited)
- Passing data via build annotations (ineffective for large amounts of data)
In the case of parent/child pipelines defining some variables from the parent to its children can get you a long way towards data sharing. There are some cases however when the data to be transferred is too big for using variables or annotations. That’s where having a mechanism to share a volume across pipelines is useful.
Ideally pipelines should have access to a common workspace folder where builds can consume assets created from other builds without any manual setup involved. That folder should work like /codefresh/volume but it should be available among different pipelines and not just pipeline steps.
In this blog post we’ll show you exactly how to configure this common workspace folder in your Codefresh Hybrid Runner.
Prerequisites
The approach we will describe needs the following
- A Codefresh account
- A Cloud filesystem (we will use Amazon Elastic File system in our example)
- A Kubernetes cluster with access to the cloud volume
- A Codefresh runner installation (i.e. this feature is not available to SAAS environments)
Note that you need to have some basic knowledge of Kubernetes, how Persistent volumes work and how to create storage objects in your cloud provider.
The steps we will follow are:
- Creation of the network object that will be used as the shared workspace
- Connecting the network storage object to a Kubernetes cluster as a volume
- Mounting the volume to the Codefresh runtime
- Running Codefresh pipelines that take advantage of the shared volume
Let’s see these in order.
Using Amazon EFS for shared pipeline storage
For demonstration purposes, we will use AWS EFS as our backend. The reason we picked EFS is that it supports access from multiple Availability Zones (AZ) concurrently and `ReadWriteMany` access mode which is required.
The first thing to do is to create an EFS file system in your Amazon account. See the AWS documentation if you are not familiar with the process.
Do not forget to:
- Install the CSI driver for EFS in your cluster.
- Create the corresponding mount targets for your different AZs.
- Note down the file system ID (you will need it later)
Once this is done, we are ready to pass the file system object to Kubernetes in the form of Persistent Volumes (PV) and Persistent Volume Claims (PVC).
Attaching EFS volumes to Kubernetes
To make Kubernetes aware of our new storage object let’s create a new Storage Class.
kind: StorageClass
apiVersion: storage.k8s.io/v1
metadata:
  name: efs-sc
provisioner: efs.csi.aws.com
With the storage class set we can now create a Volume in Kubernetes.
Enter the EFS file system ID that you was provided to you during the filesystem creation in the csi.volumeHandle field:
apiVersion: v1
kind: PersistentVolume
metadata:
  name: 'efs-runner-share'
spec:
  capacity:
    storage: 5Gi
  volumeMode: Filesystem
  accessModes:
    - ReadWriteMany
  persistentVolumeReclaimPolicy: Retain
  storageClassName: efs-sc
  csi:
    driver: efs.csi.aws.com
    volumeHandle: "fs-xxxxxxxxxxxxxxxxx"
Note: the capacity.storage defined is irrelevant. The EFS file system will expand as required.
Finally let’s create a Volume claim to get access to the storage object., The namespace for the PVC must match the namespace where your Codefresh Hybrid Runner is installed.
apiVersion: v1
kind: PersistentVolumeClaim
metadata:
  name: efs-runner-share
  namespace: runner
spec:
  accessModes:
    - ReadWriteMany
  storageClassName: efs-sc
  resources:
    requests:
      storage: 5Gi
Apply all the manifests above either with kubectl or even better with the Codefresh GitOps module 🙂
Mounting the shared volume to Codefresh pipelines
Now that shared storage is attached to your Kubernetes cluster, we are ready to configure our Codefresh runtimes to take advantage of it.
We are assuming you have a Hybrid Runner and Runtime Environment created already; if that’s not the case, check our documentation for detailed instructions.
Make sure that you have the Codefresh CLI installed locally. Export your Runtime Environment (RE) definition to a file using:
codefresh get re-o yaml > RE.yaml
Now, let’s mount the volume we created to our runtime environment. Under the dockerDaemonSchedule block, add the following:
dockerDaemonScheduler:
…
  userVolumeMounts:
    share-volume:
      name: efs-runner-share
      mountPath: /codefresh/share
  userVolumes:
    share-volume:
      name: efs-runner-share
      persistentVolumeClaim:
        claimName: efs-runner-share
Save your file and patch the RE
codefresh patch re -f RE.yaml
You have now a new volume mounted at /codefresh/share for all the builds associated with this RE. Success!
Caveat: clean up the volume
This is a permanent volume that is not managed by our normal cleaning mechanisms, so be sure to take care of deleting old files on a regular basis. You can use a cron pipeline to do that independently (maybe with a find command) or use pipeline hooks to delete files at the start/end of each run. This will depend on your exact use case.
How to use the global shared volume in Codefresh pipelines
With the initial setup out of the way, you are now ready to share data between different Codefresh pipelines. This is as easy as writing/reading data from /codefresh/share in any of your pipelines that run on the Codefresh runtime that has the volume attached.
Example scenario: Global Maven caching
For maven caching, it’s just a matter of using the correct option to setup your folder on that shared volume.
  build_application:
    title: "Building website"
    image: maven:3.3-jdk-8
    working_directory: "${{clone}}"
    commands:
      - mvn -Dmaven.repo.local=/codefresh/share/m2_repository package
    stage: "build"
In this case a cron pipeline would be in charge of cleaning this folder on a regular basis (interval will depend on usage, size, …)
Example scenario: sharing data between parent/child Codefresh pipelines
Here we need to find a mechanism so the two (or more) pipelines can agree on a folder where to share data. We are going to use the parent BUILD_ID as it can be accessed from the child pipeline using the annotation cf_predecessor that contains the parent BUILD_ID
So the parent-pipeline step will look like this:
  share_data:
    image: "ubuntu:latest"
    commands:
      - |
       mkdir /codefresh/share/${{CF_BUILD_ID}}
       # Fill folder with needed content
        echo "parent- $(date)" > /codefresh/share/${{CF_BUILD_ID}}/file.txt

  codefresh-run:
    title: Run a codefresh pipeline
    type: codefresh-run
    arguments:
      PIPELINE_ID: Demo/share-child
While the child pipeline (Demo/share-child) will be similar to:
  get_parentId:
    image: codefresh/cli
    commands:
      - export parentId=$(codefresh get annotation build ${{CF_BUILD_ID}} cf_predecessor -o json | jq -r '.value')
      - cf_export PARENT_ID=${parentId}

  s1:
    image: "ubuntu:latest"
    commands:
      - |
        # consume content
        ls -ail /codefresh/share/${{PARENT_ID}}
       cat /codefresh/share/${{PARENT_ID}}/file.txt
        # You can event add some content to be used by the parent pipeline
       echo "Weather is beautiful down there" > /codefresh/share/${{PARENT_ID}}/result.txt
Don’t forget to clean your shared folder, if required, by using a hook (step or pipeline)
hooks:
  on_finish:
    exec:
      image: "ubuntu:latest"
      commands:
        - rm -rf /codefresh/share/${{CF_BUILD_ID}}
Conclusion
In this blog post, we showed how you can customize your Hybrid Runner to define a volume that will be automatically mounted to all the builds. By doing so, you can define a common workspace accessible by multiple builds simultaneously even between different pipelines.
This configuration allows you to bypass the local nature of the traditional Codefresh Volume (where assets can only be shared across steps of the same build) and effectively have a mechanism to share assets across builds.
This blog post was written by Francisco Cocozza and Laurent Rochette.
Do not hesitate to reach out to us if you need additional information or want to learn how you use this feature.
If you are not using Codefresh yet, get started today by creating an account and we would love to hear from you!