Update: July 5
After publishing this post we got an extensive response from Roland Huss maintainer of the fabric8 plugin, both as a comment here and at his blog
We updated the article to address some of his concerns, and also responded in the comments.
Even though containers have changed the way an application is packaged and deployed to the cloud, they don’t always make things easier for local development. Especially for Java developers (where standardized packaging formats were already present in the form or WAR and EAR files), Docker seems to be at first glance another level of abstraction that makes local development a bit more difficult.
It is true that several Docker advantages are not that impressive to Java developers, but that does not mean that developing Java applications with Docker is necessarily a complex process. In fact, using Docker in a Java application can be very transparent, as the Docker packaging step can be easily added as an extra step in the build process.
In this article, we will see how Docker can easily work with Maven (the de-facto build system for Java applications). As with most other technologies before Docker, Maven can be easily extended with custom plugins that inject the build lifecycle with extra functionality.
We will explore two Maven plugins for Docker:
- The new version of the Spotify Docker plugin
- The fabric8 Docker plugin
At the time of writing these are the two major Docker plugins that still see active development. There are several other Maven docker plugins that are now abandoned. Also, note that the old version of the Spotify plugin is now deprecated and here we are focusing on the new one.
Should you use a Maven plugin for Docker?
This question might seem strange given the title of the article, but it makes perfect sense if you have followed Docker from its early days. Docker is one of the fastest moving technologies at the moment and in the past, there were several occasions where new Docker versions were not compatible with the old ones. When you select a Maven plugin for Docker, you essentially trust the plugin developers that they will continuously update it, as new Docker versions appear.
There have been cases in the past where Docker has broken compatibility even between its own client and server, so a Maven plugin that uses the same API will instantly break as well. In less extreme cases, Docker has presented new features that will not automatically transfer to your favorite Maven plugin. You need to decide if this delay is important to you or not.
For this reason, it is crucial to understand how each Maven plugin actually communicates with the Docker environment and all the points where breakage can occur.
I have seen at least two companies that instead of using a dedicated Docker plugin, are just calling the native Docker executable via the maven exec plugin. This means that the Docker version that is injected in the Maven lifecycle is always the same as the Docker daemon that will actually run the image. This solution is not very elegant but it is more resistant to API breakage and guarantees the latest Docker version for the Maven build process.
The example application
As a running example, we will be using an old school Java application found at https://github.com/kostis-codefresh/docker-maven-comparison. It is old school because it is a simple WAR file (no DB needed) that requires Tomcat to run. Also, the Dockerfile expects the WAR file to be created externally (we will talk about multi-stage builds later in this article). Here is the respective Dockerfile found at the root of the project:
FROM tomcat:9.0-jre8-alpine

COPY target/wizard*.war $CATALINA_HOME/webapps/wizard.war
The war file is created during the package phase of the Maven build process. The source code contains unit tests as well as integration tests that connect to localhost:8080 and just verify that that tomcat is up and running and that it has deployed the correct application context.
The unit tests are executed during the test phase while the integration tests are using the failsafe plugin and thus run at the integration-test phase (or verify).
If you are not familiar with the Maven lifecycle, consult the documentation to see all the available phases.
The Spotify Maven Docker plugin
The Docker plugin from Spotify is the embodiment of simplicity. It actually supports only two operations: building a Docker image and pushing a Docker image to the Registry.
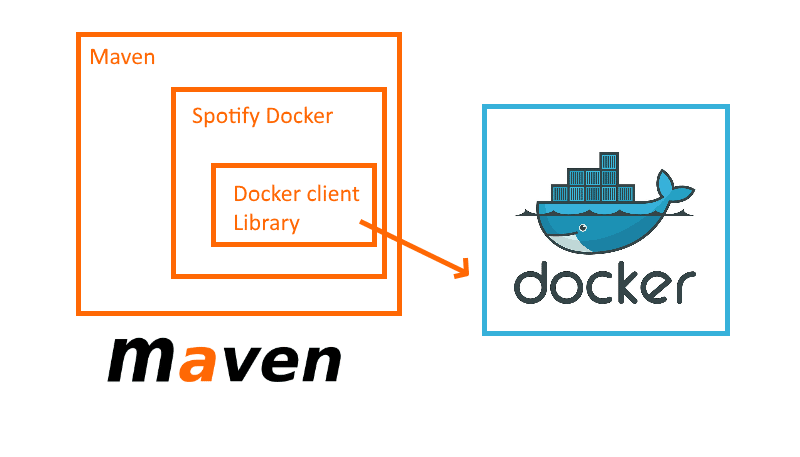
The plugin is not calling Docker directly but instead acts as a wrapper around Docker-client (https://github.com/spotify/docker-client ) also developed by Spotify.
This means that the plugin can only use Docker features that are offered by the docker-client library and if at any point this library breaks because an incompatible Docker version appeared, the plugin will also break.
Using the plugin is straightforward. You include it in your pom.xml file in the build section as you would expect.
        com.spotify
             dockerfile-maven-plugin
             1.4.3


                     default

                         build


             docker.io/kkapelon/docker-maven-comparison
                 ${project.version}
There are 3 things defined here:
- The name of the Docker image that will be created (also includes the registry URL)
- The tag of the Docker image. Here it is the same at the Maven project version. So your Docker images will be named with the same version as the WAR file
- A binding of the plugin to the Maven build lifecycle. Here I have left the default values so the plugin will automatically kick-in after the package phase and thus the Dockerfile will detect the already created WAR file.
Now you can simply run “mvn package” and watch the Docker image get created:
[INFO] Packaging webapp
[INFO] Assembling webapp [wizard] in [/home/osboxes/workspace/docker-maven-comparison/01-using-spotify-plugin/target/wizard-0.0.1-SNAPSHOT]
[INFO] Processing war project
[INFO] Copying webapp resources [/home/osboxes/workspace/docker-maven-comparison/01-using-spotify-plugin/src/main/webapp]
[INFO] Webapp assembled in [161 msecs]
[INFO] Building war: /home/osboxes/workspace/docker-maven-comparison/01-using-spotify-plugin/target/wizard-0.0.1-SNAPSHOT.war
[INFO]
[INFO] --- dockerfile-maven-plugin:1.4.3:build (default) @ wizard ---
[INFO] Building Docker context /home/osboxes/workspace/docker-maven-comparison/01-using-spotify-plugin
[... redacted for brevity…]
[INFO]
[INFO] Detected build of image with id 8deea9aaed5f
[INFO] Building jar: /home/osboxes/workspace/docker-maven-comparison/01-using-spotify-plugin/target/wizard-0.0.1-SNAPSHOT-docker-info.jar
[INFO] Successfully built docker.io/kkapelon/docker-maven-comparison:0.0.1-SNAPSHOT
[INFO] ------------------------------------------------------------------------
[INFO] BUILD SUCCESS
[INFO] ------------------------------------------------------------------------
We can verify that the image was created:
$ docker image list
REPOSITORY                                 TAG                 IMAGE ID            CREATED             SIZE
kkapelon/docker-maven-comparison           0.0.1-SNAPSHOT      e7efa33b669f        2 seconds ago       119 MB
We can test the image by launching the container
$ docker run -p 8080:8080 kkapelon/docker-maven-comparison:0.0.1-SNAPSHOT
The Spotify plugin also includes the capability to push a Docker image to a Registry. It supports various authentication methods that allow you to use DockerHub or another external registry that requires credentials. The Docker push step can easily be bound to the Maven deploy phase so that the end of a Maven build also results in uploading a Docker image.
I am not going to show this capability, however, as pushing Docker images from a developer workstation is not recommended. Only a CI server should push Docker images in a well-behaved manner (i.e. when tests are passing). Pushing Docker images from a developer workstation is even more dangerous if the changes are not committed first.
Finally, the Spotify Docker plugin can be executed using its individual goals, if for some reason you don’t want to bind it to the Maven lifecycle. These are
- dockerfile:build
- dockerfile:push
- dockerfile:tag
This concludes the capabilities of the Spotify Maven plugin. It is as simple as it gets focusing only on creating Docker images.
Remember however that our sample application also includes integration tests. Wouldn’t it be nice if we could also launch the Docker image as part of the Maven lifecycle and run the integration tests against the resulting container?
This is where the next plugin finds its place…
The Fabric8 Maven Docker plugin
As we saw in the previous section, the Spotify Maven plugin is a very spartan solution that focuses on building Docker images and nothing else. The Maven plugin from Fabric8 takes instead the “kitchen-sink “ approach. It supports both building and starting/stopping Docker containers among several other features such as Docker volumes, log viewing, docker machine support etc.
It even supports the creation of Docker images without a Dockerfile (!!!) as we will see later on.
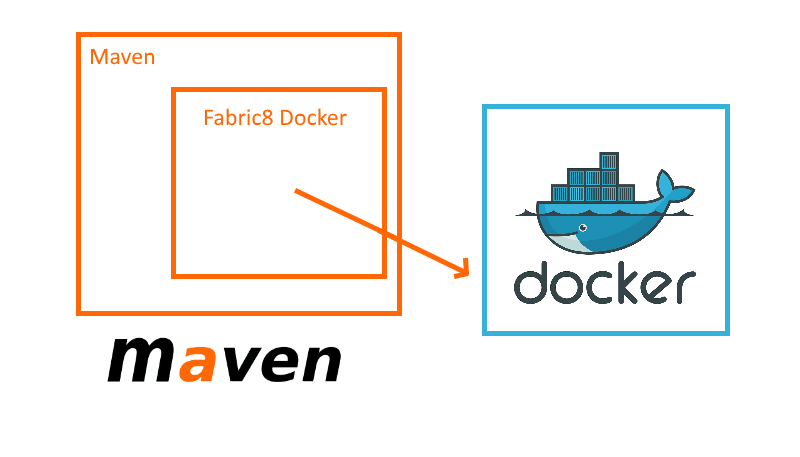
This plugin communicates directly with the Docker daemon in an effort to make it as robust as possible and minimize its dependencies.
At first glance, the fabric8 plugin seems very opinionated. As a starting point, you can create Docker images with it without actually having a Dockerfile! Instead, the plugin allows you to describe your image in an XML format that will be then converted to a Dockerfile on the fly. Here is an example straight out of the documentation.
  java:8u40
  [email protected]

    latest
    ${project.version}


    8080


    /path/to/expose


    2147483648


      java
      -jar
      /opt/demo/server.jar


    dir
    /opt/demo
    assembly.xml
As you can see there are all the familiar Docker directives such as FROM, VOLUME, ENTRYPOINT etc.
I admit I don’t like this approach and did not explore it further. Dockerfiles are well understood and documented even outside the Java world, while describing a Docker in this XML format is something specific to this plugin, and goes against the platform independence of Docker.
Hopefully, the fabric8 plugin also supports plain Dockerfiles. Even there, however, it has some strong opinions. (Update:See comments on this article) It assumes that the Dockerfile of a project is in src/main/docker and also it uses the assembly syntax for actually deciding what artifact is available during the Docker build step.
Here is the respective pom.xml fragment
io.fabric8 docker-maven-plugin 0.26.0 start pre-integration-test build start stop post-integration-test stop ![]()
docker.io/kkapelon/docker-maven-comparison ${project.basedir}/Dockerfile 8080:8080 http://localhost:8080/wizard
Again we configure the name of the image and the location of the Dockerfile. For the run section, we map port 8080 (where tomcat runs) from the container to the Docker host and we also define a wait condition.
Having a wait condition is one of the strongest points of the Fabric8 Docker plugin as it allows you to run integration tests against the containers. Maven will wait until the container is “healthy” before moving to the next phase, so we can guarantee that when the integration tests are running the container will be ready to accept requests.
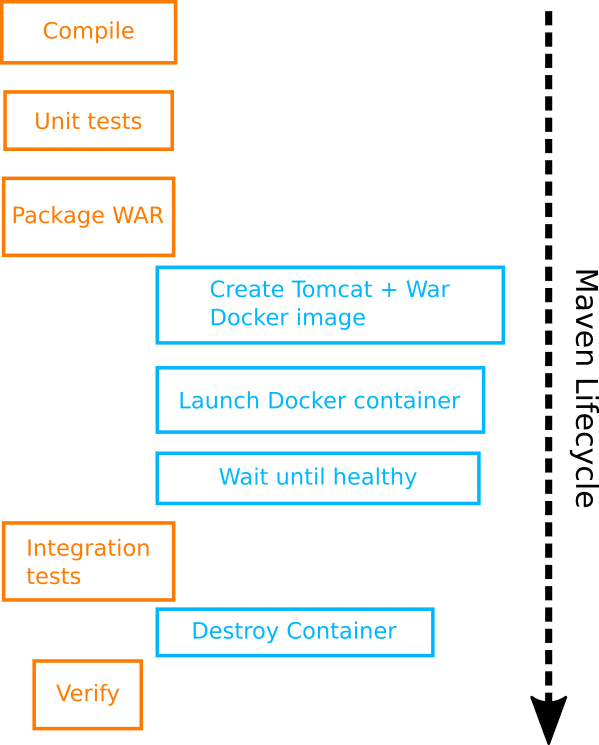
The configuration setting basically makes sure that the container is launched before the tests and destroyed after. Here is the diagram:
The final result is that we can run mvn verify and the following will happen:
- Java code will be compiled
- Unit tests will run
- A WAR file will be created
- A tomcat Docker image with the WAR file will be built
- The Docker image will be launched locally and will expose port 8080
- Maven will wait until the container is actually up and can serve requests
- Integration tests will run and will hit localhost:8080
- The container will be stopped
- The result of the build will be reported
Here is a sample run
[INFO]
[INFO] --- docker-maven-plugin:0.26.0:build (start) @ wizard ---
[INFO] Building tar: /home/osboxes/workspace/docker-maven-comparison/02-using-fabric8-plugin/target/docker/docker.io/kkapelon/docker-maven-comparison/tmp/docker-build.tar
[INFO] DOCKER> [docker.io/kkapelon/docker-maven-comparison:latest]: Created docker-build.tar in 464 milliseconds
[INFO] DOCKER> [docker.io/kkapelon/docker-maven-comparison:latest]: Built image sha256:f15a6
[INFO] DOCKER> [docker.io/kkapelon/docker-maven-comparison:latest]: Removed old image sha256:7cebc
[INFO]
[INFO] --- docker-maven-plugin:0.26.0:start (start) @ wizard ---
[INFO] DOCKER> [docker.io/kkapelon/docker-maven-comparison:latest]: Start container 65cefab5942c
[INFO] DOCKER> [docker.io/kkapelon/docker-maven-comparison:latest]: Waiting on url http://localhost:8080/wizard.
[INFO] DOCKER> [docker.io/kkapelon/docker-maven-comparison:latest]: Waited on url http://localhost:8080/wizard 8297 ms
[INFO]
[INFO] --- maven-failsafe-plugin:2.18:integration-test (default) @ wizard ---
[INFO] Failsafe report directory: /home/osboxes/workspace/docker-maven-comparison/02-using-fabric8-plugin/target/failsafe-reports
-------------------------------------------------------
 T E S T S
-------------------------------------------------------
[..redacted for brevity…..]
Tests run: 2, Failures: 0, Errors: 0, Skipped: 0

[INFO]
[INFO] --- docker-maven-plugin:0.26.0:stop (stop) @ wizard ---
[INFO] DOCKER> [docker.io/kkapelon/docker-maven-comparison:latest]: Stop and removed container 65cefab5942c after 0 ms
[INFO]
[INFO] --- maven-failsafe-plugin:2.18:verify (default) @ wizard ---
[INFO] Failsafe report directory: /home/osboxes/workspace/docker-maven-comparison/02-using-fabric8-plugin/target/failsafe-reports
[INFO] ------------------------------------------------------------------------
[INFO] BUILD SUCCESS
[INFO] ------------------------------------------------------------------------
Plot twist: Using Maven from Docker
If you have been paying attention you will have noticed that the Dockerfiles we used so far expect the application to be already compiled. This means that the machine that creates the Docker image needs to have a development environment as well (in our case a JDK and Maven).
This is of course very easy to handle in your workstation, but quickly becomes problematic when it comes to build slaves. Traditionally, build slaves that include development tools have been very resistant to changes (especially if in your organization the build slaves are not controlled by the development team). Upgrading a newer version of the JDK or Maven in a build slave is one of the most common requests from a dev team to an operations team. The pain of tooling upgrades is even more evident with organizations that are not pure Java shops (imagine a build slave that has Java, Node, Python, PHP etc).
The reason that this happens is that both plugins we have seen so far assume that Maven is in control. The two plugins work by allowing Maven to control Docker during the build process.
Here is the plot twist: We could also revert this relationship and allow Docker to control Maven :-). This means that Docker calls Maven commands from within a Docker container. While most people think Docker as a deployment format for the application itself, in reality, Docker can be used for the build process as well (i.e. tooling via Docker)
The approach has several advantages. First of all, it makes the combination, future proof as the API of the docker daemon is no longer relevant to the build process. Secondly, it makes for really simple build slaves (they only have Docker installed and nothing else)
As a developer, you also gain the fastest upgrade possible for build tools. If you have Maven version N and you want to go to version N+1 you just change the Docker image that is used for the Maven compilation and you are done. No need to open a ticket or notify anybody for an upgrade. Do you want to use 3 different versions of JDKs at once? Again this is super simple as you can use 3 different Dockerfiles for 3 different application. All of them can build on the same machine.
In the past, Docker tooling for compiled languages was a bit complicated (because normally you don’t want your compilation tools to end up in the production image), but with the introduction of multi-stage builds in Docker version 17.06 the process is now much easier.
The idea here is that we make the Docker build completely self-sufficient. Instead of making the Docker file assume the existence of the WAR file, we create the WAR file as part of the build process itself.
Here is the respective Dockerfile:
FROM maven:3.5.2-jdk-8-alpine AS MAVEN_TOOL_CHAIN
COPY pom.xml /tmp/
COPY src /tmp/src/
WORKDIR /tmp/
RUN mvn package

FROM tomcat:9.0-jre8-alpine
COPY --from=MAVEN_TOOL_CHAIN /tmp/target/wizard*.war $CATALINA_HOME/webapps/wizard.war

HEALTHCHECK --interval=1m --timeout=3s CMD wget --quiet --tries=1 --spider http://localhost:8080/wizard/ || exit 1
First, we use a Maven image to compile the source code of the application. As an extra bonus mvn package will also execute the unit tests. Then, from the results, we take only the WAR file and embed in the Tomcat image as before.
The source code, the maven dependencies, the raw classes and everything under the Maven target folder are NOT included in the final image.
So what have we gained here?
First of all, there is no fear of API breakage. This Dockerfile will always work regardless of internal API changes in the Docker daemon.
Secondly, if you want to update to Maven 3.6 for the compilation process you just change the first line in the docker file and rebuild your image. This is as simple as it gets.
Finally, if you have 10 applications that compile this way you can actually use 10 different combinations of JDK/Maven just be using a different Maven image. But the build slave itself uses only Docker. No more nightmares of configuring multiple JDKs on the same host.
And let’s say that tomorrow you decide to use Gradle for this very same application. Again you will just use a Gradle image as the first line in the Dockerfile. The ops team does not need to know or even care about what build tool you need for your application.
Having a build process based on Docker also opens a lot of opportunities for working with tools that are Docker compatible (rather than Java/Maven specific)
The best example of this is the ease of moving this project to CI/CD. In the past, migrating to a CI/CD platform meant that you needed to understand first if your favorite versions of Java/Maven were supported. And if they weren’t you had to contact the vendor and ask them to add support.
This is not needed anymore. You can use any tool/platform that supports Docker even if it doesn’t advertise explicit support for Maven.
One thing that we missed with the multi-stage docker build shown above is the run of integration tests (unit tests are still executed just fine).
To run integration tests we will use Codefresh, the Docker-based CI/CD platform. Because Maven is now controlled by Docker and Codefresh supports natively Docker tooling as part of the build process, we can run the build on the cloud without really caring about what tools are available on Codefresh build slaves.
Multi-stage builds with Codefresh
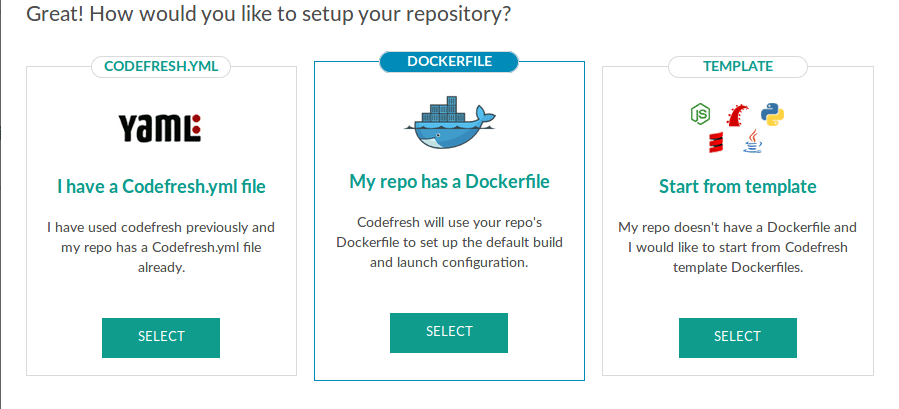
The power of multi-stage builds becomes evident as soon as you create a project in Codefresh. As long as your project contains a Dockerfile (which is true in our case) your build is dead simple!
Here Codefresh will just use the Dockerfile and create a Docker image, downloading the Maven docker image as part of the Docker build itself. You don’t need to know if Codefresh has explicit support for Maven, it doesn’t really matter (this wouldn’t be true if you tried to use the traditional way where Maven controls the build).
Once you select your Dockerfile and without any other configuration Codefresh performs a build and the resulting Docker image is placed on the internal Docker registry (built-in with each Codefresh account).
If we used the non-multi-stage Docker file things would not be as simple. We would need to define within Codefresh how to compile the code first (using a Maven step) and then how to create the image from the resulting WAR file. This is perfectly possible with Codefresh, but much more complex than what we have now.
Multi-stage builds and integration tests with Codefresh
I promised before that we will take care of the automatic run of integration tests (i.e. tests that require the application to be up) even with multi-stage builds. The unit tests run just fine during the build (as part of the maven package goal) but the integration tests do not.
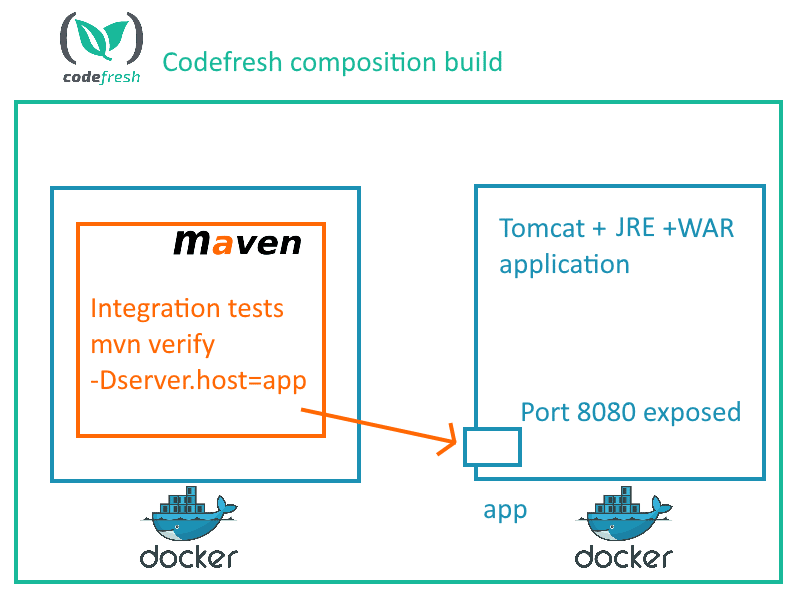
We need a way to launch the application and run integration tests against it. Codefresh can easily do this using compositions (think Docker compose as a service). A Codefresh pipeline can start and stop a Docker image as part of the build process using a syntax similar to Docker compose.
But how do we run the integration tests? Using the Docker paradigm of course! We will create a separate Docker image that holds the tests (i.e. the source code plus Maven). This image is only used during compilation, it is not deployed anywhere so we are ok with it having development tools.
Here is Dockerfile.testing
FROM maven:3.5.2-jdk-8-alpine
COPY wait-for-it.sh /usr/bin
RUN chmod +x /usr/bin/wait-for-it.sh
COPY pom.xml /tmp/
COPY src /tmp/src/
WORKDIR /tmp/
This is a simple Docker file that extends the Maven image and just copies the source code. We also package the wait-for-it script that will come handy later on.
Now we are ready to run everything in Codefresh. For this build, we will use a codefresh.yml file that
- Creates the Docker image of the application (multi-stage build)
- Creates a second Docker image with the tests
- Launches the application image and expose port 8080
- Executes the tests from the testing image targeting the launched application
- Finishes the build with success if everything passes
Here is the codefresh.yml file
version: '1.0'
steps:
  build_image:
    type: build
    description: Building the image...
    image_name: docker-maven-comparison
    working_directory: ./04-codefresh
    tag: develop
  build_image_with_tests:
    type: build
    description: Building the Test image...
    image_name: maven-integration-tests
    working_directory: ./04-codefresh
    dockerfile: Dockerfile.testing
  integration_tests:
    type: composition
    title: Launching QA environment
    description: Temporary test environment
    working_directory: ${{main_clone}}
    composition:
      version: '2'
      services:
        app:
          image: ${{build_image}}
          ports:
           - 8080
    composition_candidates:
      test_service:
        image: ${{build_image_with_tests}}
        links:
          - app
        command: bash -c '/usr/bin/wait-for-it.sh -t 20 app:8080 -- mvn verify -Dserver.host=app'
Each Codefresh file contains several top-level steps. The steps defined here are:
- Build_image
- Build_image_with_tests
- Integration_tests
The first step just builds our main application (using the multi-stage dockerfile so that is only has Tomcat and the WAR file).
The second step creates a separate image for integration tests. It is similar with the first step, but it just defines another dockerfile. These first two steps are of type build image.
The last step (which is where the magic happens) does the following:
- It launches the first container (with the application) and exposes port 8080. This container is named “app”
- It launches the second container with the integration tests. The containers have network connectivity between them and the application one is running on a hostname called “app”
- We call the wait-for-it script to account for the tomcat startup time (if you have worked with docker compose locally this should be familiar to you).
- Once tomcat is up, the integration tests are running using mvn verify. Notice that the integration tests are “targetable” and can work either with localhost or with another hostname
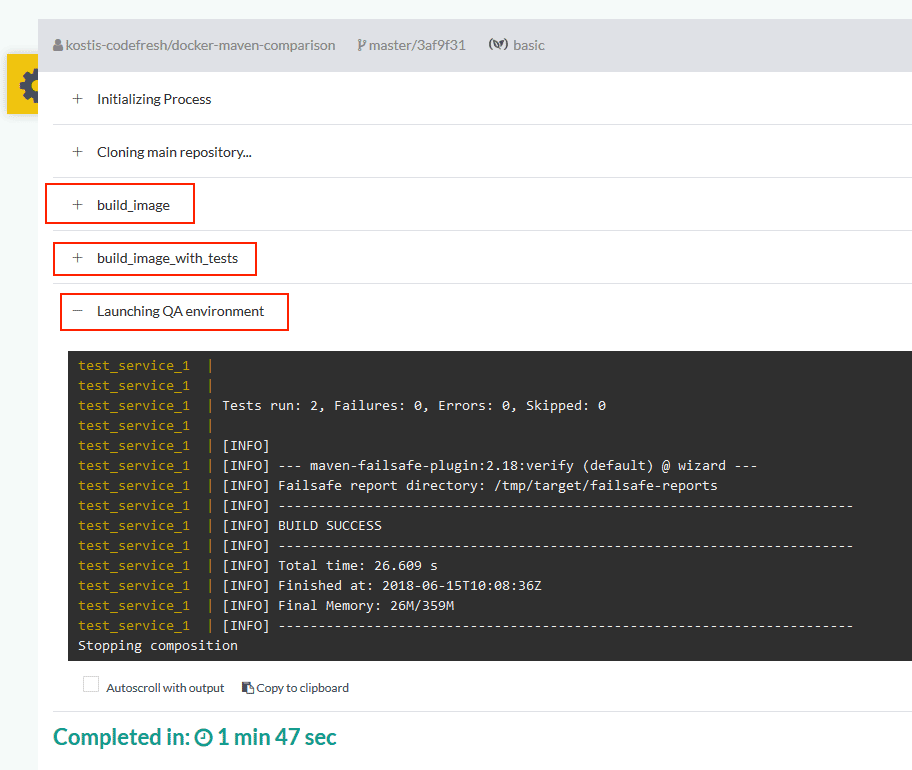
That’s it! The whole pipeline will succeed if everything goes well. If the unit tests fail or if the integration tests fail, or even if a Docker build fails the whole pipeline will stop with an error.
All steps are visible in Codefresh with individual logs so it is easy to understand which step does what.
Conclusion
Even though we started this article with Maven plugins for Docker, I hope that you can see that multi-stage builds where Docker is controlling Maven (and not the other way around) is a good alternative to the traditional way of Maven plugins:
- They make our application resilient against Docker API changes
- There is no need for special Maven plugins anymore
- It makes the build self-contained. No developer tools are needed on the build machine
- It makes the setup of build slaves super easy (only Docker is needed)
- Your operations team will love you, especially if they have to deal with languages other than Java
- It is very easy to setup CI/CD if you follow the Docker paradigm. And with Codefresh it is very easy to run integration tests as well.
That does not mean that traditional Maven plugins do not have their place. In fact, even multi-stage Docker builds have their own challenges (with regards to caching) and this is why in a future article, we will explore how to work with Maven caching and multi-stage builds.
Ready to try Codefresh, the CI/CD platform for Docker/Kubernetes/Helm? ? Create Your Free Account Today!

