Update: Part 2 of the series in now available
One of the big strengths of Codefresh is its friendly UI. For example, in Codefresh you can quickly deploy a service/deployment to Kubernetes using just the graphical Interface. Of course, you are still free to use your own kubectl commands if you wish to do so, by taking advantage of the pipeline yaml definition.
The same ease of use is given to all other critical aspects of the UI, such as the Docker registry, Kubernetes Dashboard, and Helm releases. If you are getting started with CI/CD it is very easy to navigate the Codefresh UI and get familiar with all the deployment tools it offers.
Pipeline Creation from the Codefresh UI
One particularly interesting feature loved by our users is the real-time yaml verification that Codefresh offers while you are editing the definition of a pipeline.
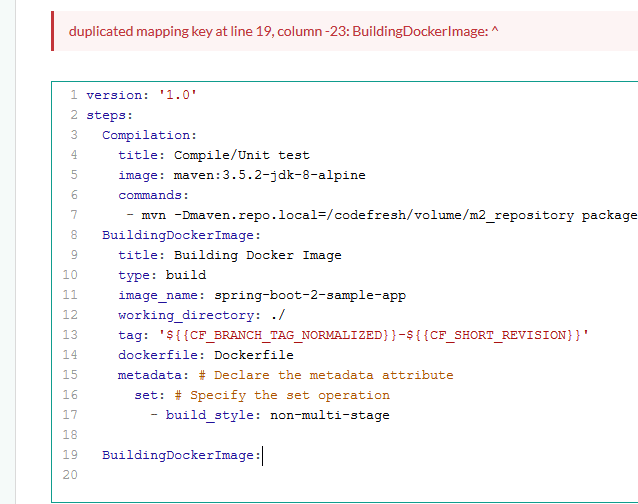
This feature is very powerful when you are creating a new project in Codefresh, as it notifies you very early of possible syntax errors, even before your run the pipeline. This way, you can iterate very quickly on pipeline changes, without having to commit anything to your repository.
Once your pipeline is complete, you should commit it as a codefresh.yml file in the git repository. This practice aligns with the configuration-as-code mentality, allowing you to version all pipeline changes and giving you an auditing history through git.
The pipeline definition does not really need to be in the same git repository as the source code. It can be on any other repository and multiple Codefresh projects can share the same pipeline. This is a great opportunity for reusing your pipeline definitions across similar projects and allows developers to take advantage of pipelines already created in the organization in a centralized repository.
In summary, pipeline creation is very easy in Codefresh both for individual developers and teams within companies that wish to reuse pipeline definitions.
Creating Pipelines in an Automated Manner
While these two methods of pipeline creation (inline editing, and loading from a git repository) are enough for the majority of our customers, we had several enterprise organizations that wanted to take pipeline creation to the next level by requesting:
- External pipeline creation (i.e. not being forced to use the Codefresh UI)
- Templating and external management of pipelines
- Provisioning of pipelines from operations so that developers can find a pre-configured Codefresh project
The most common usage scenario is requested from customers with separate operations and development teams. Operations want to help developers with project creation and ideally, they want to initialize a git repository along with its Codefresh pipeline in a single step.
This means that developers don’t even have to login in Codefresh just to get the pipeline running. They only commit code to the git repository and Codefresh will automatically build everything with the existing git triggers.
To address this scenario, Codefresh offers the following building blocks:
- Programmatic pipeline creation from the API
- Easy integration with the Codefresh CLI
- Mono-repo support
Let’s examine these features in turn…
Codefresh Pipeline Specification
Codefresh already offers a specification for the whole pipeline (i.e. not just the build steps defined in yml). Here is a quick example:
version: '1.0'
kind: pipeline
metadata:
  name: my-project/my-basic-pipeline
  description: my description
  labels:
    key1: value1
    key2: value2
  project: my-project
spec:
  triggers:
    - type: git
      provider: github
      name: my-trigger
      repo: kostis-codefresh/nestjs-example
      events:
        - push
      branchRegex: /./
      verified: true
  contexts: []
  variables:
    - key: PORT
      value: 5000
      encrypted: false
    - key: SECRET
      value: '*****'
      encrypted: true
  steps:
    main_clone:
      title: Cloning main repository...
      type: git-clone
      repo: '${{CF_REPO_OWNER}}/${{CF_REPO_NAME}}'
      revision: '${{CF_REVISION}}'
      git: github-1
    PrintFileList:
      title: Listing files
      image: 'alpine:latest'
      commands:
        - ls -l
        - echo "hello world"
        - echo "plain value $PORT"
  stages: []
As you can see this yml file is a superset of what Codefresh yaml offers. It also has sections for triggers and variables as well as general pipeline metadata.
This means that you can create any Codefresh pipeline with your tools and choose your own templating solution if you wish to do some pre-processing on Codefresh pipelines before creating them.
As a quick example, the operations team could have a single template of a Codefresh pipeline which uses only “approved” and “trusted” build tooling, while still providing value overrides for the git repository to be checked out.
Creation of Codefresh Pipelines from CLI
The second crucial element is the way this pipeline can be pushed to Codefresh. The API call for doing this is available to be used by any kind of HTTP application and so it is very easy to integrate it in your own solution by yourself. A much faster solution is to use the Codefresh Command Line interface that has built-in integration.
You can create a pipeline with a simple command such as:
codefresh create pipeline -f my-pipeline-spec.yml
This will take as input a Codefresh specification file and automatically create the pipeline in the UI with no other user intervention.
The Codefresh CLI is also offered as a Docker image so it is very easy to use it in a freestyle step.
Git triggers for Mono-Repos
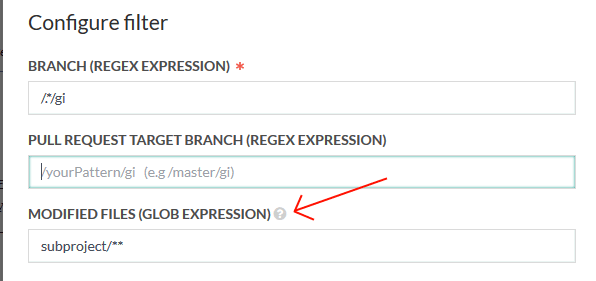
The last piece of the puzzle is the support Codefresh offers for mono-repos. This means you can define a pipeline in a git repository and having it trigger only when a specific folder or set of files are changed.
This way you can have multiple projects in the same git repository each with its own pipeline. When a developer commits to any of the folders, only the respective pipeline will be triggered.
You can also use the same mechanism for the initial pipeline (i.e the pipeline that will create pipelines as we will see below).
The Complete Workflow
Now that we have all pieces of the puzzle in place, let’s see how we can use them together. There are many ways to put all the pieces together, but a good starting point is the following:
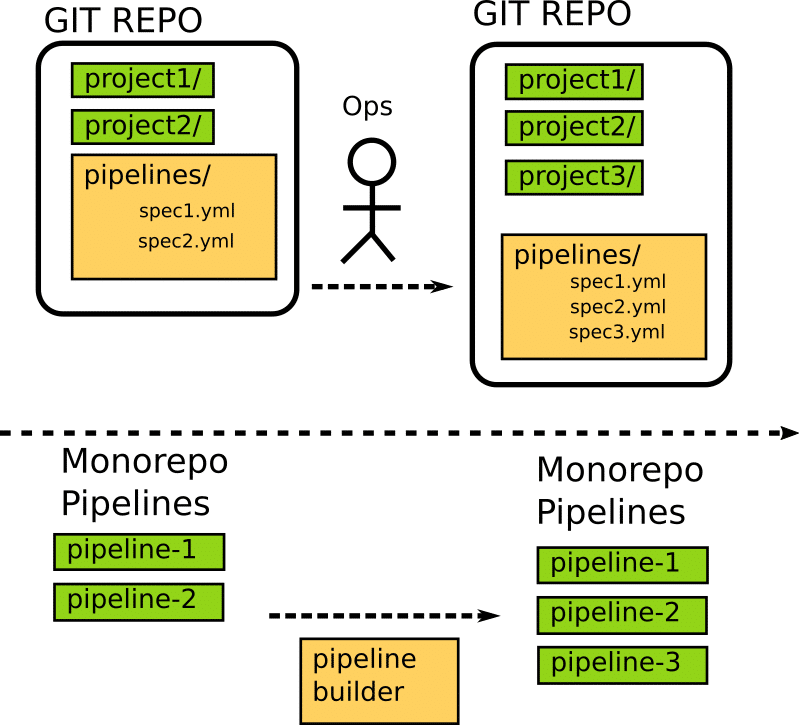
Here is how the whole process works:
- In the beginning, there is a single git repository with one or more projects and a special folder called “pipelines” that holds all the pipelines specifications for those projects.
- A special “pipeline builder” pipeline is set up that is triggered only for changes in the “pipelines” folder (you could also use a cron trigger).
- Once a development team wants to start a new project, an operations person performs the following actions:
- Creates a project folder in the root of the git repository
- Creates a pipeline spec in the “pipelines folder” that builds the project created in the first step
- The “pipeline builder” pipeline is triggered by Codefresh because a change happened in the “pipelines” folder.
- The pipeline executes and calls the Codefresh CLI in a freestyle step. The CLI takes as a parameter the spec file that was just created (spec3.yml in the example above).
- A project-specific pipeline is automatically created for the newly created project (pipeline-3 in the example above).
At this point, the operations person contacts the development team and says that the project infrastructure is ready.

Any developer can now make a commit into the project folder and the respective pipeline will run a build as normal. All this happens behind the scenes. The developers of the project do not even need to know what Codefresh is actually doing.
This is only a suggestion on how to create programmatic pipelines in Codefresh. There are many more variations that might suit better your organization.
In a future blog post we will see another scenario of dynamic pipeline creation where the pipeline specification is inside the project folder itself instead of an external location.
Update: Part 2 of the series in now available
New to Codefresh? Create Your Free Account Today!